Admin Guide
Users with the Admin role type have top-level administrative authority within the domain.
Admins can access all workspaces, including domain settings, and adjust detailed configurations.
Learn more about roles
here.
Entering Admin Center
Click the 'Admin' toggle at the top right to switch to Admin mode.

※ Only users with the Admin role type can access Admin Center.
Especially, the menu structure in Admin mode differs from that in user mode.
1 - User Management
You can invite new users, view and manage all users across the domain.
(1) Switch to Admin Center
(2) Navigate to [IAM > User]
Inviting Users
(1) Click the [+ Add] button at the top

(2) Invite users with workspaces and roles assigned
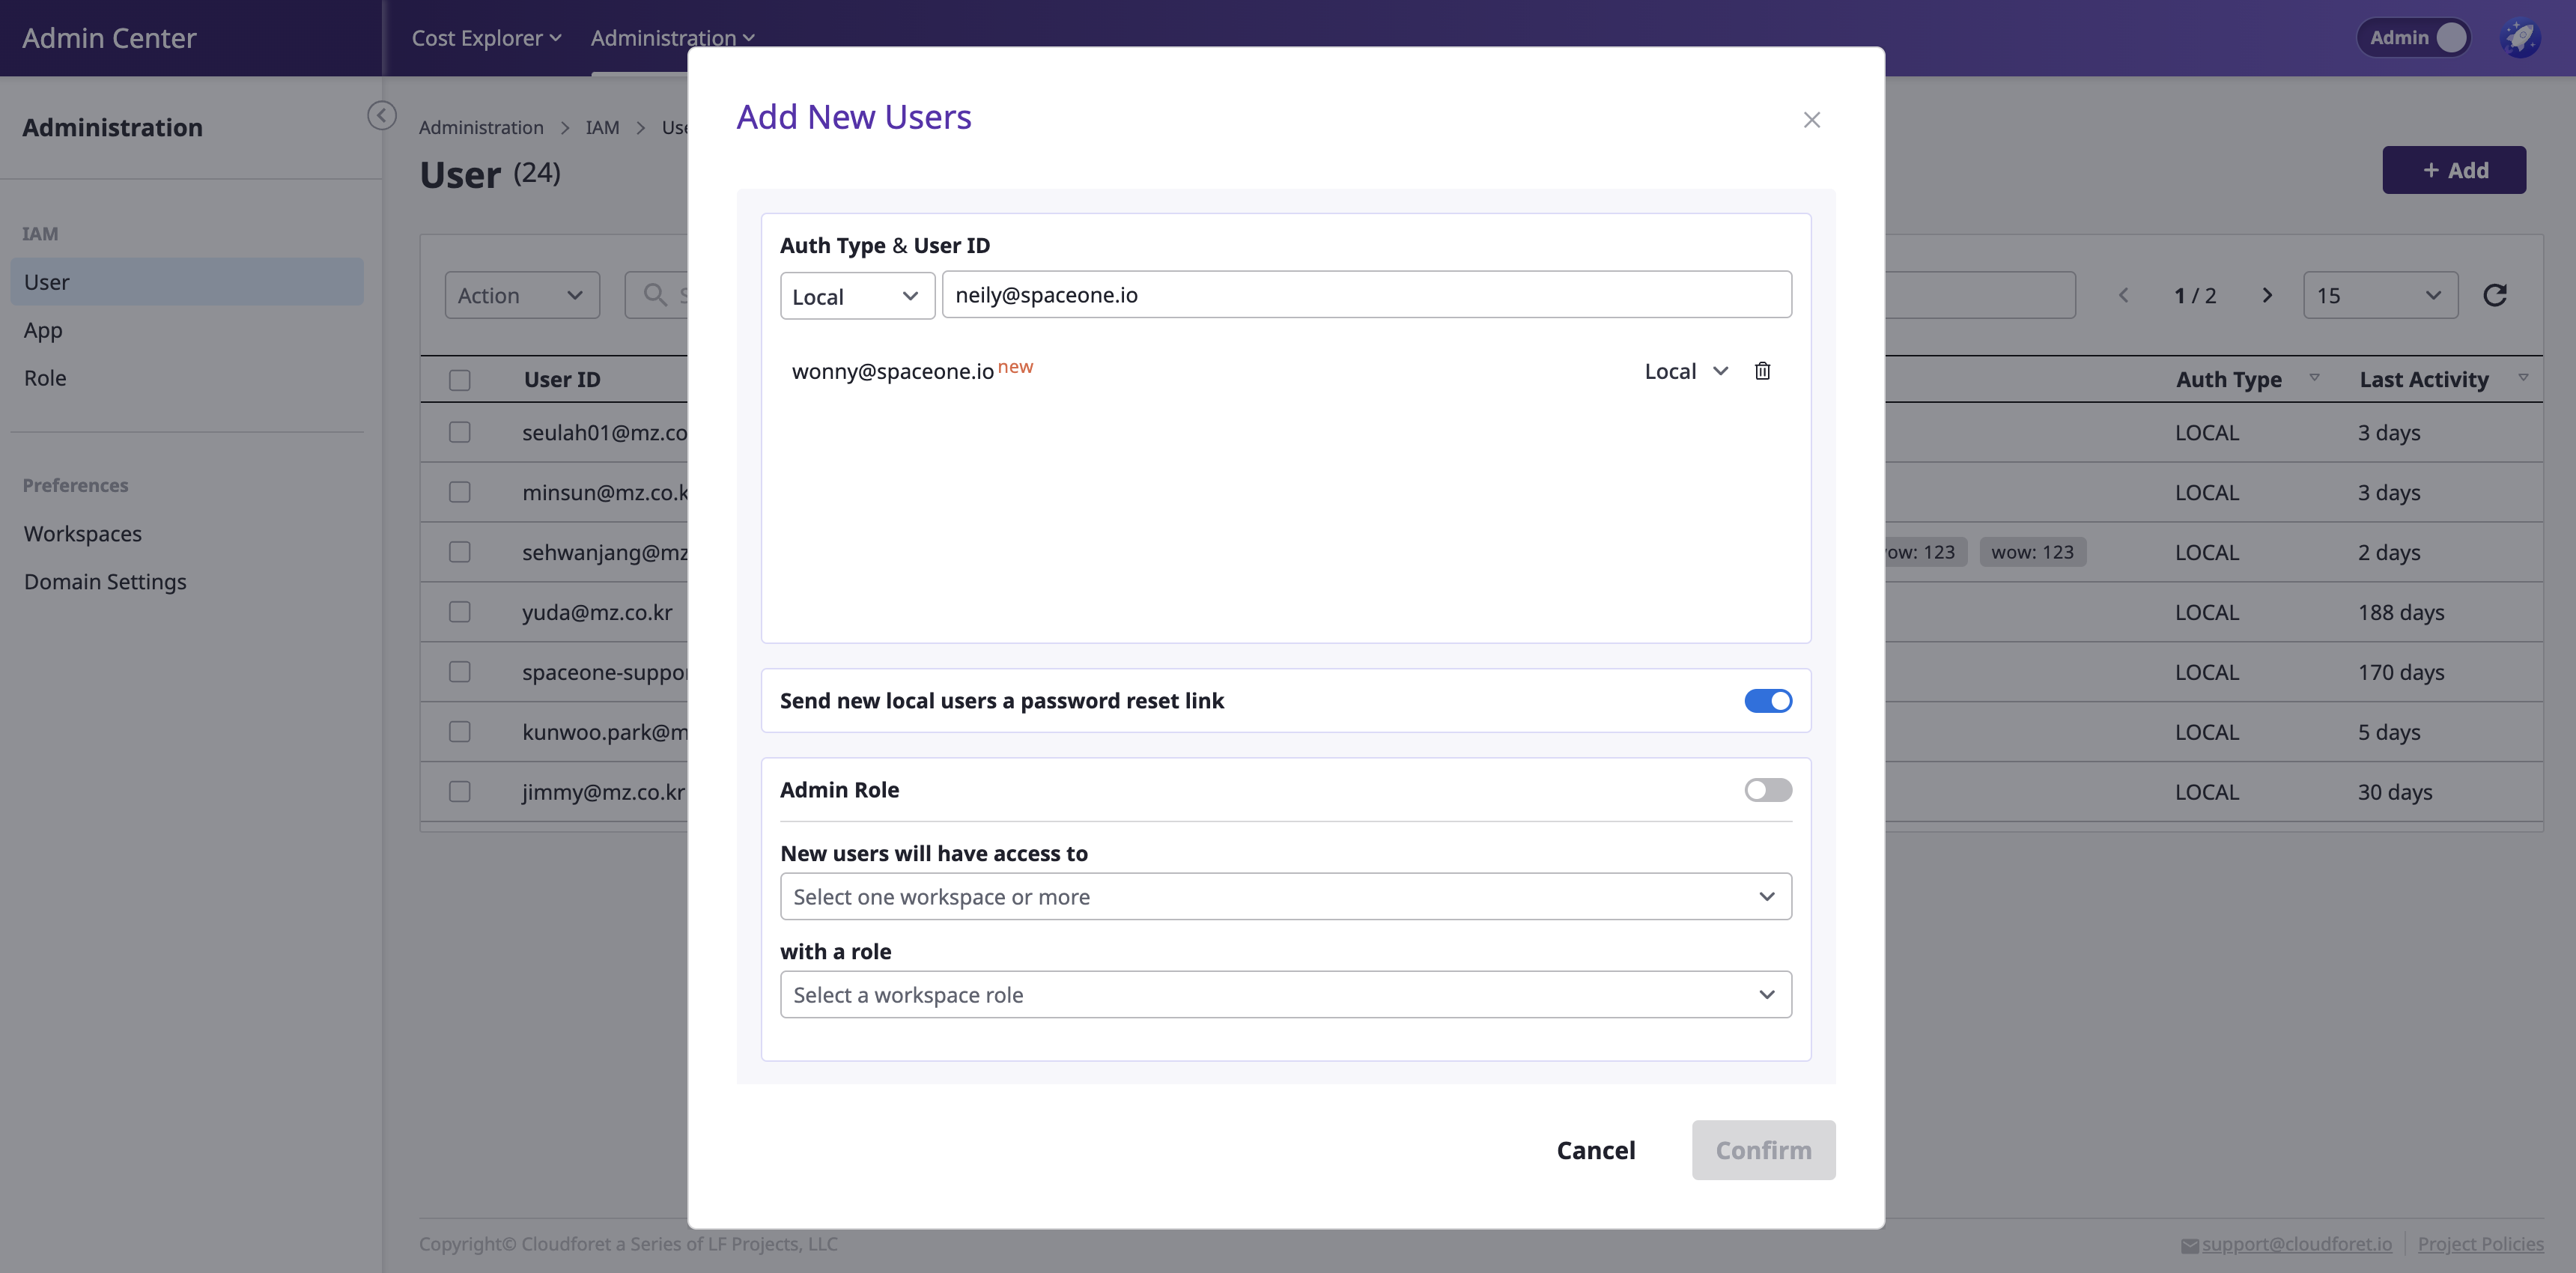
(2-1) Add user account
- Local: Local: Enter in email format
- For other SSO such as Google, Keycloak, etc., enter according to the format configured in the domain.
(2-2) Select if the user has the Admin role or not
- Admin Role ON: No need to select a workspace as it grants access to the entire domain
- Admin Role OFF: Must select one or more workspaces and assign roles within those workspaces
(2-3) Click the [Confirm] button to complete the user invitation
Learn more about roles
here.
(3) Check the added user list
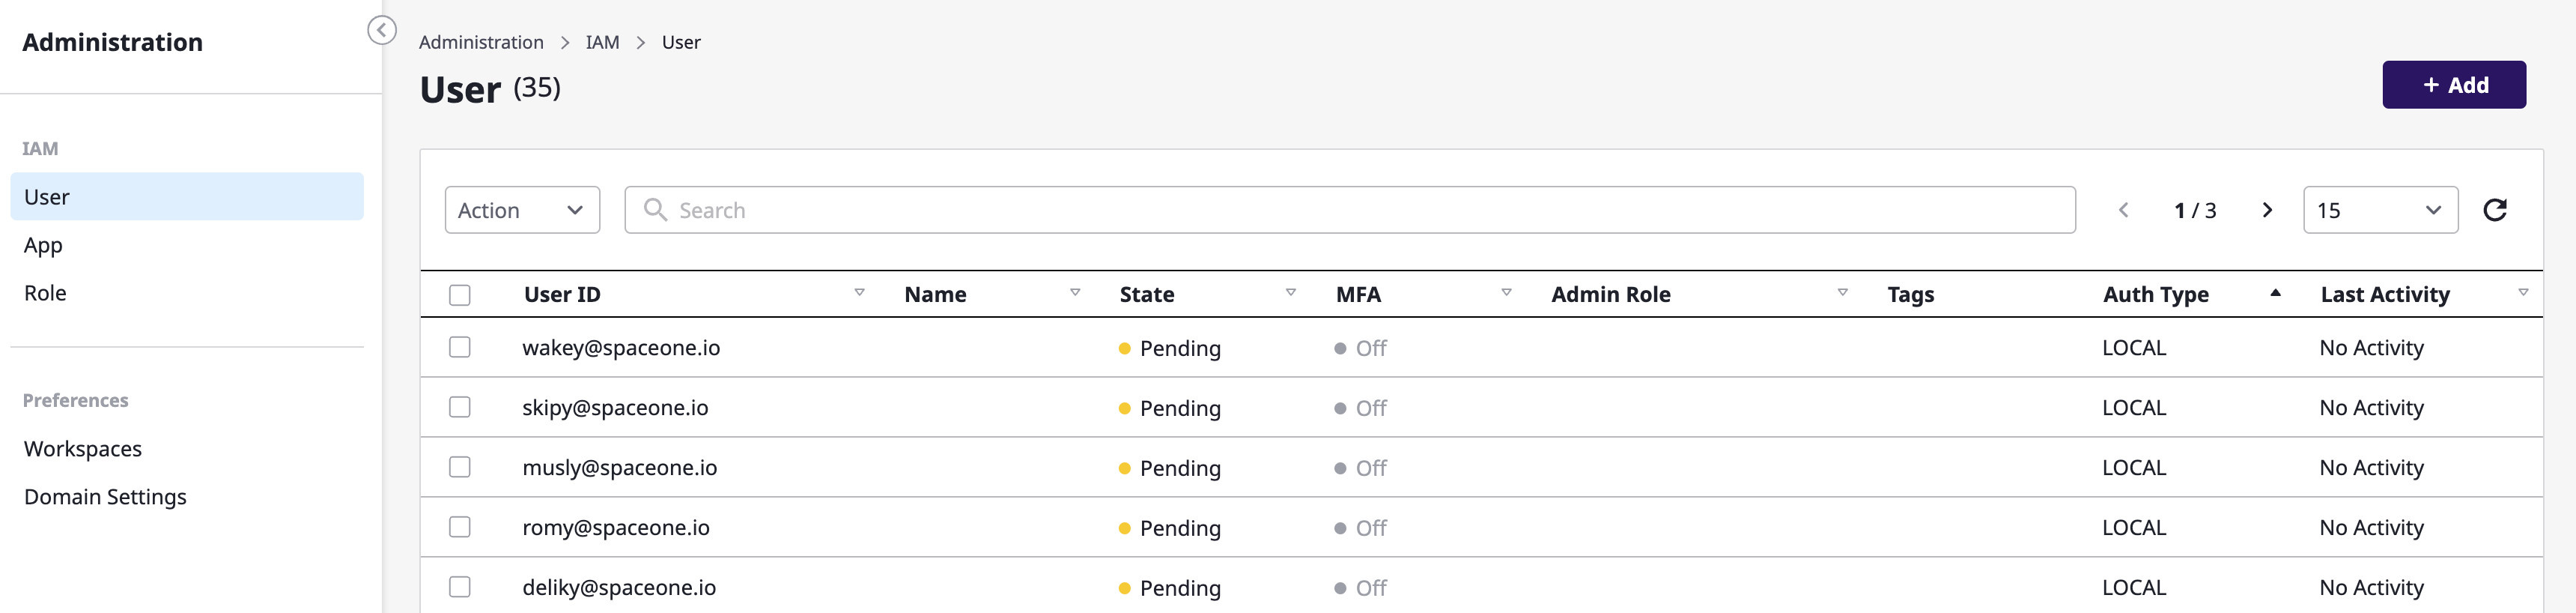
Clicking on a specific user allows you to see detailed user information and the list of workspaces the user belongs to.
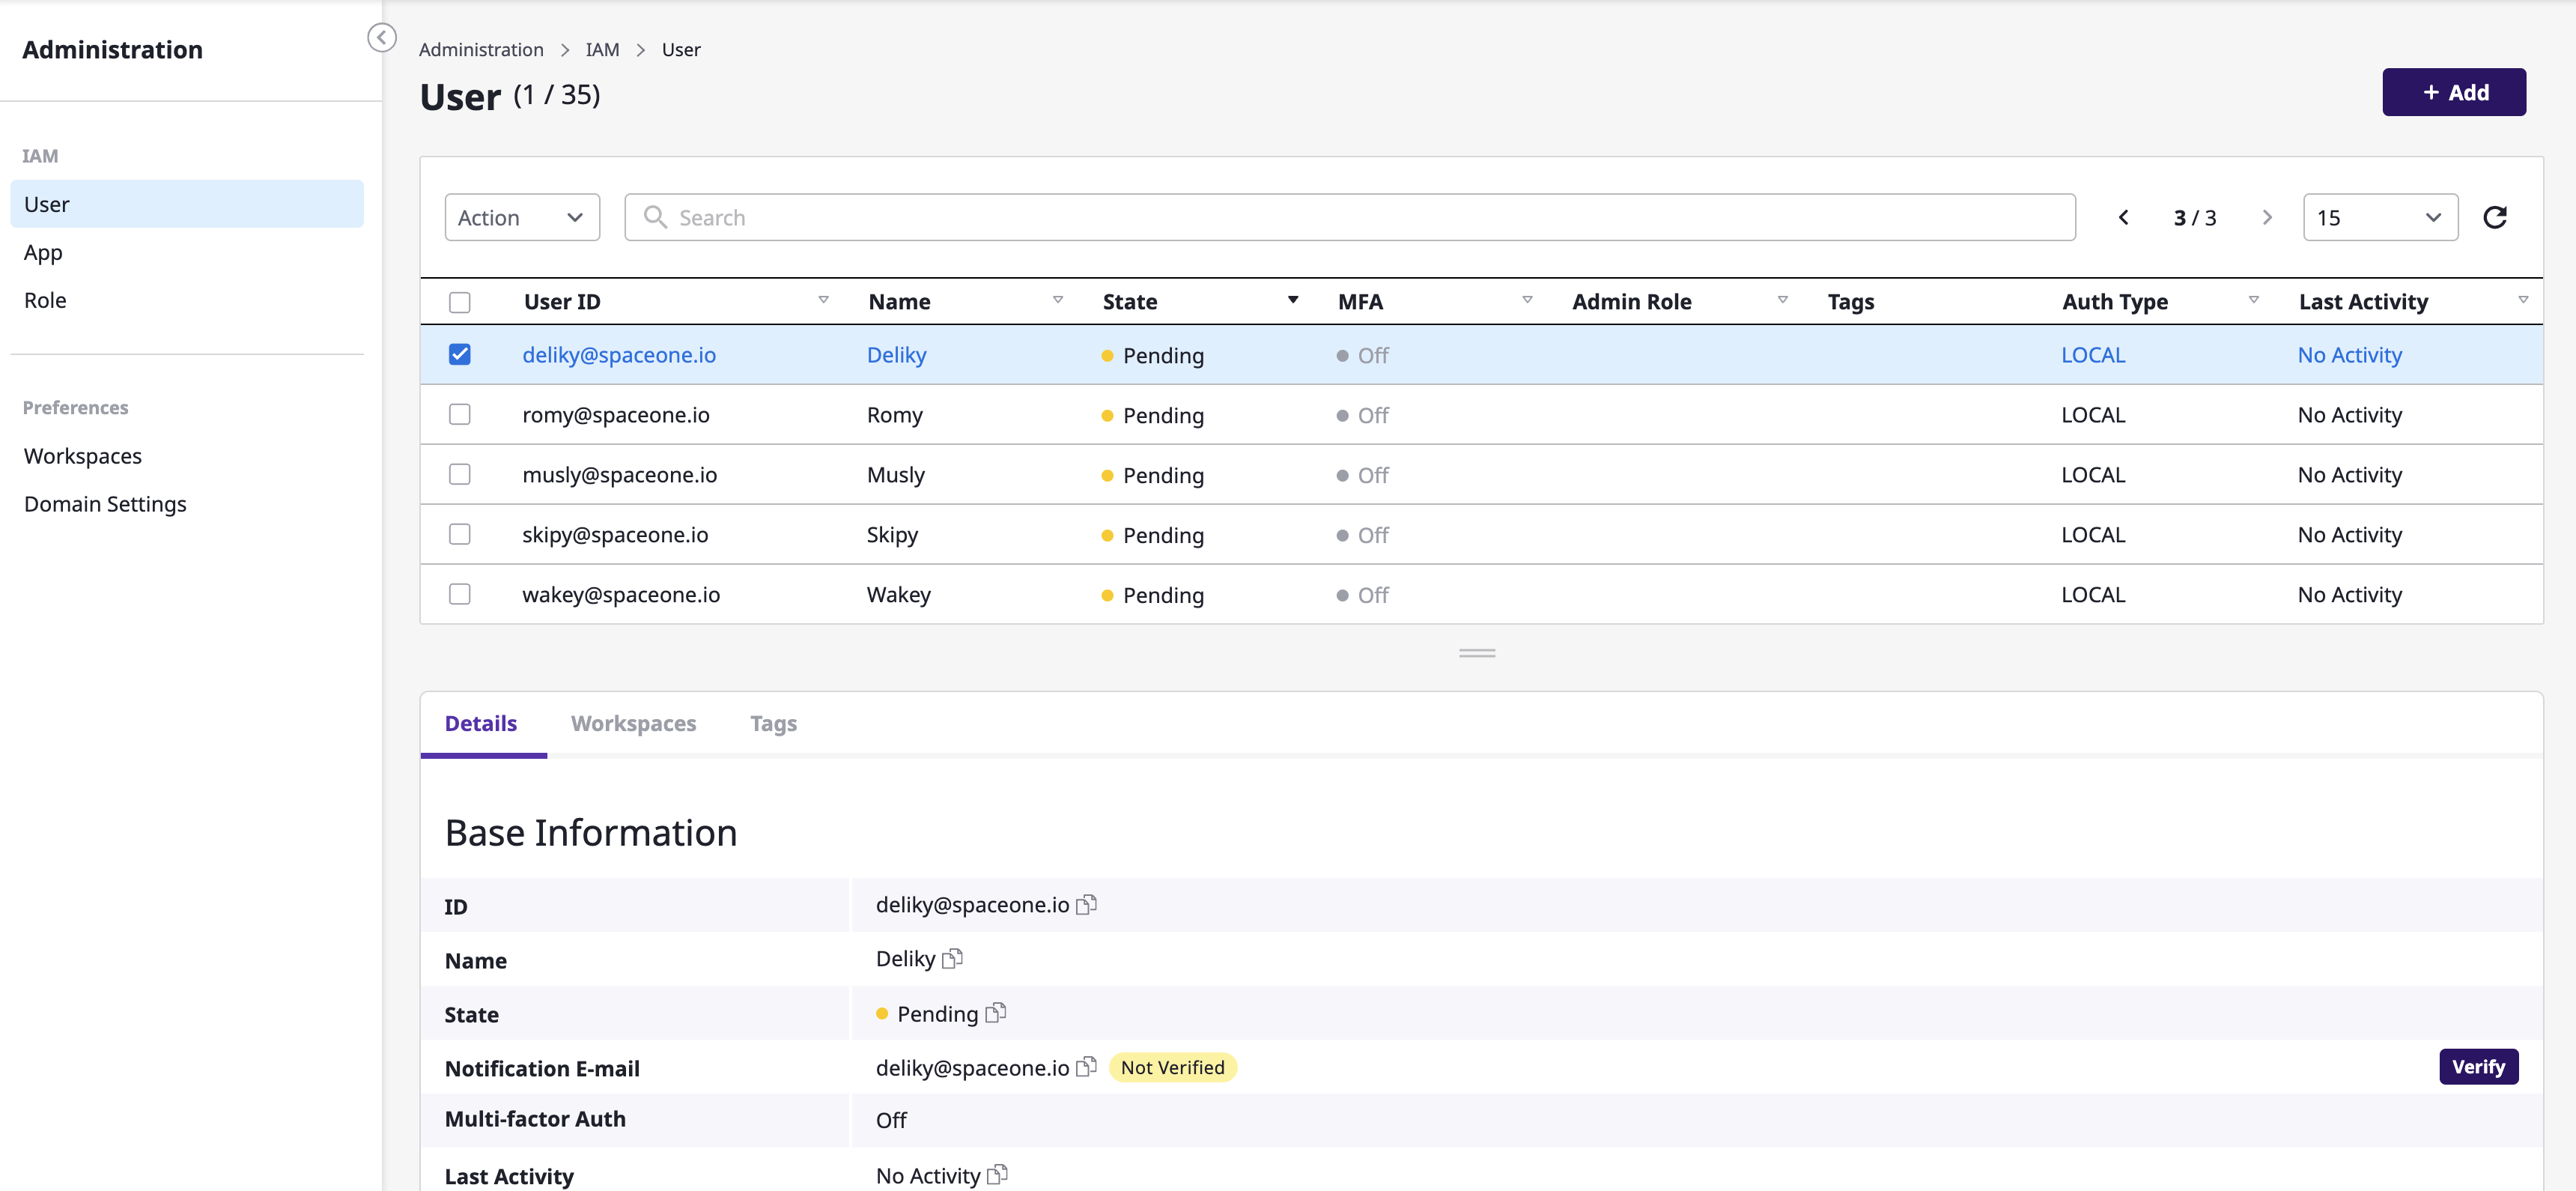
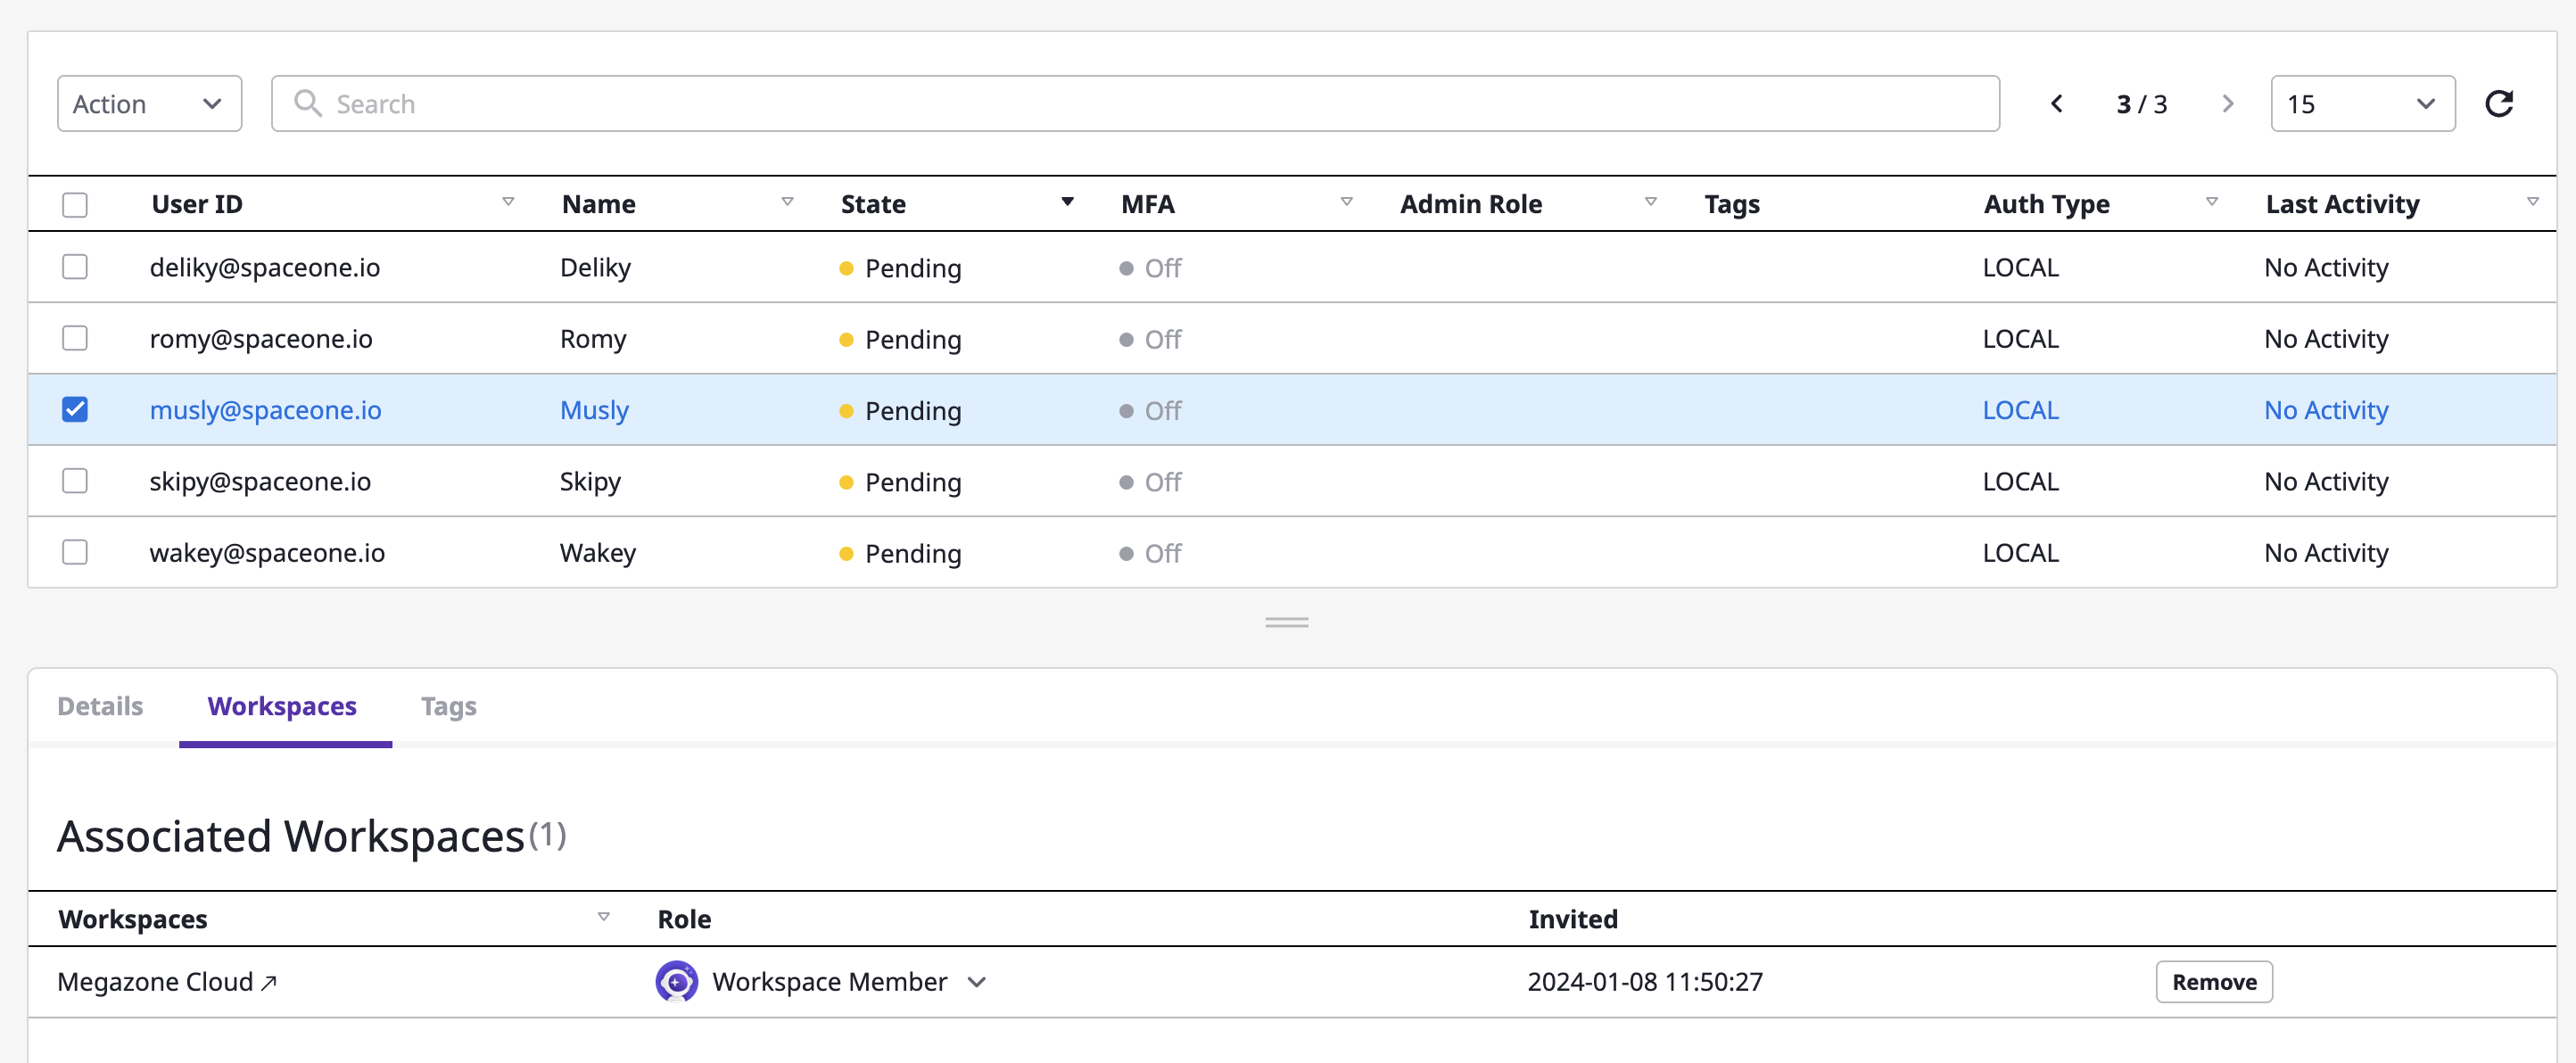
Users who have not yet logged in after being invited will have their state displayed as 'Pending.'
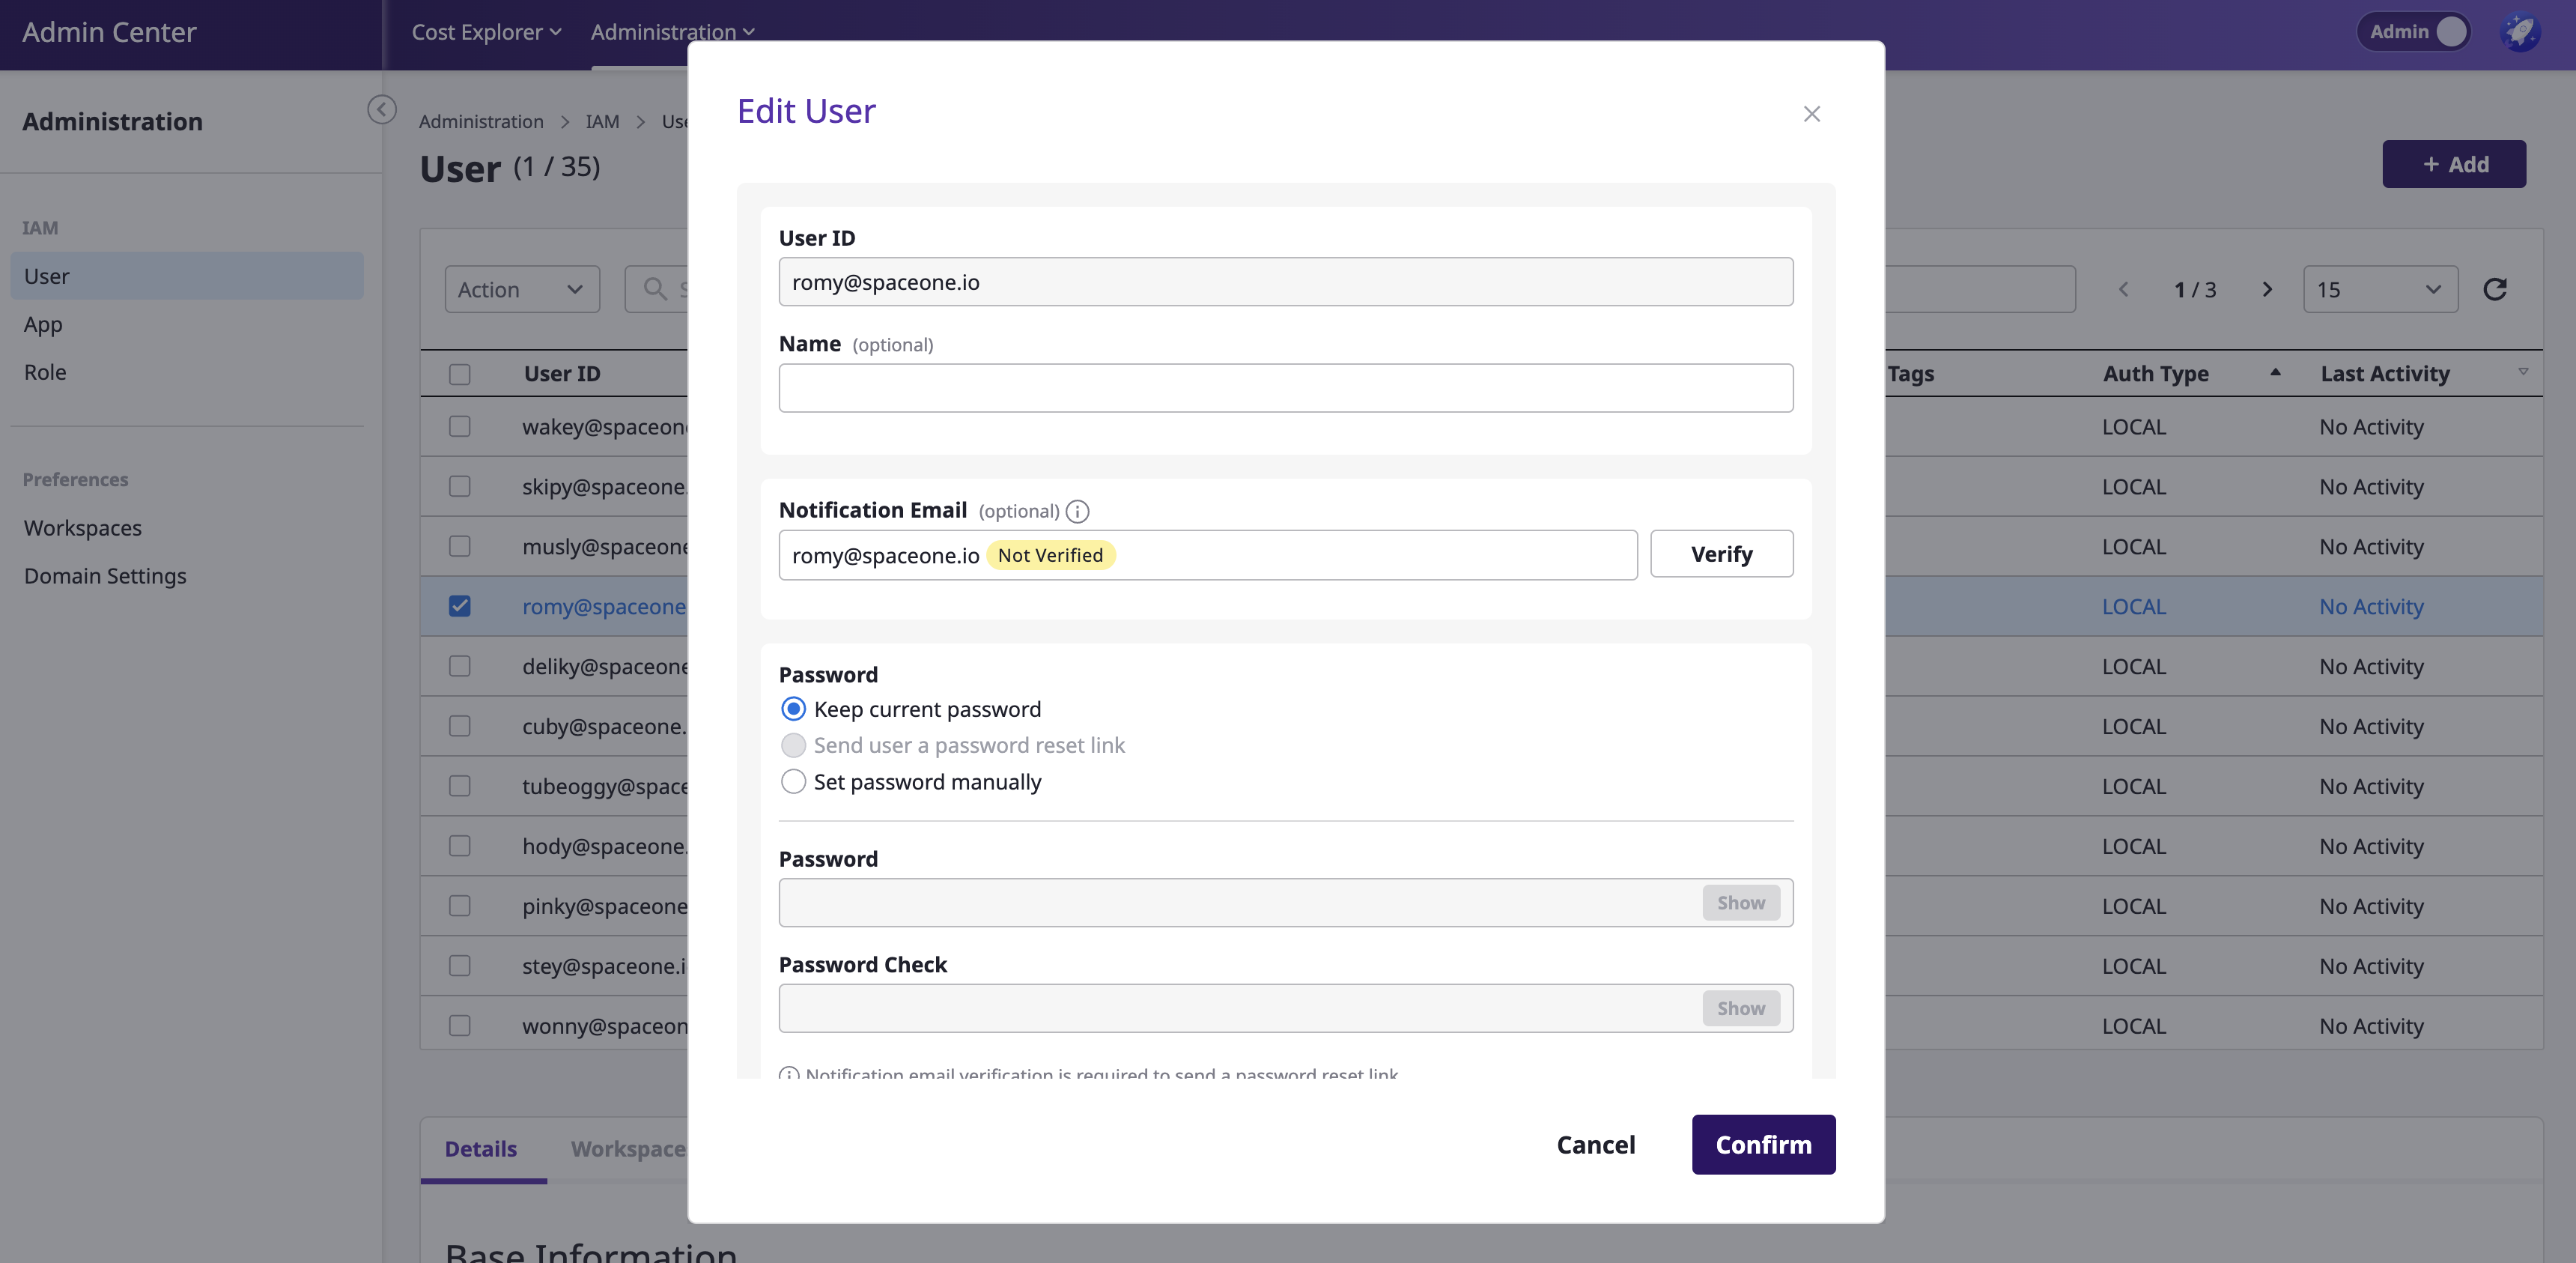
Editing Users
(1) Click on a specific user, then click the [Actions > Edit] button.

(2) Edit user information:
- Change Name
- Change Notification Email: the Admins can change the email address and verify it directly.
- Change Password: the Admins can either set a new password directly for the user or send a password reset link via email.
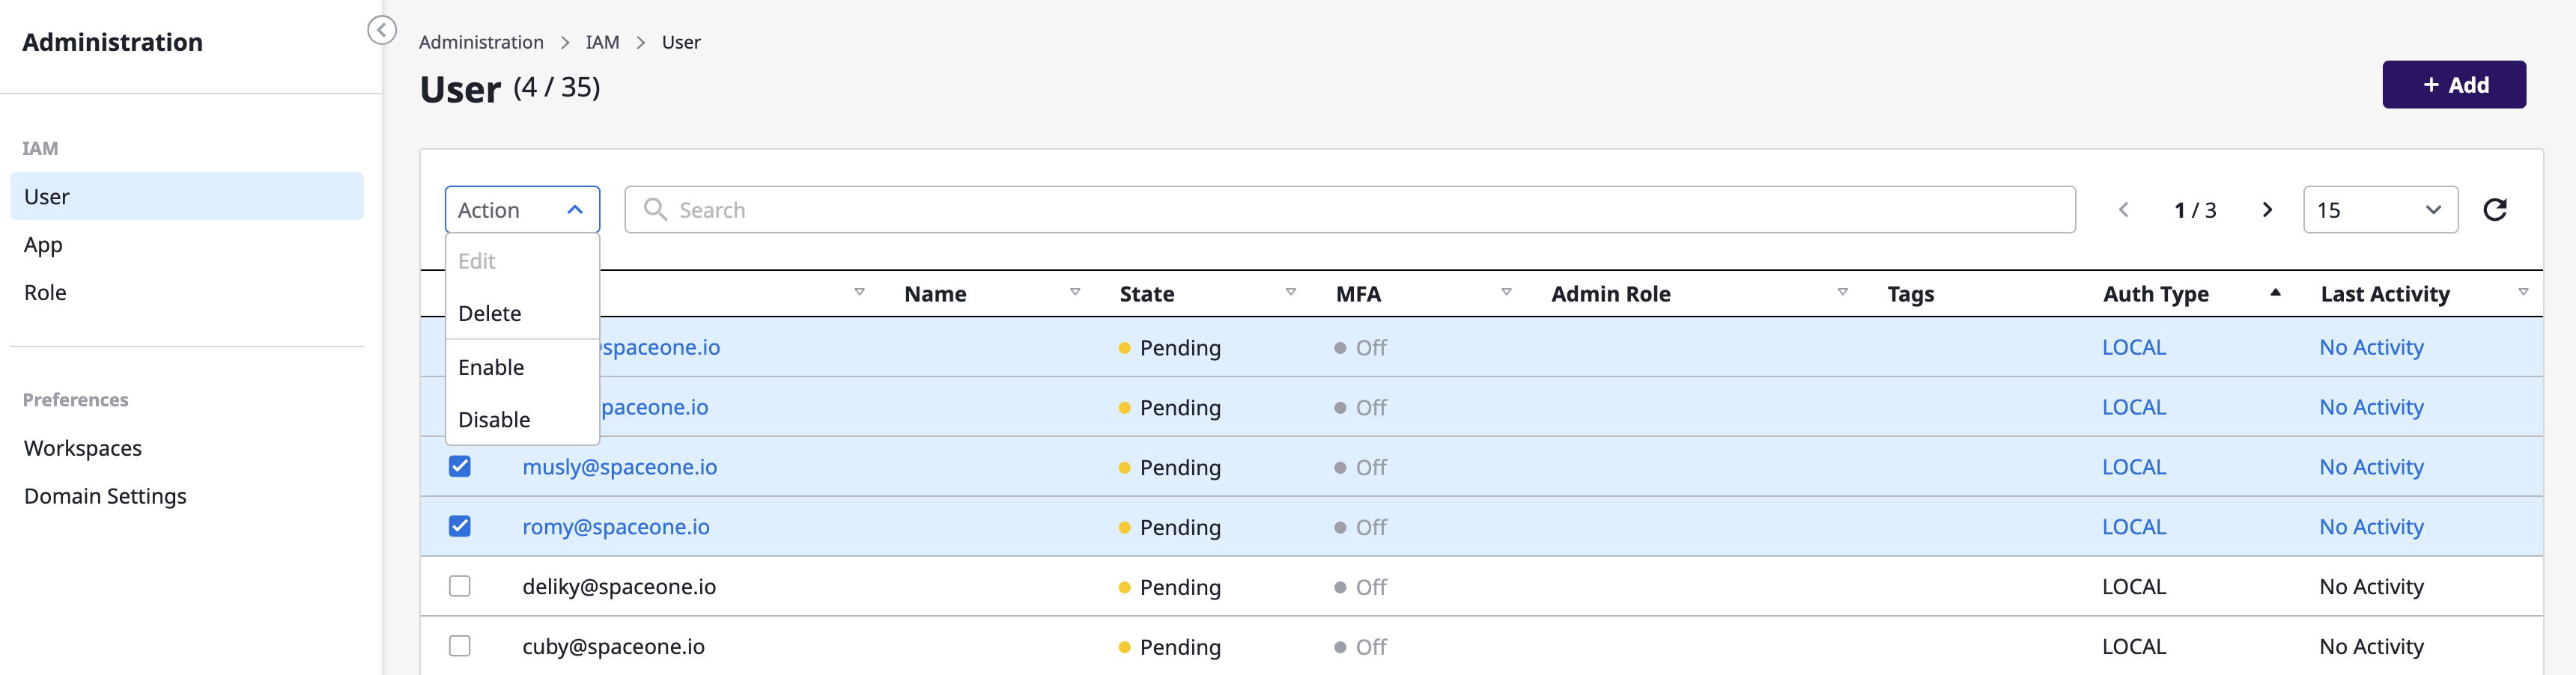
(3) Enable/Disable Users
Select one or more users, then click the [Actions > Enable] or [Actions > Disable] button to change their active status.
2 - App Settings
You can create and manage apps for generating Client Secrets for API/CLI access.
(1) Switch to Admin Center
(2) Navigate to [IAM > App]
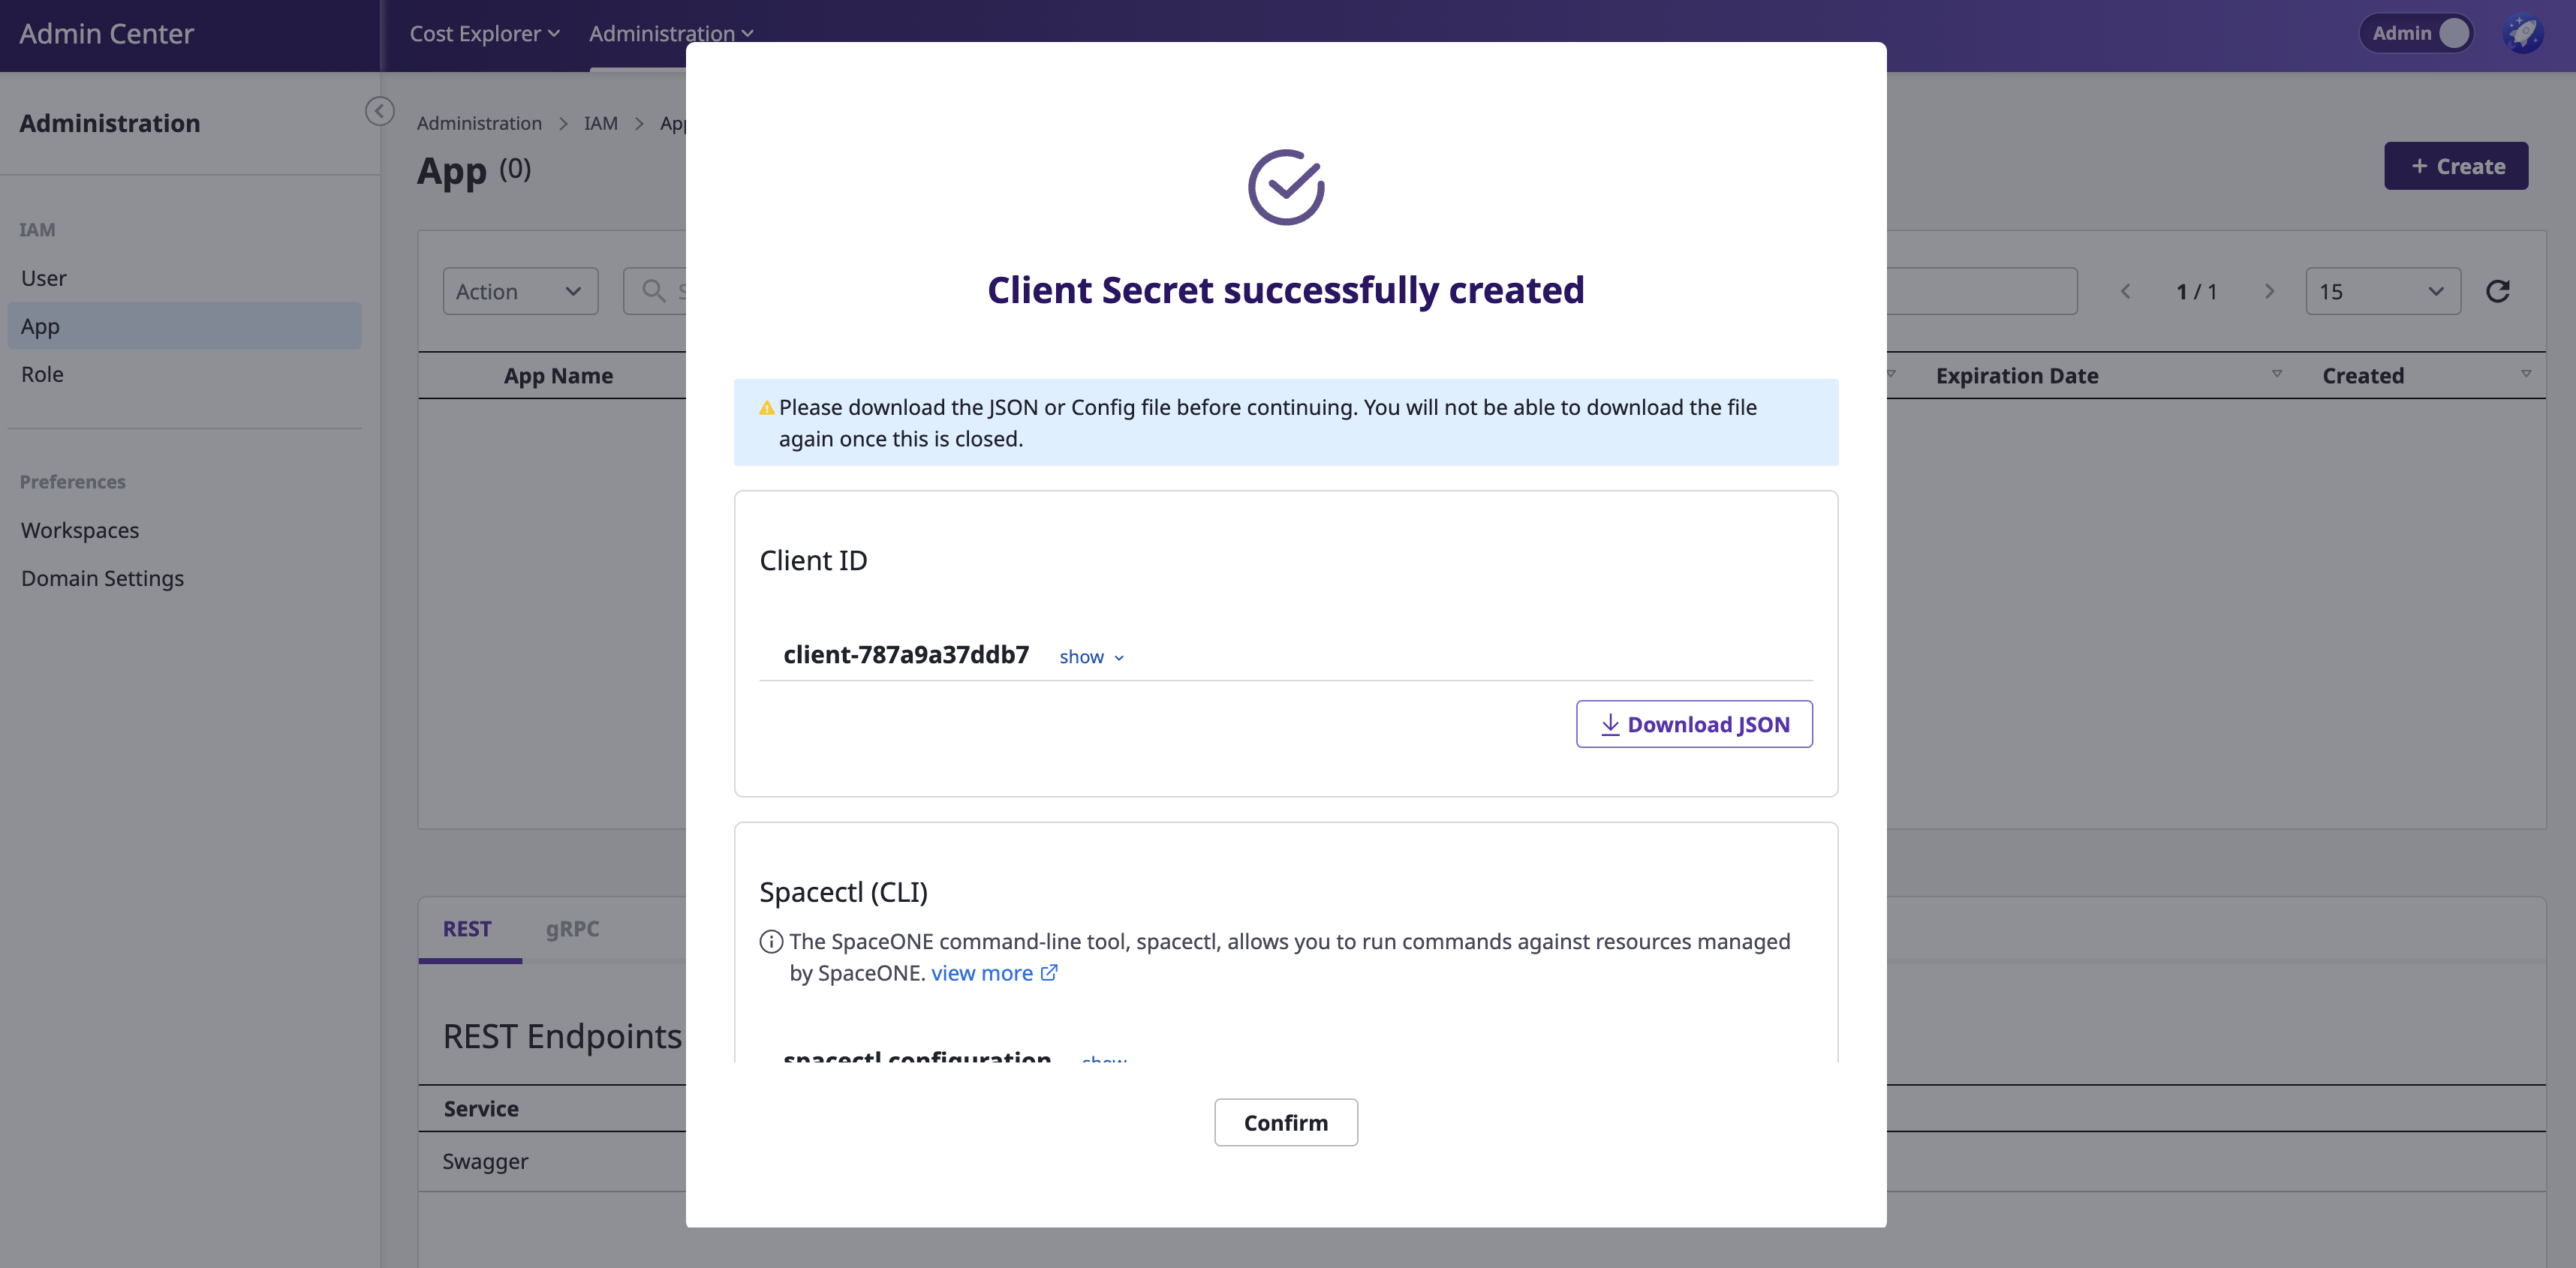
Creating Apps
To use Spacectl, the CLI tool provided by Cloudforet(SpaceONE), an accessible Client Secret is required.
In Admin Center, you can create an app with admin roles and provide its Client Secret key to other users.
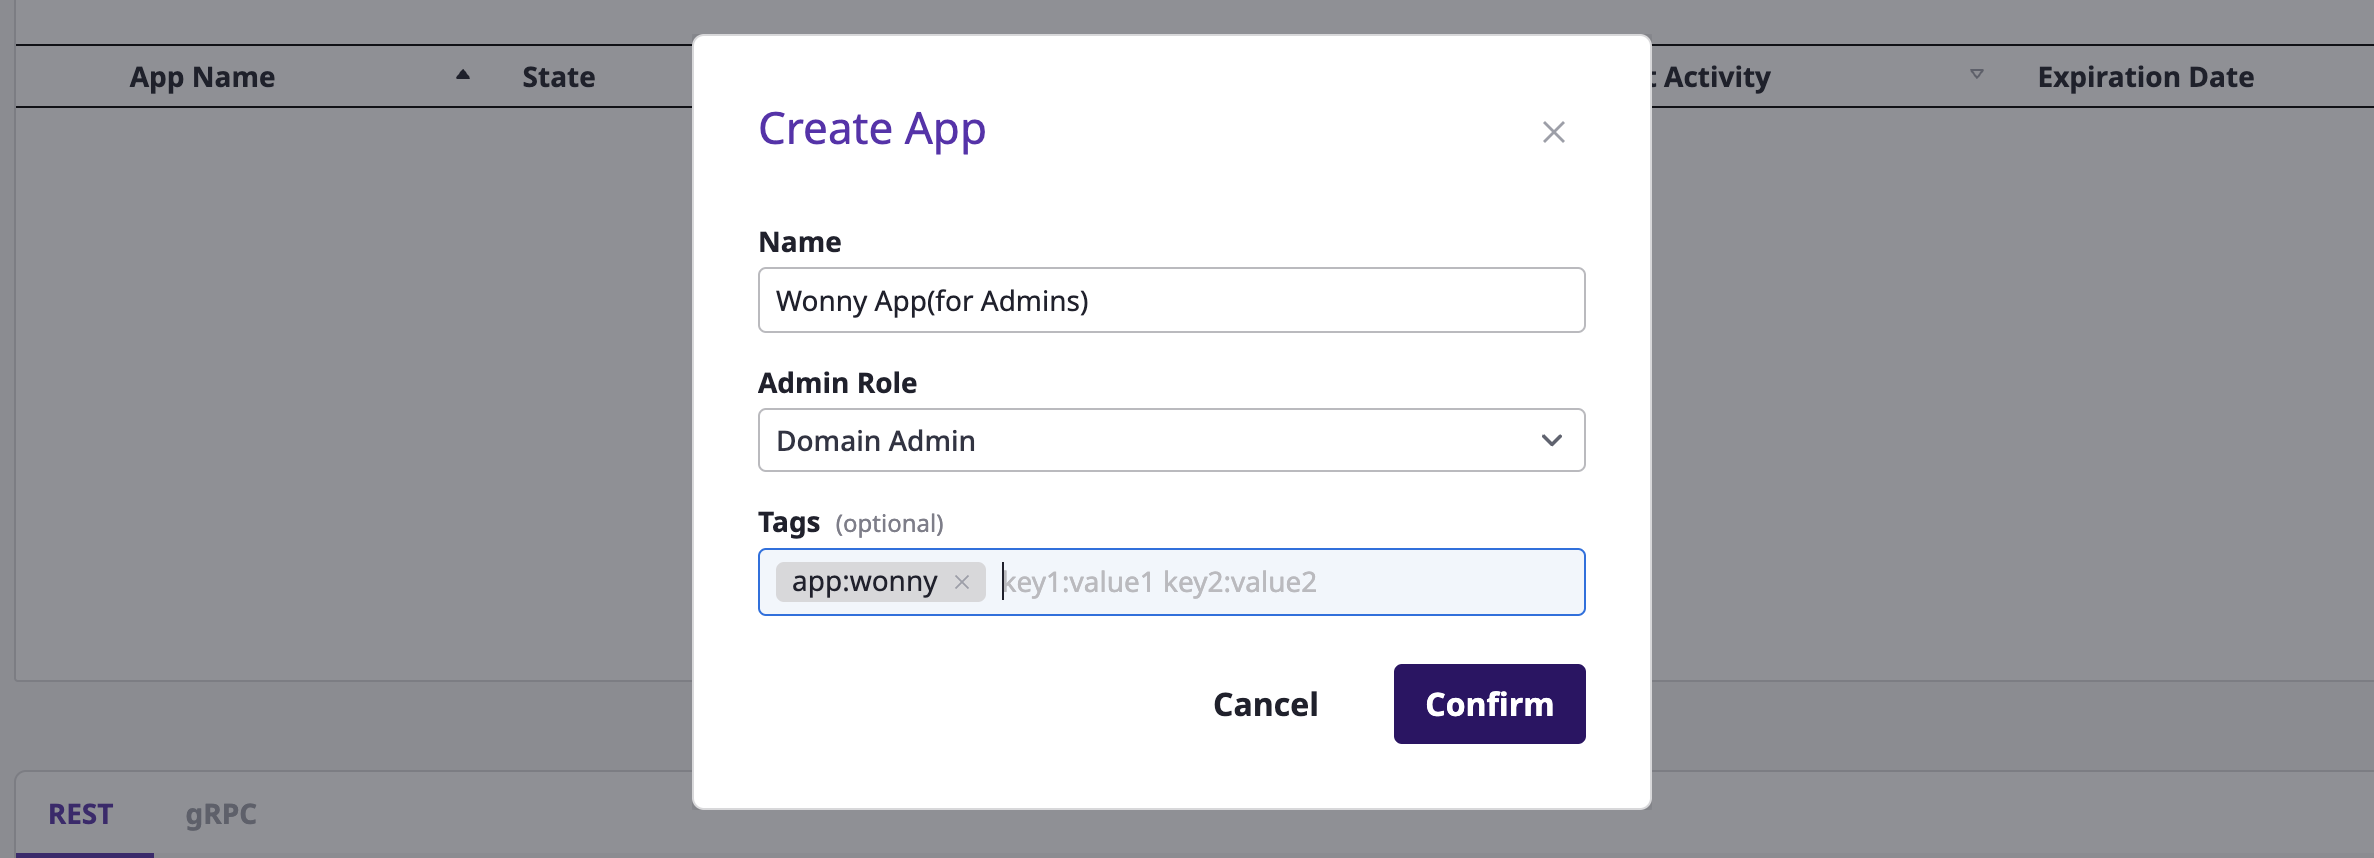
(1) Click the [+ Create] button at the top right

(2) Enter the required information:
- Enter a name.
- Select an Admin role: You can find detailed information about roles here.
- Enter tags: input in the 'key:value' format.
- Click the [Confirm] button to complete the app creation.
(3) Download the generated files
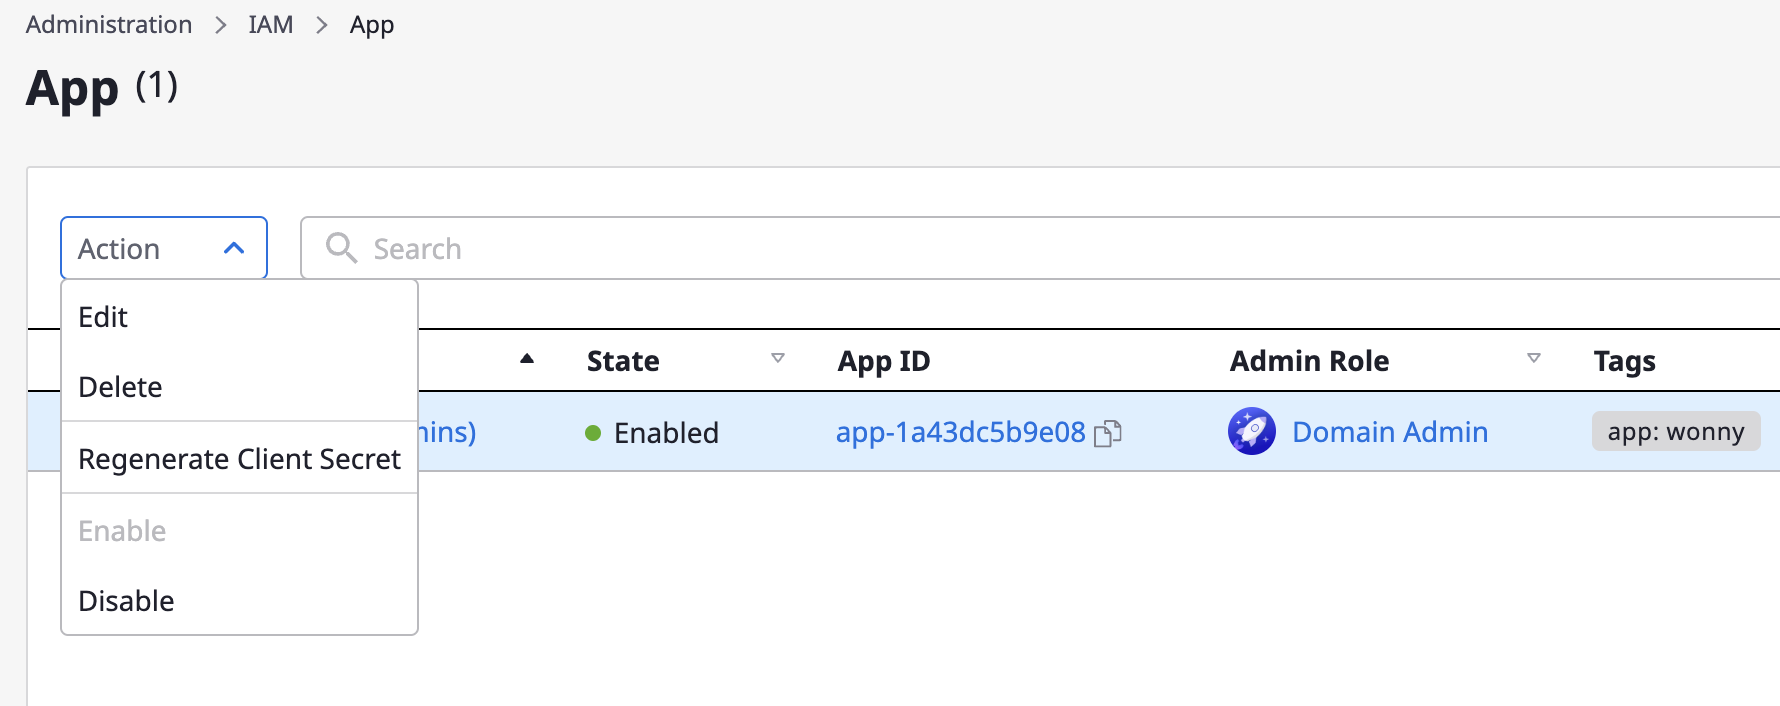
Regenerating Client Secret
(1) Select the app that needs regeneration.
(2) Click [Actions > Regenerate Client Secret] at the top.
- The Secret will be regenerated, and you can download the updated configuration files.
3 - Role Settings
Detailed role management is available through user role types, page access permissions, and API connections.
(1) Switch to Admin Center
(2) Navigate to [IAM > Role]
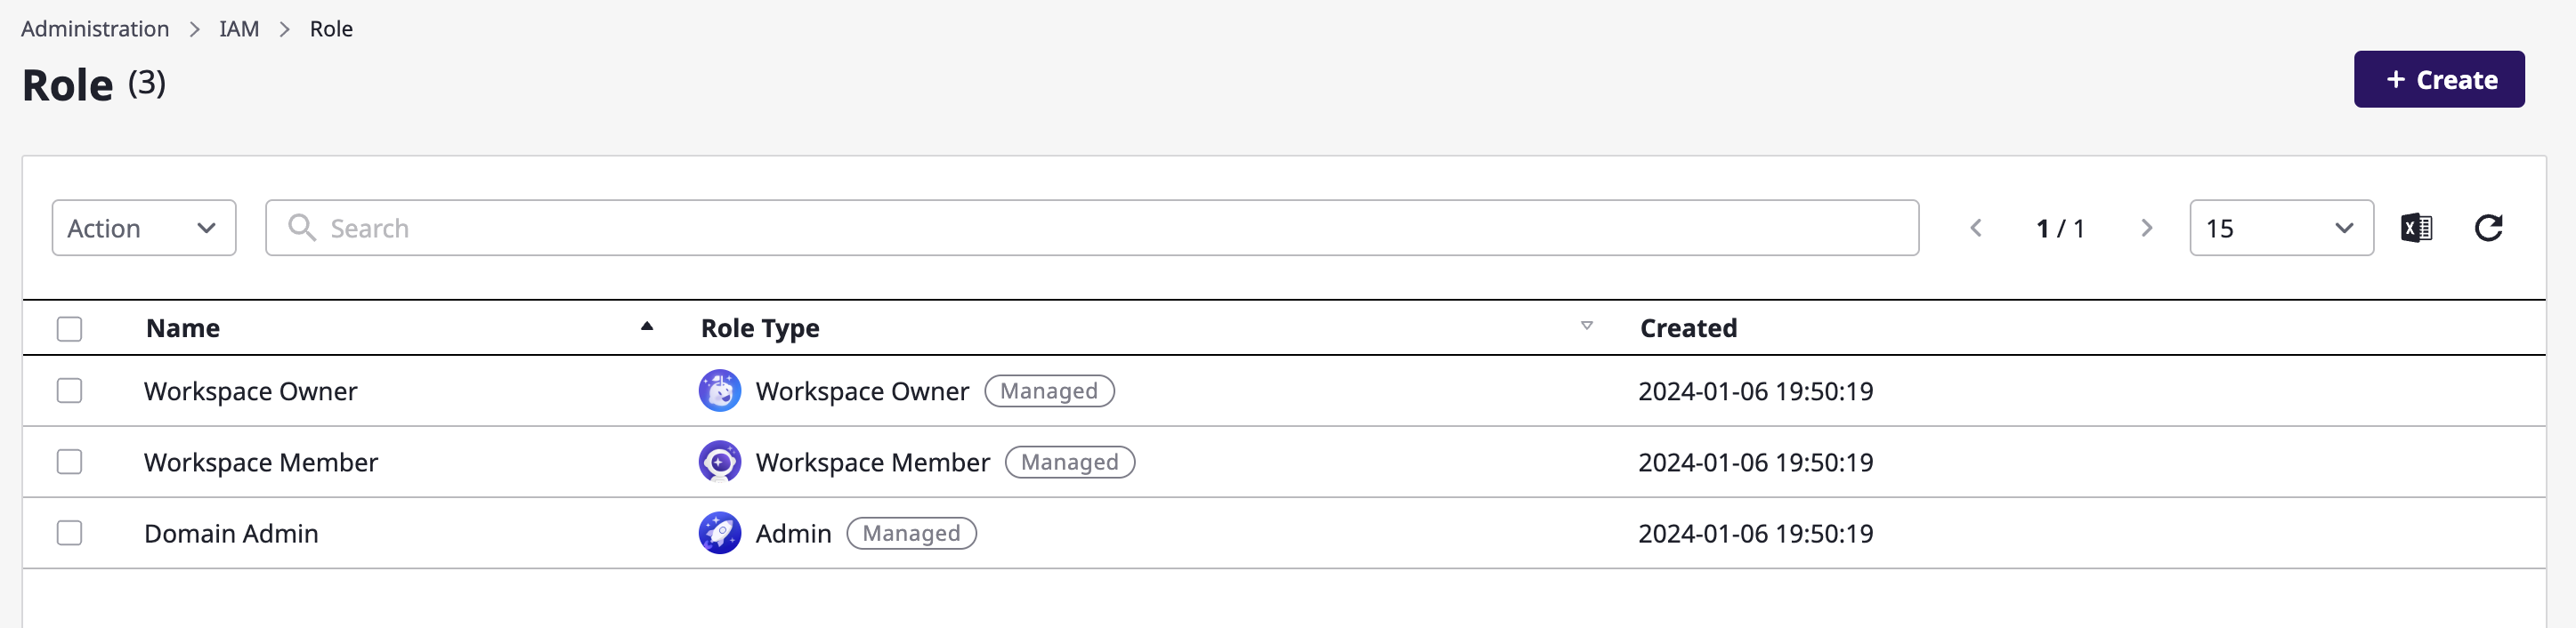
Using Managed Roles
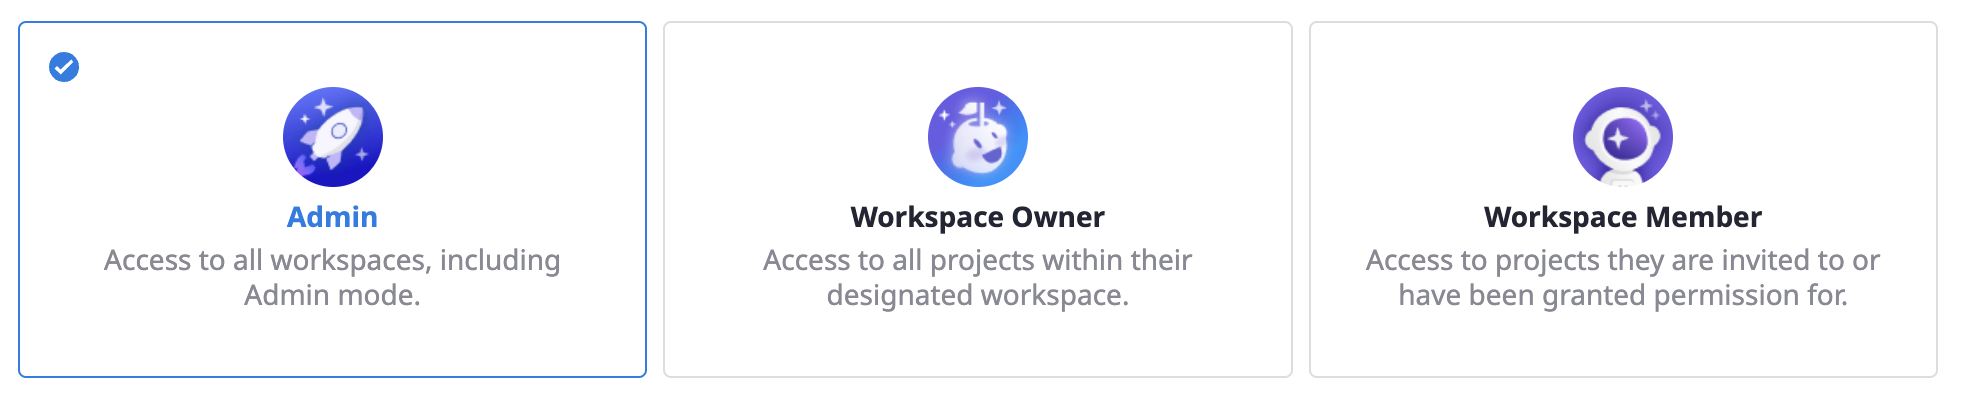
- Pre-provided 'Managed' roles allow you to easily identify and quickly assign roles to users:
Domain Admin, Workspace Owner, Workspace Member. (Managed roles cannot be modified or deleted.)
Creating Custom Roles
(1) Click the [+ Create] button at the top

(2) Enter the role name
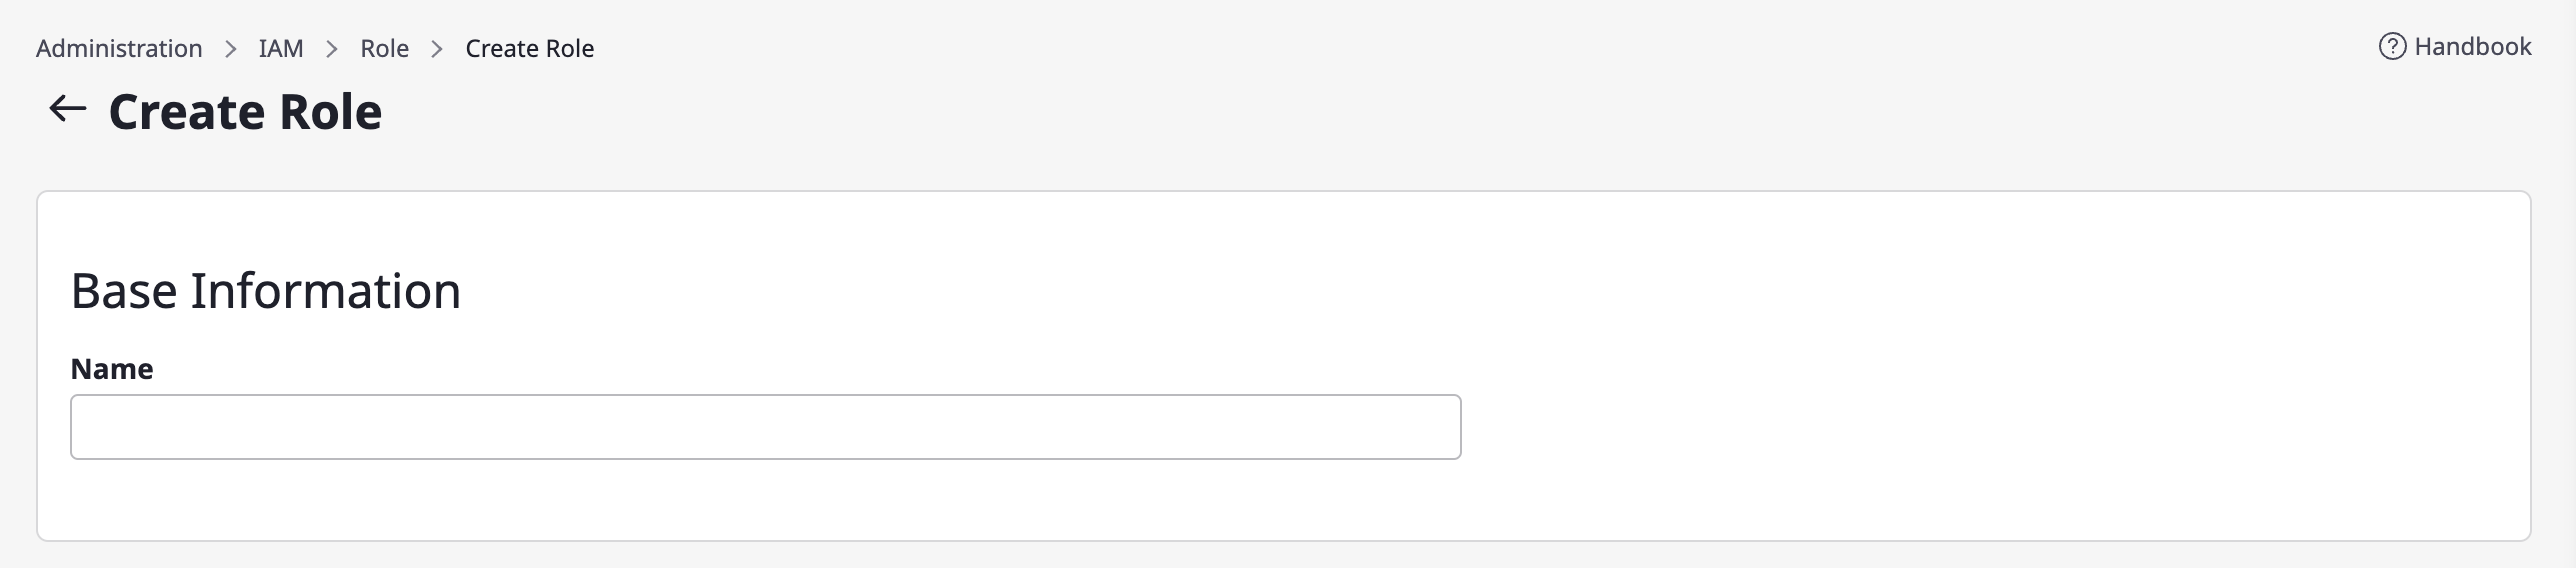
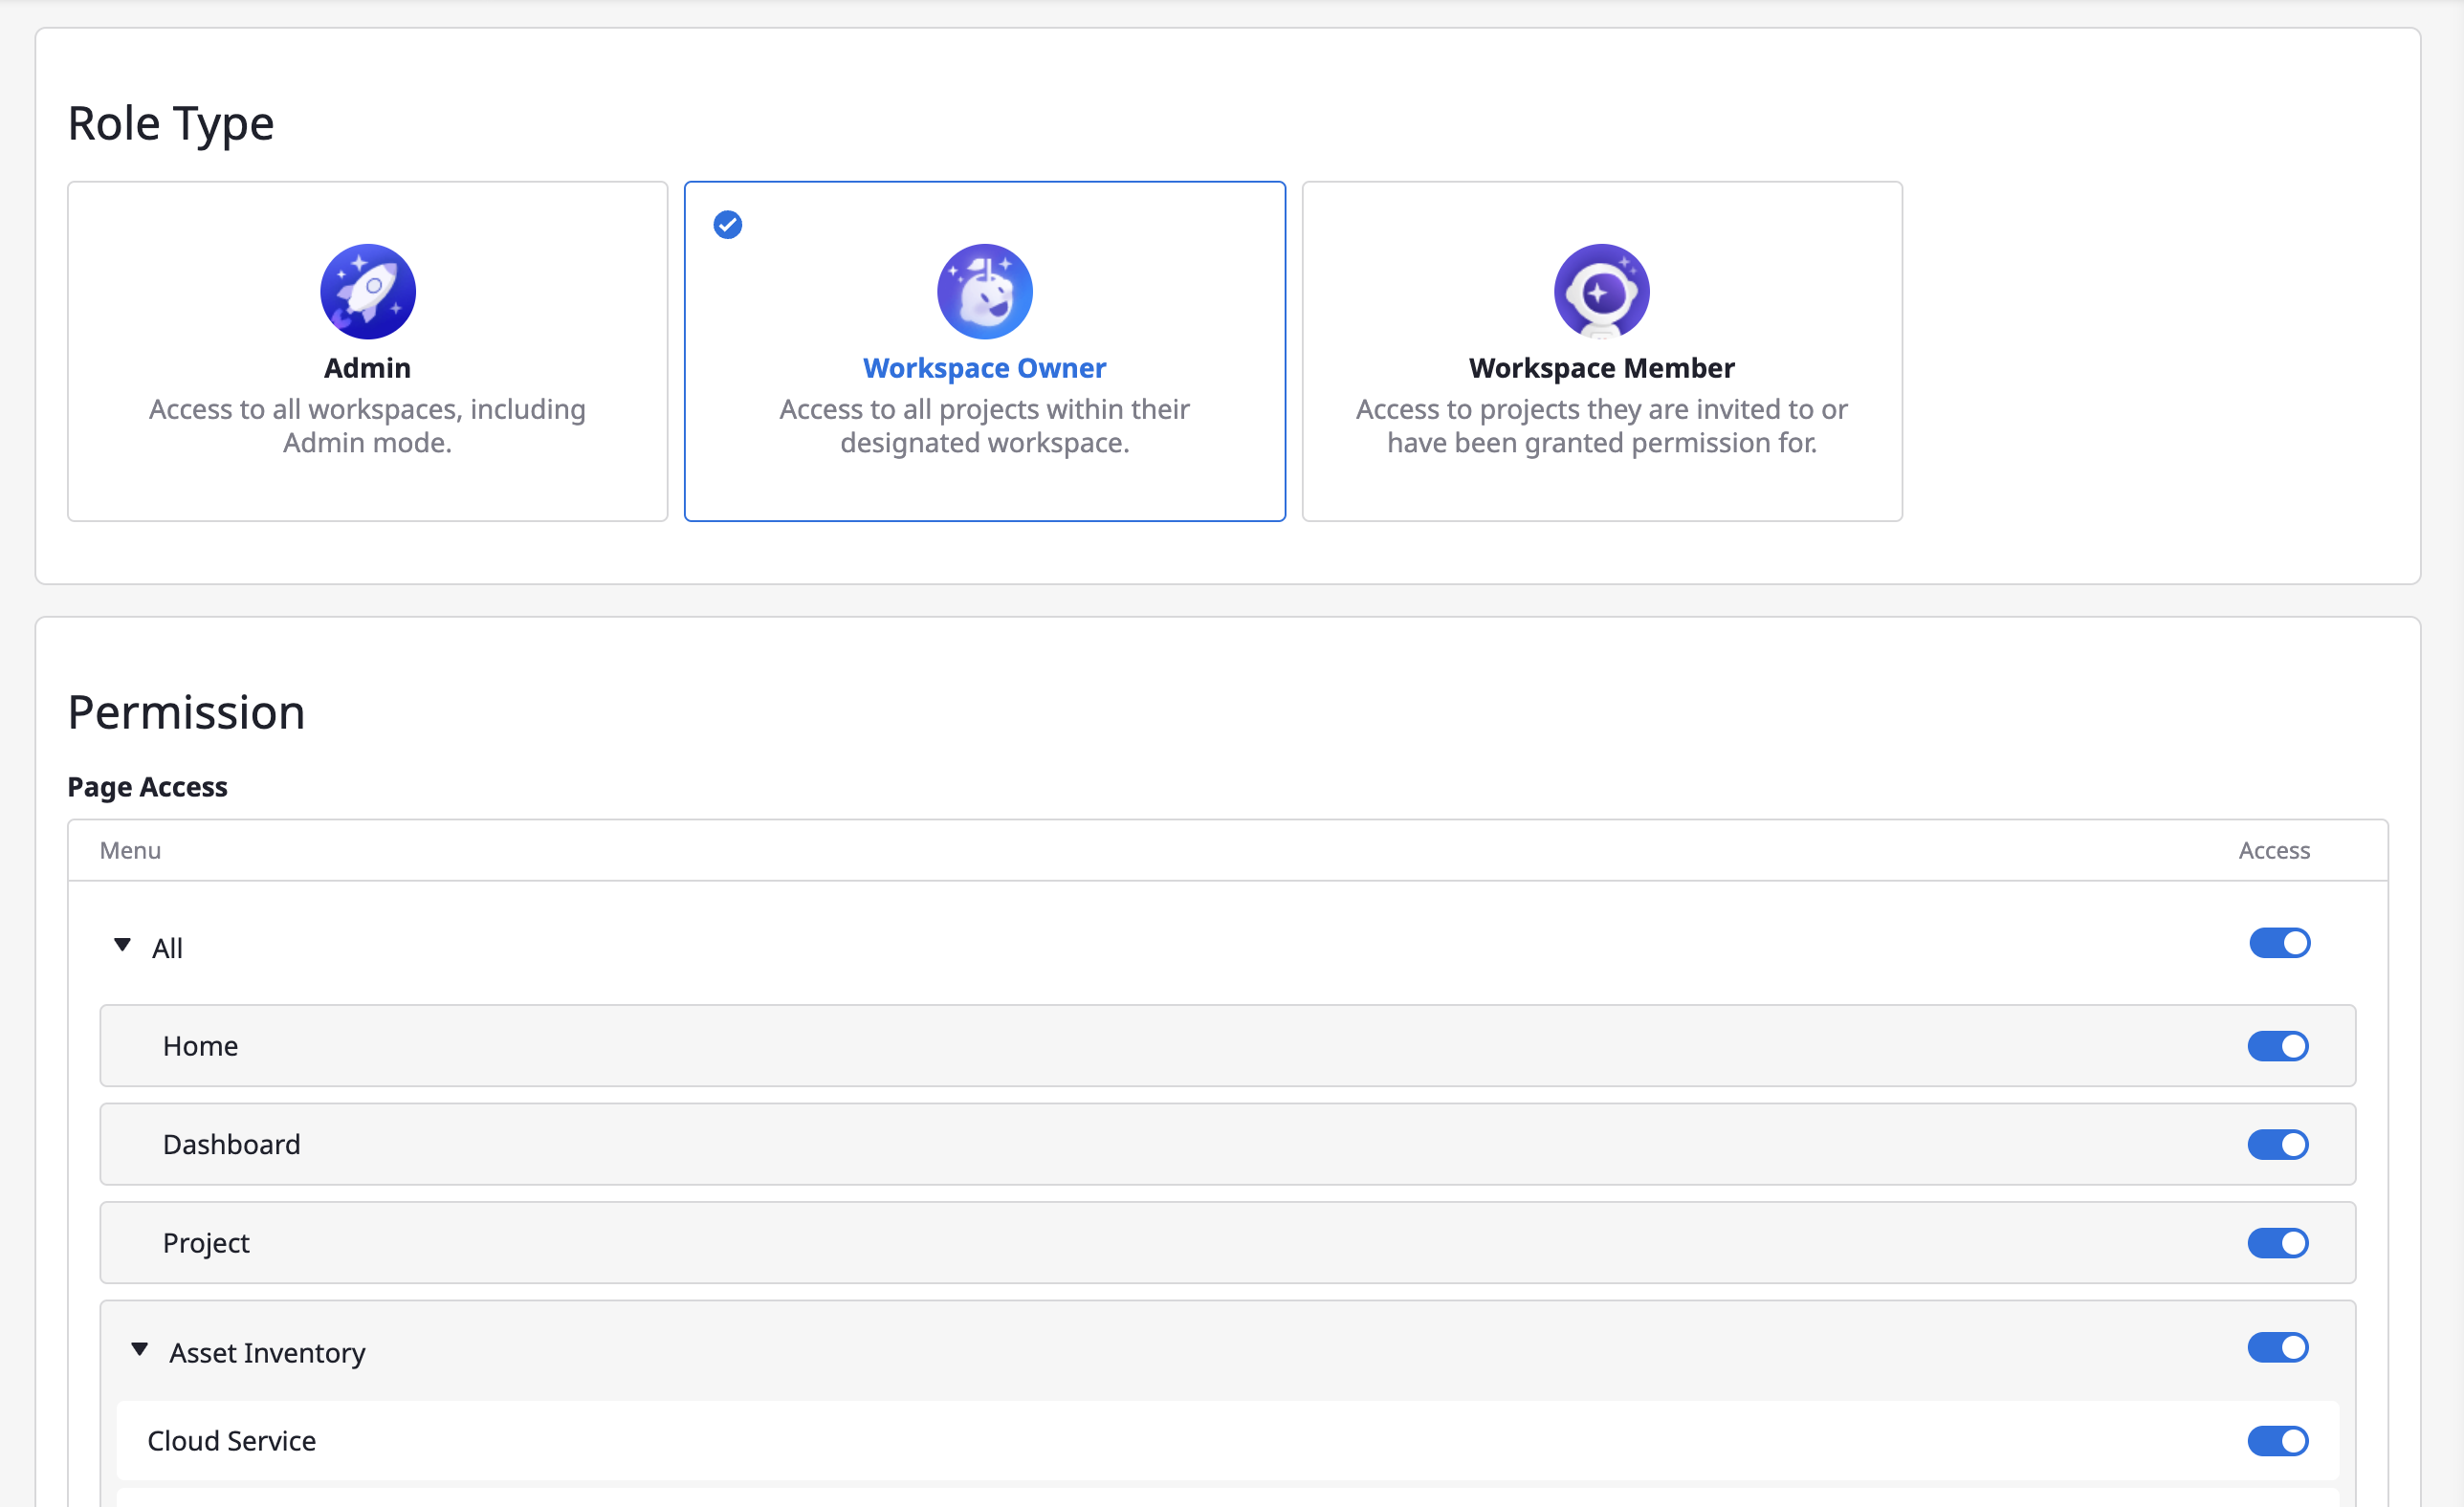
(3) Select a role type
Learn more about permission in details
here.
(4) Set page access permissions
- The Admin role type has access to the entire domain, so no additional page access permissions are needed.
- Workspace Owner and Workspace Member can have page access permissions set accordingly.
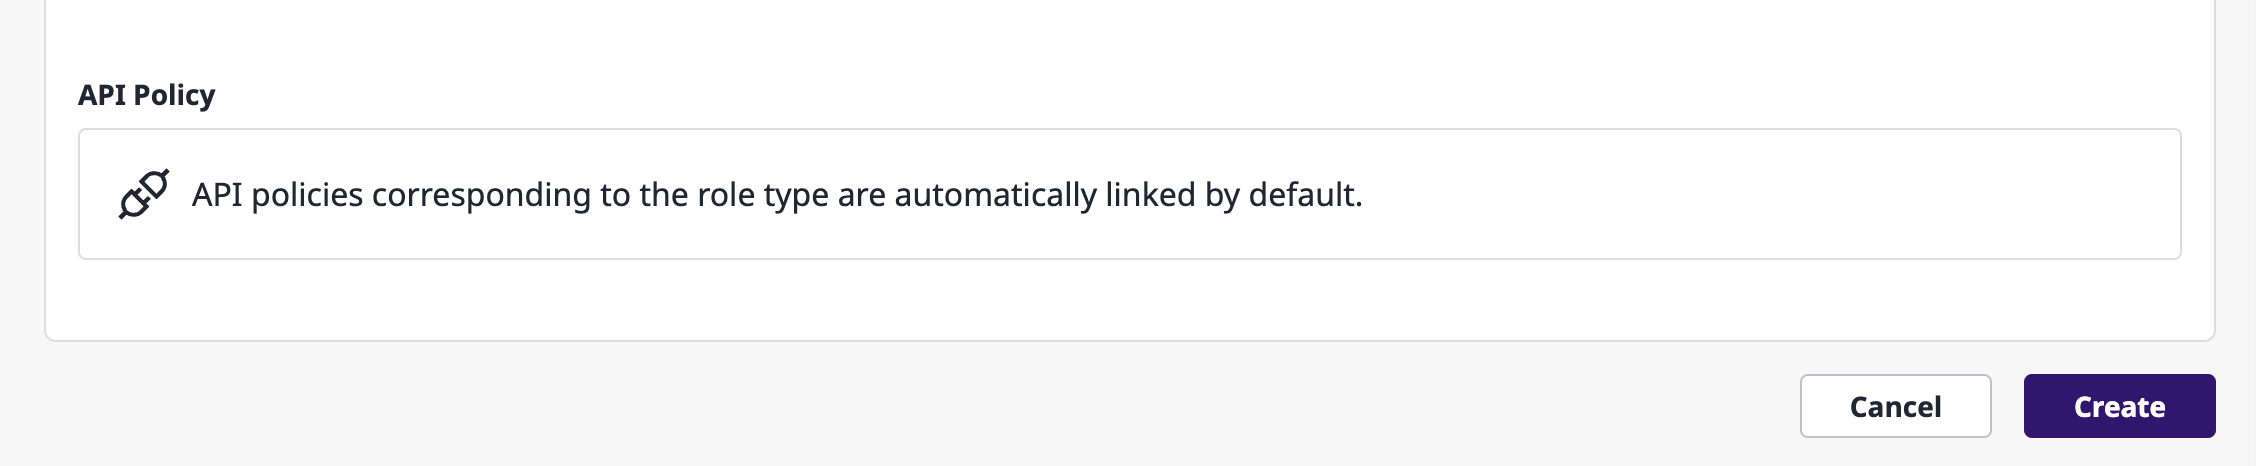
(5) Click the [+ Create] button to complete the role creation
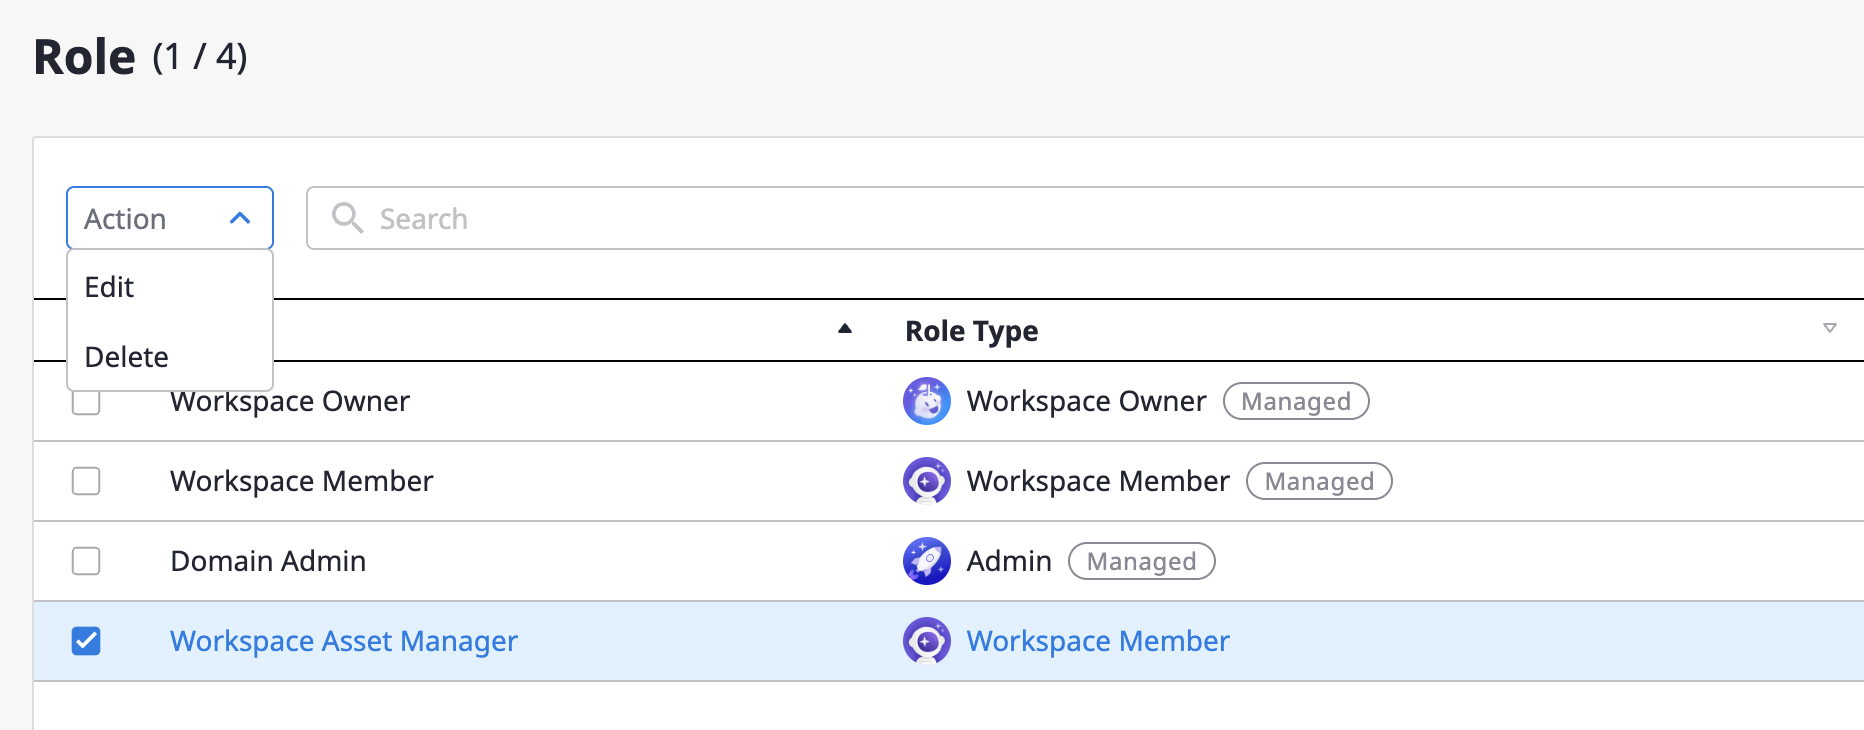
Editing/Deleting Roles
(1) Select a role
(2) Click [Actions > Edit] or [Actions > Delete] at the top
(3) When 'Edit' is clicked, you will be taken to the role editing page as shown below
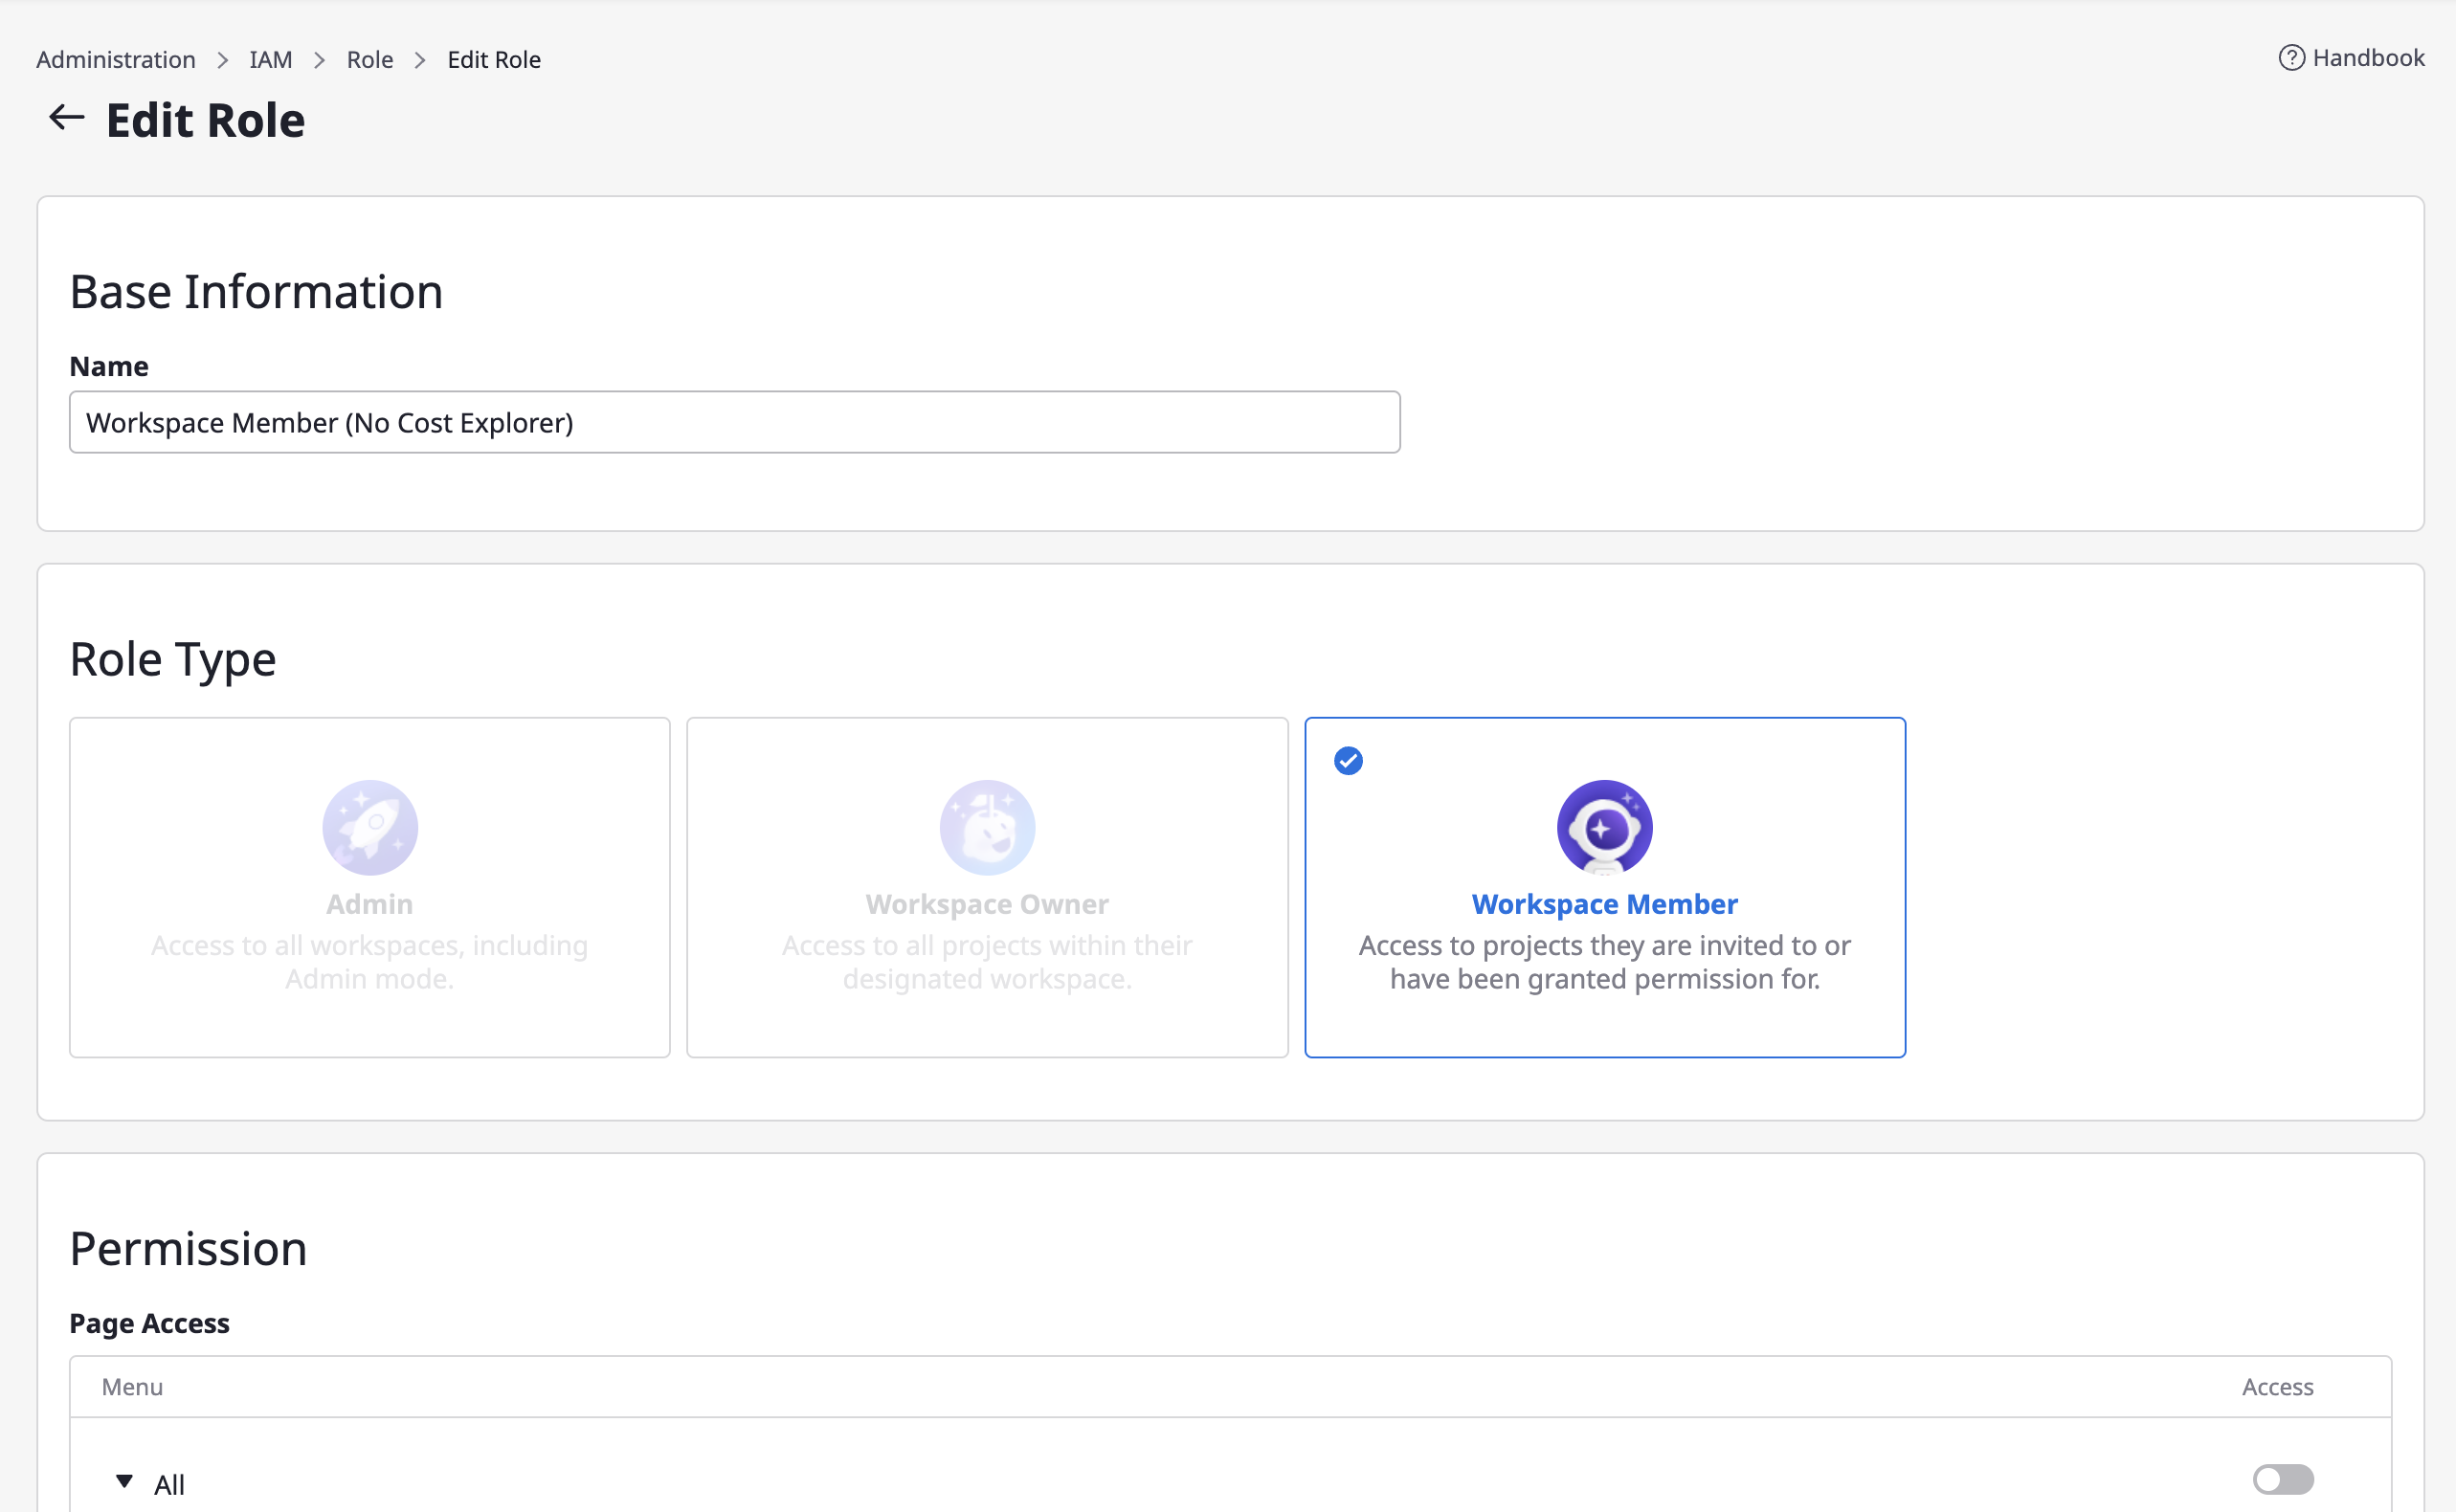
Note: When editing a role, the role type cannot be changed.
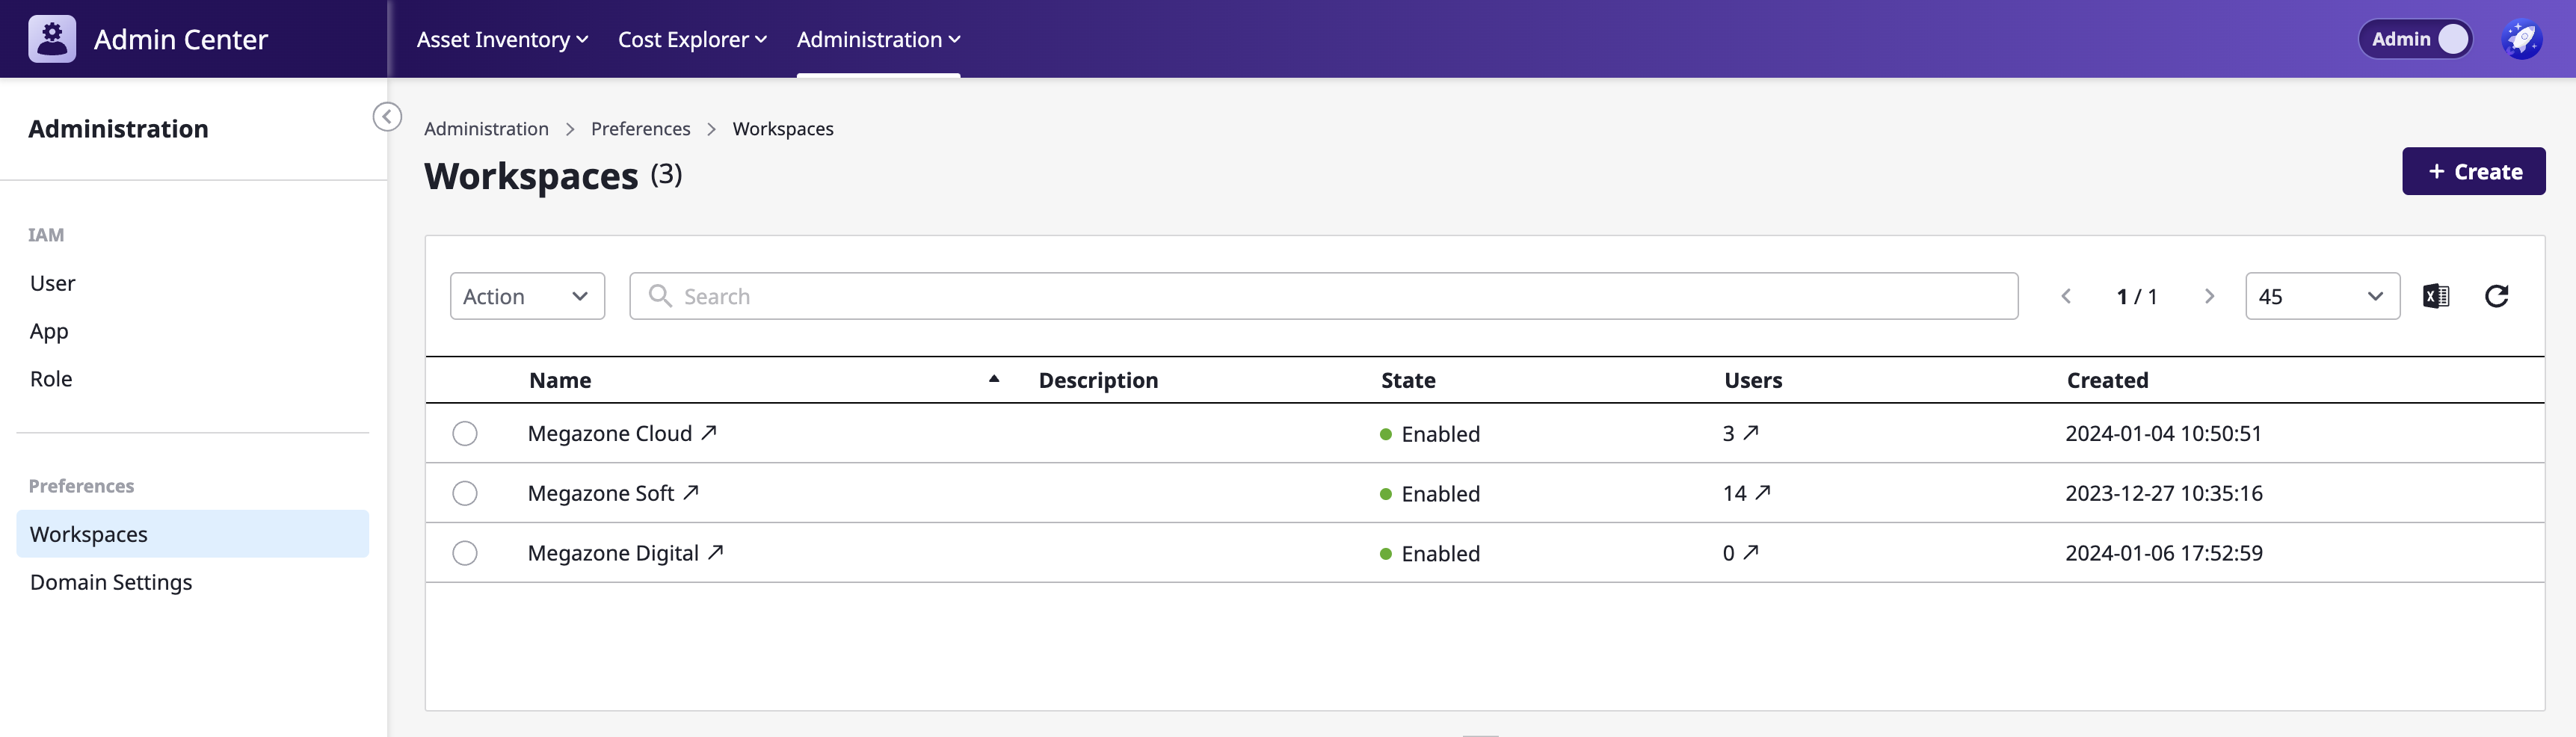
4 - Workspace Settings
Create and manage separate workspace environments according to the size and structure of your organization.
(1) Switch to Admin Center
(2) Navigate to [Preferences > Workspaces]
Creating Workspaces & Inviting Users
Creating a Workspace
(1) Click the [+ Create] button at the top

(2) Enter the basic information and create
- Enter a name
- Enter a description
- Select the main color of the workspace
- Click the [Confirm] button
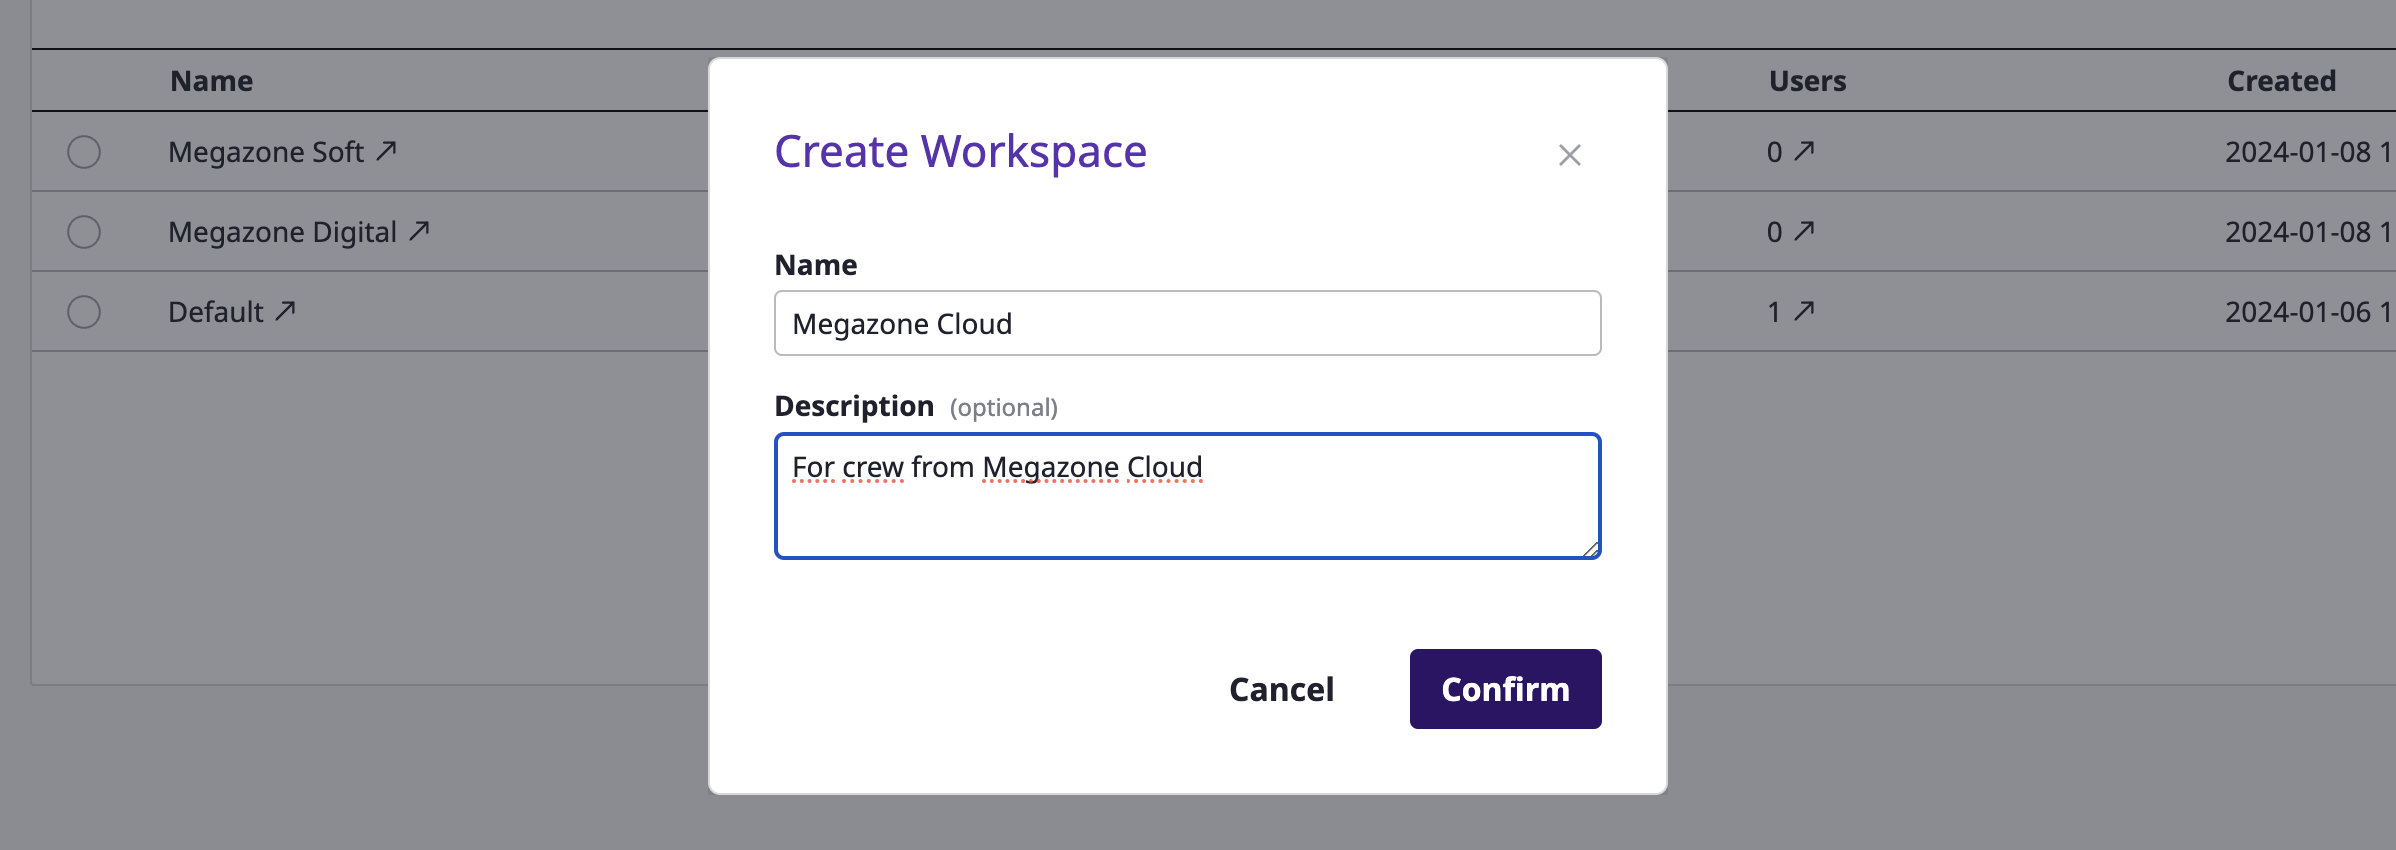
Once the workspace is created, you can immediately invite users.
Inviting Users to a New Workspace
Immediate invitation can be skipped; users can be added to the workspace later as well.
(1) Enter user accounts to add them to the list
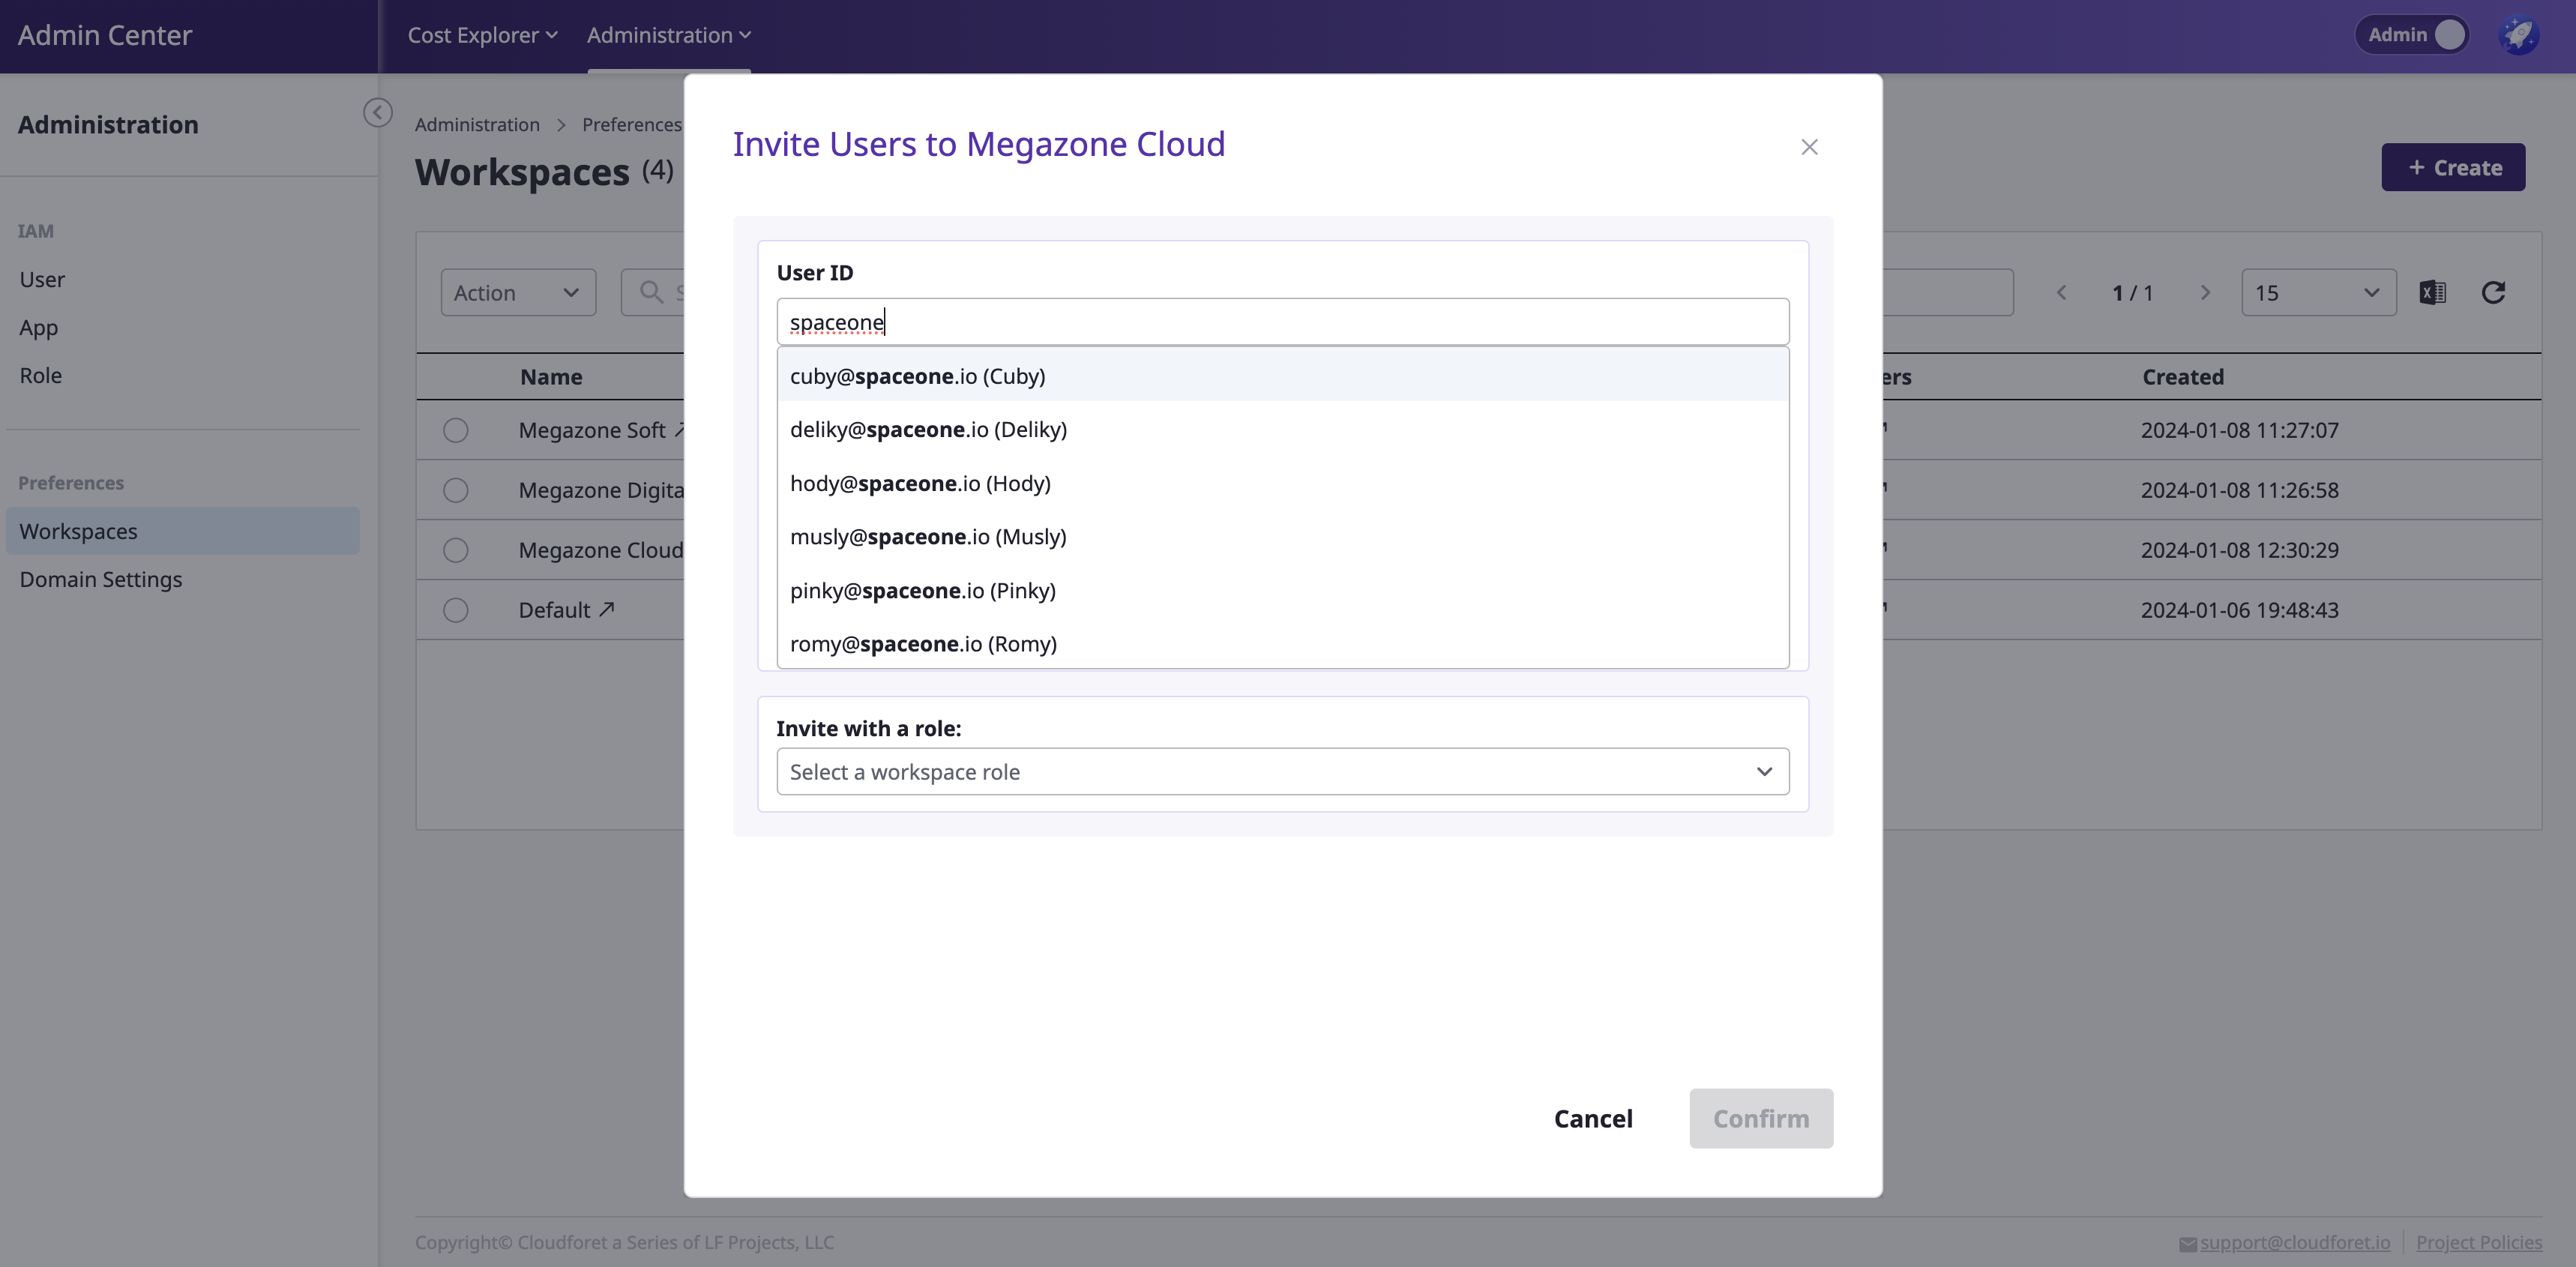
(2) Select a role
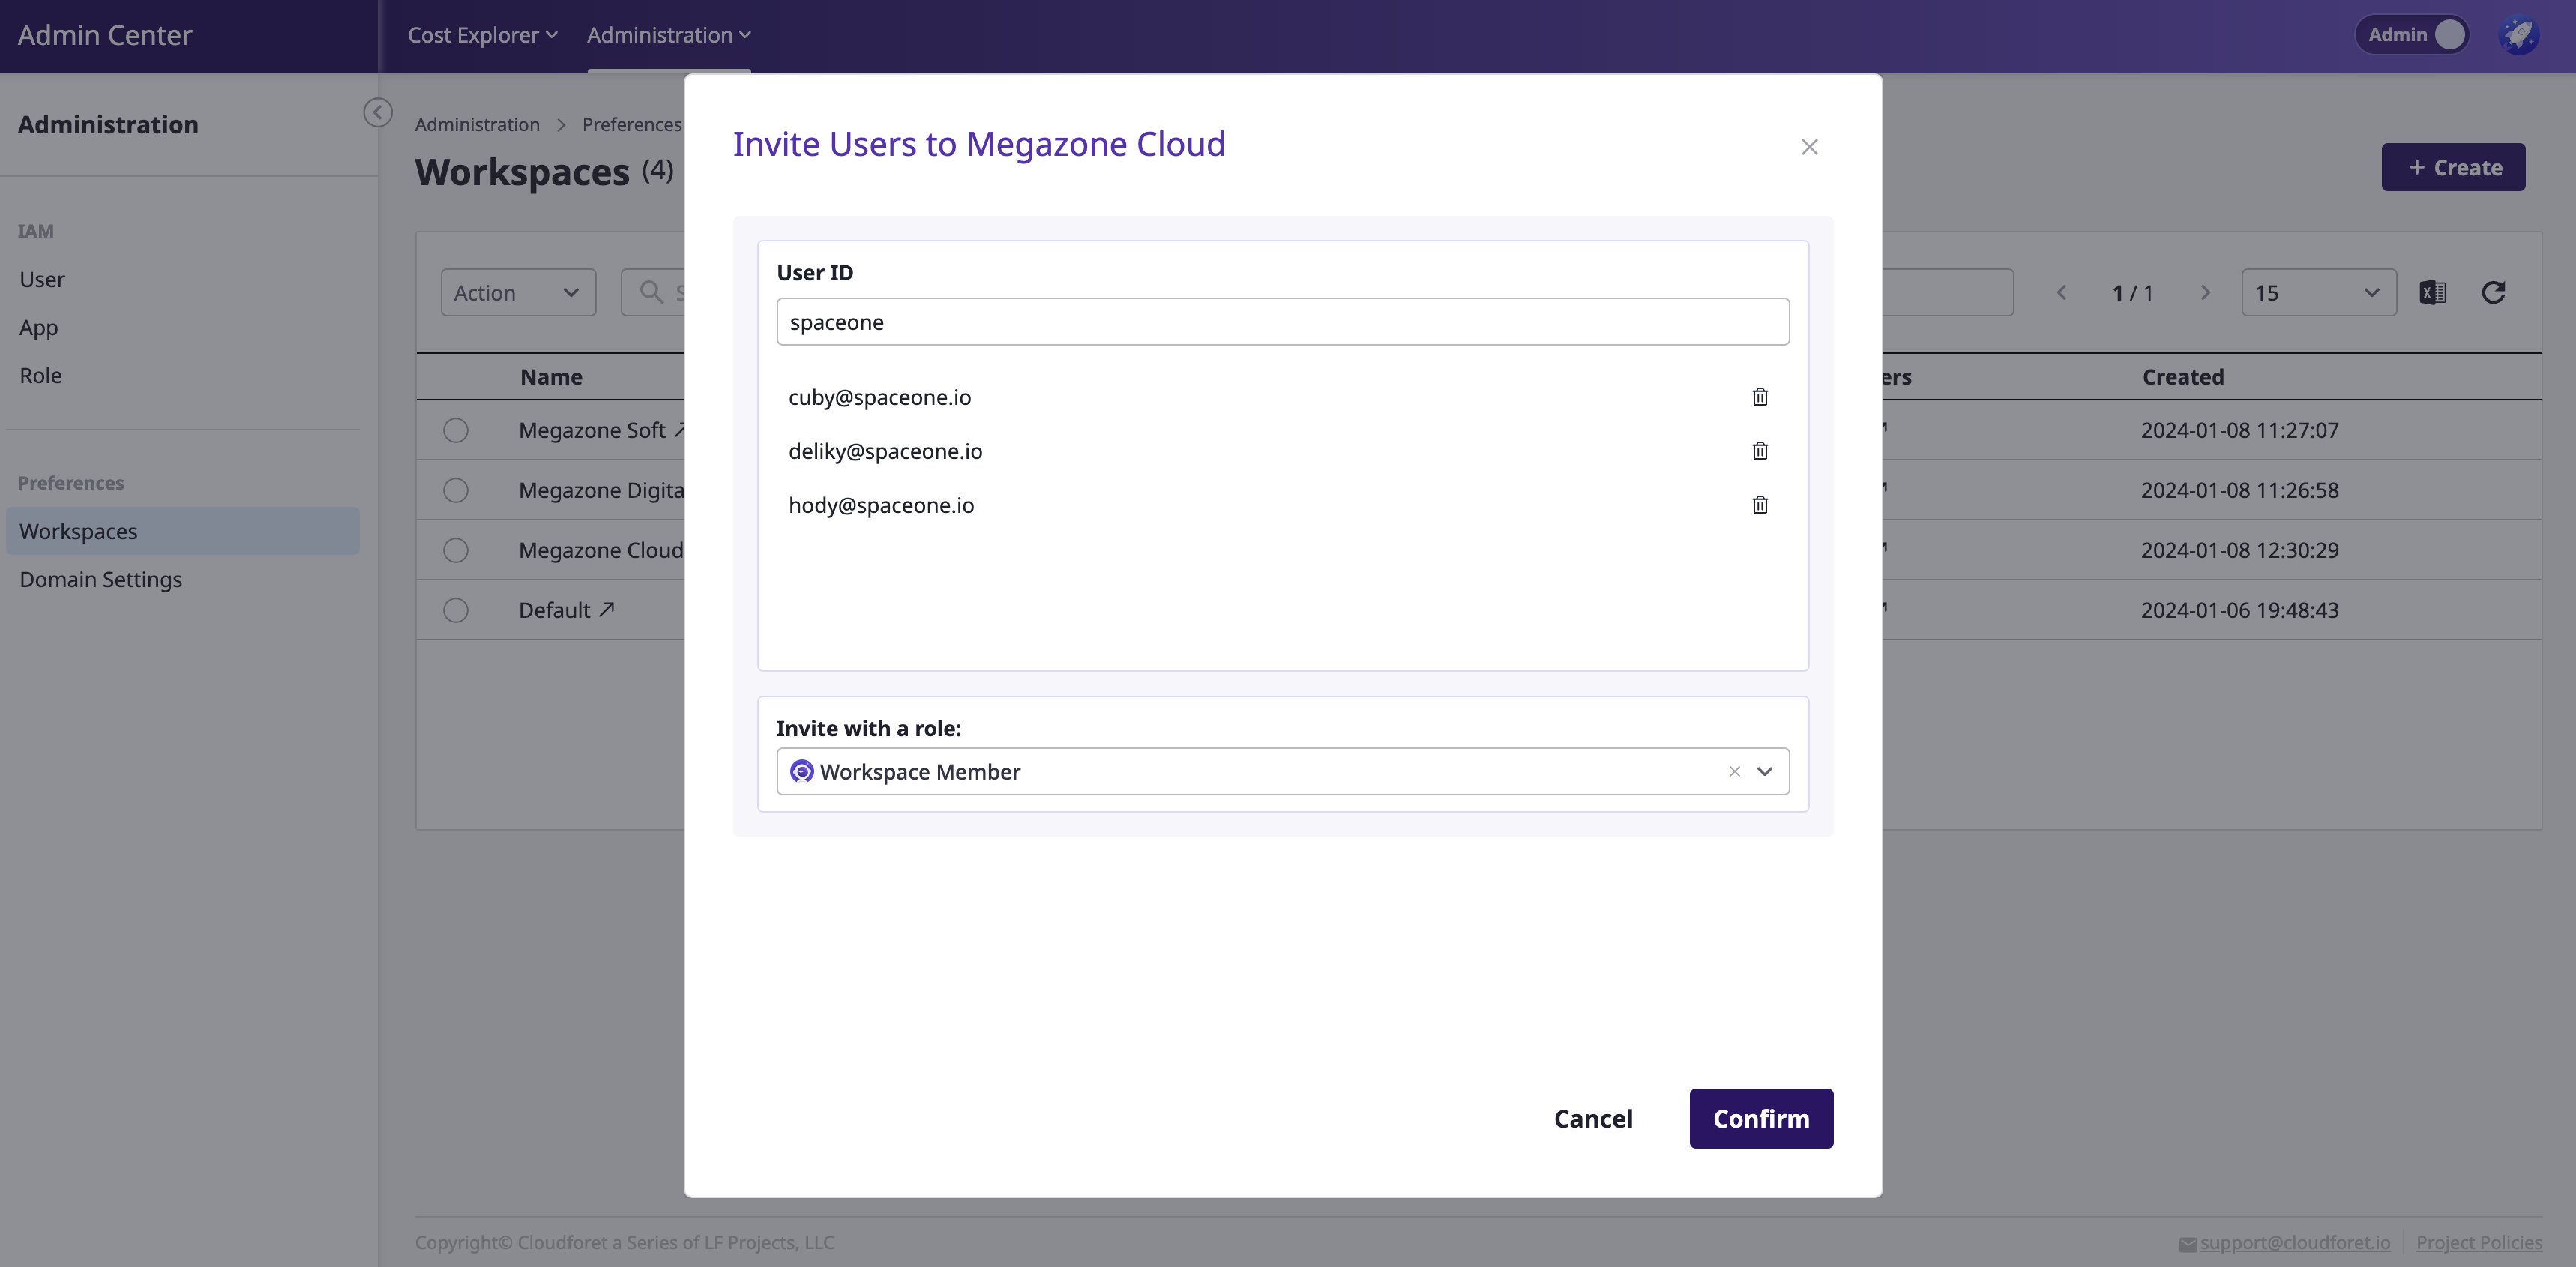
(3) Click the [Confirm] button to complete the invitation
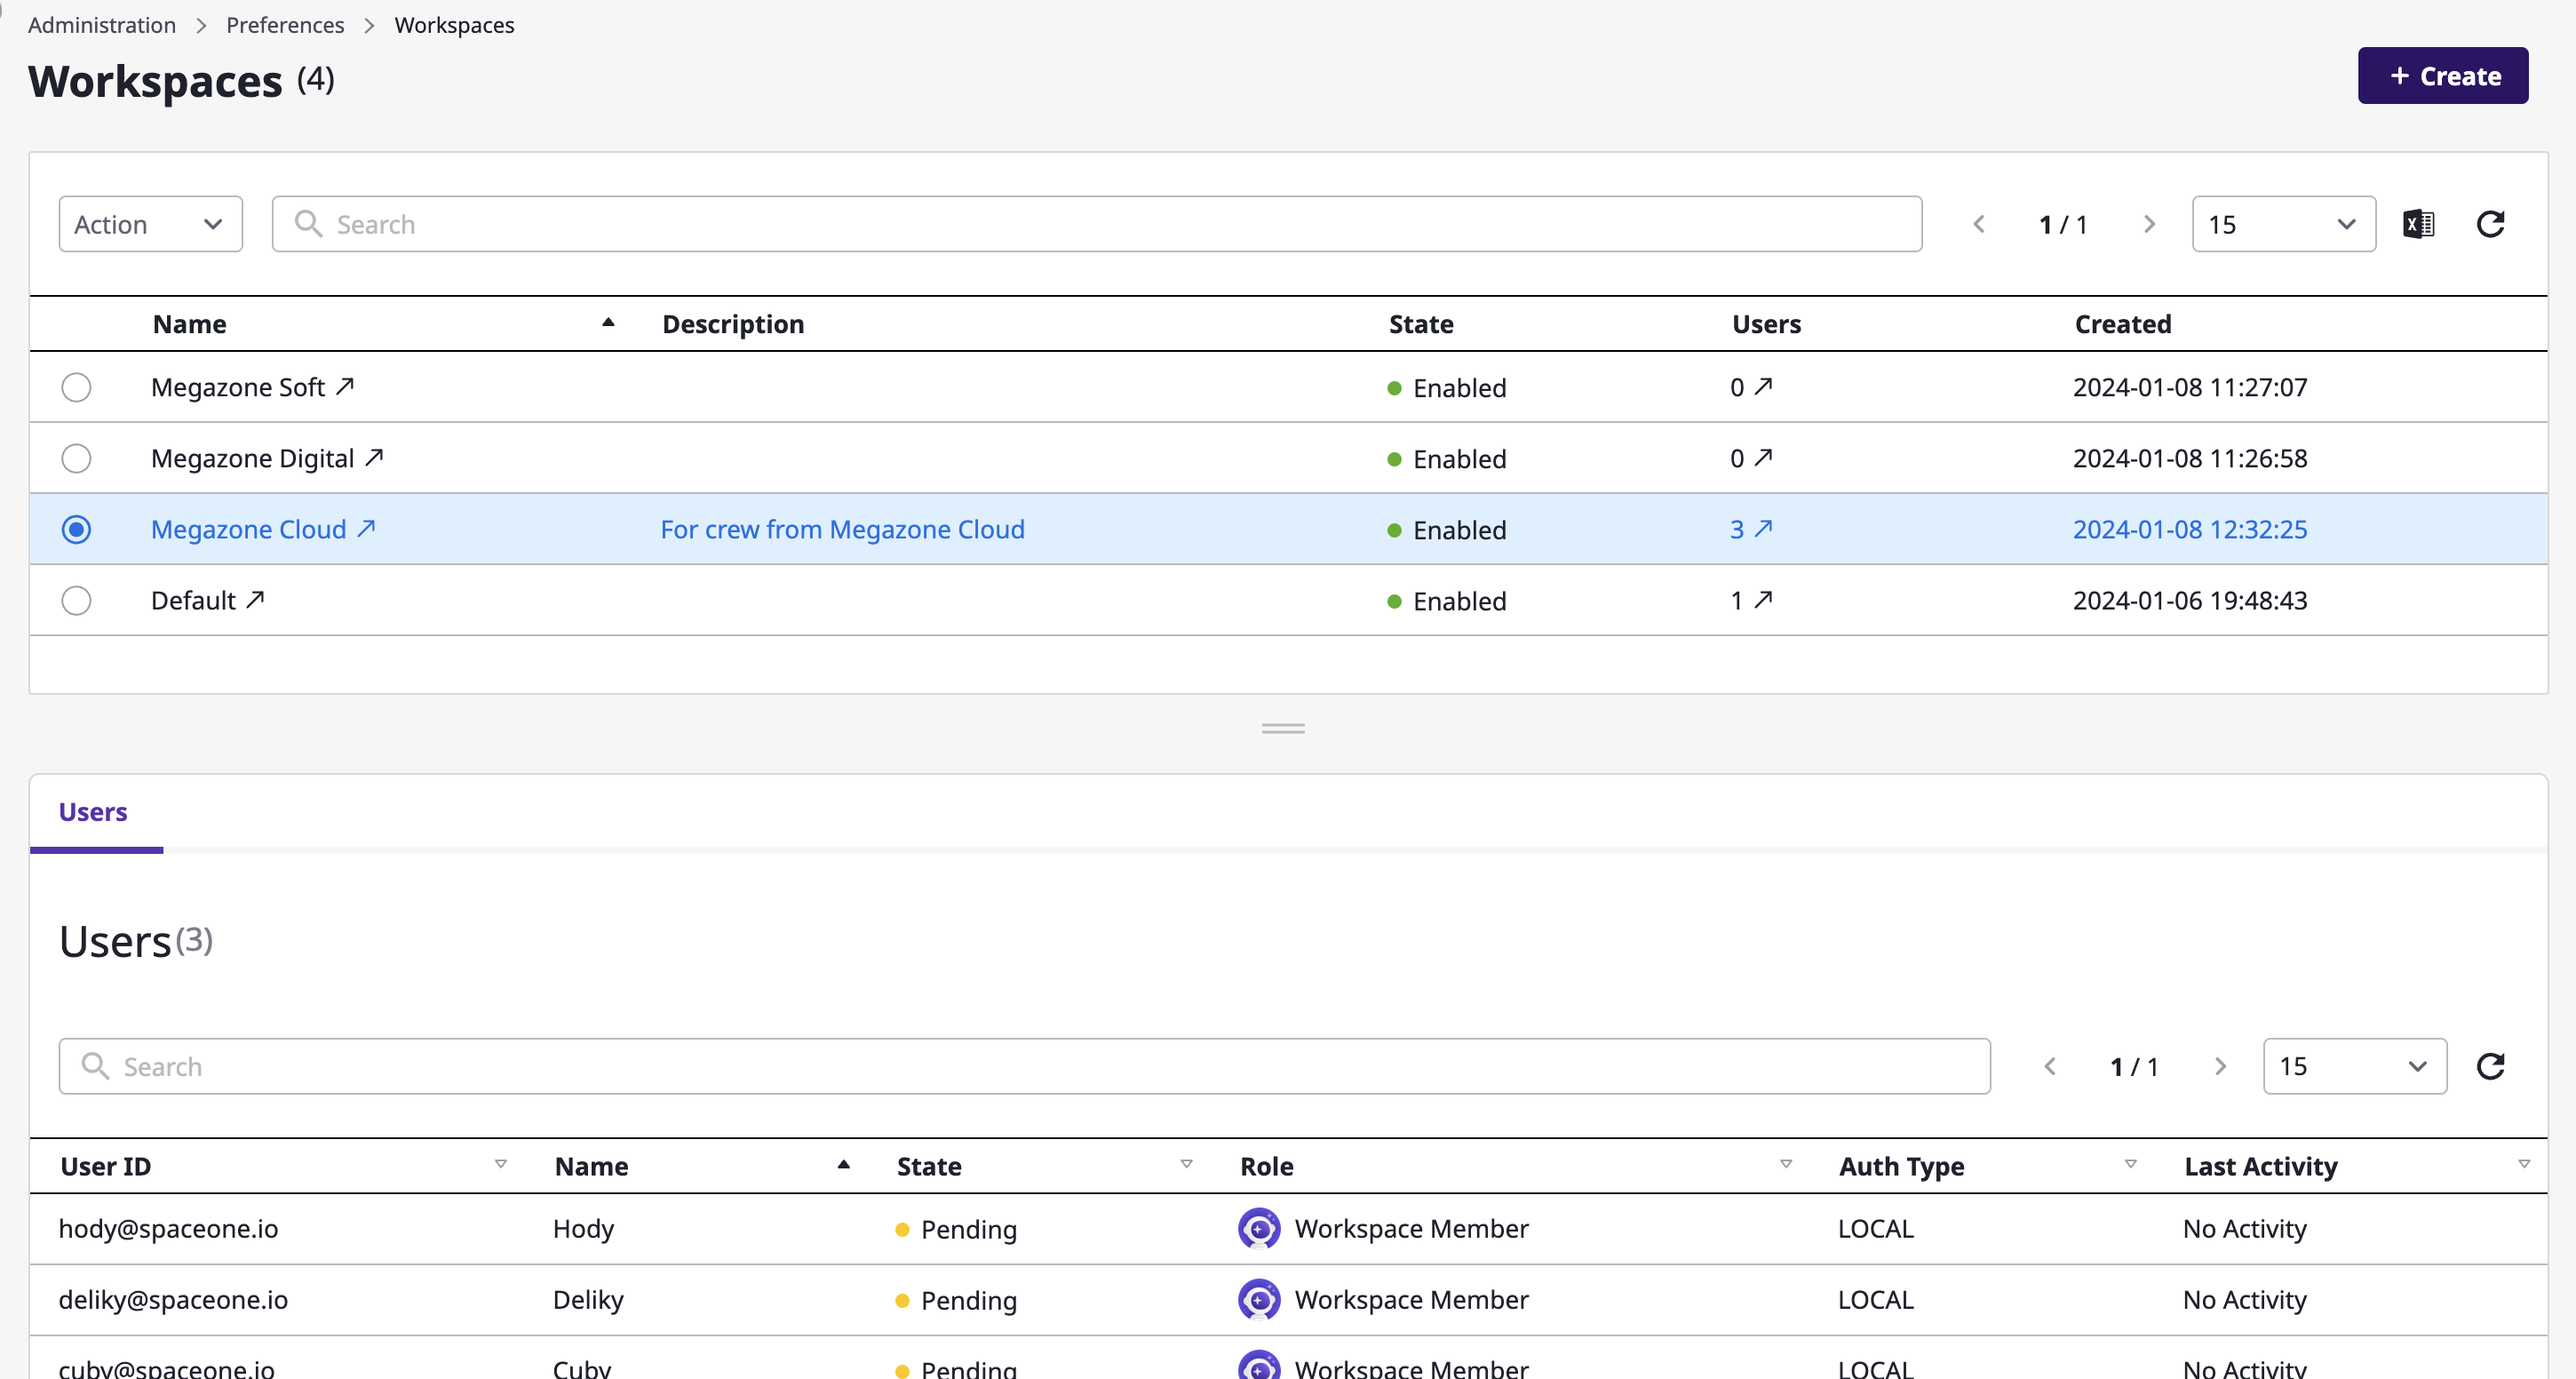
- You can view the user list at the bottom when you select the created workspace.
Editing Workspaces
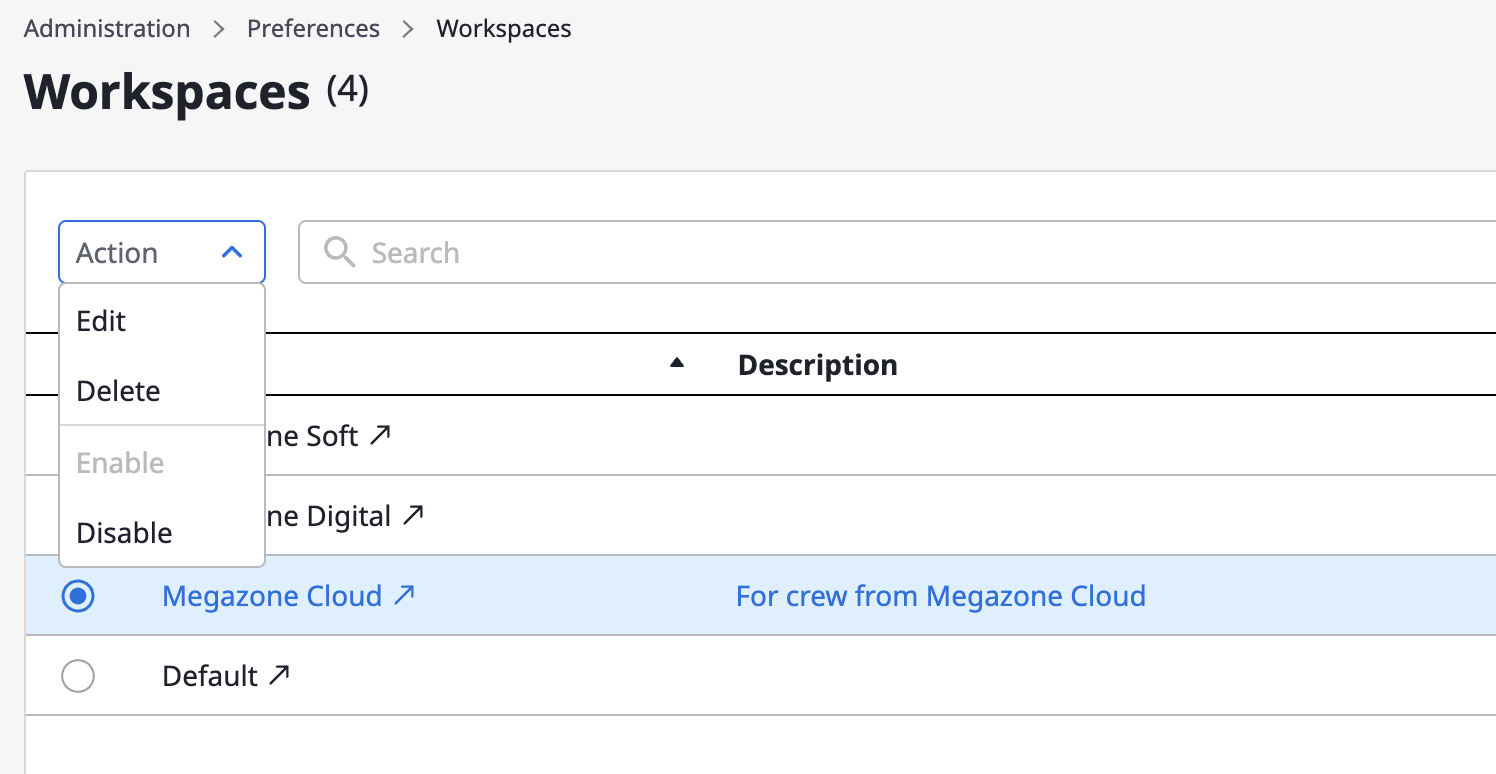
After selecting a specific workspace, click the [Actions] button at the top to make the following changes:
Edit: Edit the workspace name and description.Delete: Delete the workspace- Upon deletion, all users associated with that workspace will lose access.
Enable or Disable: Change the activation status of the workspace,- When deactivated, all users associated with that workspace will lose access.
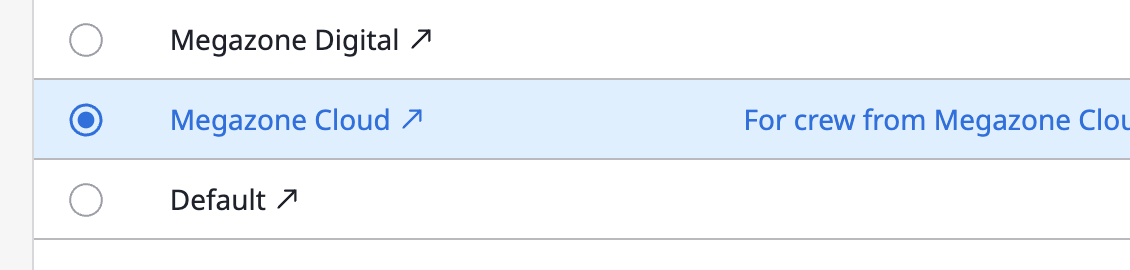
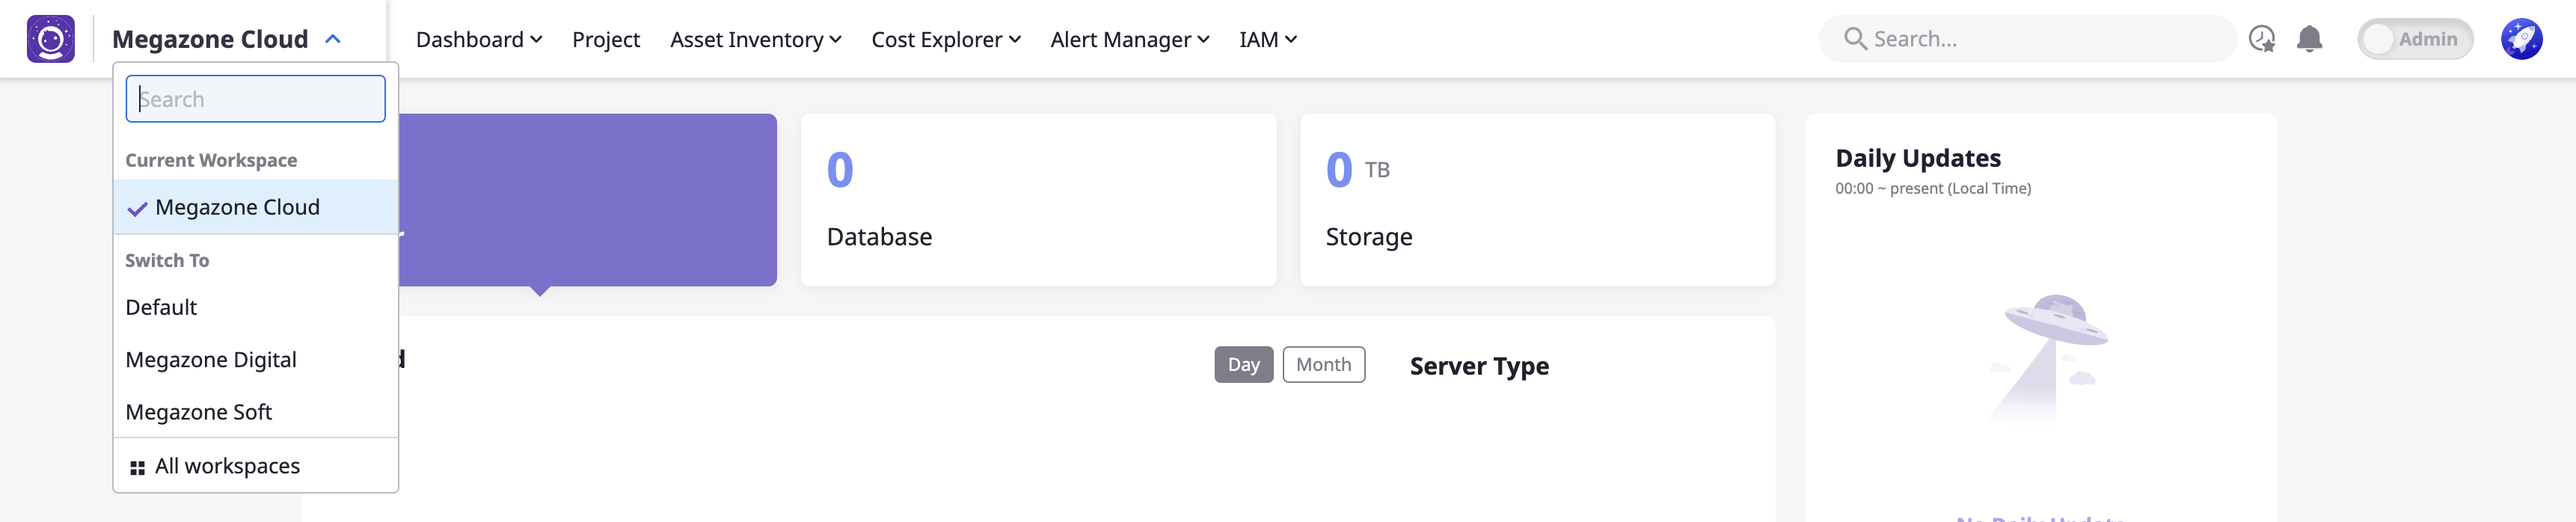
Switching to a Workspace
- Clicking on a specific workspace name will switch to that workspace environment.
- Switching to a workspace will automatically exit the Admin Center.
5 - Domain Settings
Provides white labeling features allowing you to customize elements such as domain name, icon, and images.
(1) Switch to Admin Center
(2) Navigate to [Preferences > Domain Settings]

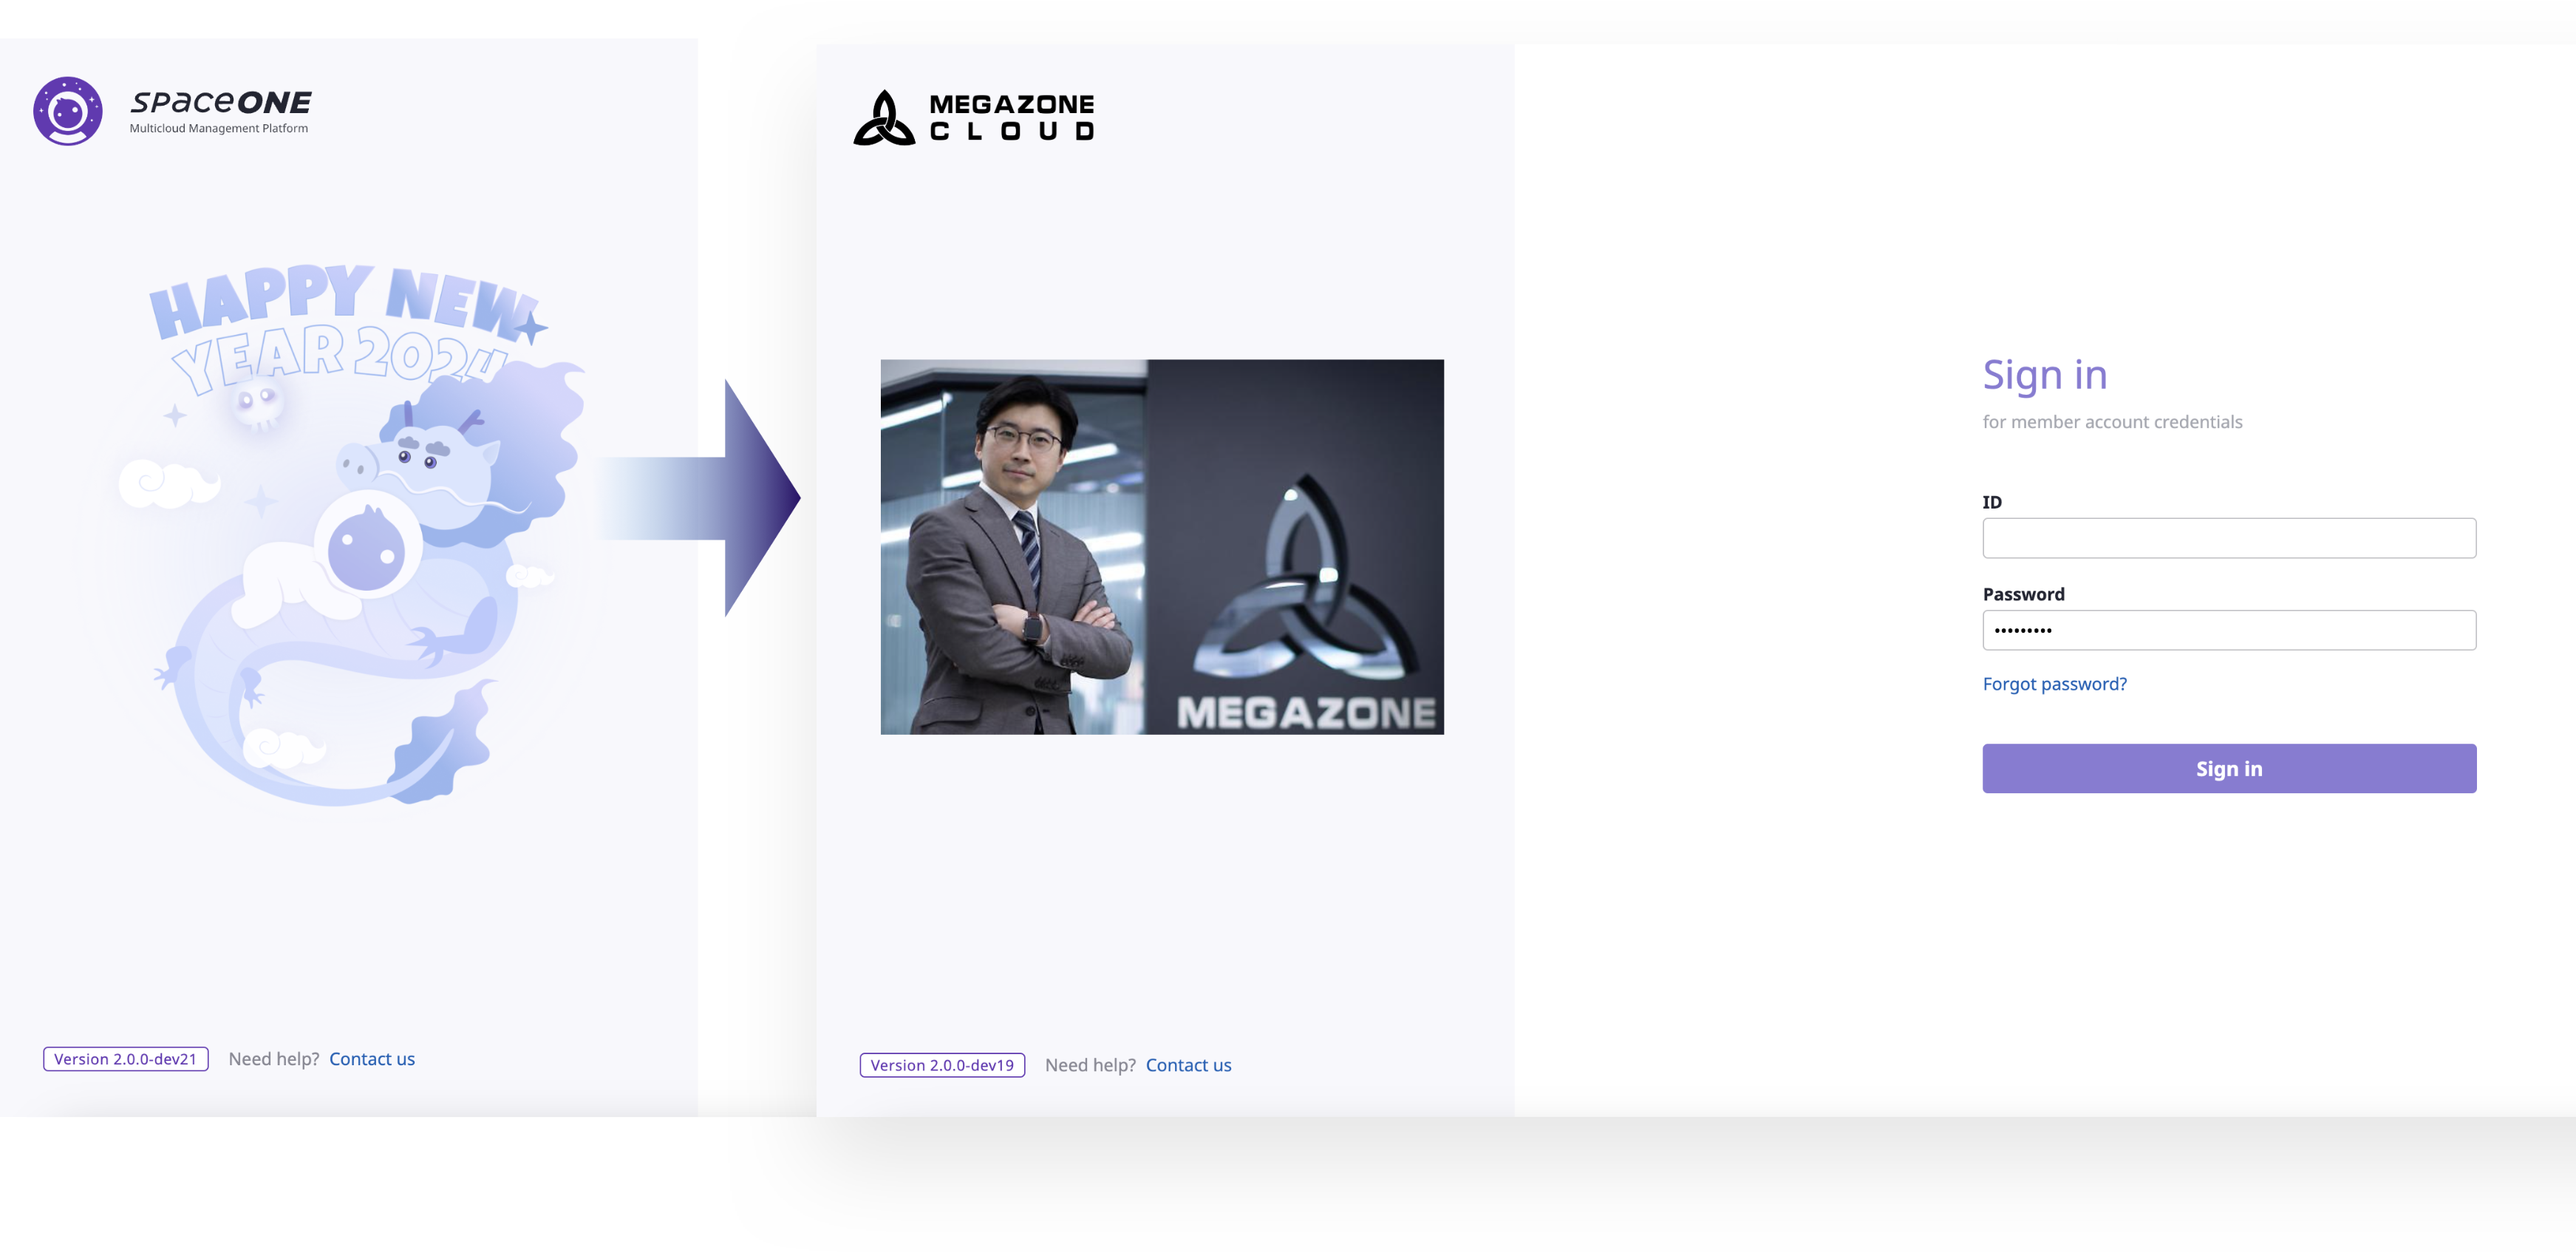
Enter the domain display name and click [Save Changes] to reflect the name in the browser tab as shown below.

Setting Brand Assets
You can apply basic brand assets to the system, such as the main icon and login page image.
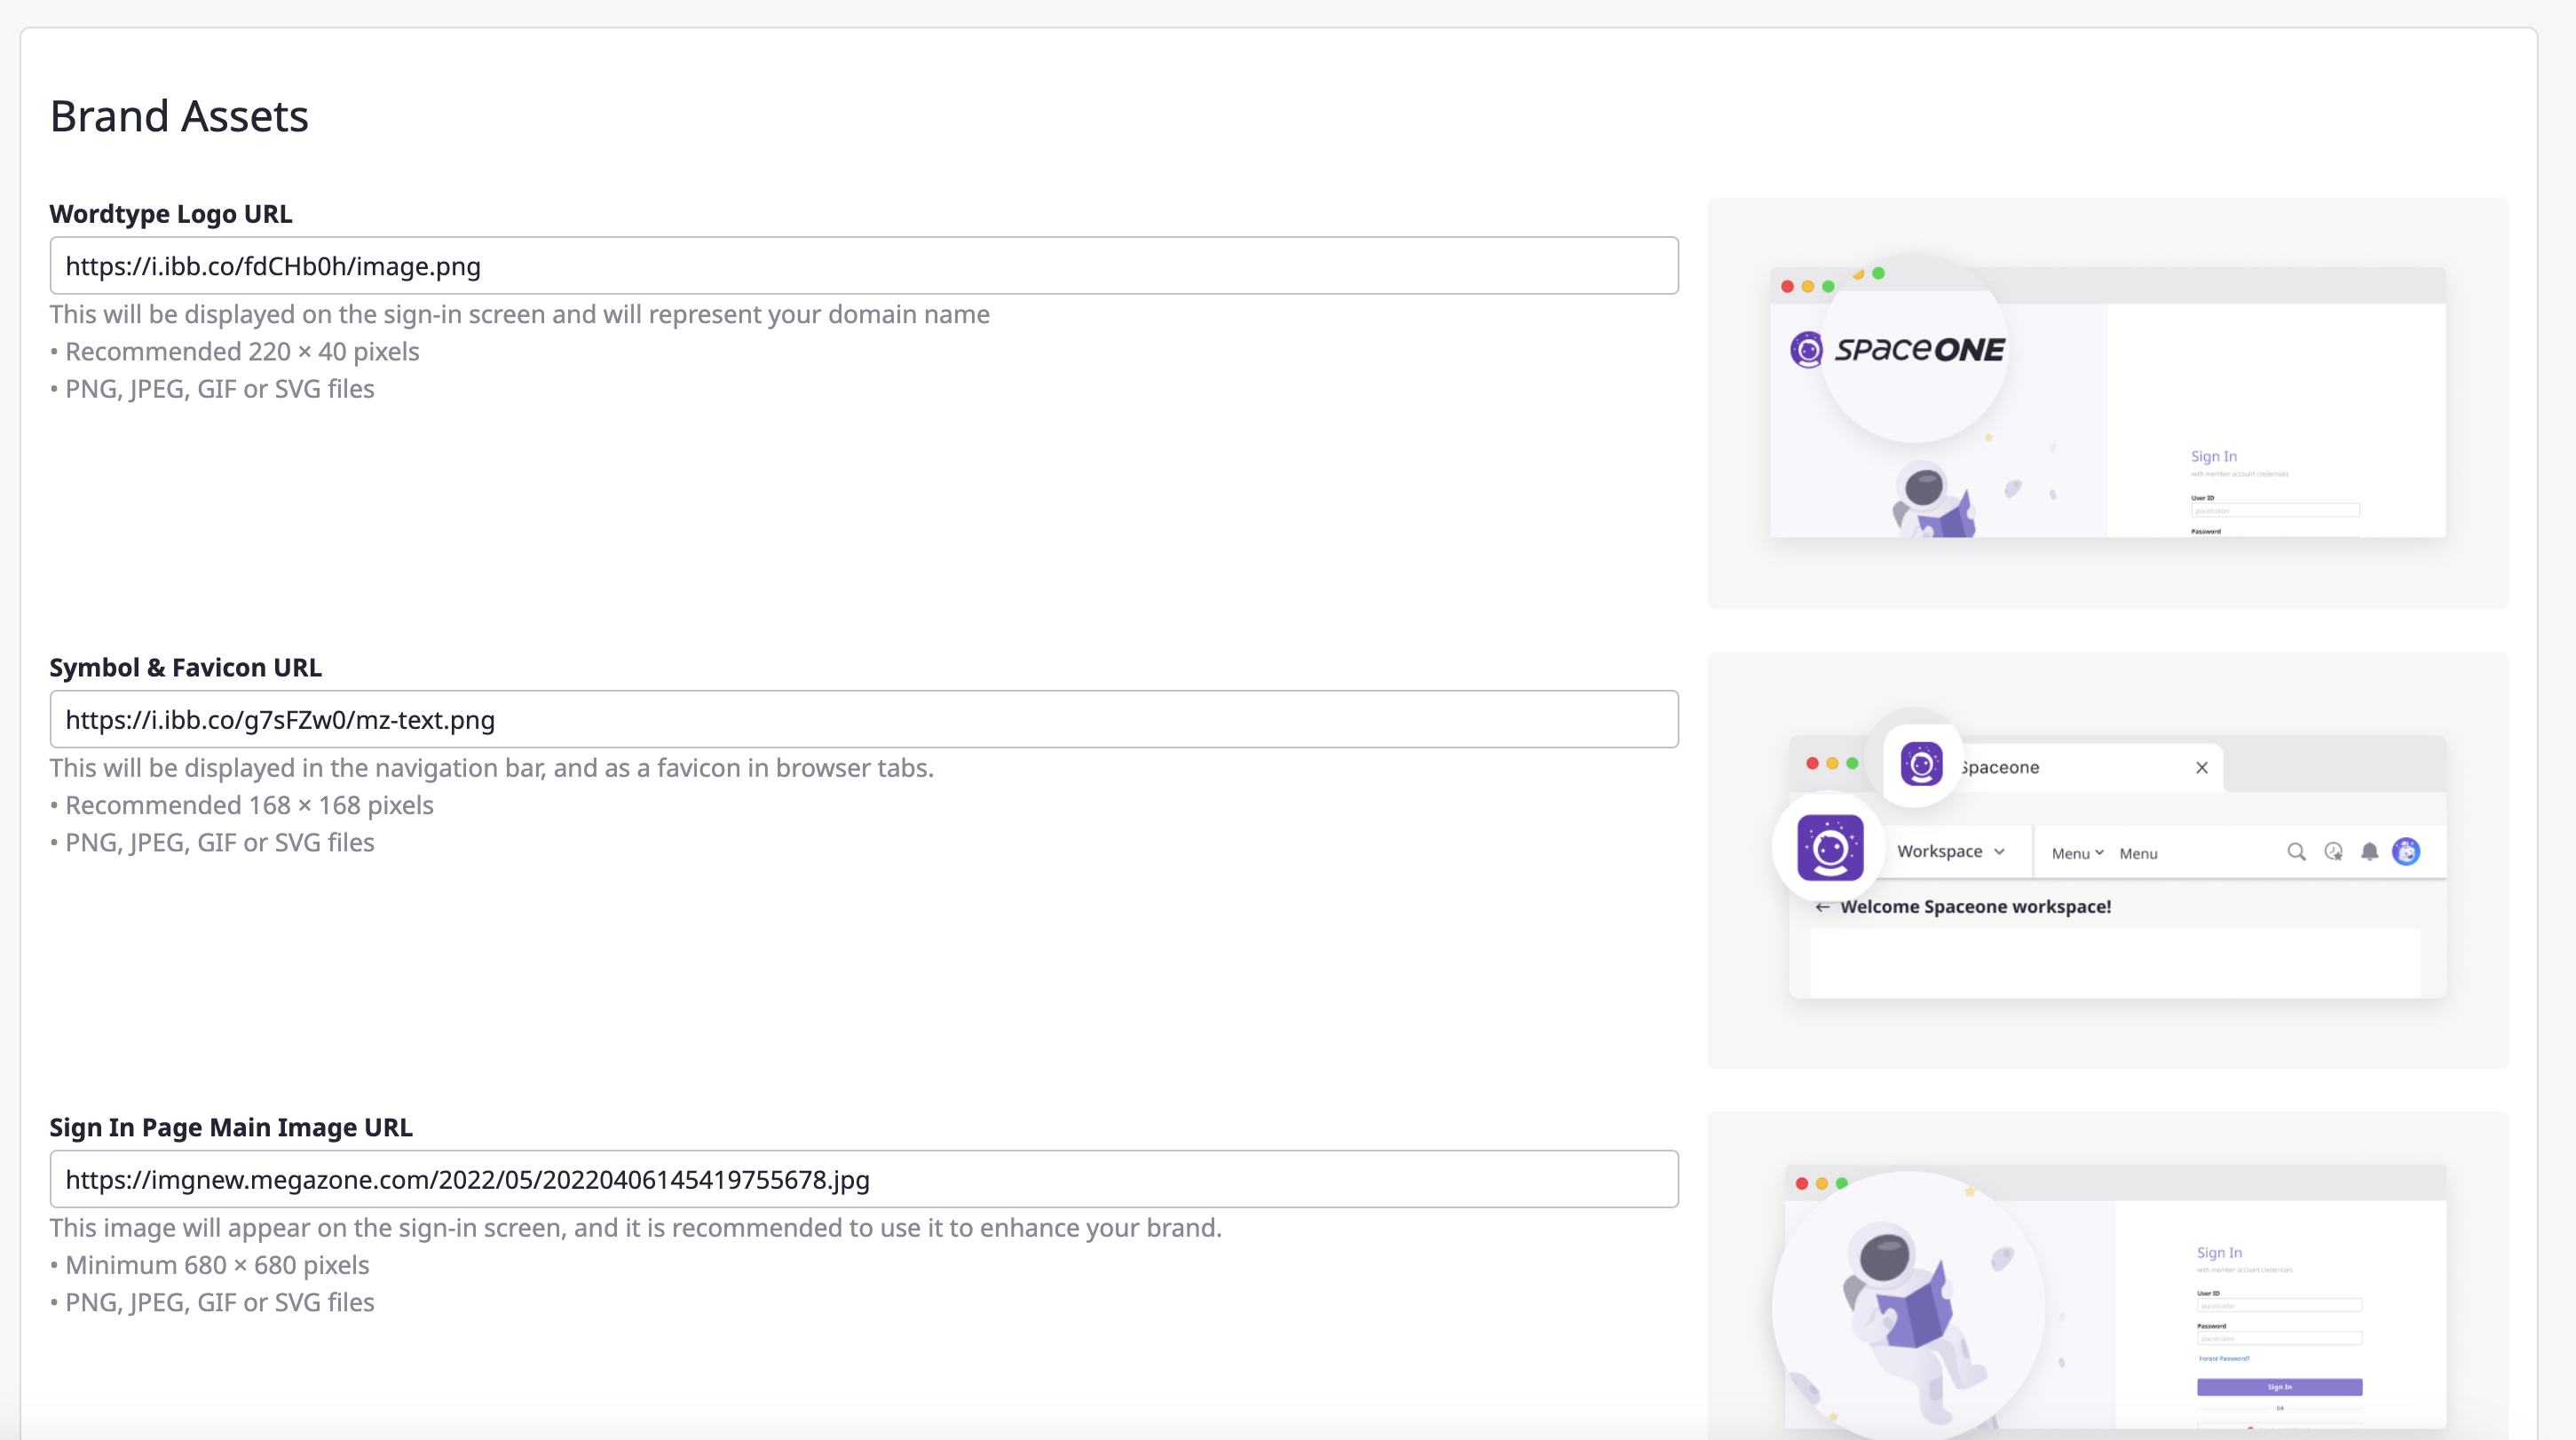
Enter the appropriate image URL for each asset and click [Save Changes] to apply them as shown below.
Setting Timezone/Language
You can set the default timezone and language for the domain.
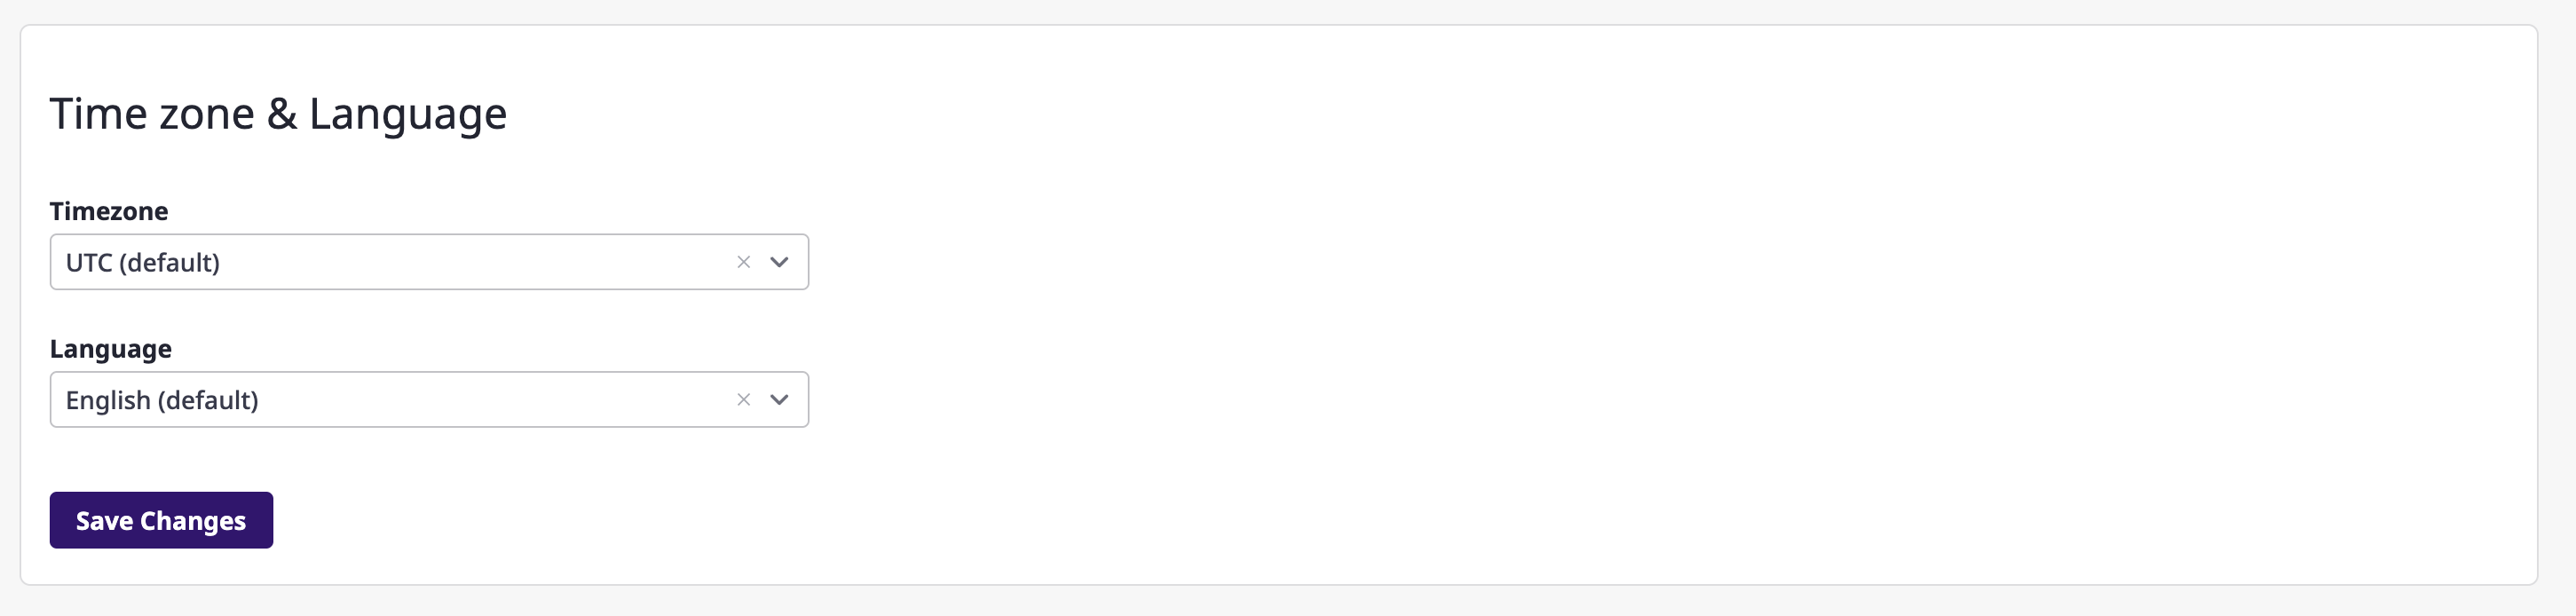
Individual users can set their own timezone and language in [My Page].
For existing users who already have settings configured, Individual settings will override the domain defaults.
6 - Notices
You can use the notice feature to view system announcements and post important updates or information related to the management and operation of the domain.
(1) Switch to Admin Center
(2) Navigate to [Info > Notice]
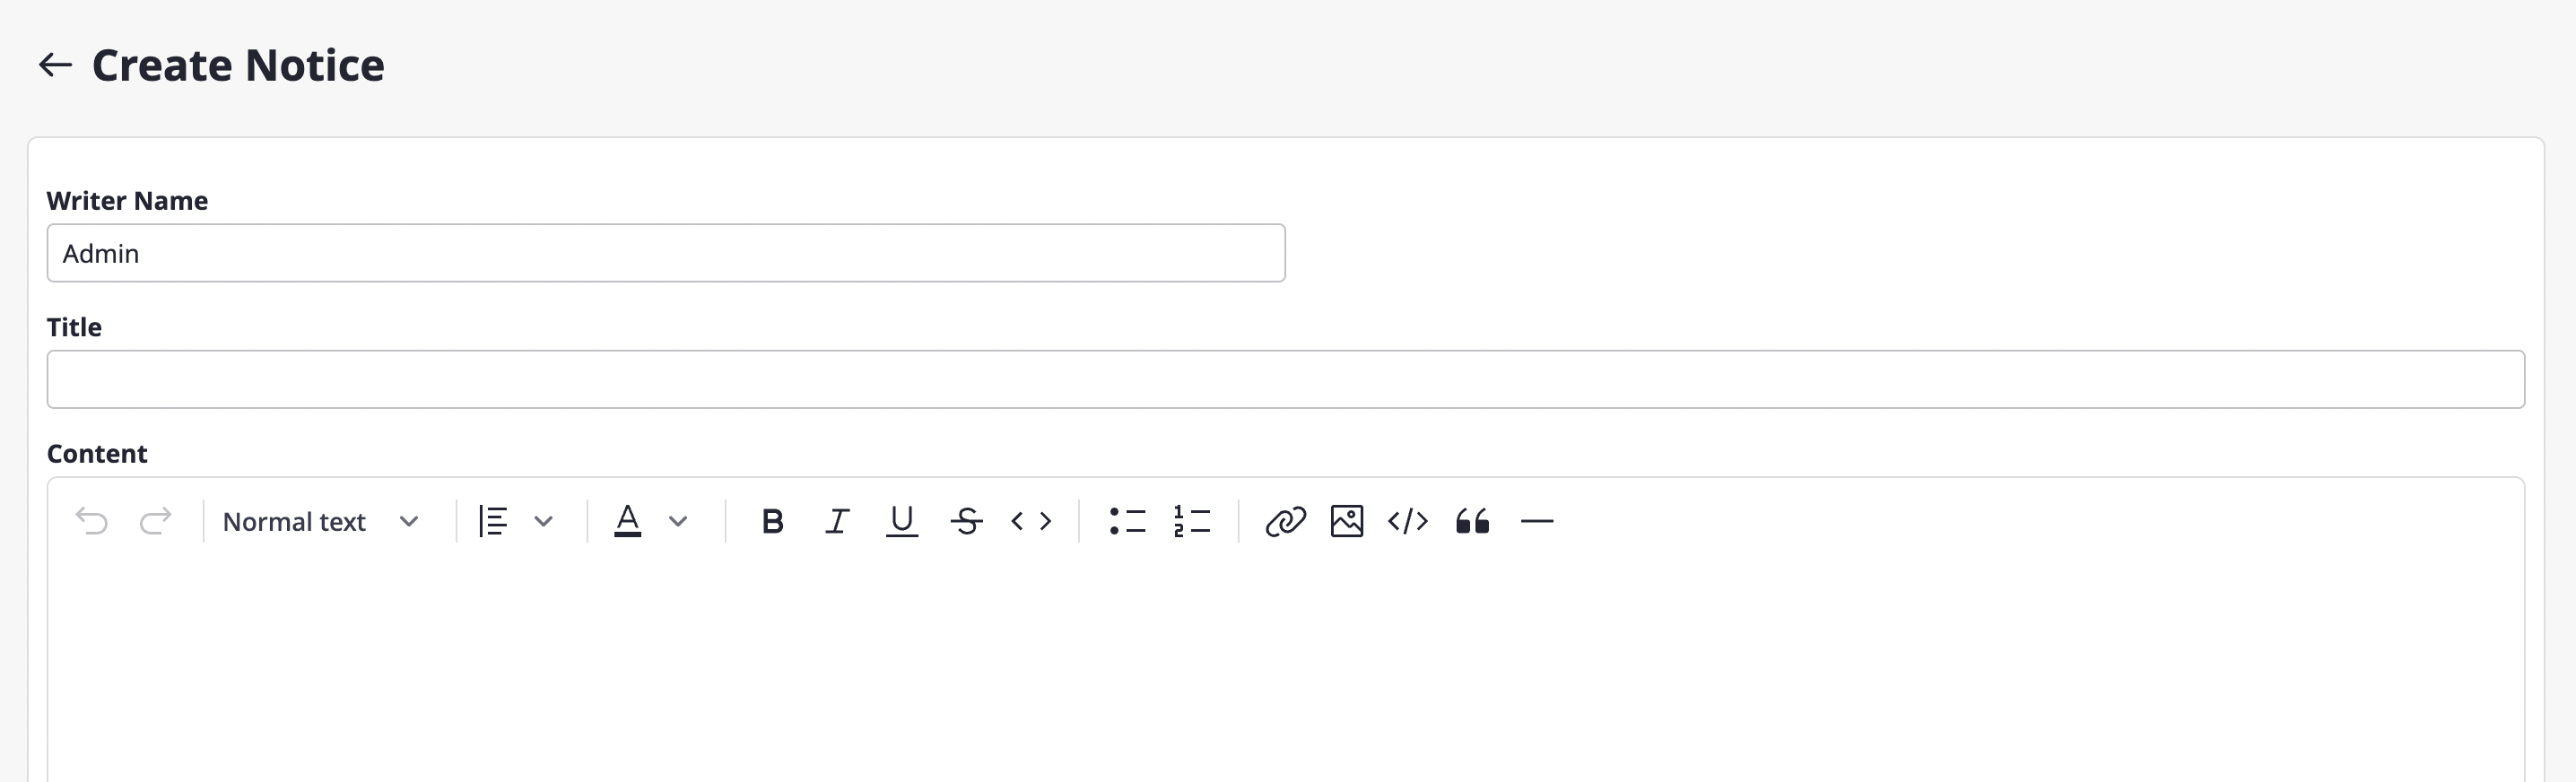
Creating a New Notice
(1) Click the [+ Create Notice] button at the top.

(2) Write the notice:
- Enter the author's name, title, and body text
- You can set the notice to be pinned at the top or displayed as a popup
- Click the [Confirm] button to post the notice
Notices written in Admin Center can also be viewed in workspaces.
7 - Data Sources
You can view the data collection results for each data source and manage them by linking connected accounts to workspaces.
(1) Switch to Admin Center
(2) Navigate to [Cost Explorer > Data Sources]
In Admin Center, you can view all data sources registered in domain.
(1) View the list of data sources
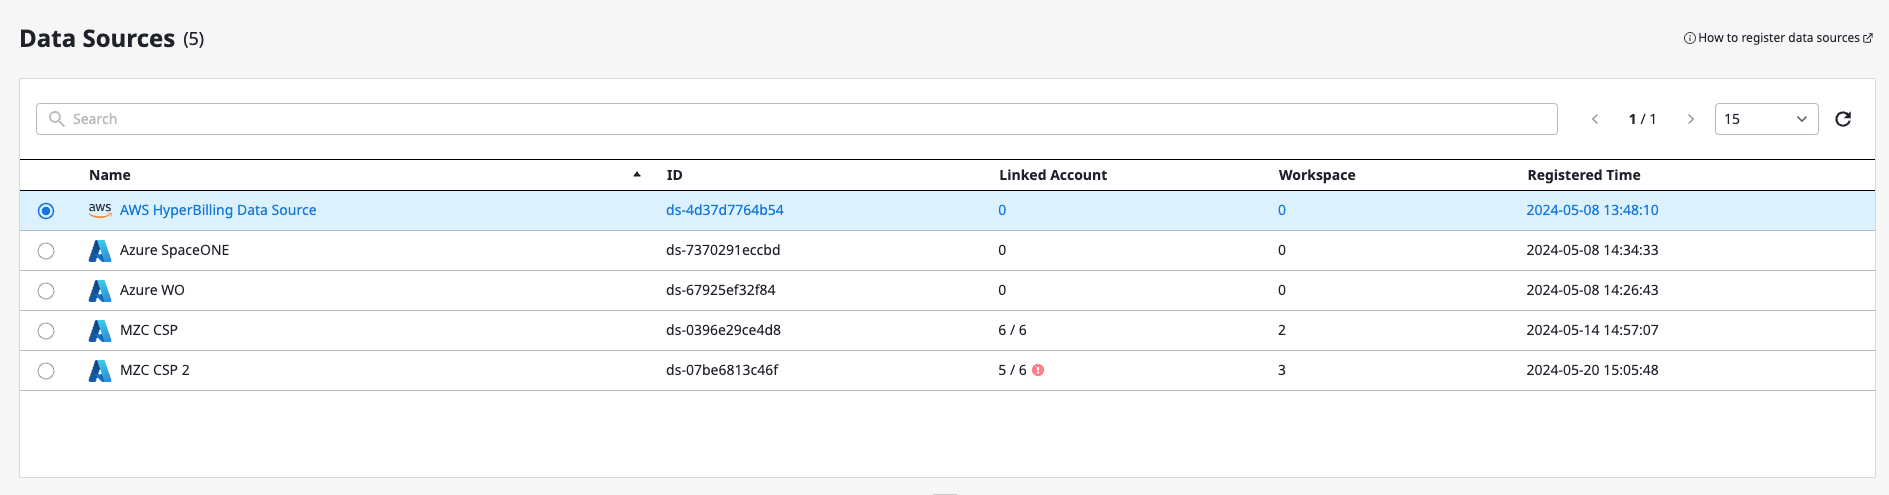
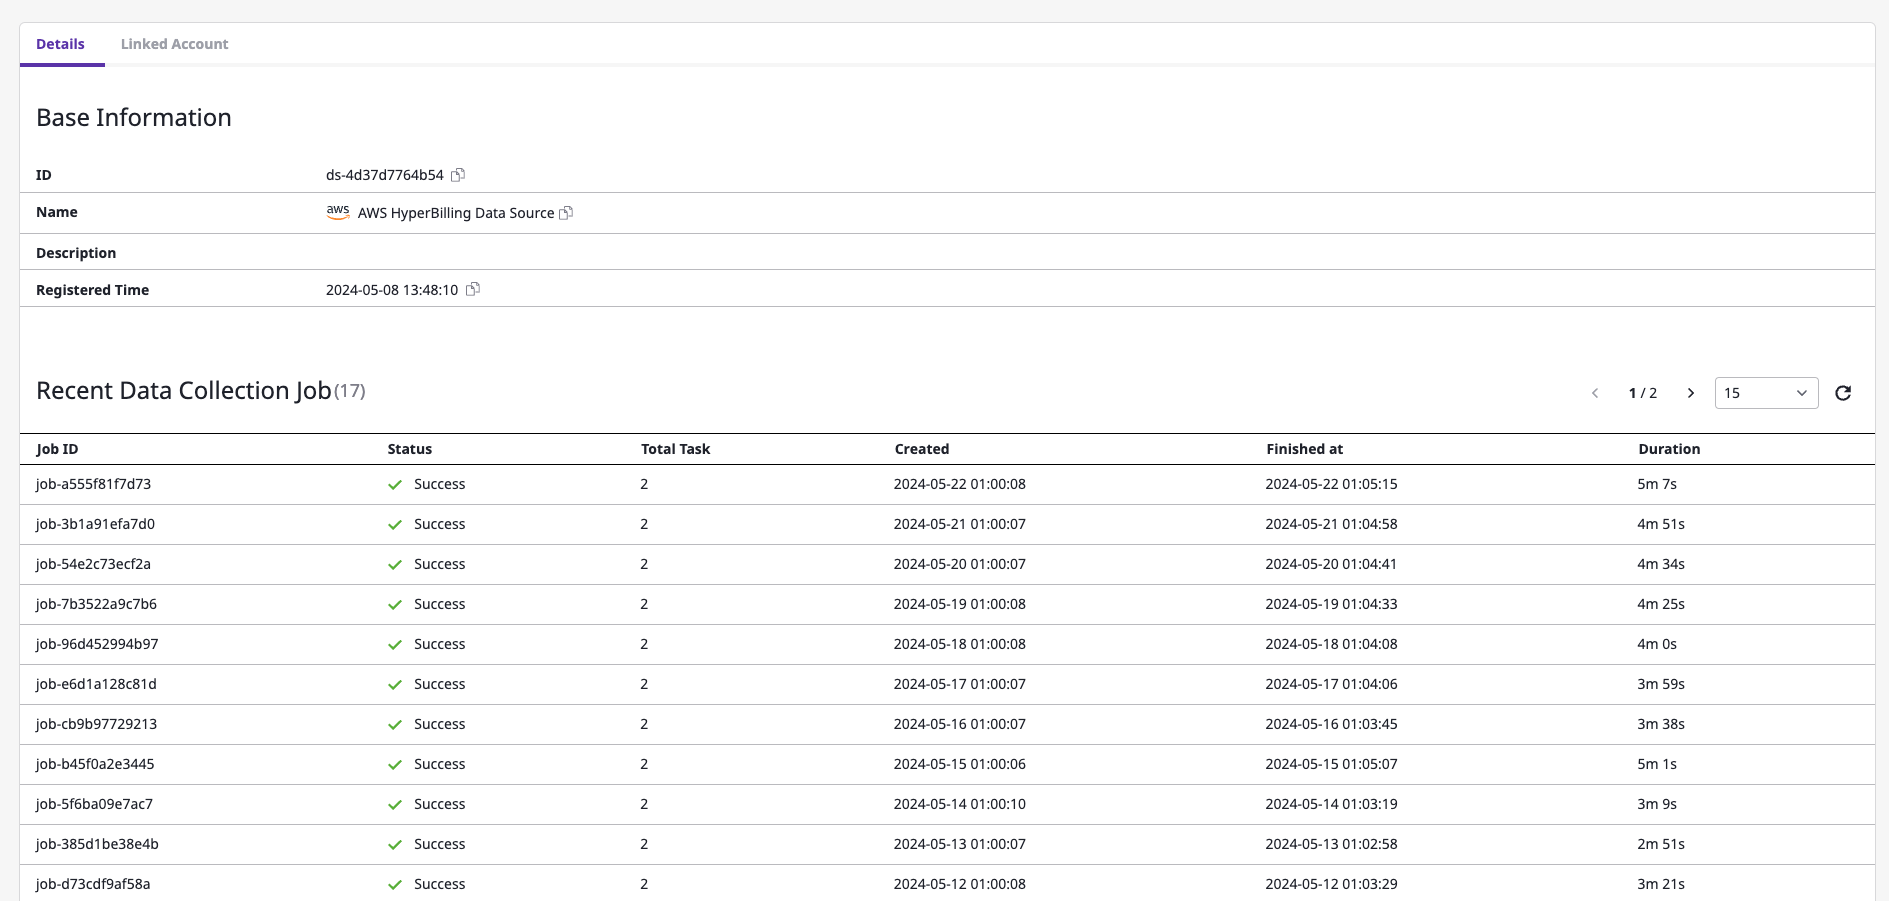
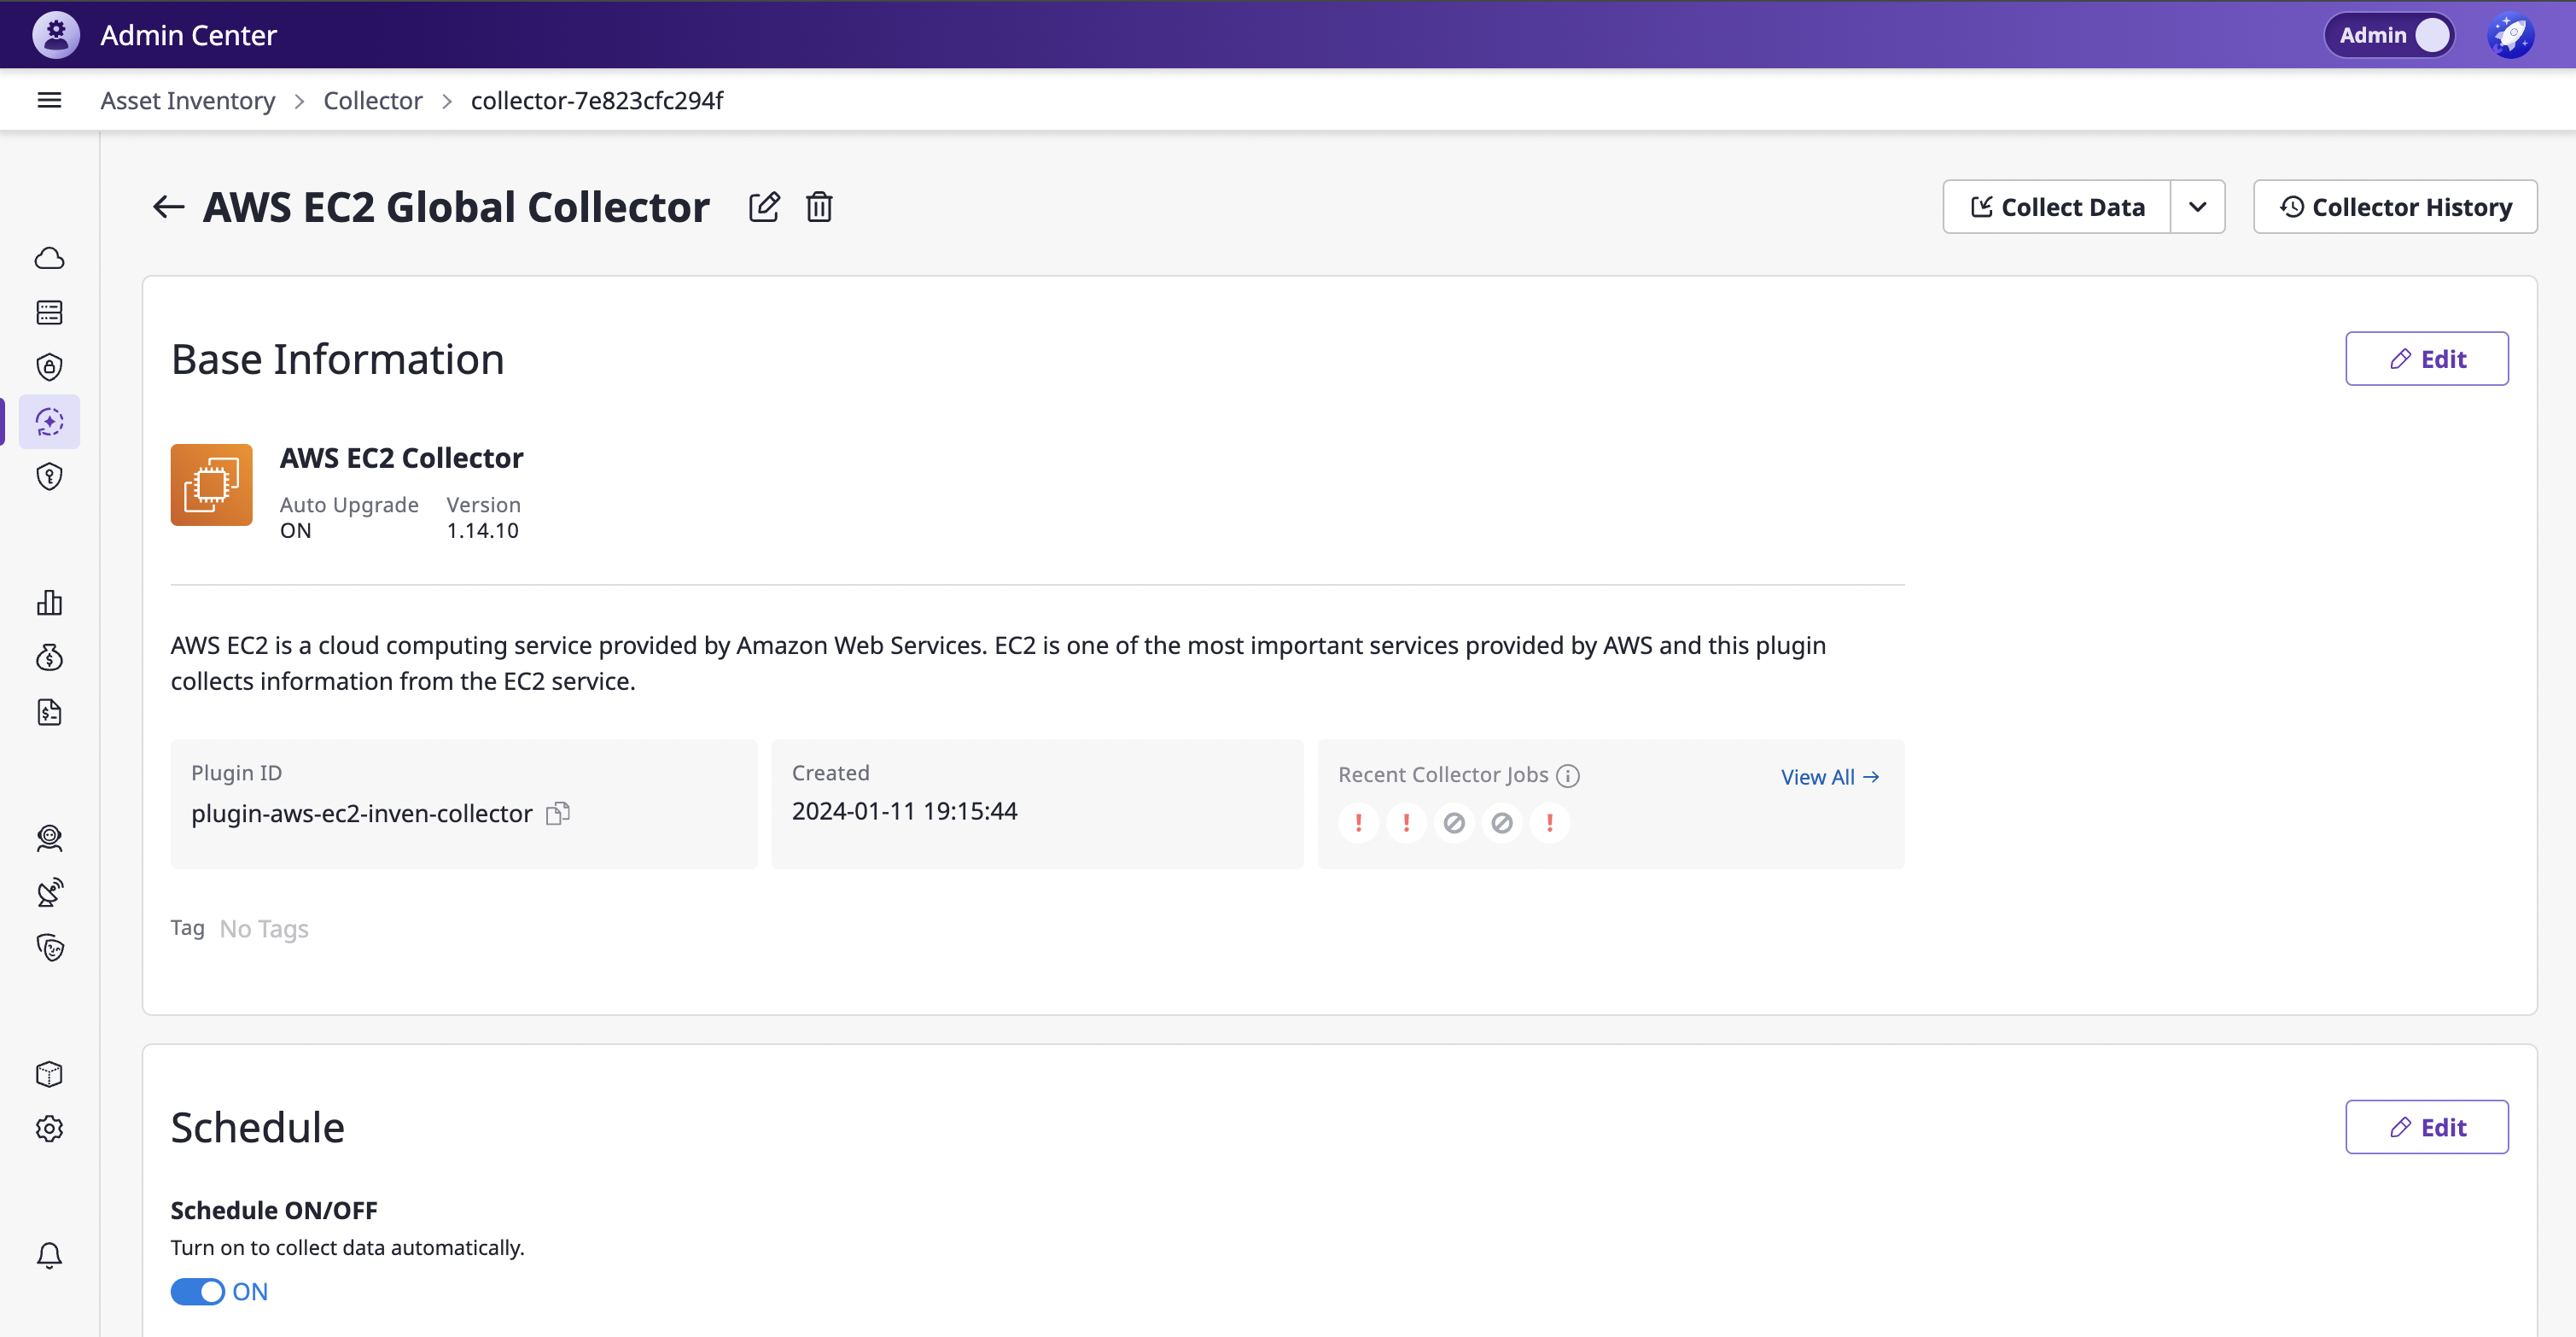
(2) Select a specific data source to view detailed information
- Basic information of the data source
- Recent data collection results
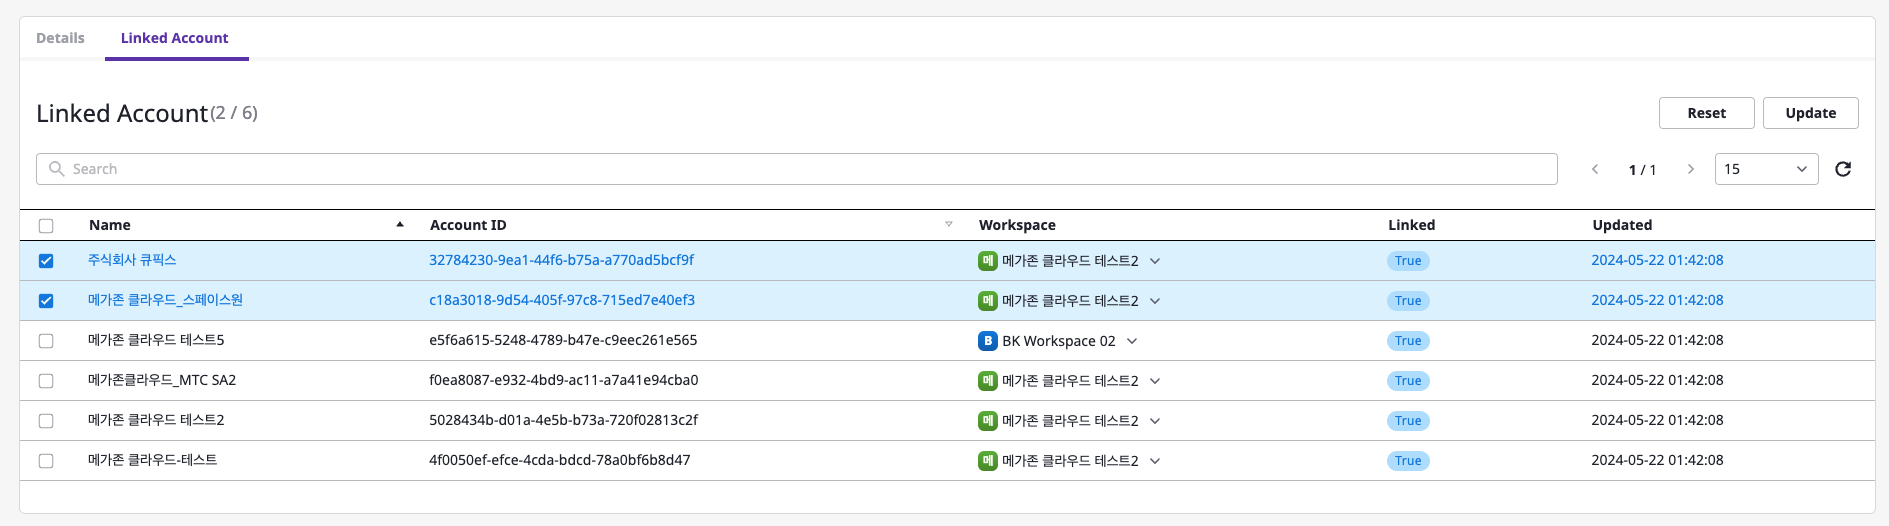
Managing Linked Accounts for a Data Source
Linked accounts from each data source are initially mapped to workspaces, and this can be changed.
(1) Click on a specific data source from the [Cost Explorer > Data Sources] page
(2) On the Linked Account tab, reset or update the workspaces linked to each service account
Reset: Unlink the workspaces from selected accountsUpdate: Re-select and link a different workspace to the selected accounts
8 - Trusted Accounts
You can add and manage top-level organization accounts for each cloud provider, and automatically sync them to create and update workspaces and projects in Cloudforet(SpaceONE)
(1) Switch to Admin Center
(2) Navigate to [Asset Inventory > Service Account]
Managing Global Trusted Accounts
In Admin Center, you can create and manage global Trusted Accounts that can be used across all workspaces.
💡 Trusted Account is used for the following purposes:
1) Higher-level accounts
- When creating a new
General Account, you can attach a Trusted Account to avoid repeatedly entering secret and access keys, thereby simplifying the process and enhancing security in line with the organization’s structure.
2) Automatic Account Synchronization
- Instead of entering individual accounts one by one, you can use the Auto Sync feature to automatically link the organizational structure configured in the cloud provider with the SpaceONE system, creating and updating workspaces and projects according to SpaceONE's structure. Detailed instructions for setting up account synchronization are provided below.
Setting Up Trusted Account Auto Sync
[ Basic Structure ]
SpaceONE has a management structure of Workspace > Project Group > Project - Service Account.
When Cloud resources are collected, it is managed by being mapped to a Project, which can then be used for grouping purposes.
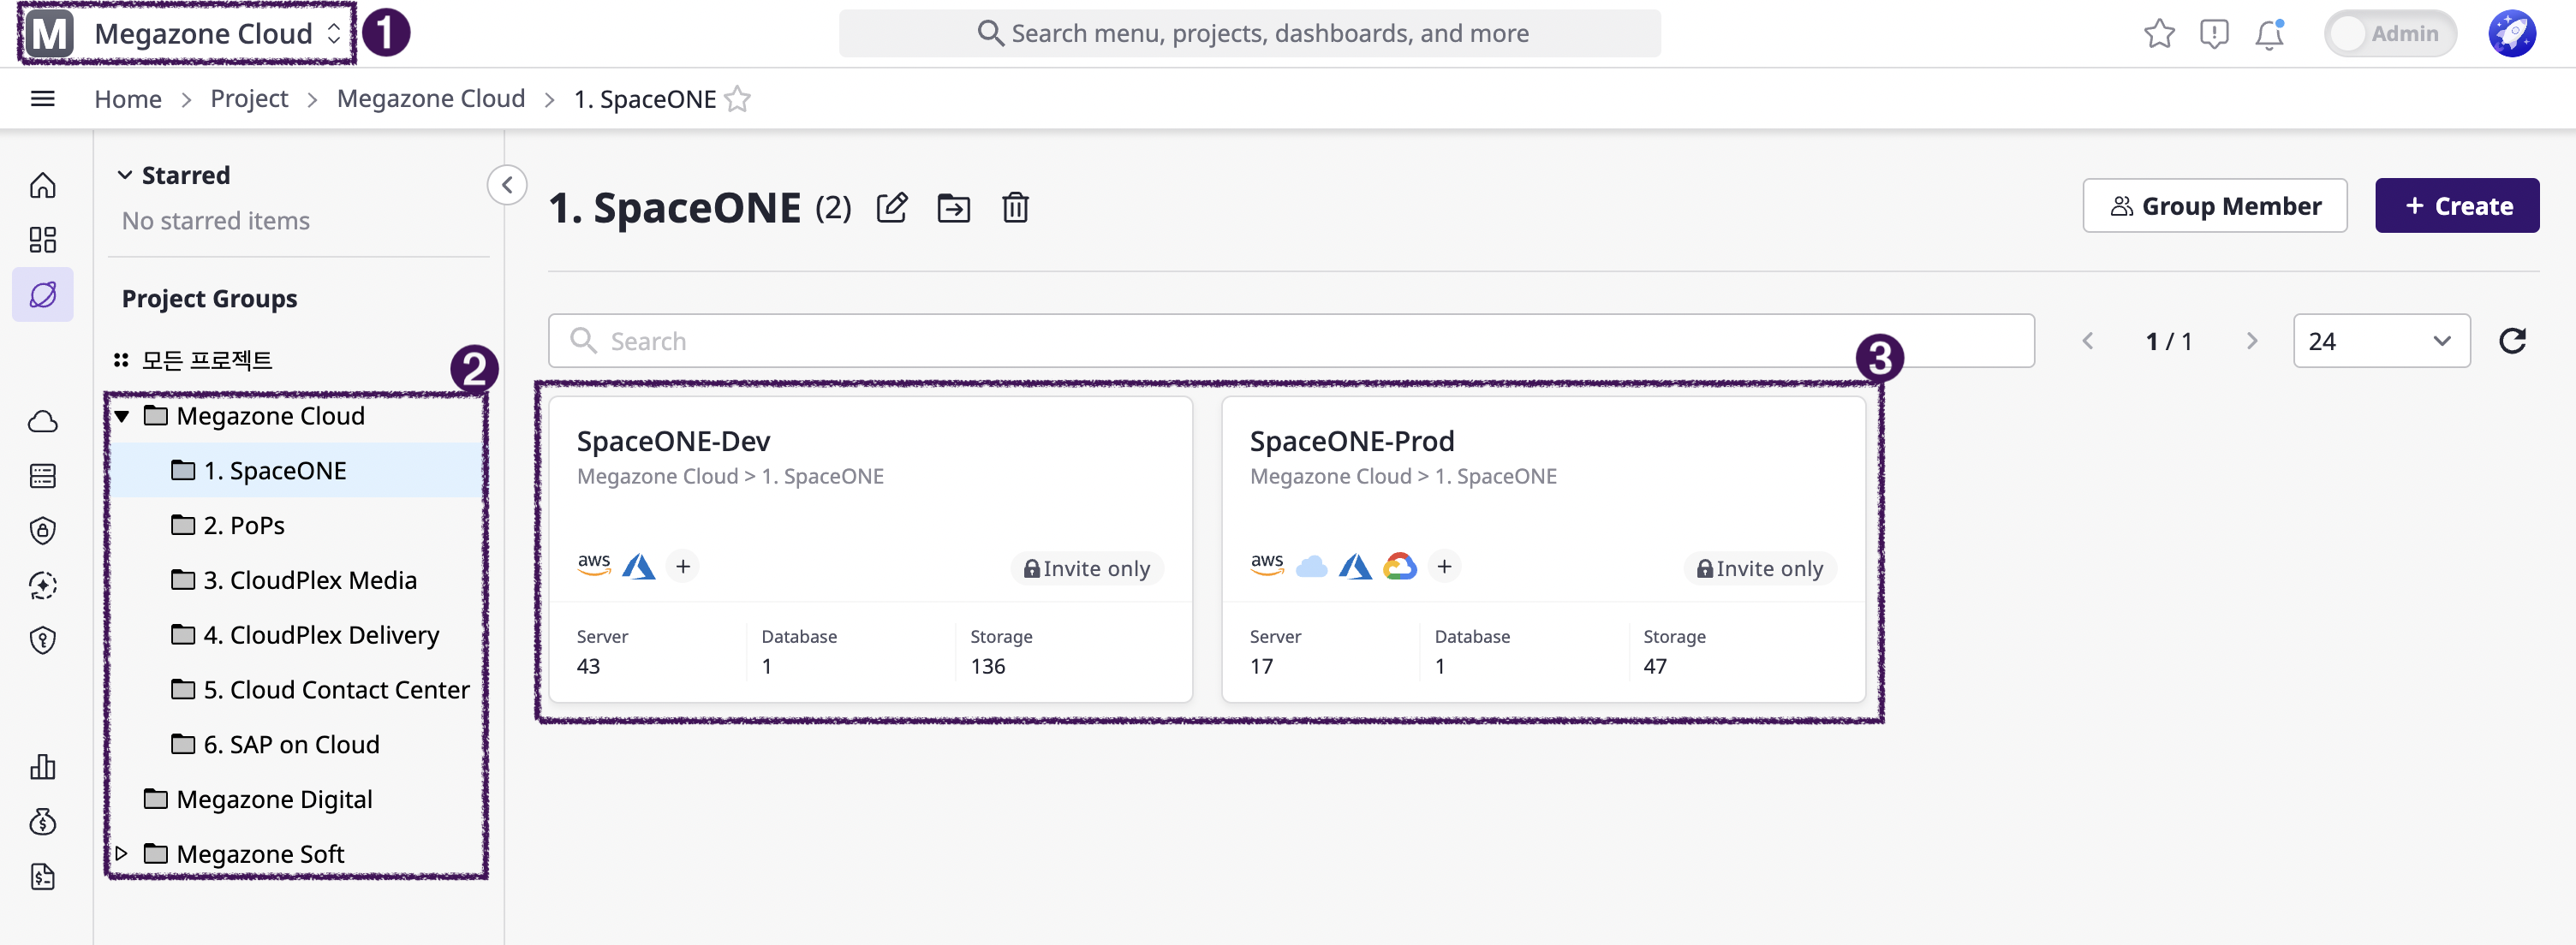
- ➊ Workspace
The top-level management structure that separates workspaces. This can be used to separate environments by company or internal organization.
- ➋ Project Group
Represents a structure for detailed departments. It commonly has a folder structure.
- ➌ Project
The lower management structure where actual Cloud resources are mapped. It represents a project unit and can map one or more accounts (Service Accounts) used in the project.
- Service Account: An account used for actual data collection, which is added to the Project.
[ Set Auto Synchronization ]
1) Select a provider and click the [+ Create] button

2) Enter Base Information & Credentials
3) Turn Auto Sync ON

- Set the Mapping Method as needed
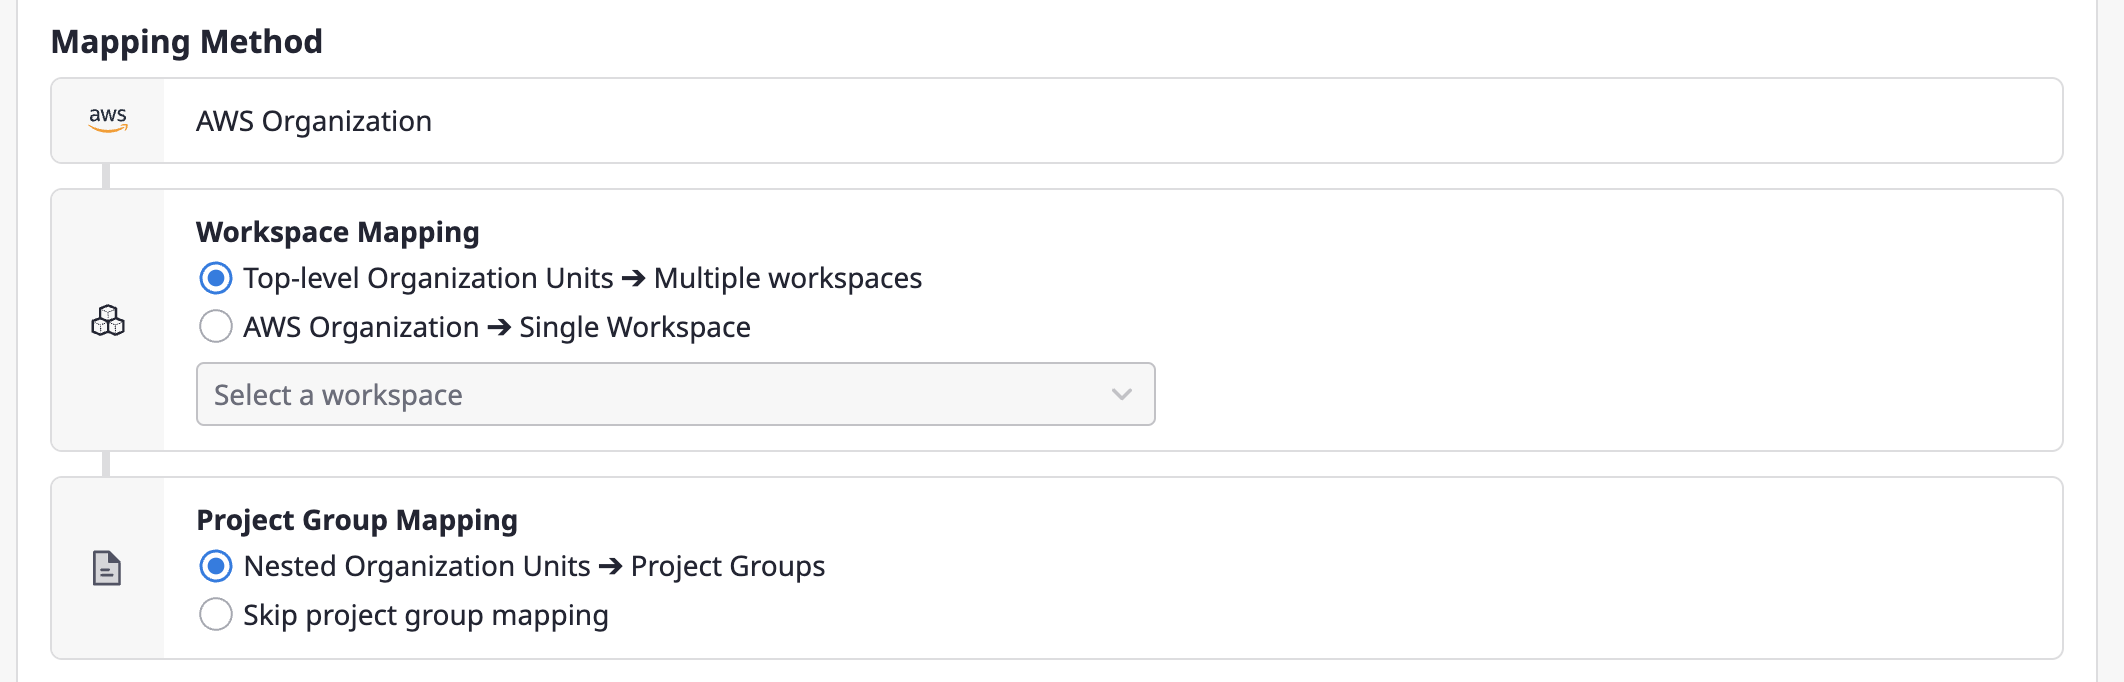
- Set Schedule: Select up to 2 times daily for sync

[ Set Auto Synchronization by Cloud Provider ]
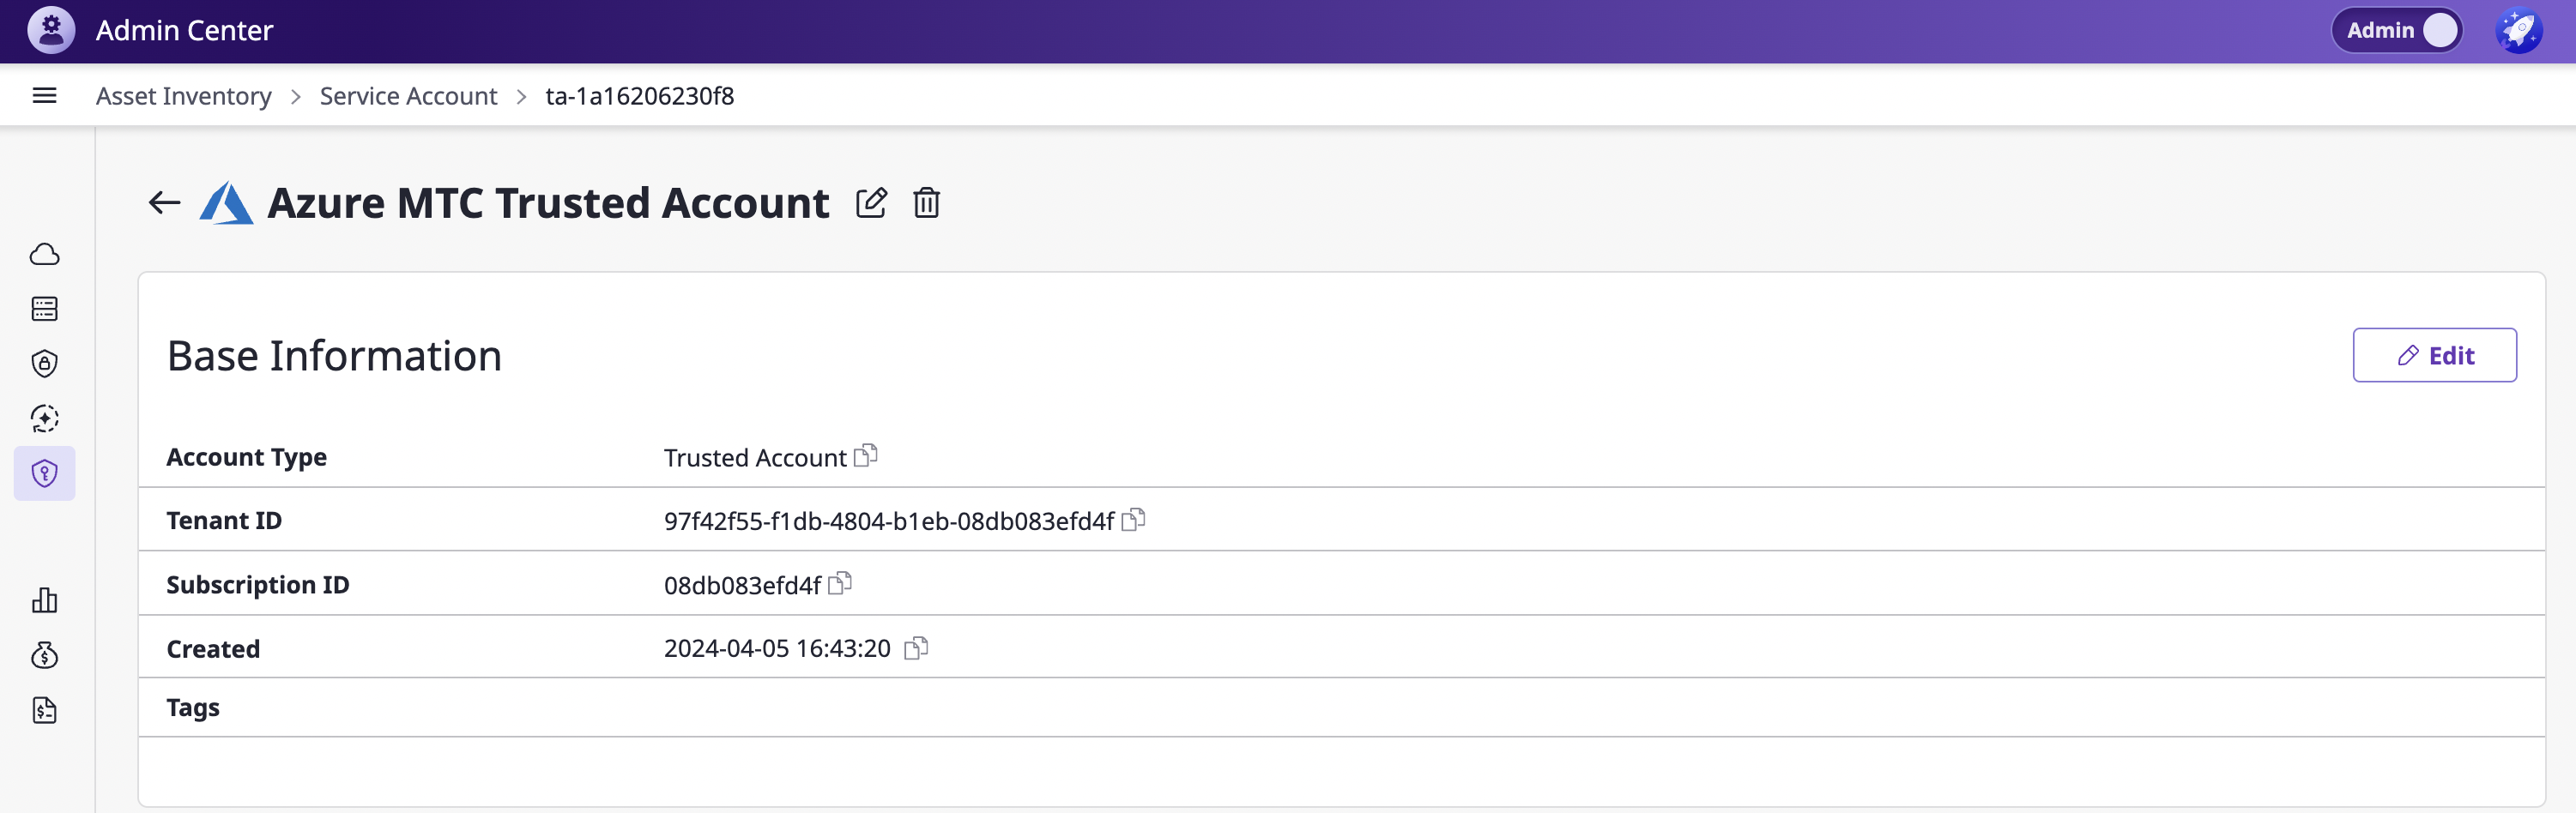
Viewing/Editing Trusted Accounts
1) Select a Trusted Account: Go to [Asset Inventory > Service Account] in Admin Center

2) Check or Edit Base Information
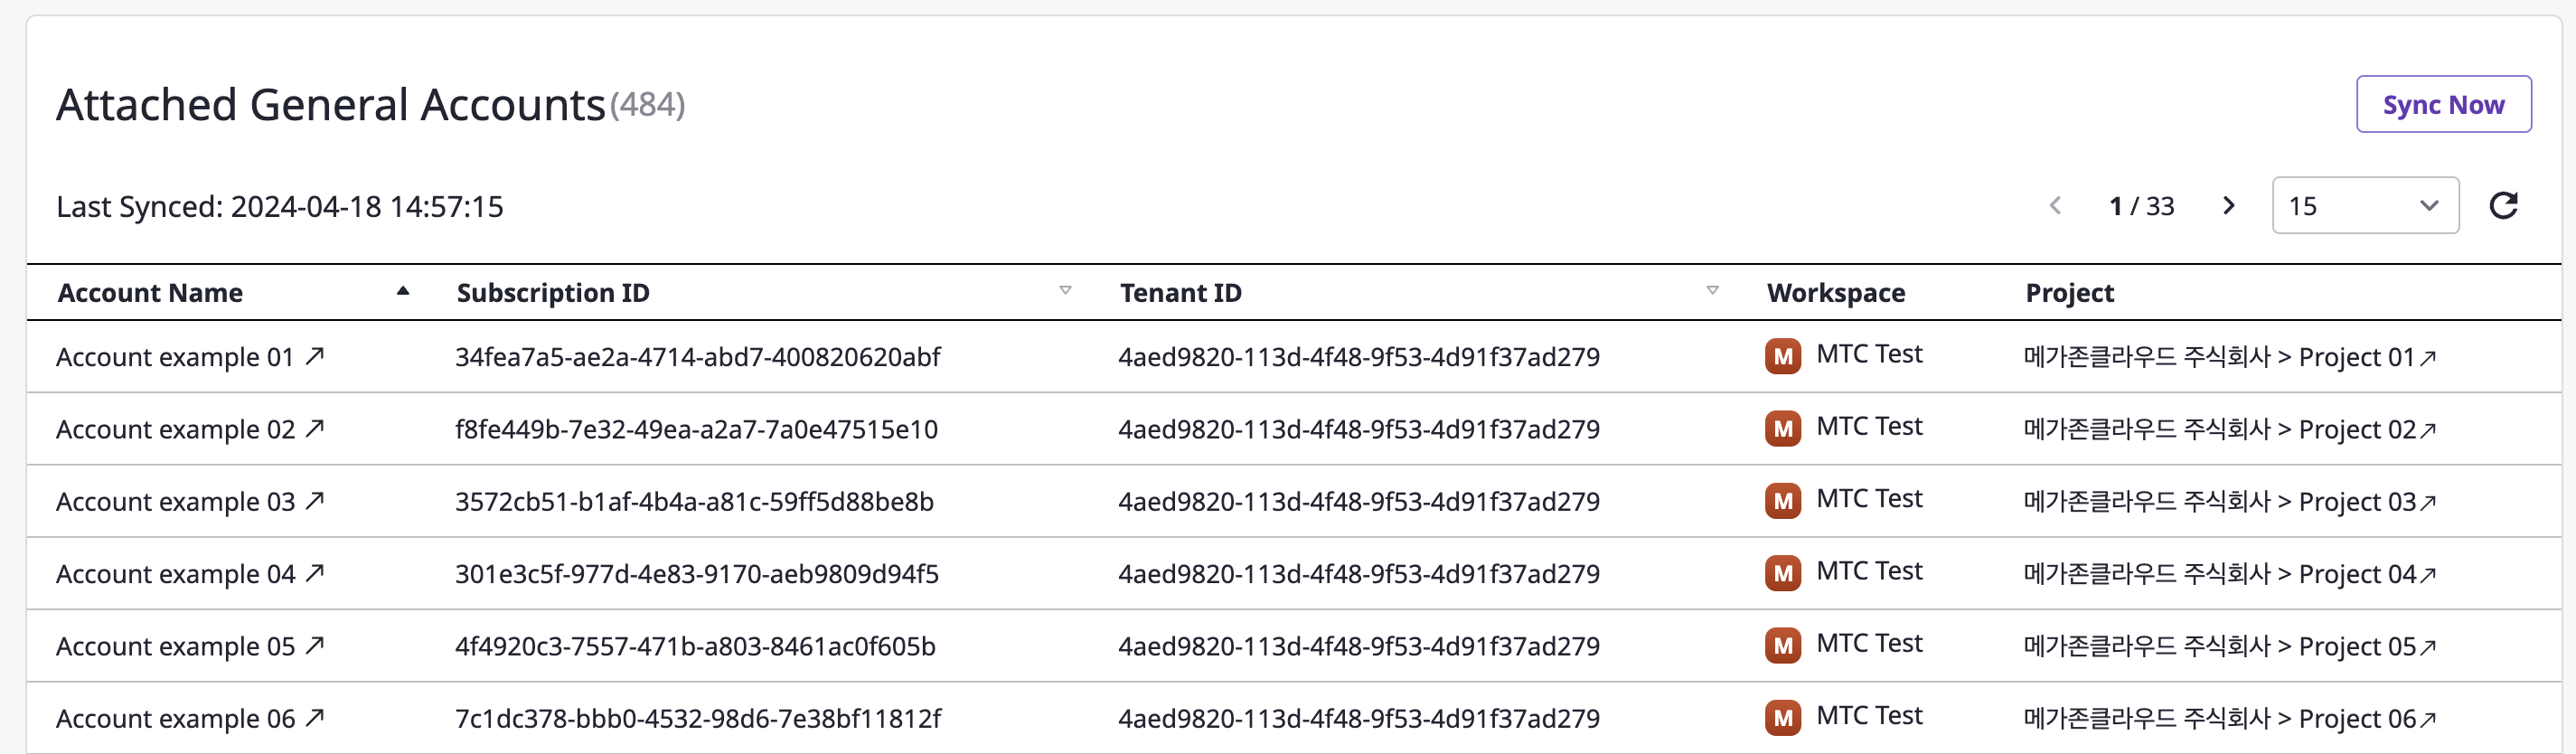
3) Check the List of Connected General Accounts:
💡 With auto sync turned on,
- Accounts are automatically synced and updated according to CSP's structures.
- �It allows you to sync and update accounts directly via the [Sync Now] button.
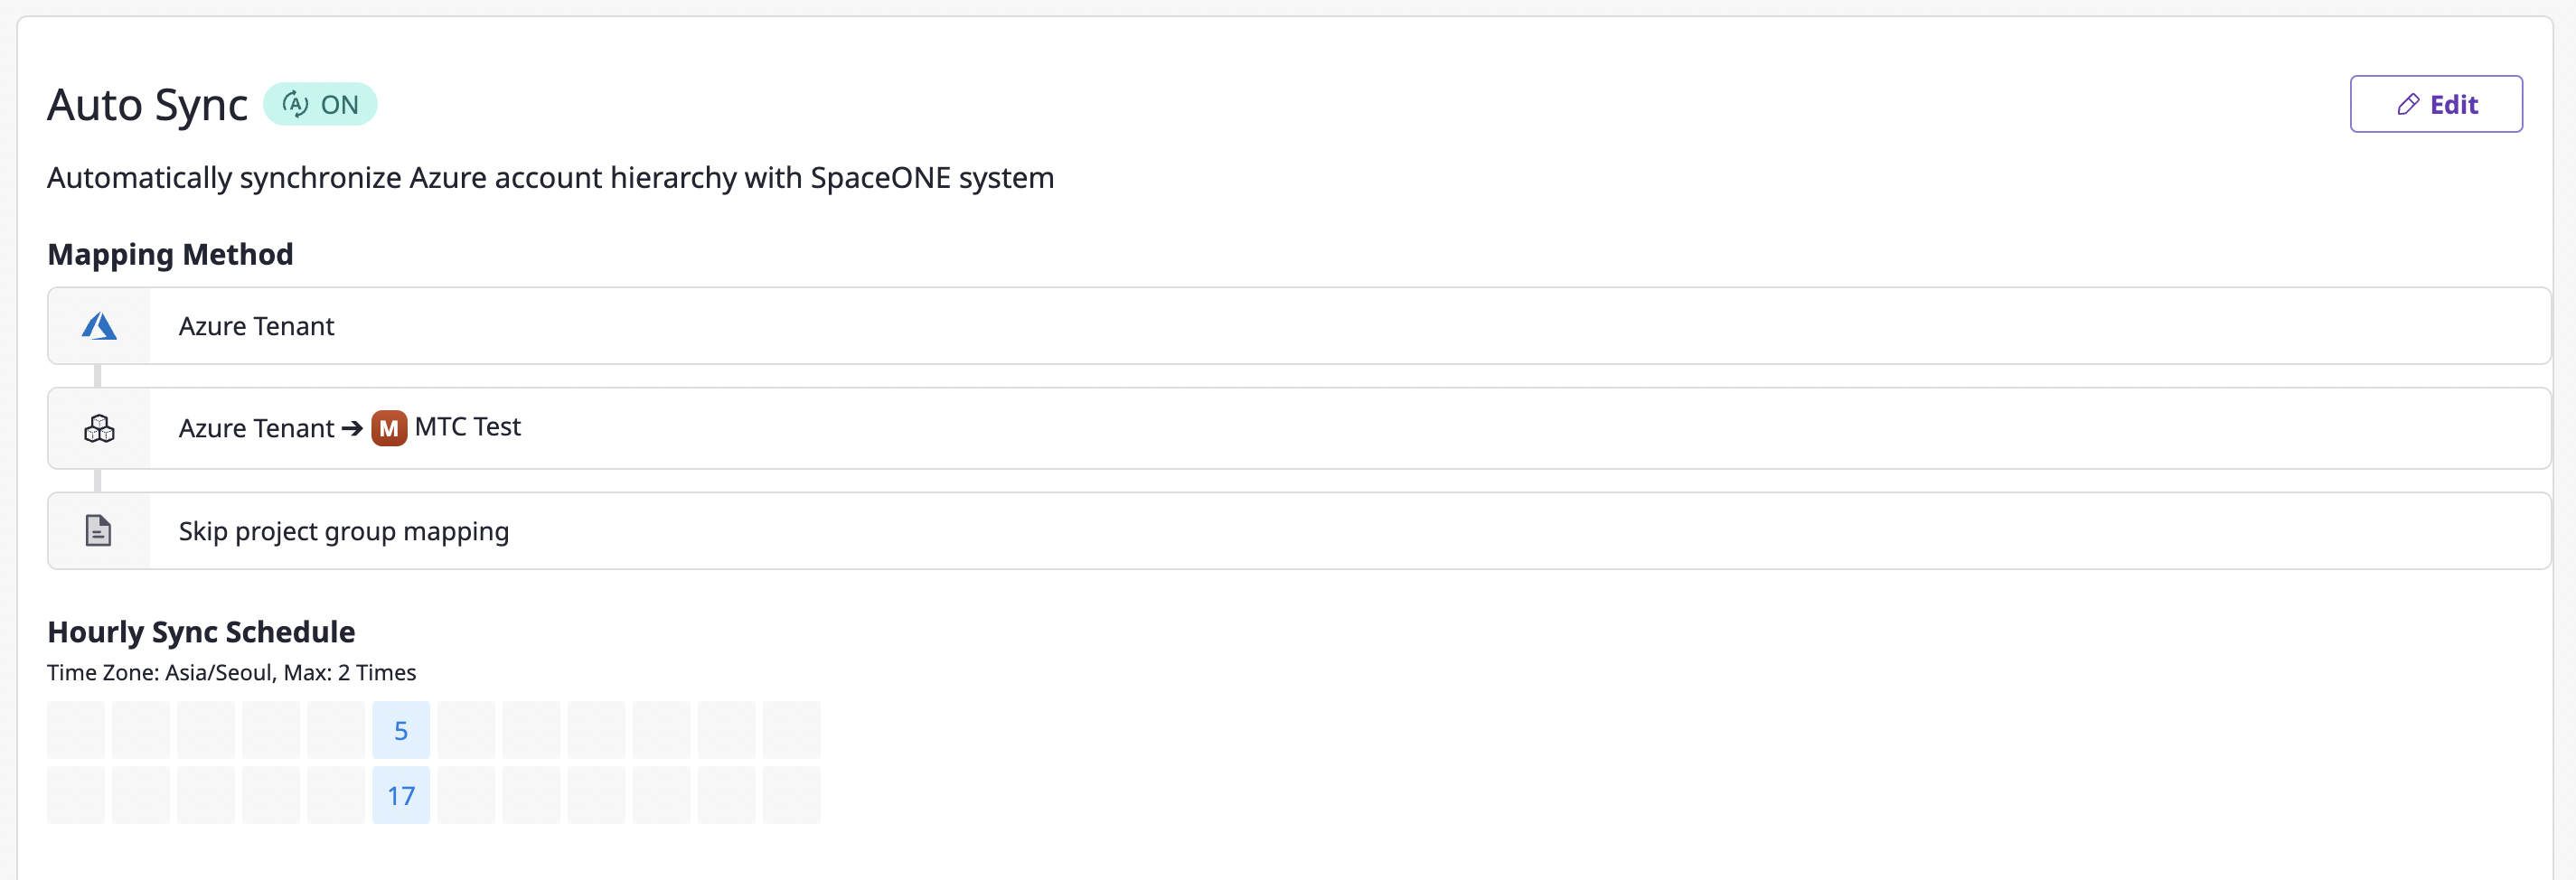
4) Check and Edit Auto Synchronization Settings:
- Set details, turn it On or Off, change schedule, etc.
5) Edit Service Account Name or Delete it:
- Change the service account name with the [✏️] edit button on the top right next to the title.
- Delete the service account via the [🗑️] delete button on the top right next to the title.

9 - Global Asset Management
You can view and utilize the detailed features of resources across all workspaces within the domain.
(1) Switch to Admin Center
Creating Global Collectors
Collectors created in Admin mode are designated as Global collectors, applying across all workspaces.
In individual workspaces, Global collectors can only collect data and cannot be modified or deleted.
➊ Creating a Collector
(1) In Admin Center, go to [Asset Inventory > Collector]
(2) Click the [+ Create] button.
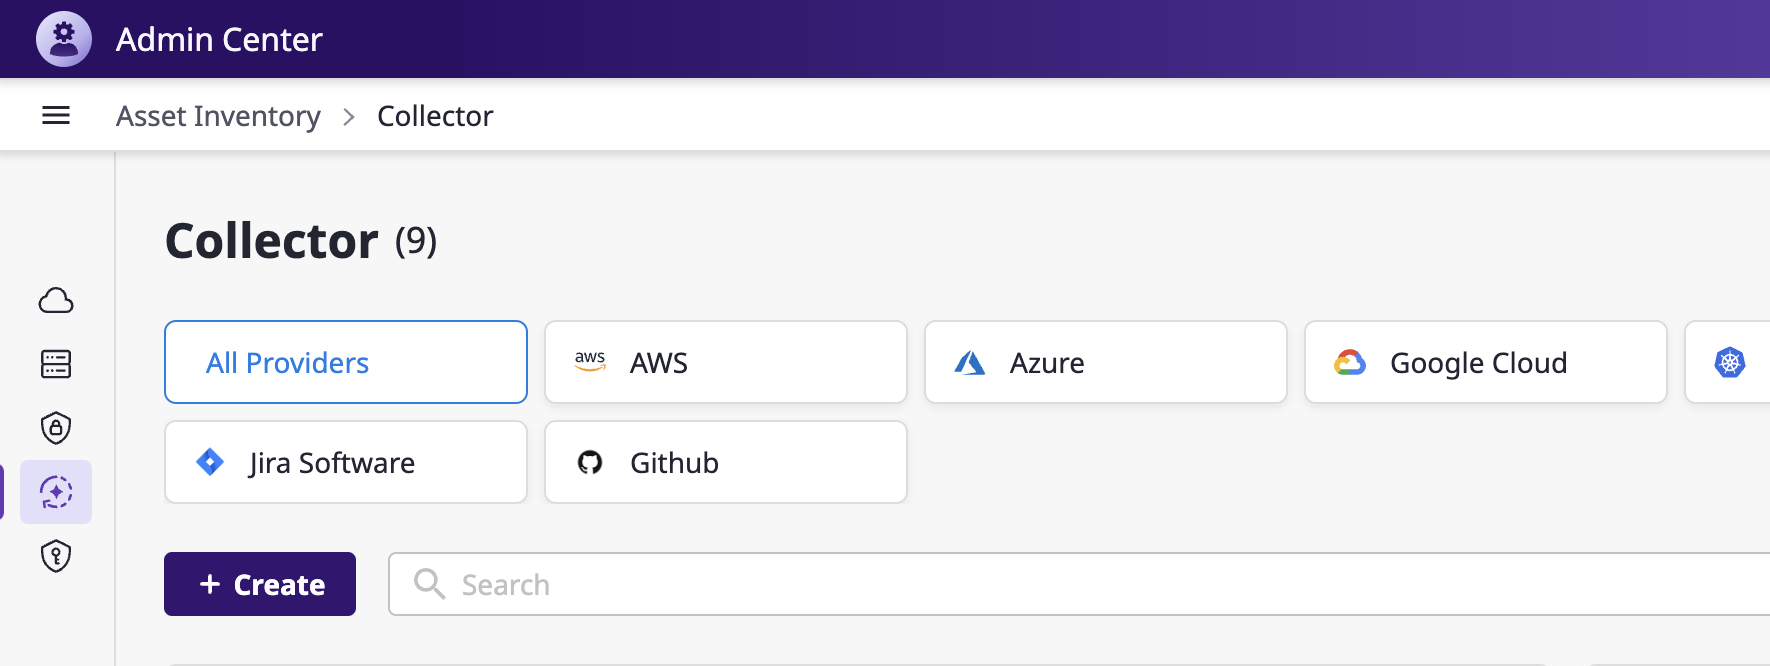
(3) Select an appropriate collector for the data needed to collect
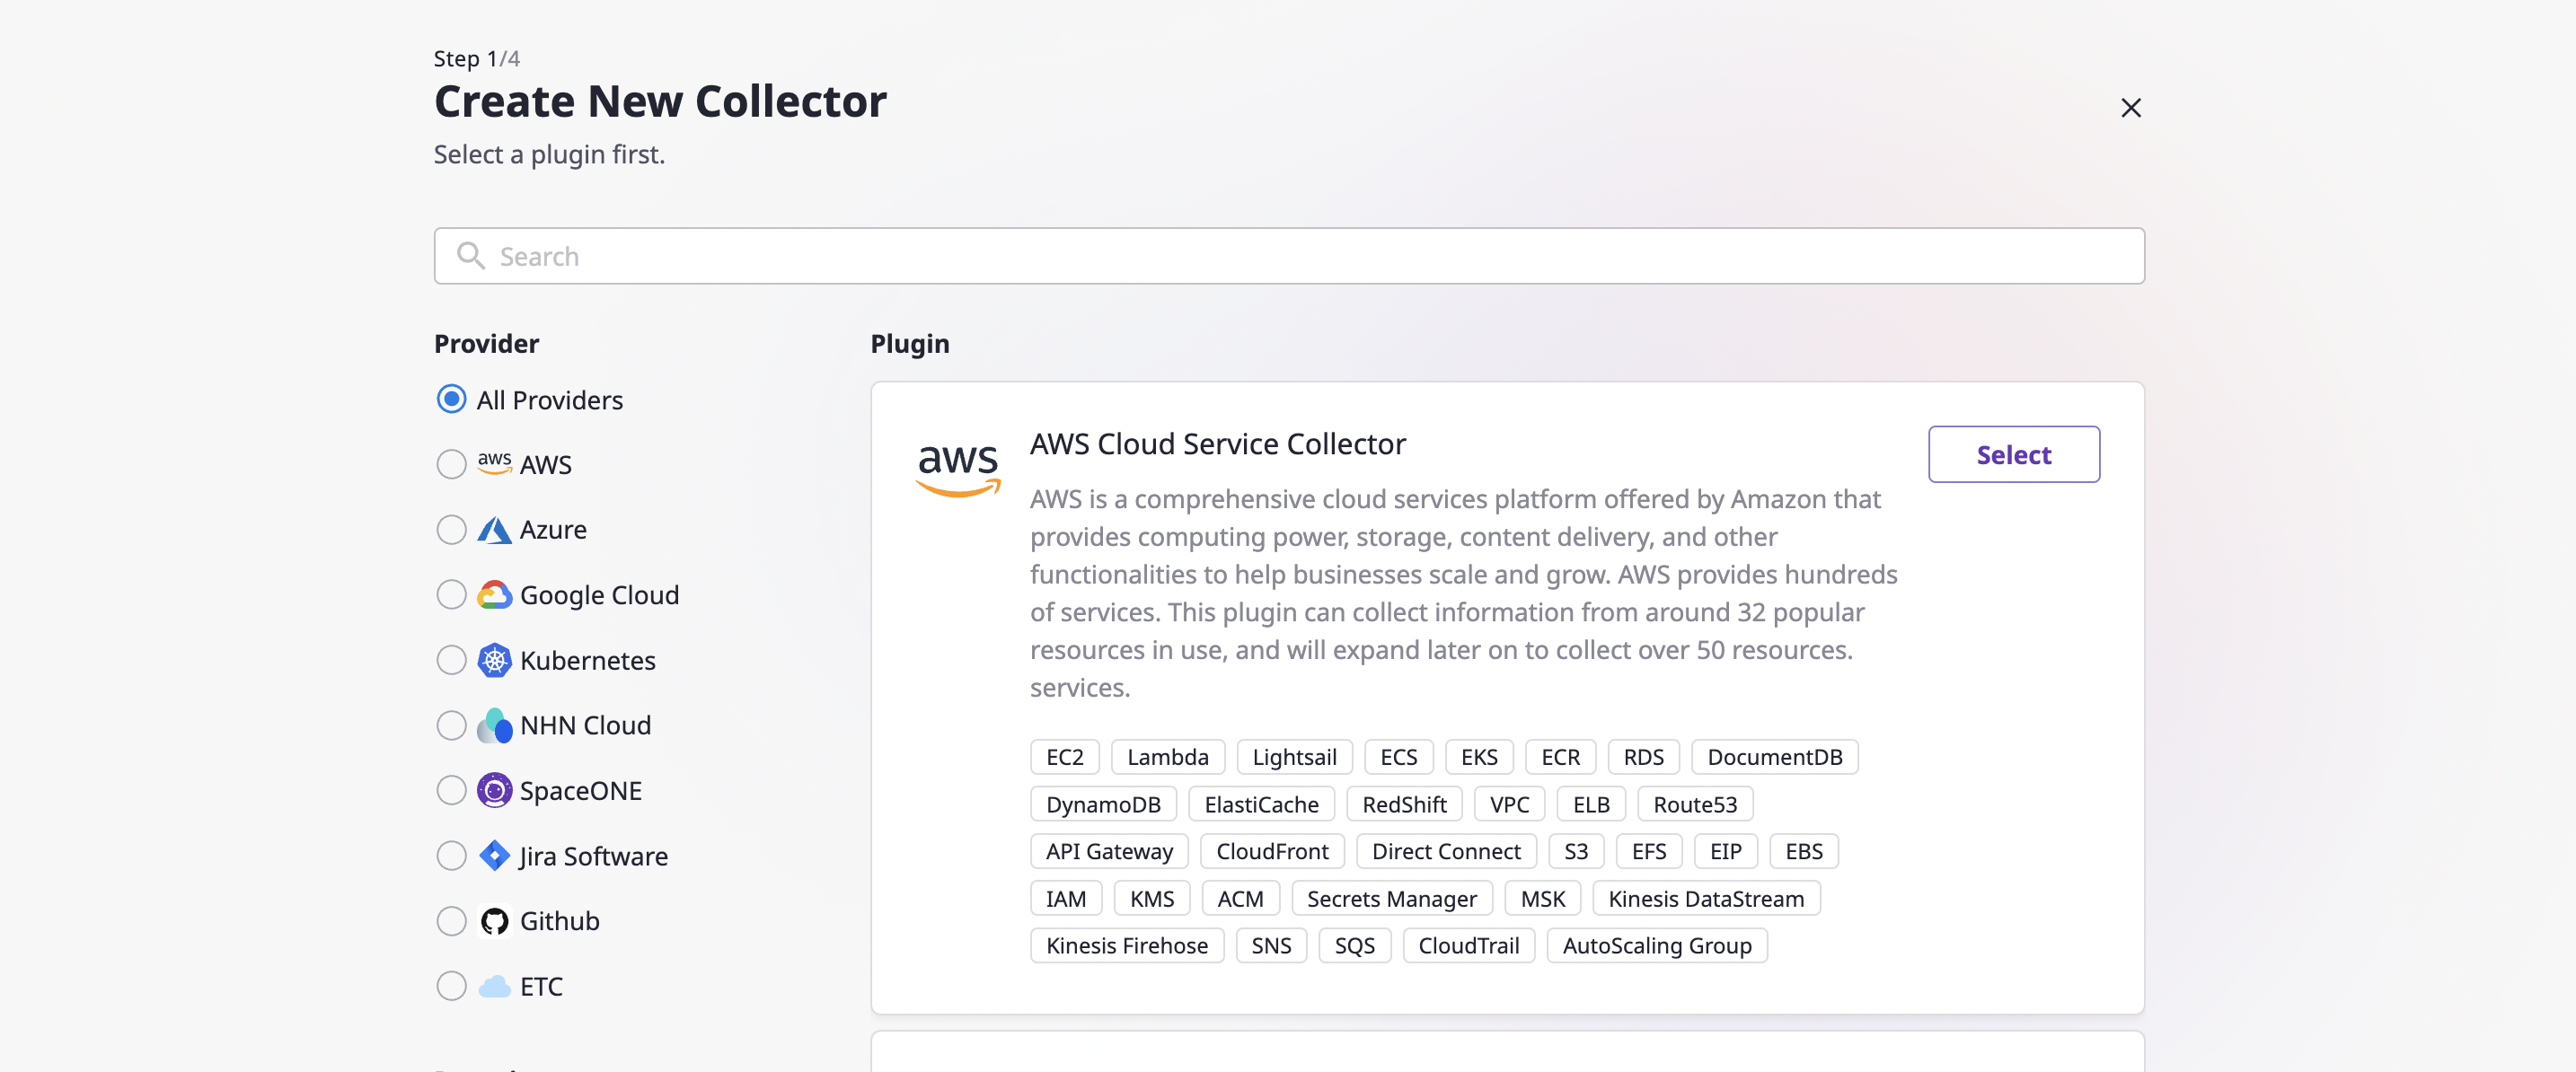
- Learn more about collector plugins here
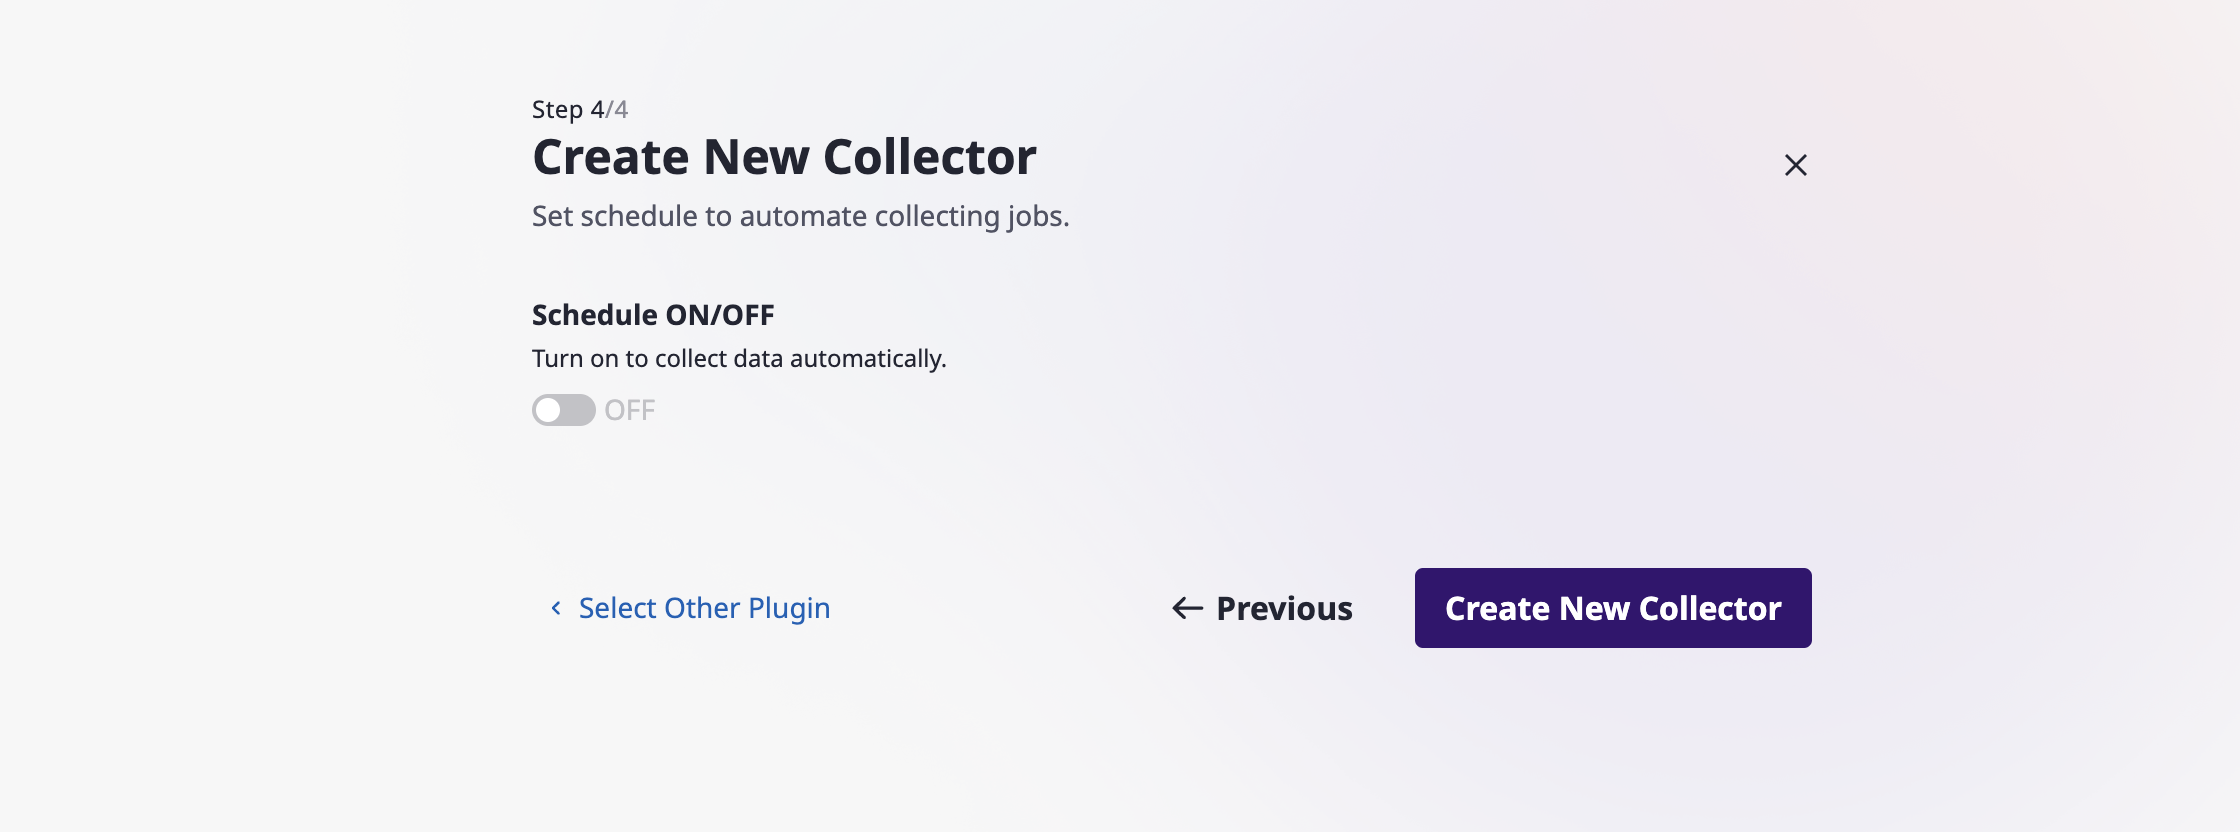
(4) Proceed through Steps 1 to 4
- In the final step (Step 4), you can set the collection schedule and enable 'Collect Data Immediately' upon creation.
➋ Editing/Deleting a Collector
(1) In Admin Center, go to [Asset Inventory > Collector]
(2) Select a collector needed to modify from the list
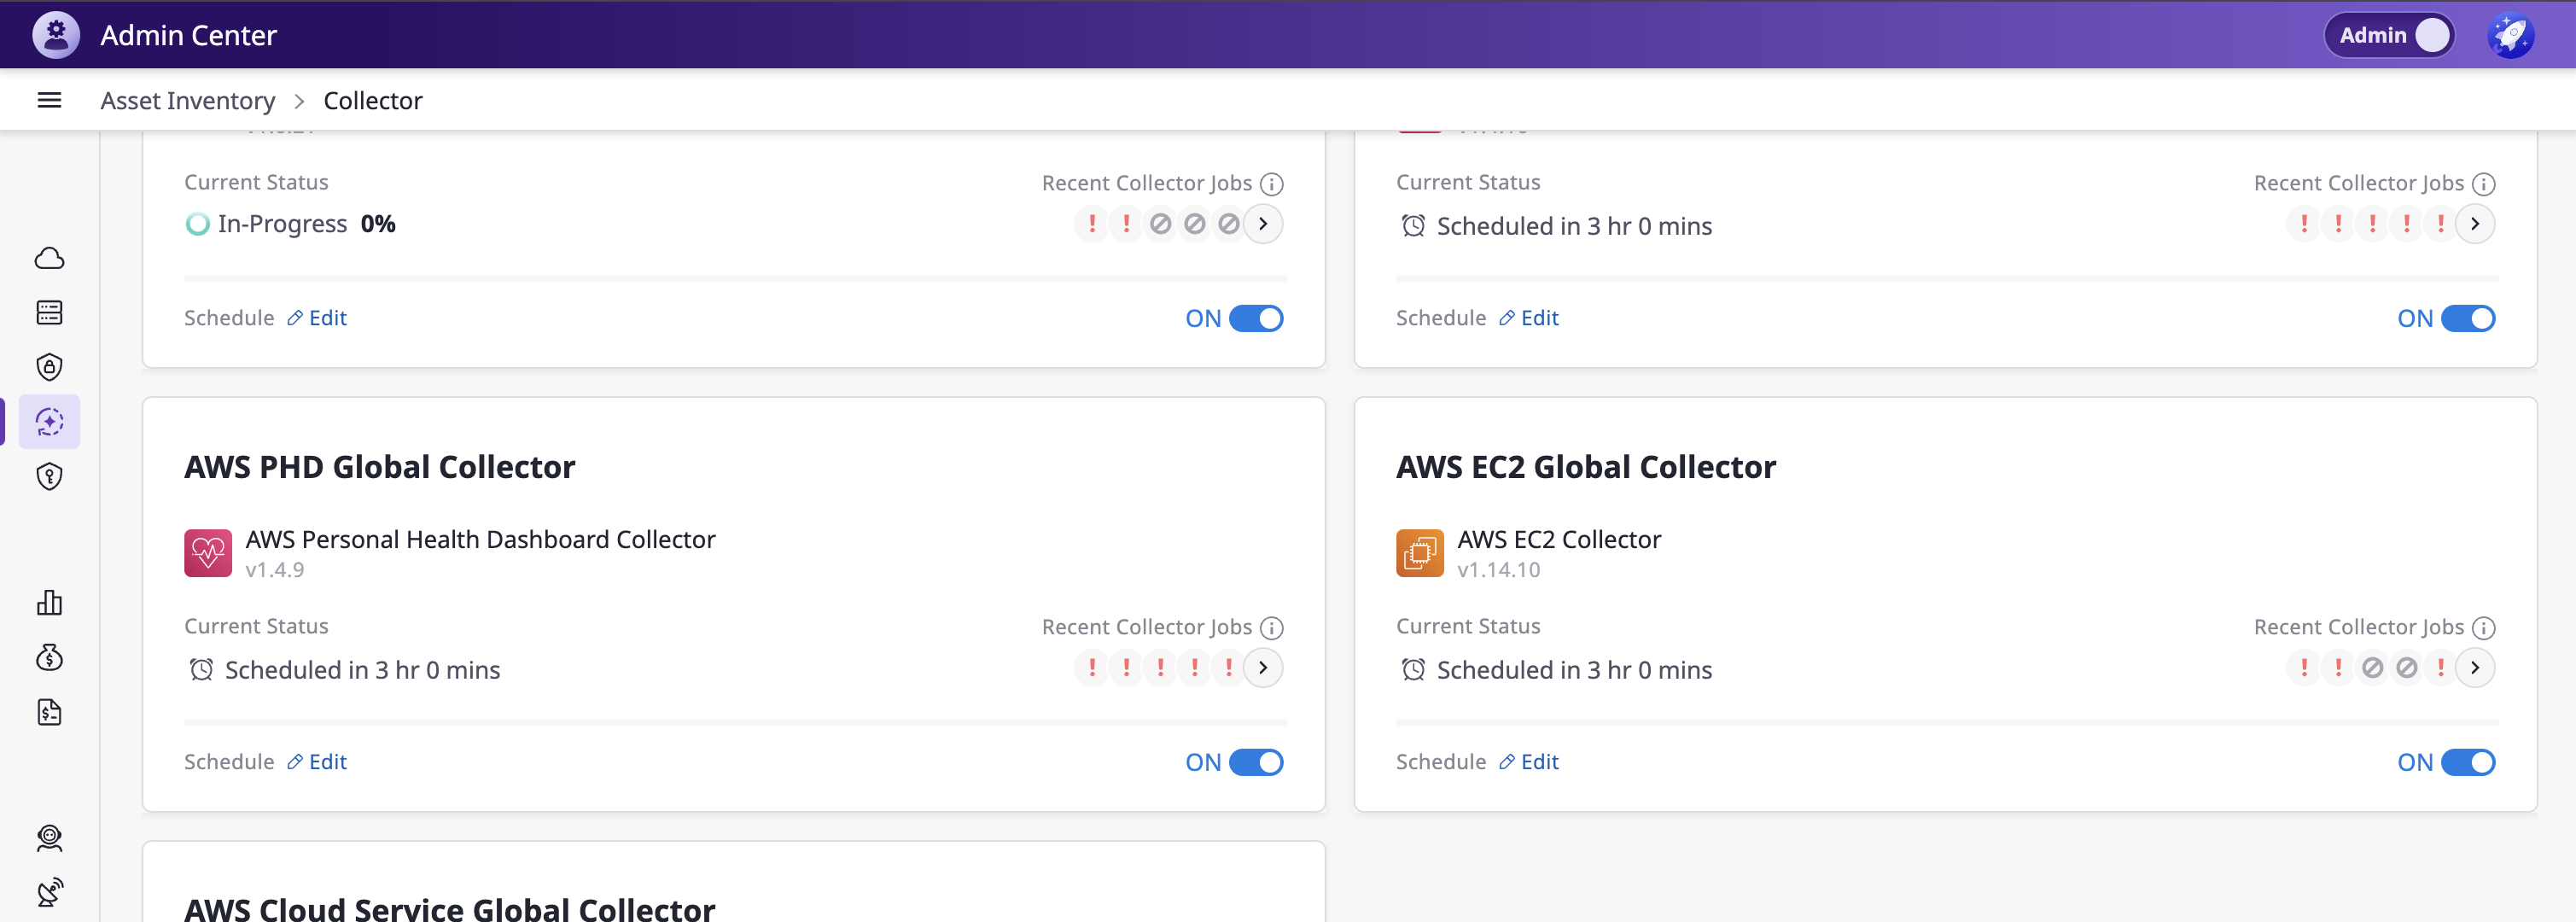
(3) In the detailed page of the selected collector, you can edit sections such as:
- Base Information / Schedule / Additional Options
(4) Edit the collector name or delete it:
- Use the [✏️] edit button next to the collector name at the top to change the name.
- Use the [🗑️] delete button next to the collector name at the top to delete the collector.

➌ Collecting Data
(1) In Admin Center, go to [Asset Inventory > Collector]
(2) With mouse over, the [Collect Data] button appears, allowing immediate data collection
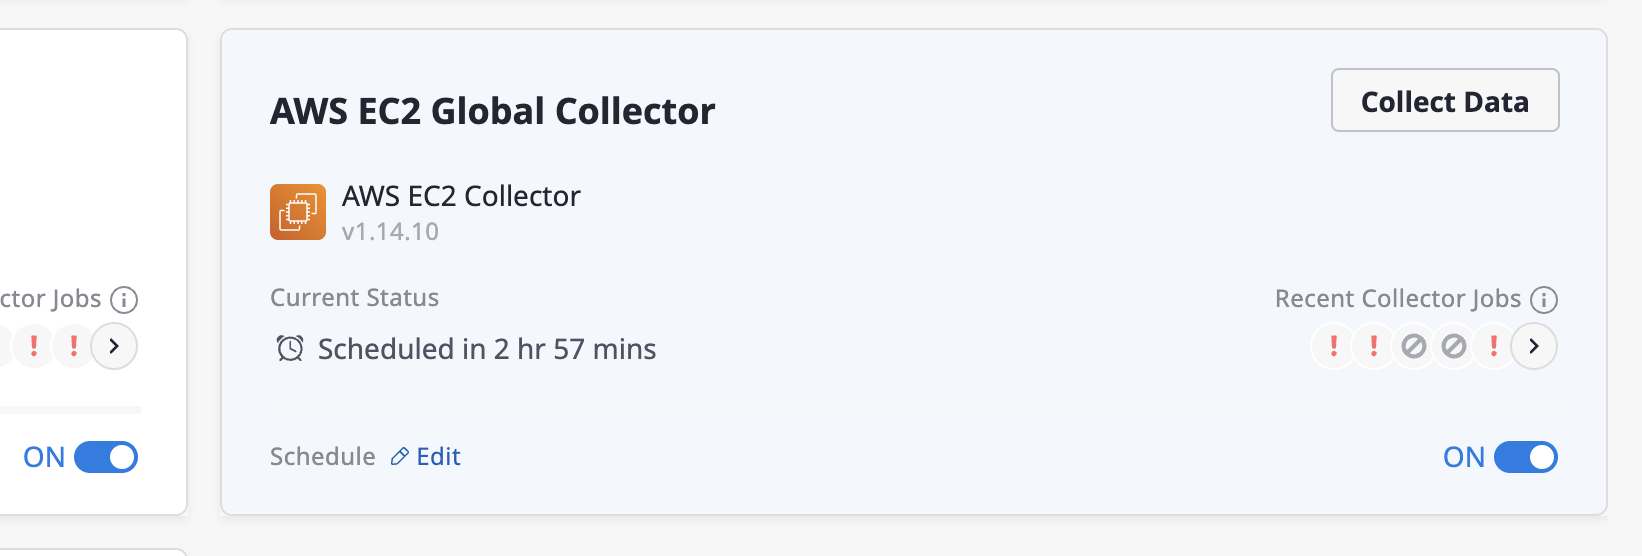
(3) Click a collector to go to the detailed page and use the [Collect Data] button at the top for immediate collection.

Data collection is based on (cloud) service accounts registered within each workspace.
For managing and registering service accounts in the workspace environment, please refer to here
Viewing All Resources in the Domain
In Admin mode, you can view all resources collected across all workspaces within the domain.
(1) [Asset Inventory > Cloud Service]: Overview of all cloud service resources.
(2) [Asset Inventory > Server]: Overview of servers within cloud service resources.
(3) [Asset Inventory > Security]: Security status and checklist based on the created security plugin frameworks.
10 - Global Cost Management
You can view the costs of all workspaces within the domain and utilize detailed features.
(1) Switch to Admin Center
Analyzing Costs from All Workspaces
You can view the total costs incurred across all workspaces at once.
(1) In Admin Center, go to [Cost Explorer > Cost Analysis]
(2) Click the 'Workspace' tab from the list of Group By to view costs by workspace.
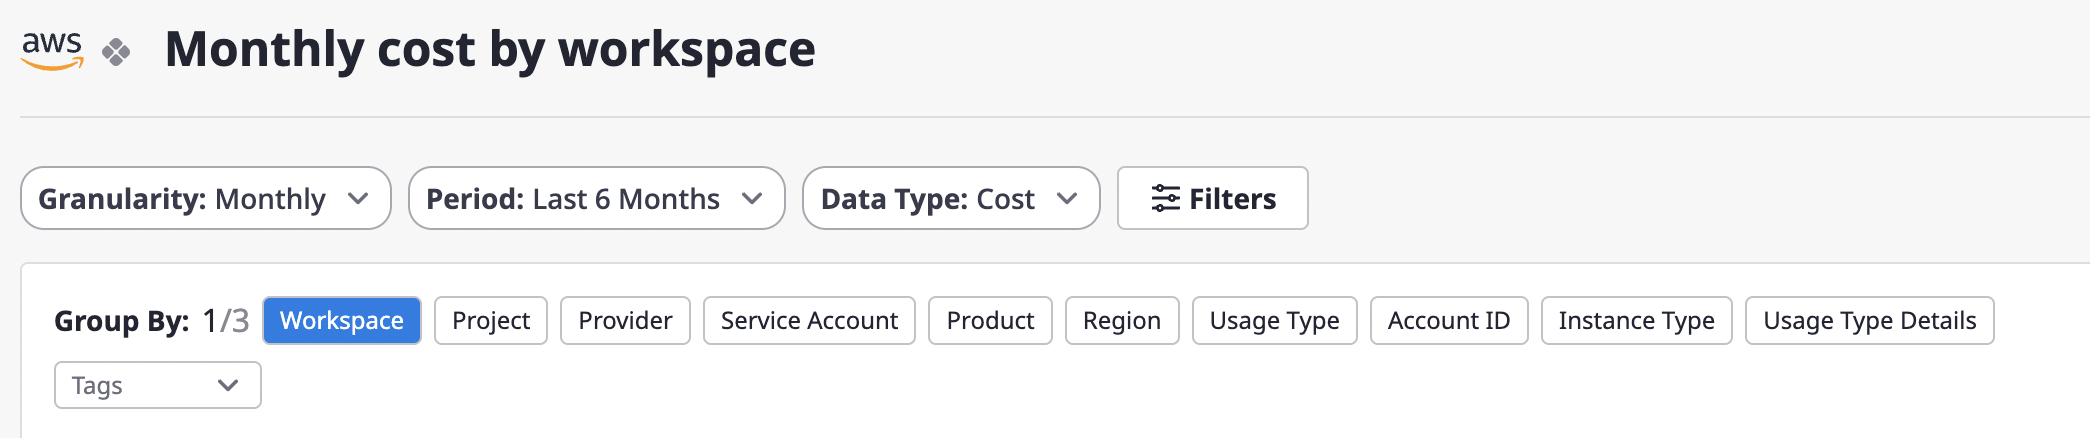
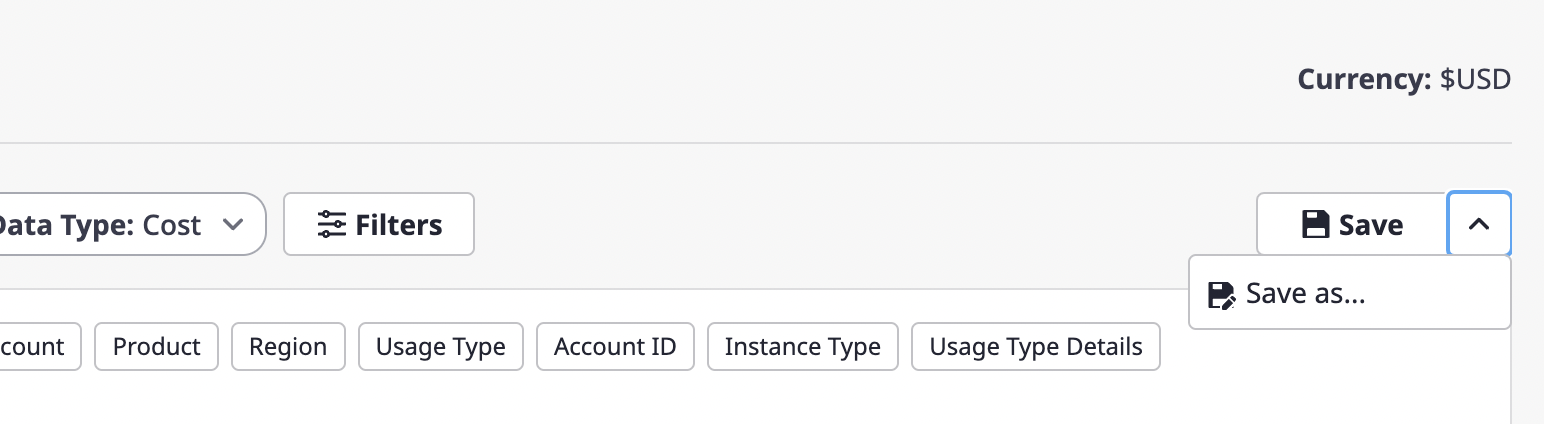
(3) Set detailed analysis using the [Filters].
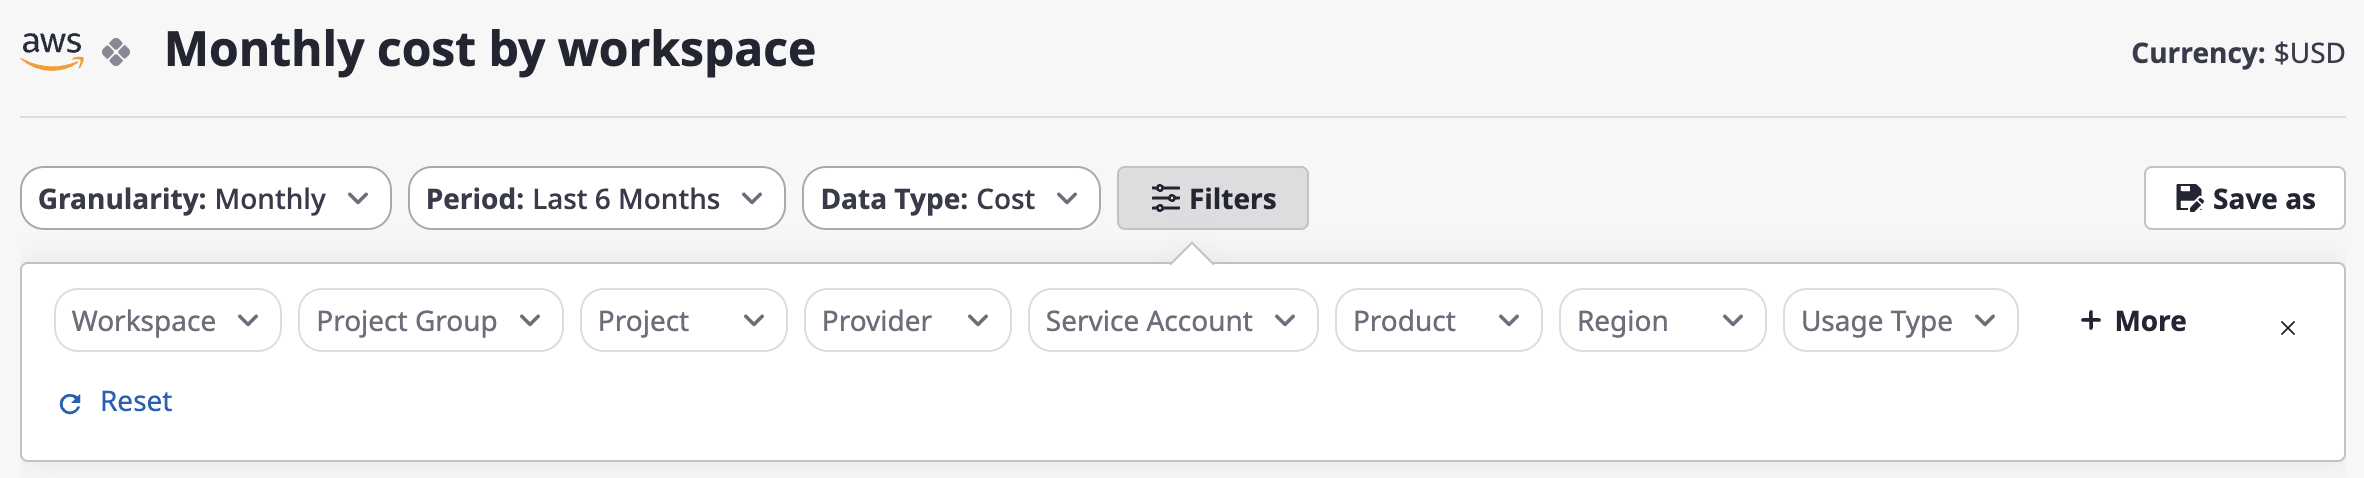
(4) Save as new cost analysis page
- Predefined analysis pages (e.g., Monthly cost by workspace): Only [Save As] is available.
- Custom cost analysis pages: You can [Save], [Save As], [Edit/Delete].
You can also check the costs incurred in each individual workspace. For details, please refer to
here
Setting Budgets by Workspace
You can create and manage budgets based on workspaces relative to the total incurred costs.
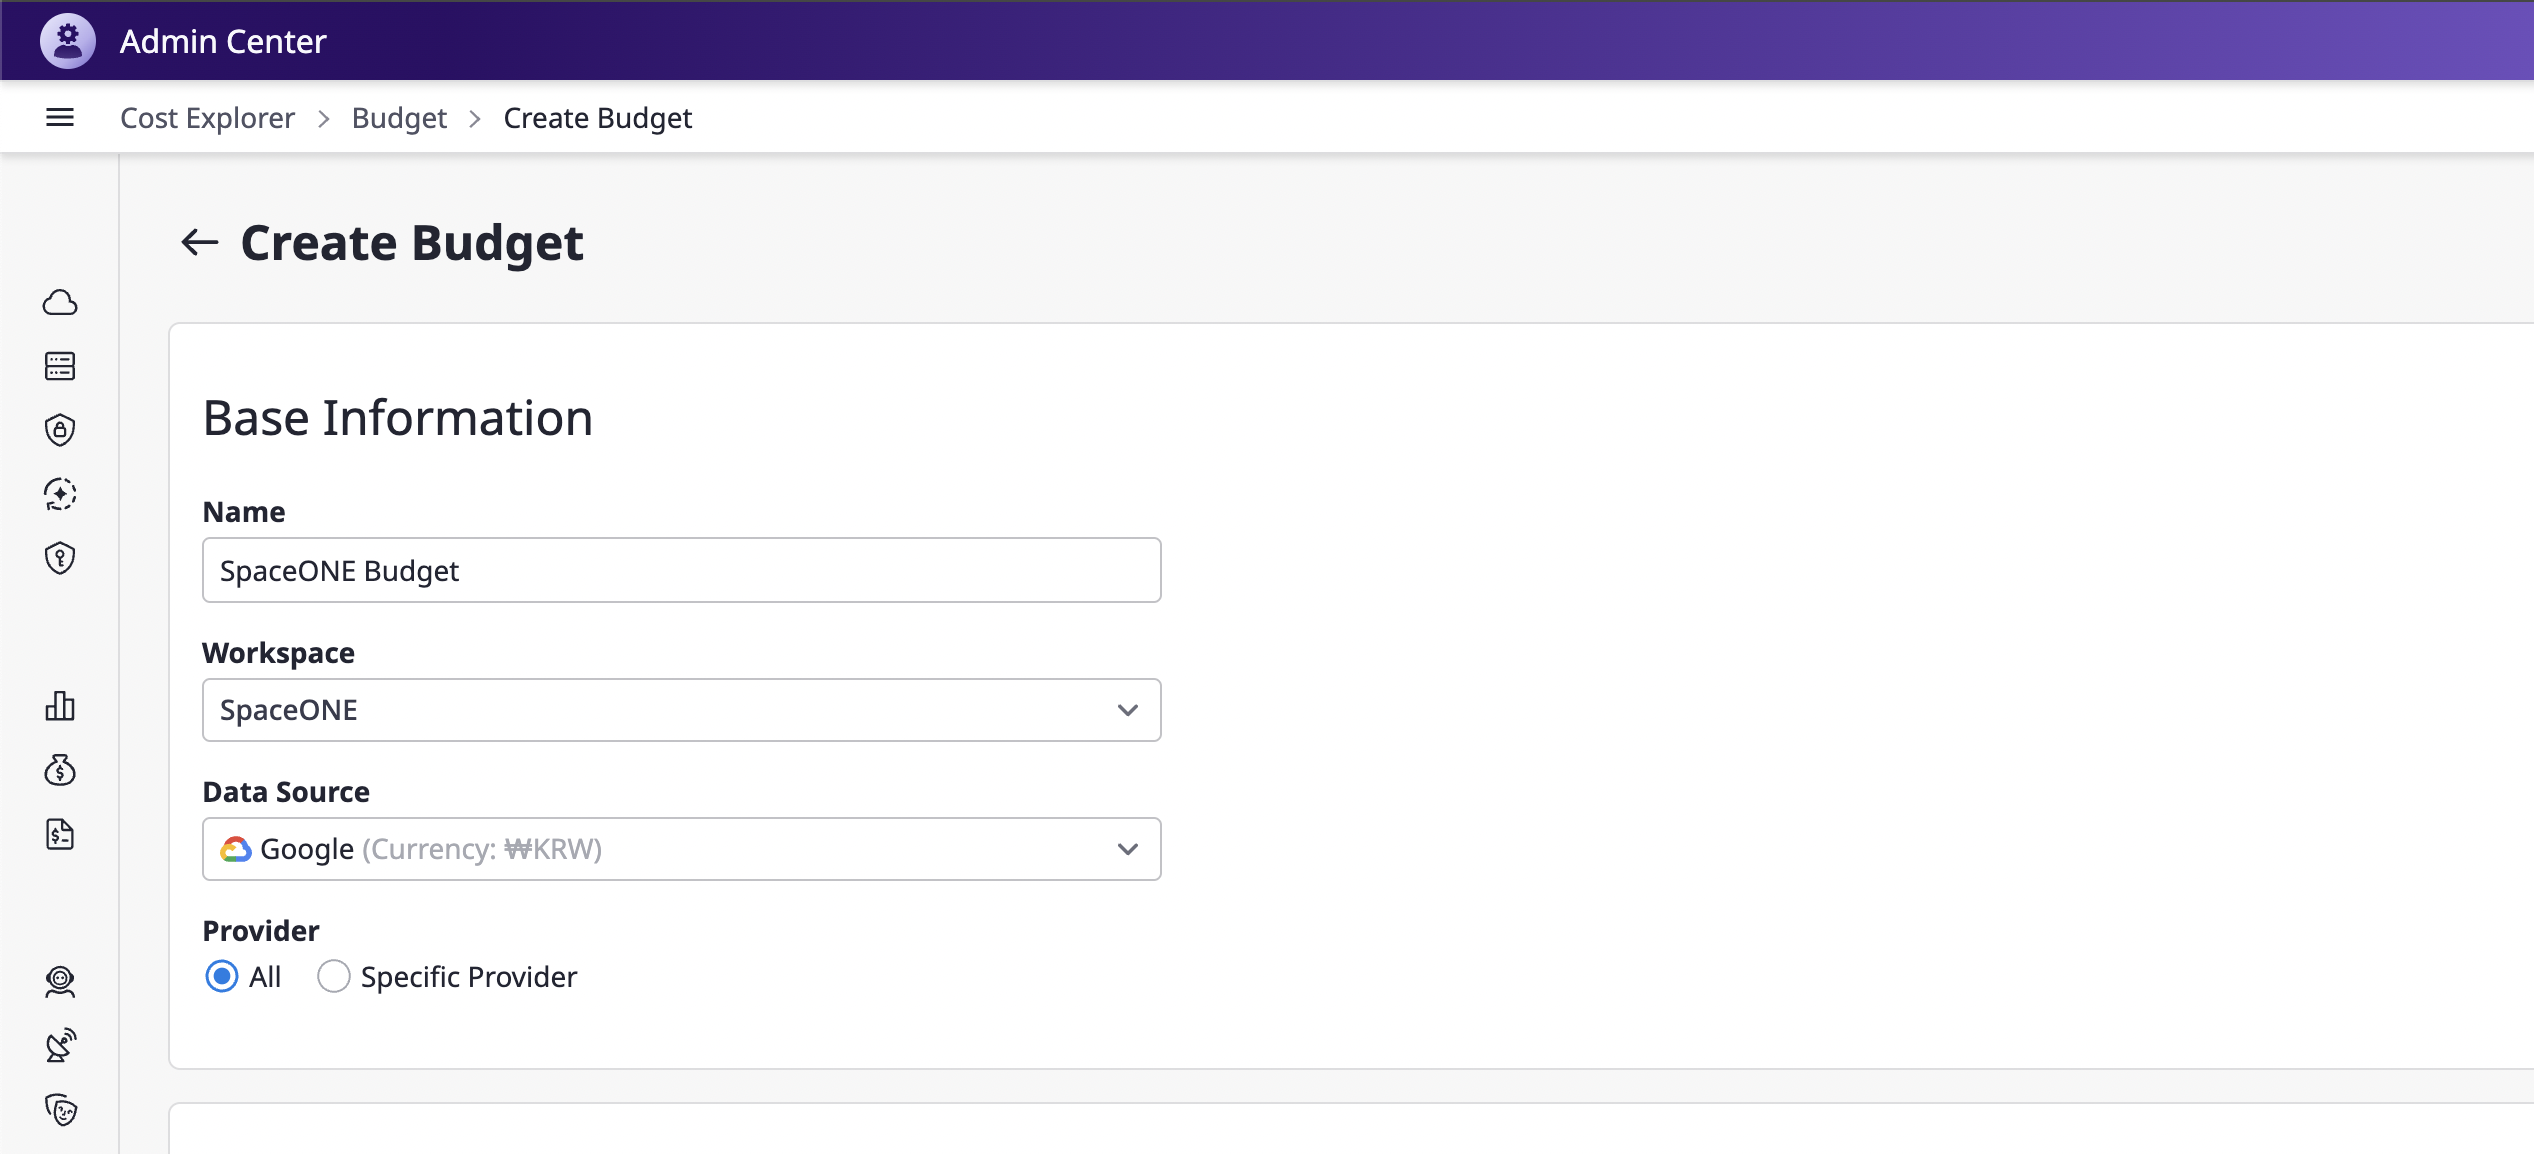
(1) In Admin mode, go to [Cost Management > Budget]
[How to set a budget]
a. Click the [+ Create] button
b. Set the budget according to the specific workspace and billing data source
- Enter a name
- Select a workspace
- Select a data source
- Choose a budget plan (total budget or monthly budget)
- Click the [Confirm] button
You can also create and manage project-based budgets in individual workspace environments.
For details, please refer to here.
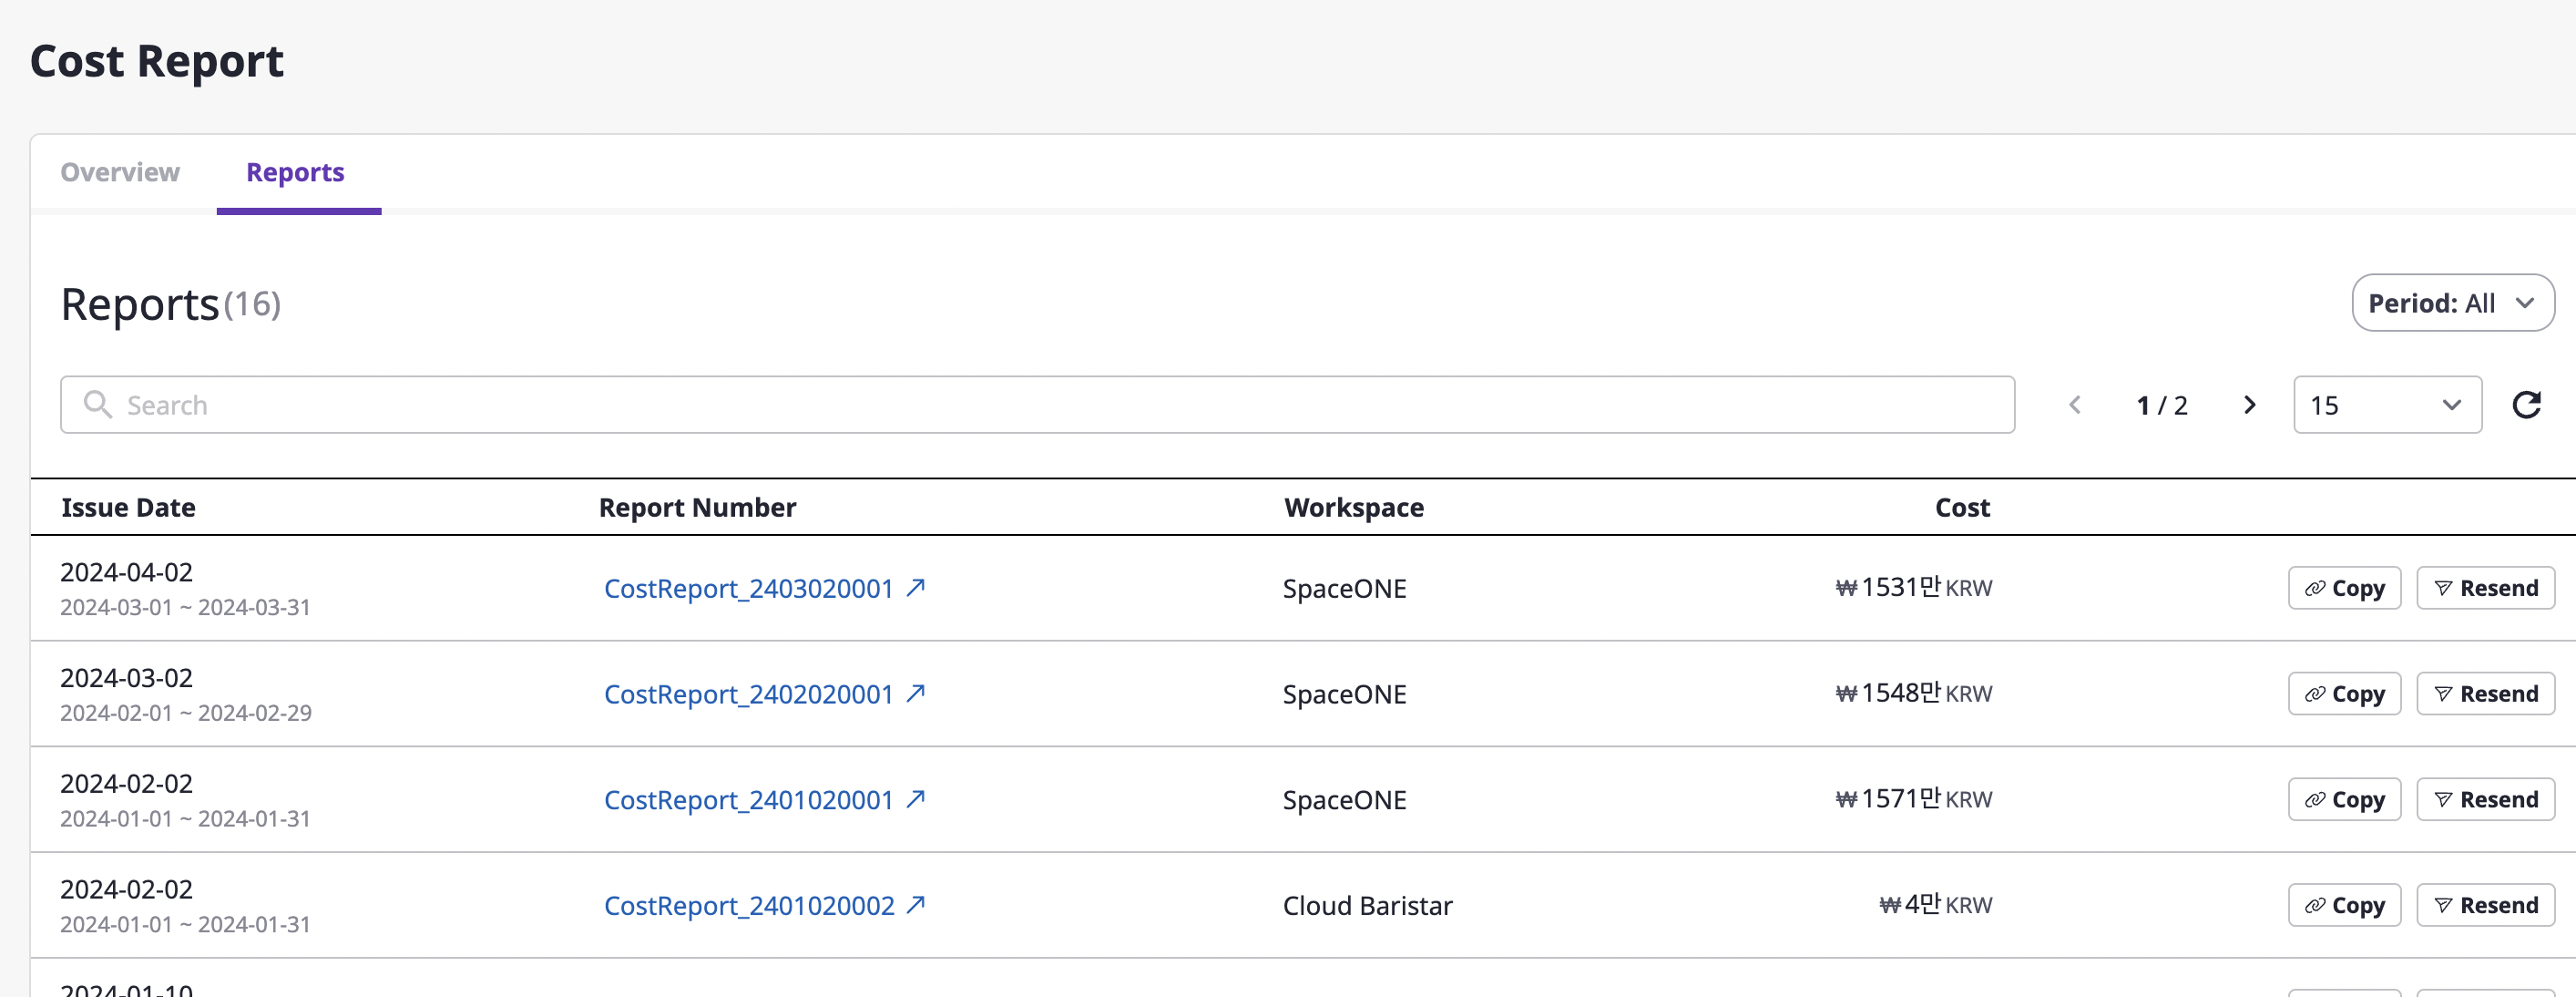
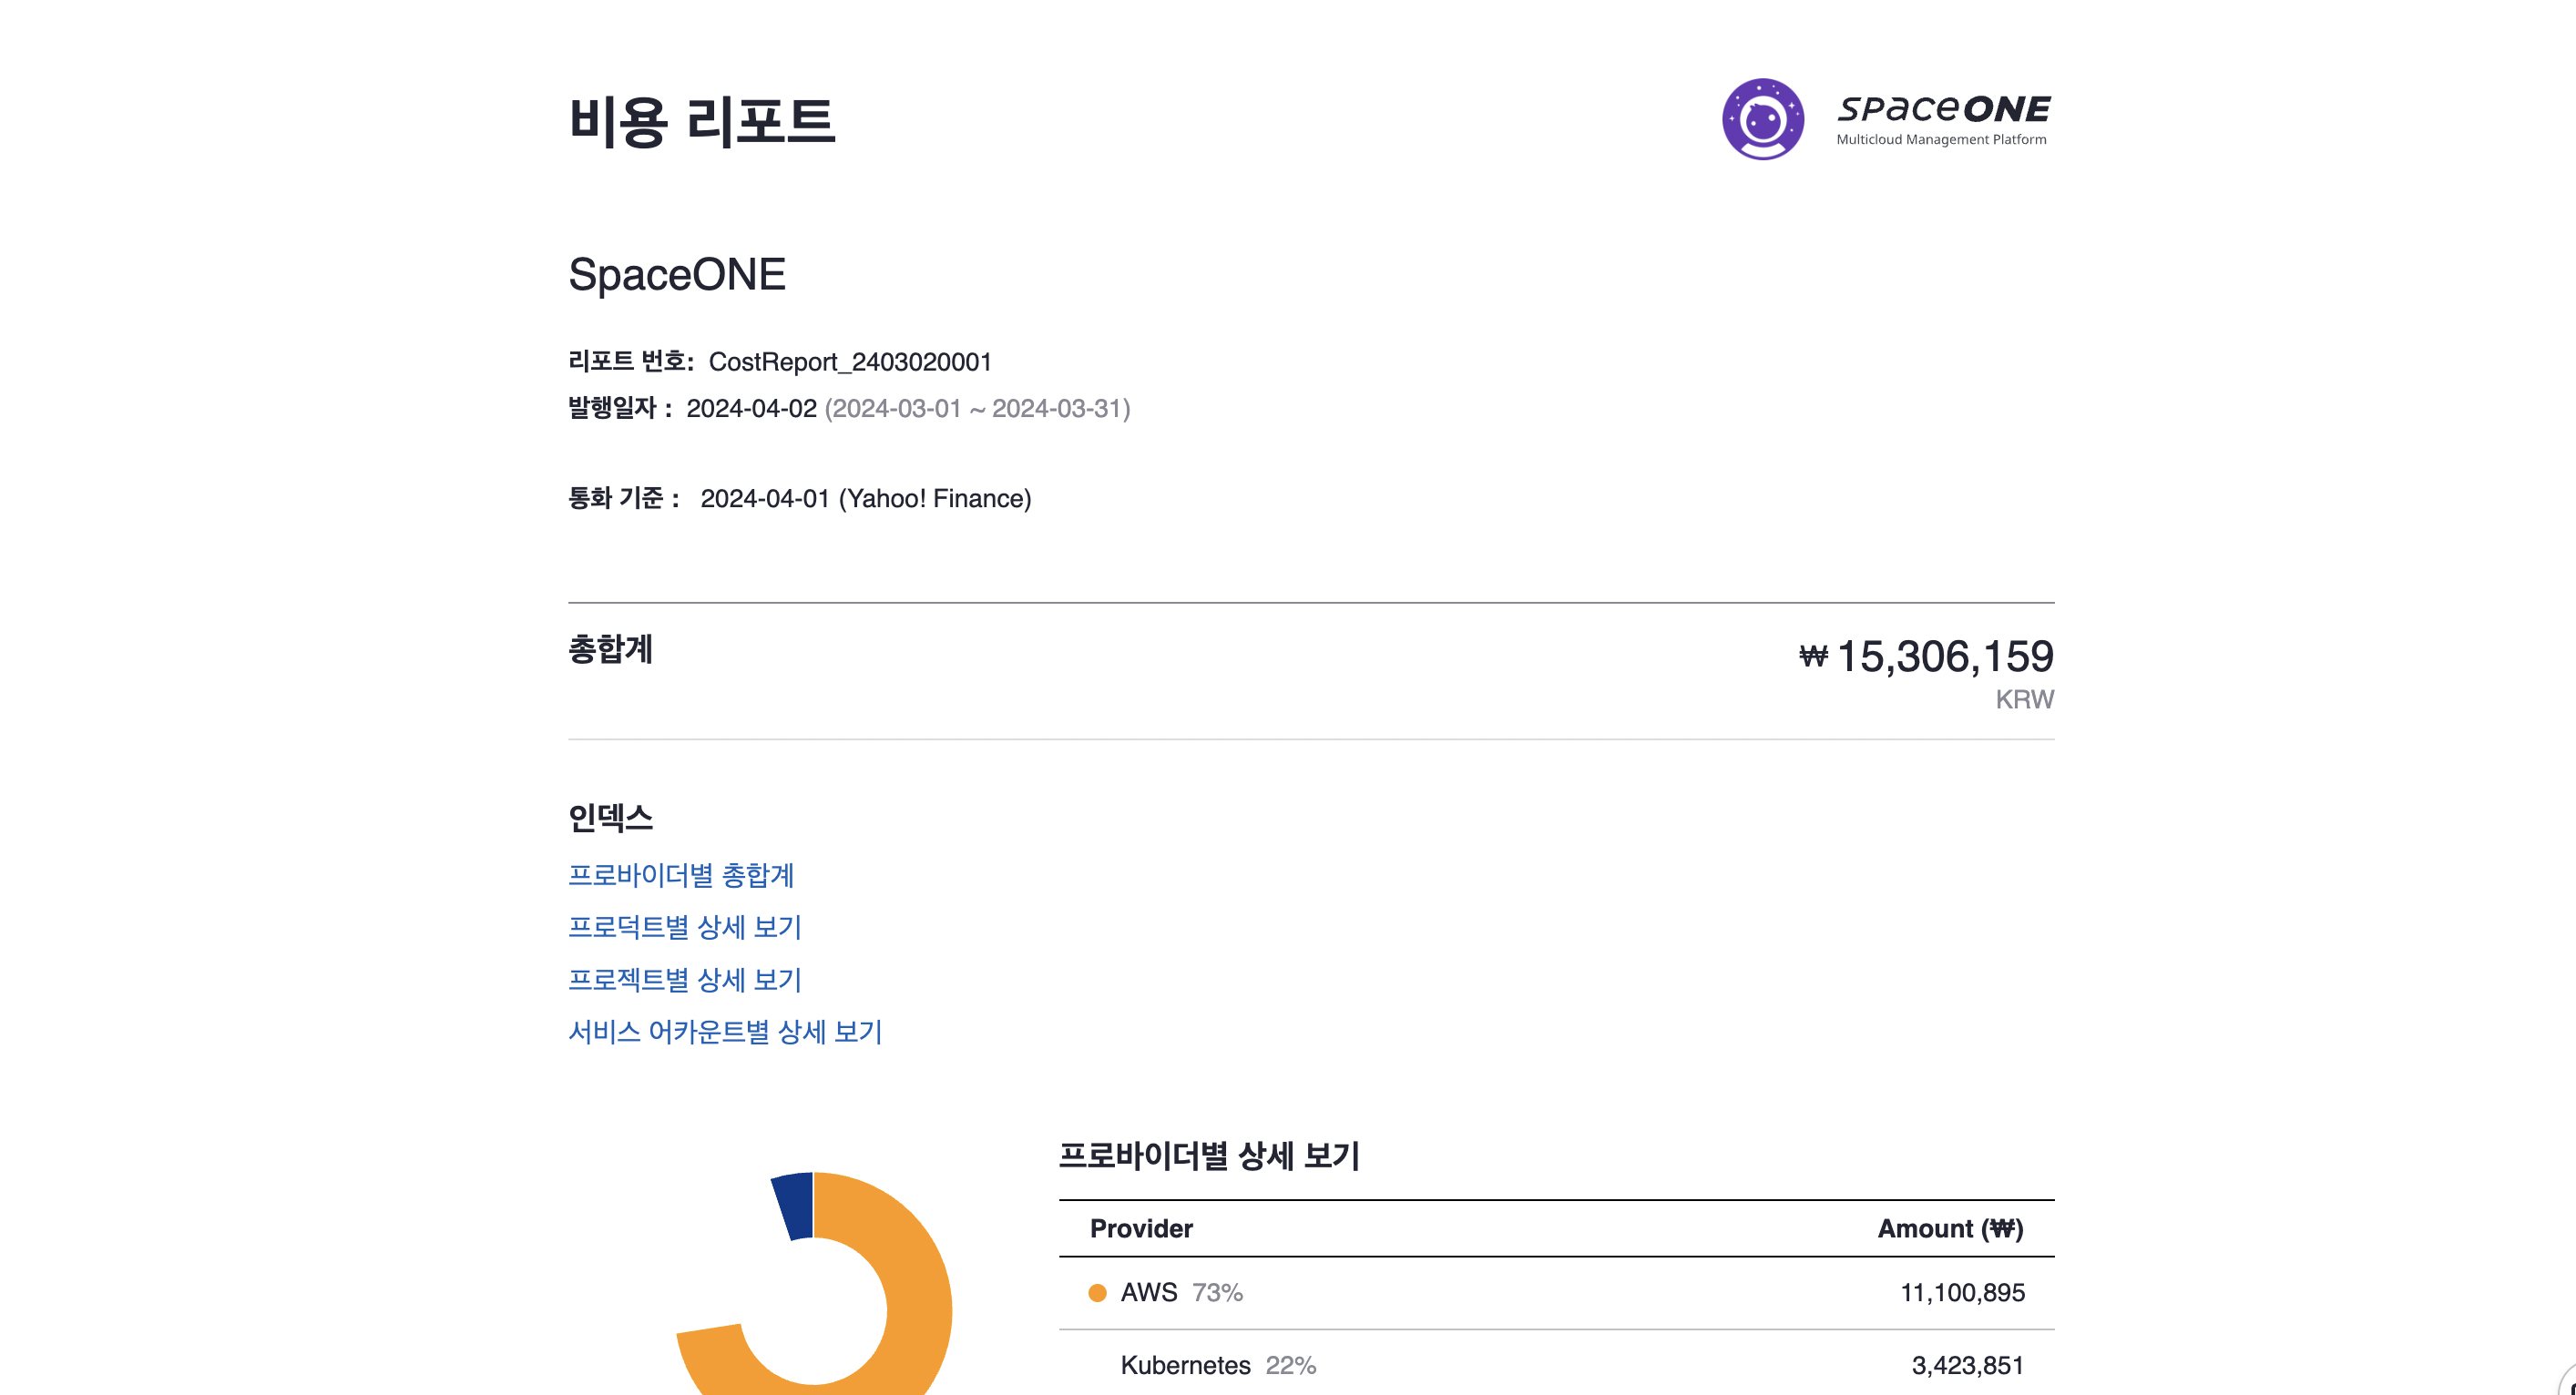
Setting Cost Report
You can configure detailed settings to view cost reports incurred across all workspaces.
(1) In Admin mode, go to [Cost Explorer > Cost Report].
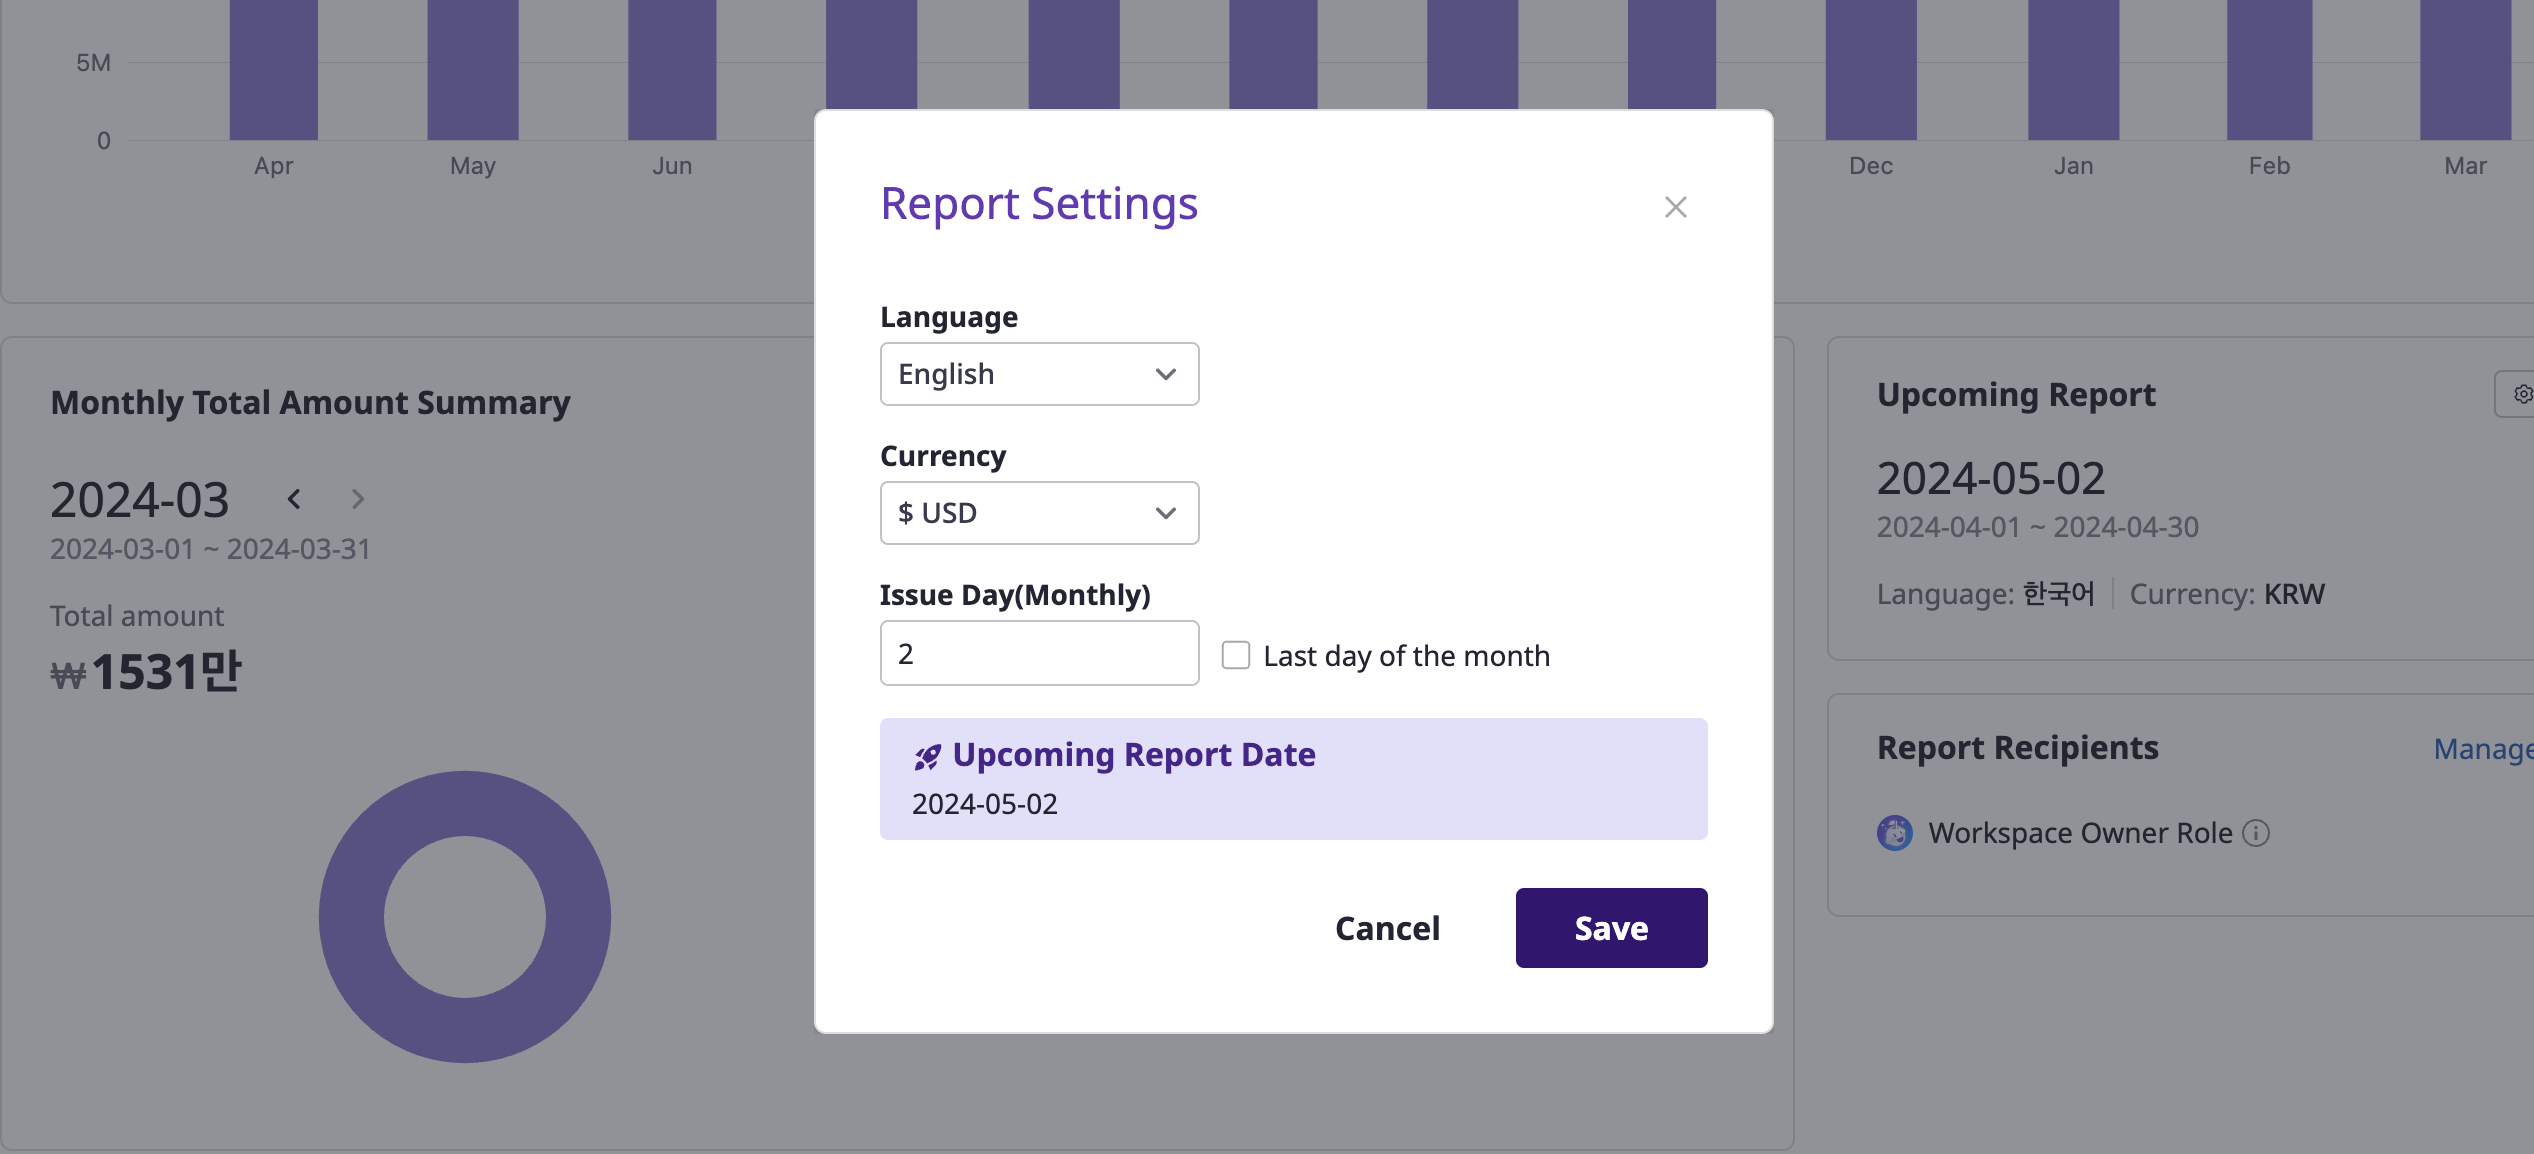
(2) In the 'Next Report' widget, click the [Settings] button to configure the report.
- Select Language/Currency/Monthly Issue date.

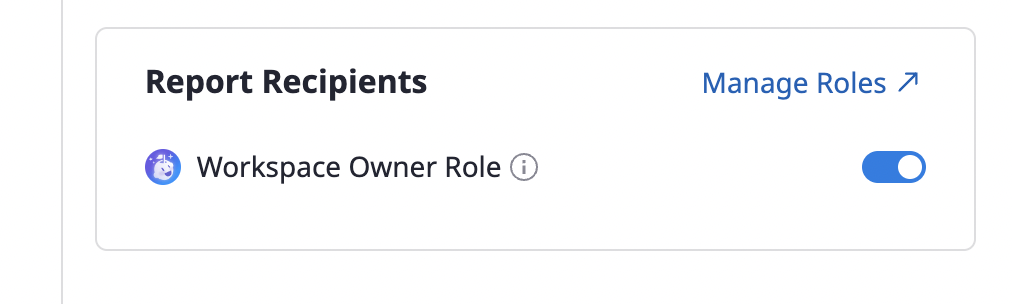
(3) In the 'Report Recipients' widget, configure the recipients.
(4) View the overall report:
- Cost trends for last 12 months
- Monthly total cost summary

(5) Click a specific report to view details
You can also view cost reports issued in individual workspace environments. For details, please refer to
here.