This the multi-page printable view of this section. Click here to print.
Alert manager
- 1: Quick Start
- 2: Dashboard
- 3: Alert
- 4: Webhook
- 5: Event rule
- 6: Maintenance window
- 7: Notification
- 8: Escalation policy
1 - Quick Start
Creating alerts
Alerts can be created in two ways:
- Create an alert manually in the Cloudforet console.
- Automatically create through an external monitoring service connection
Creating an alert manually from a console
(1) Go to the [Alert manager > Alert] page and click the [Create] button.
(2) When the [Create alert] modal dialog opens, fill in the input form.
(2-1) Enter an [Alert title] and select [Urgency].
(2-2) Designate the project for which the alert occurred.
(2-3) Write [Comment] if an additional explanation is needed.
(3) Click the [OK] button to complete alert creation.
Connecting to an external monitoring service to receive alerts
When an external monitoring service is connected, an event message occurring in the service is automatically generated as an alert.
To receive alerts from the external monitoring, Webhook creation and Connection settings are required.
Webhook creation is performed in the Cloudforet console, but Connection settings must be done directly in the Cloud Service console that provides external monitoring services.
For more on how to connect an external monitoring service, see here.
Creating a webhook
To receive event messages from an external monitoring service, you need to create a webhook.
Webhooks can be created on the project detail page.
(1) Go to the [Alerts] tab of the project detail page and select the [Webhook] tab.
(2) Click the [Add] button.
(3) Write a name in an [Add webhook] modal dialog and select the plug-in of the external monitoring service to be connected.

(4) Click the [OK] button to complete set up.
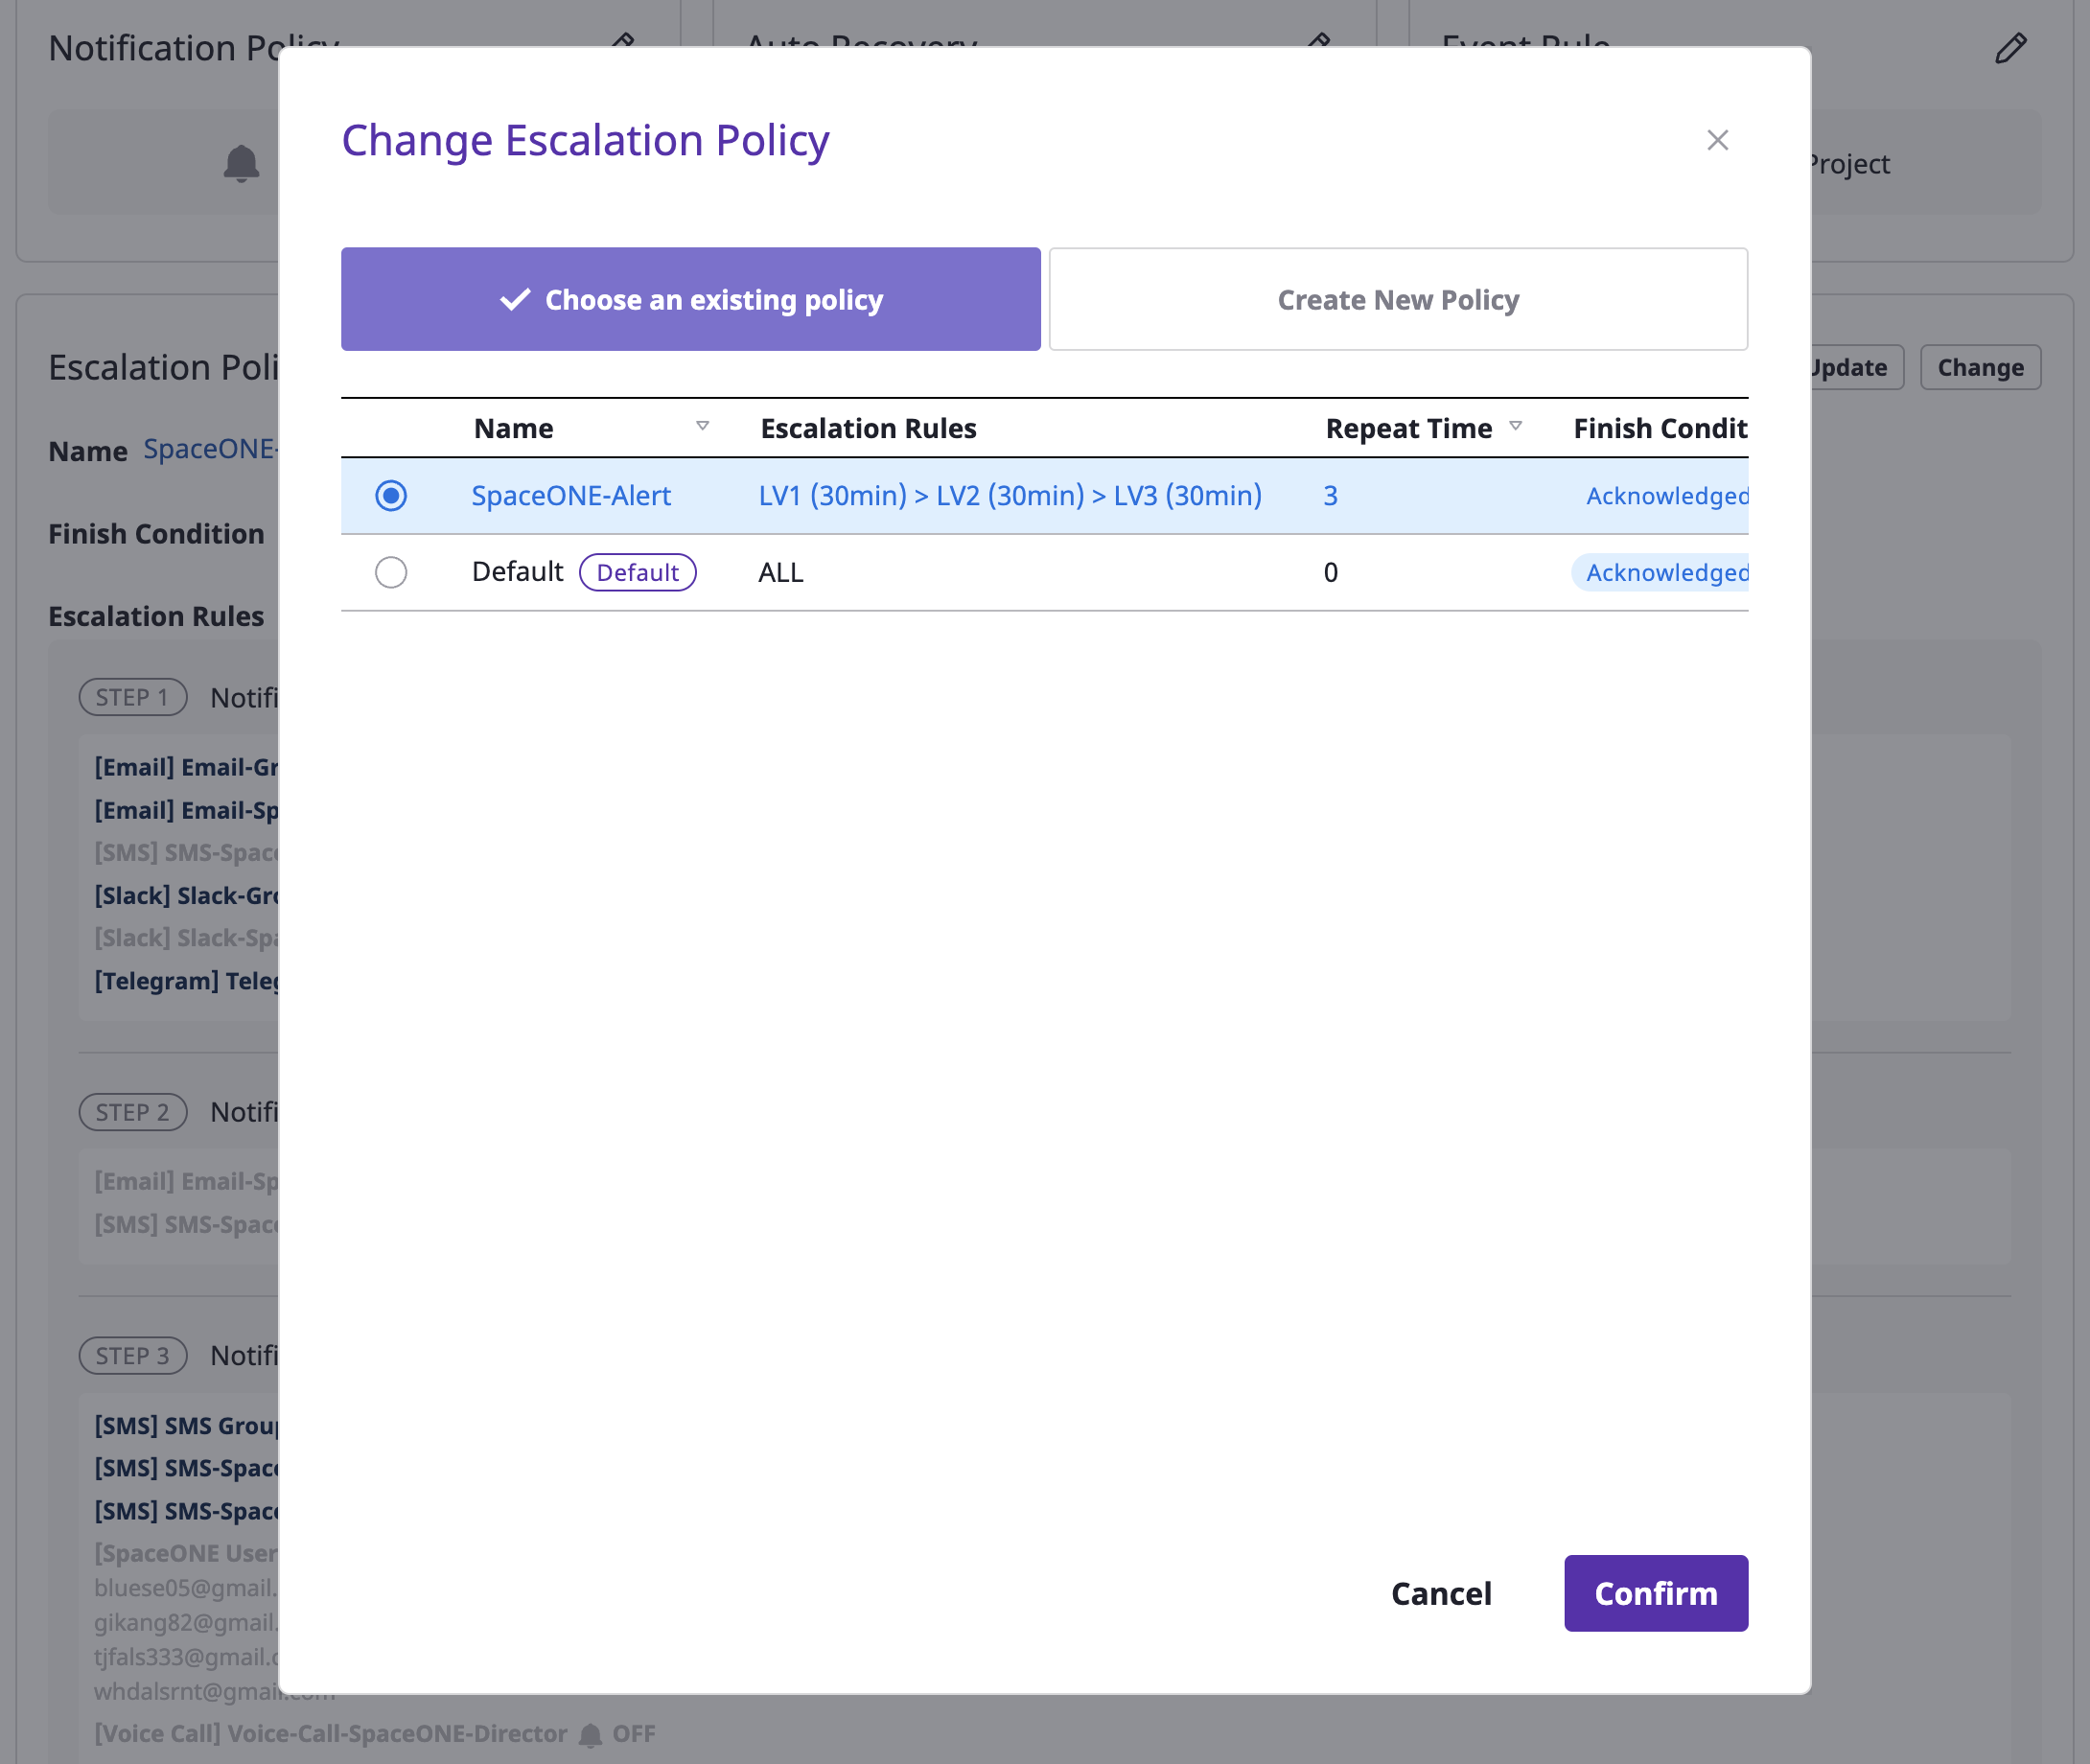
Escalation policy settings
Whether an alert received via a webhook is sent as a notification to project members is determined by escalation policy.
(1) Inside the [Alert] tab of the project detail page, move to the [Settings] tab.

(2) Click the [Change] button in the escalation policy area.
(3) After selecting the [Create new policy] tab, enter the settings to create an escalation policy.
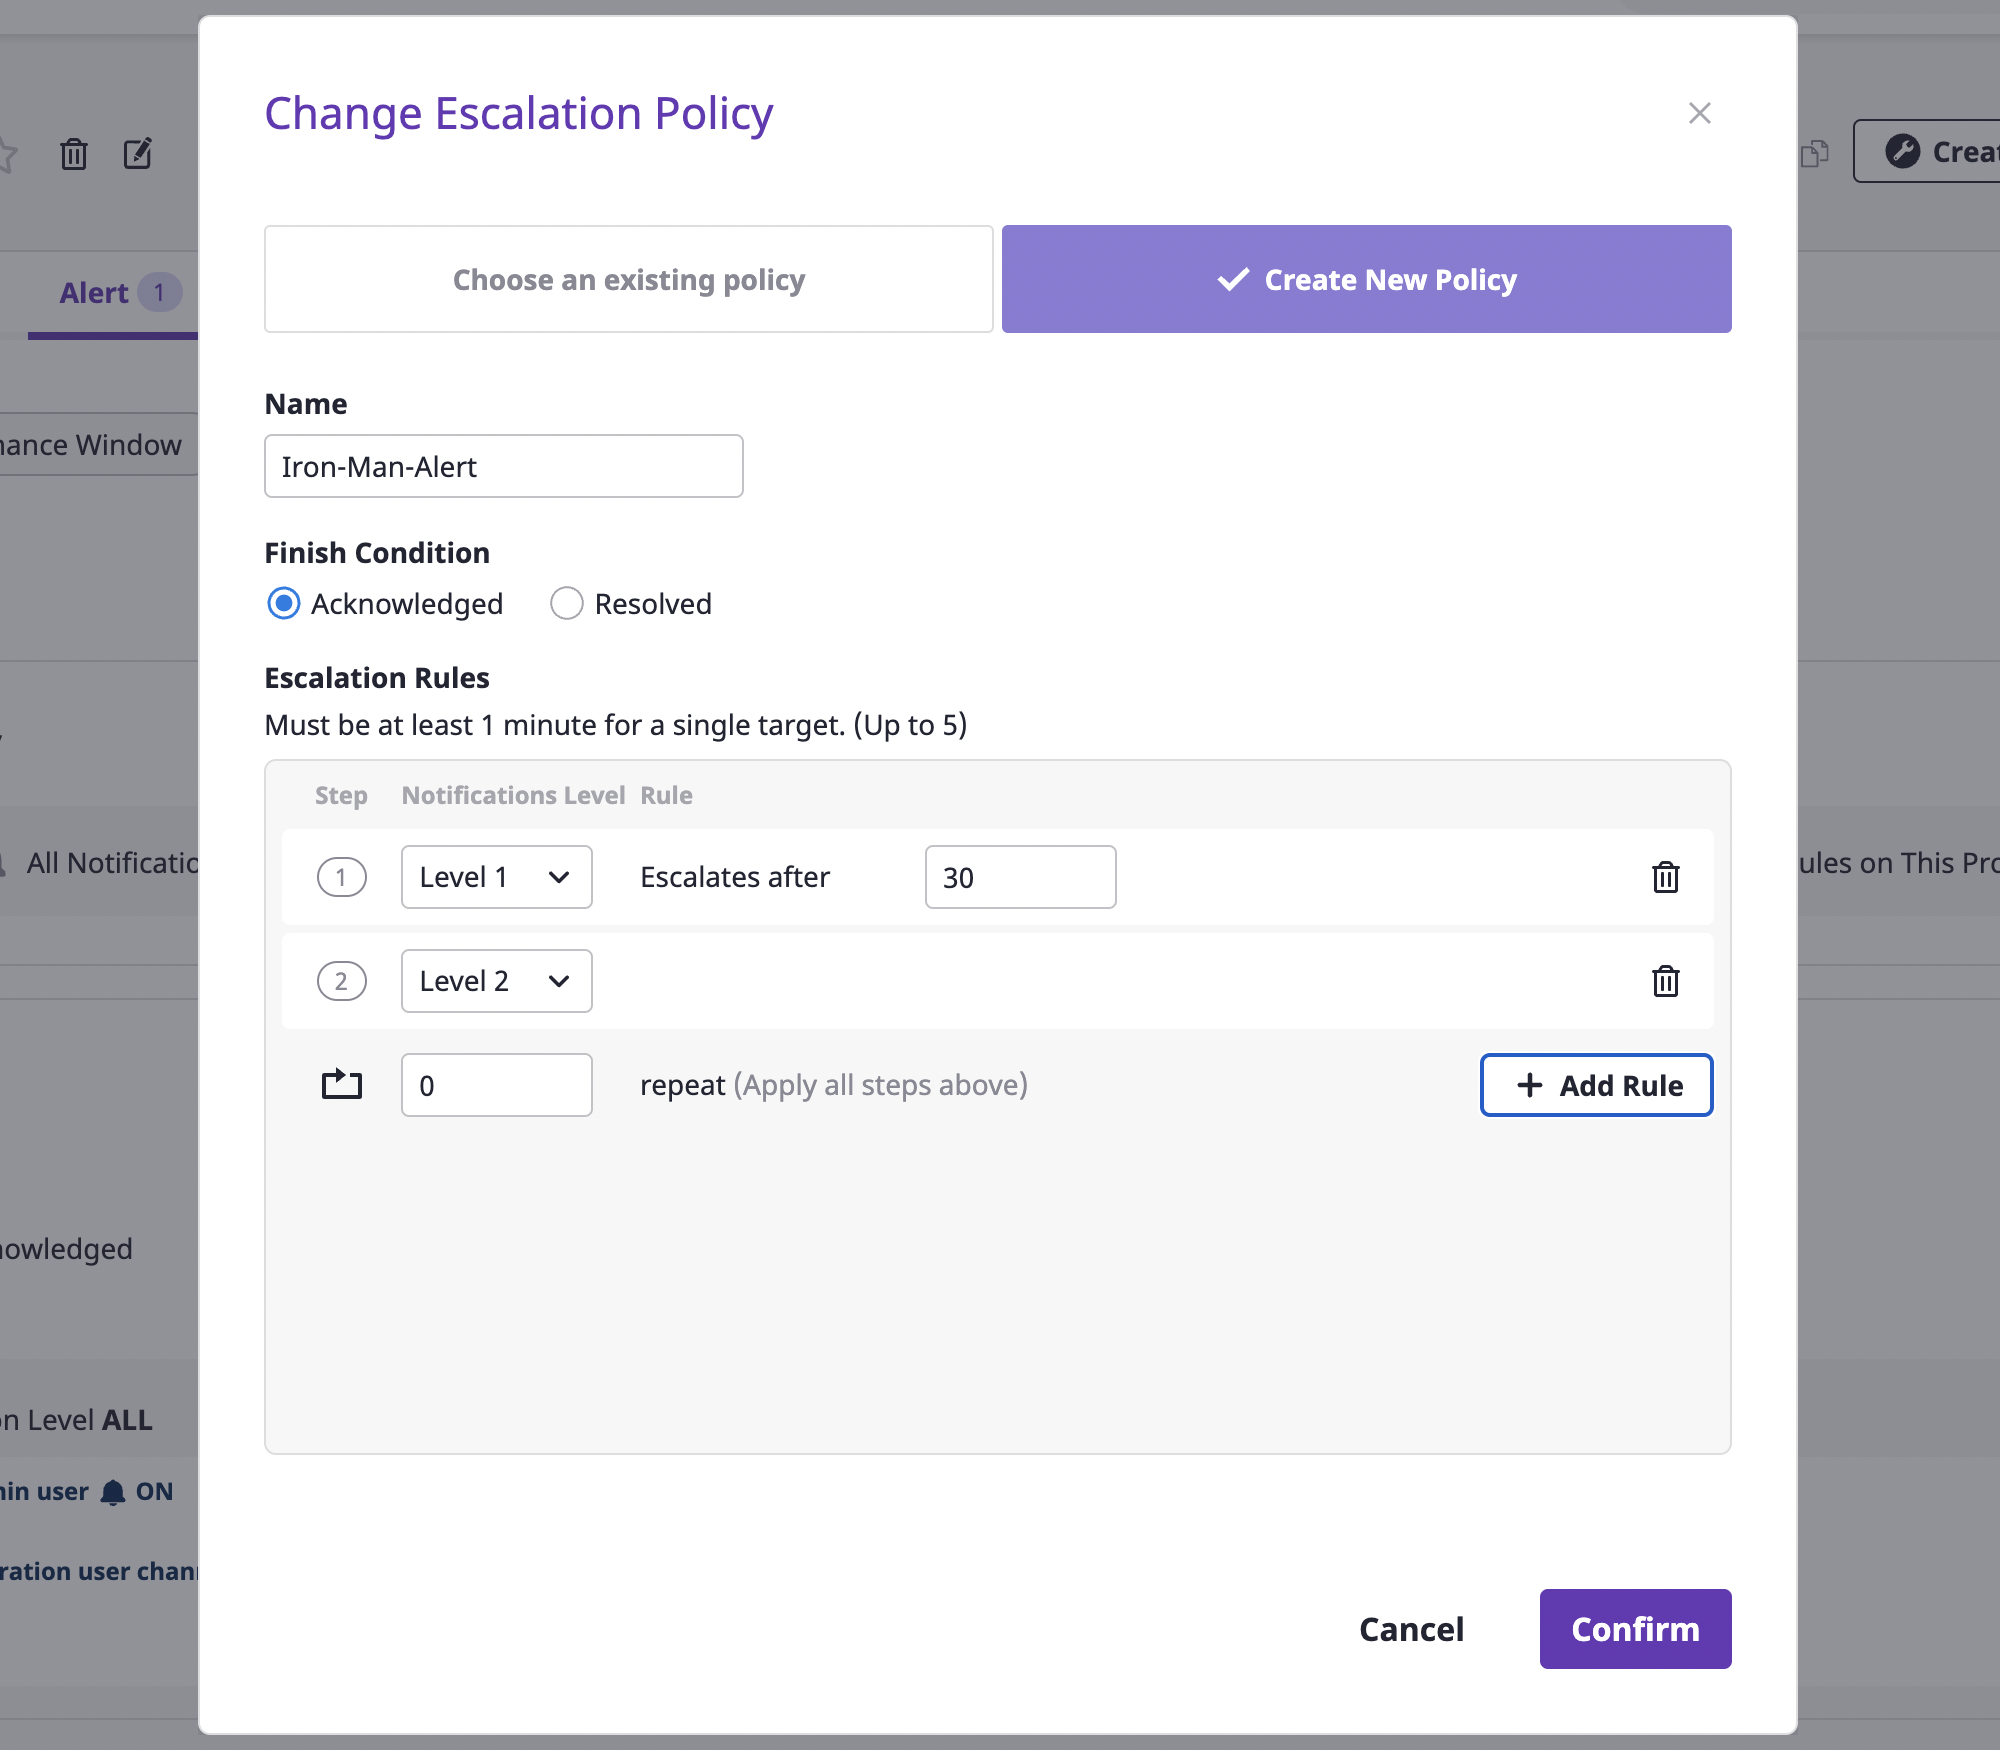
| Policy | Description |
|---|---|
| Exit condition (status) | Define the condition to stop the generated alarm. |
| Range | Indicate the scope in which escalation policy can be used. In case of "global," the policy can be used in all projects within the domain, and in case of "project," within the specified project. |
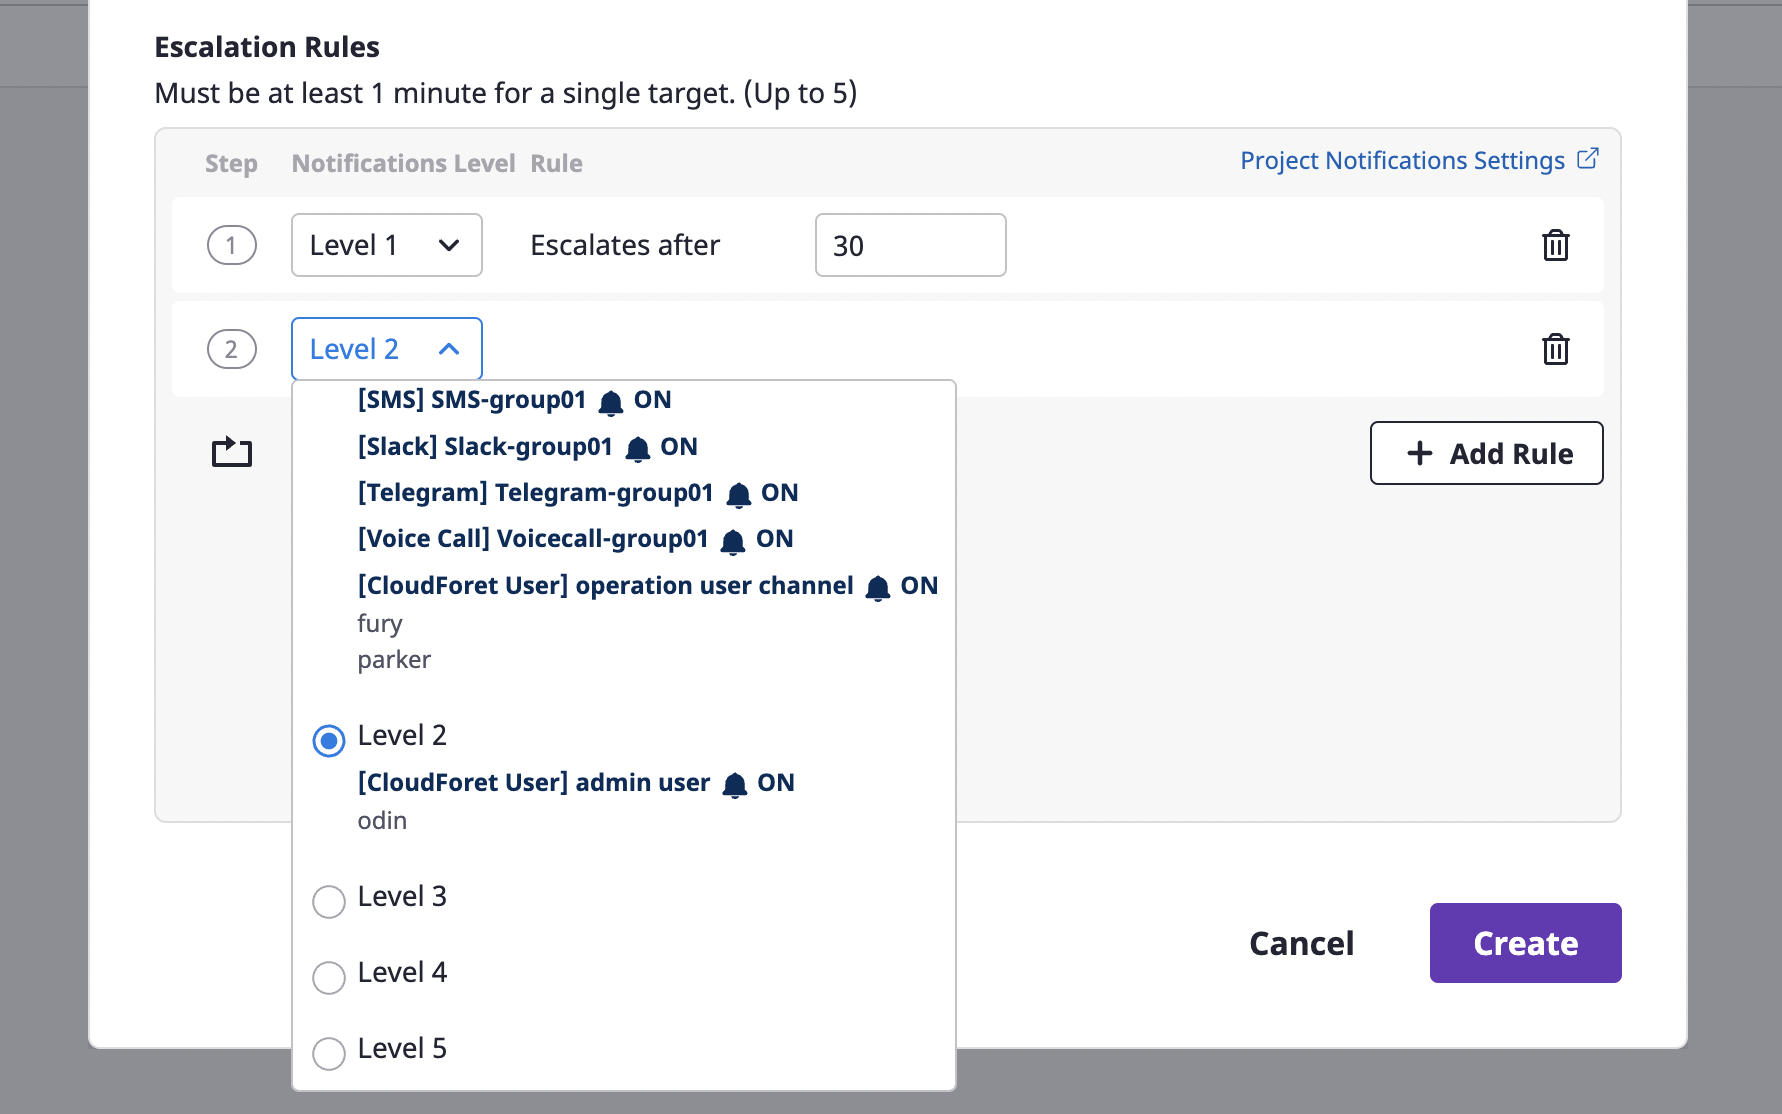
| Escalation Rules | All levels from LV1 to LV5 can be added. Alerts are sent to a notifications channel belonging to a set level, and a period between steps can be given in minutes from step 2 or higher. |
| Number of repetitions | Define how many times to repeat an alert notification. Notifications can be repeated up to 9 times. |
| Project (if you create it from the escalation rules page) | If the scope is a project, this indicates the project being targeted. |
(4) When all settings are completed, click the [OK] button to create the escalation policy.
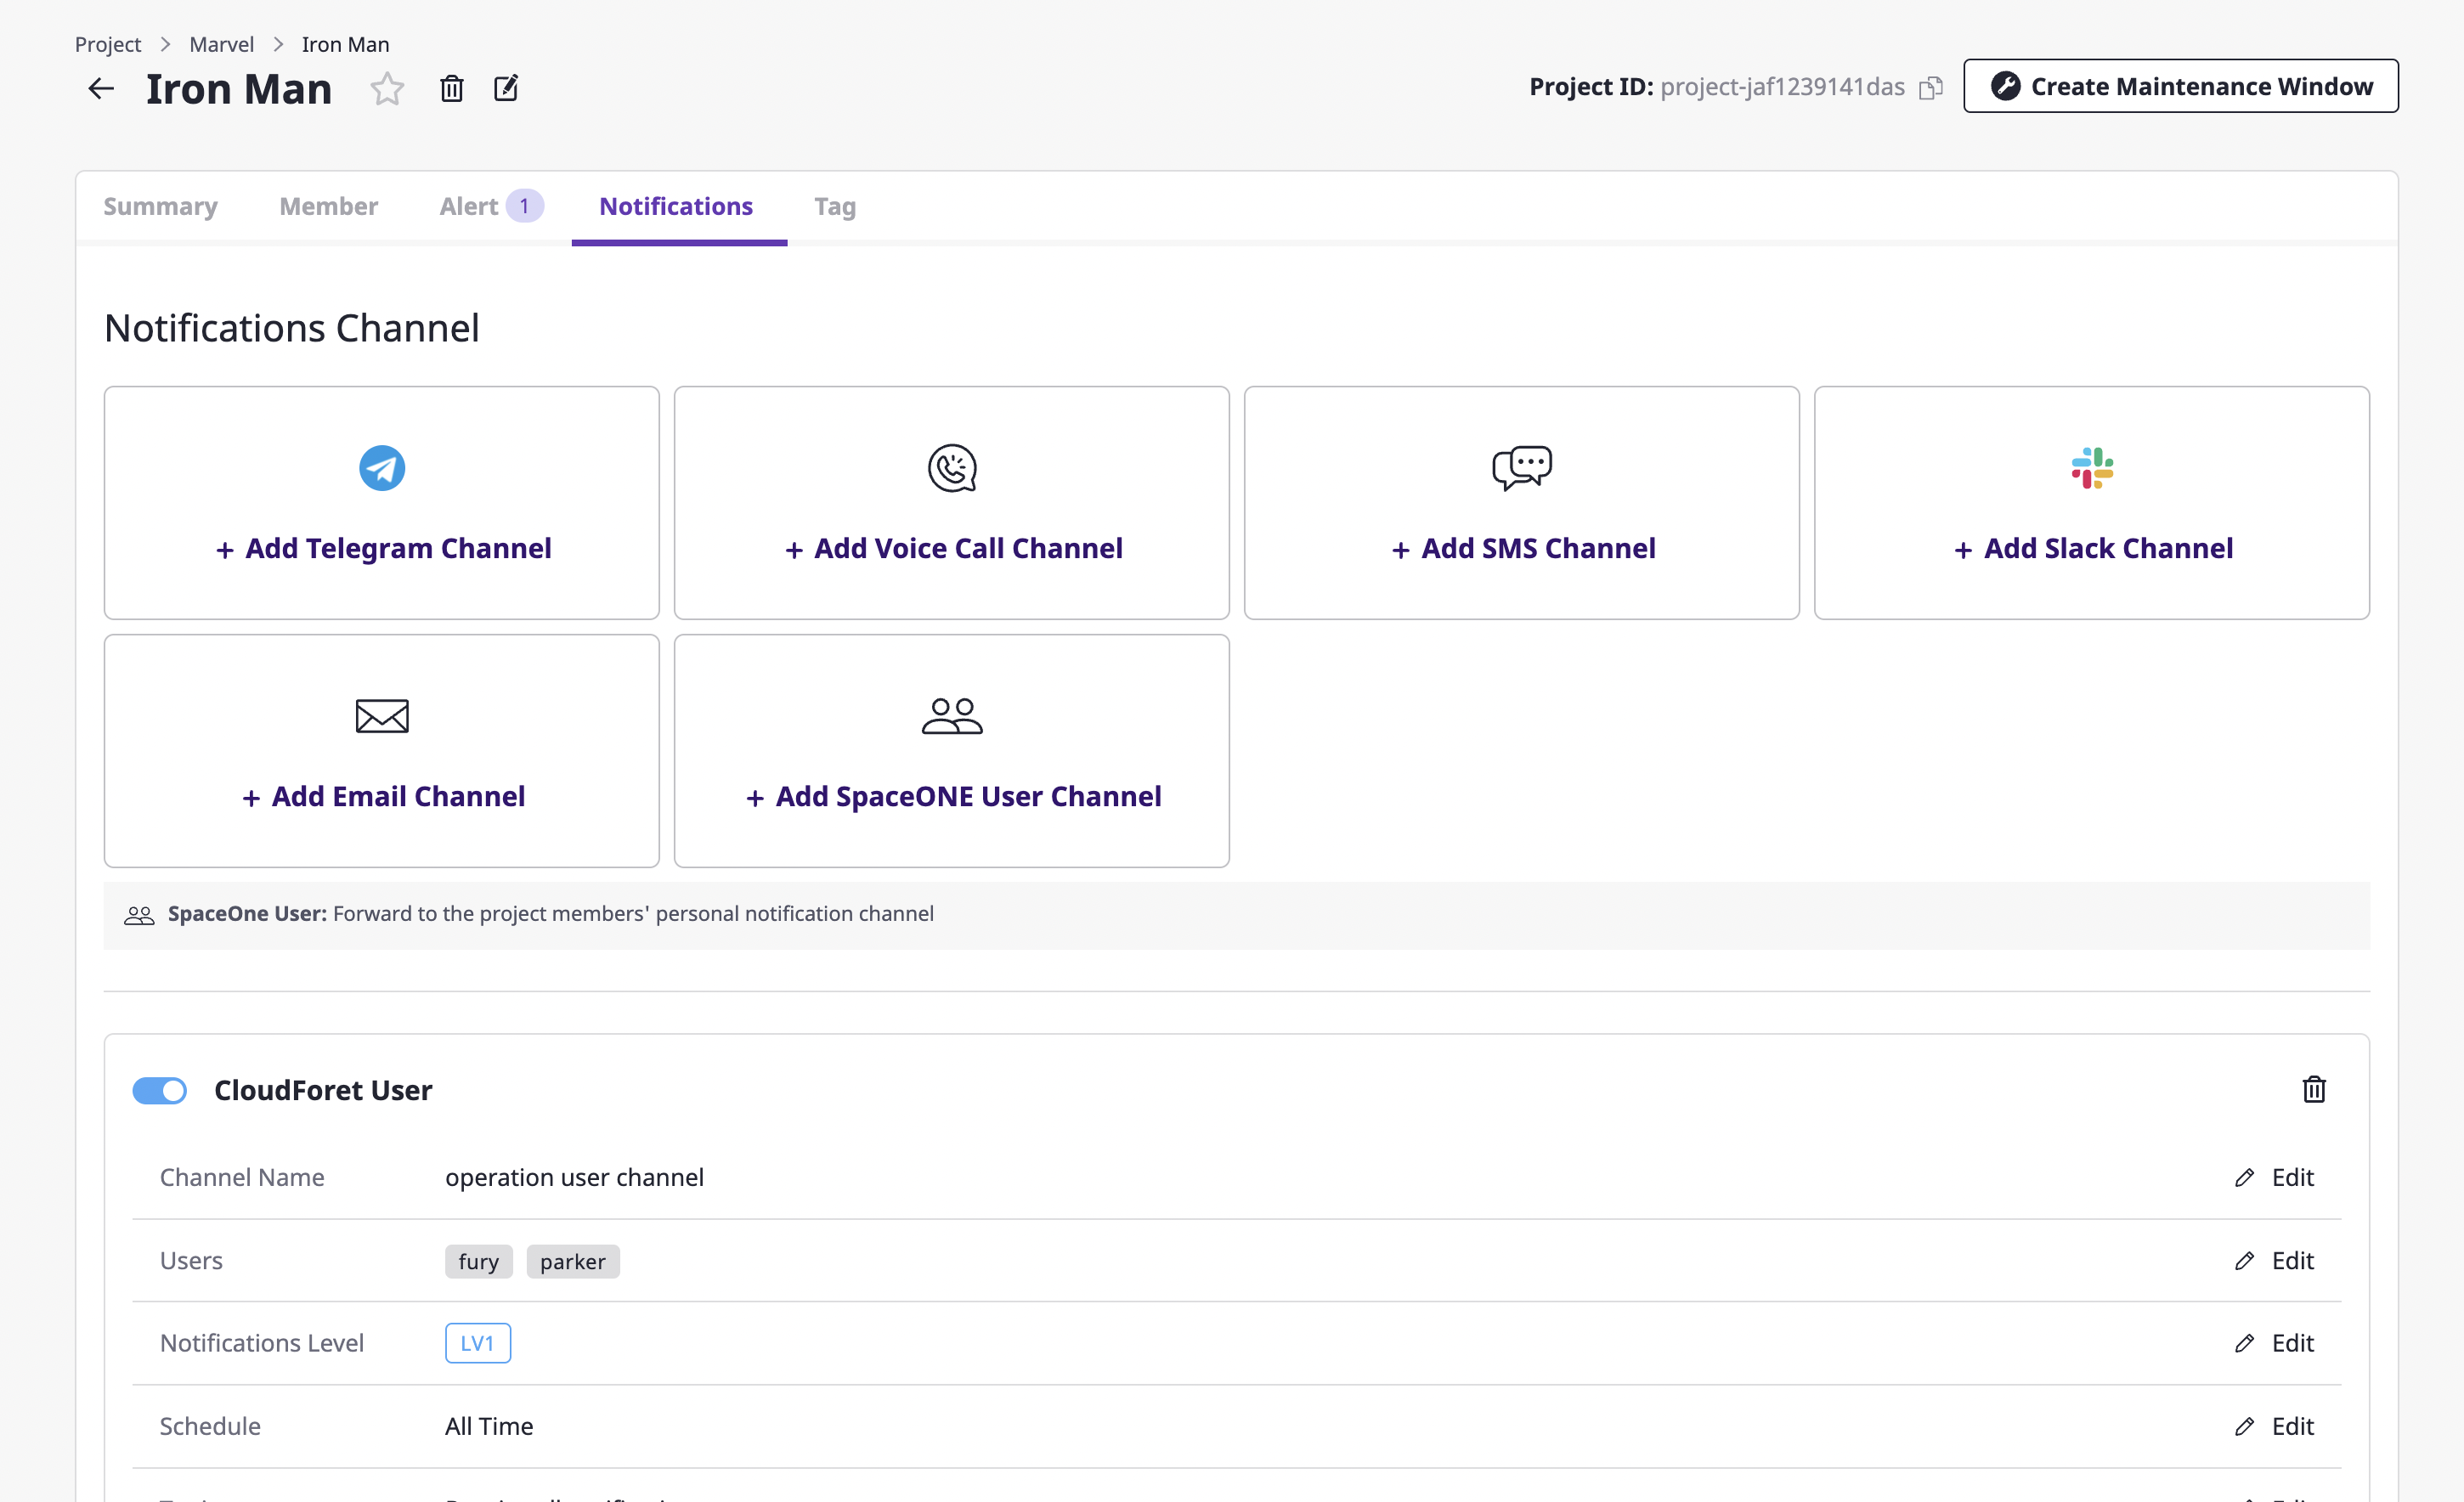
Notifications settings
In the [Notification] tab of the project detail page, you can decide whether or not to Create a notifications channel and enable it.
Notifications channel is a unit that expresses the systematic recipient area, including the method and level of notifications transmission. It helps to transmit alerts according to the level set in the escalation rule.
(1) On the project detail page, select the [Notification] tab and click the [Add channel] button of the desired notifications channel.
(2) On the notification creation page, enter the settings to create a notifications channel.
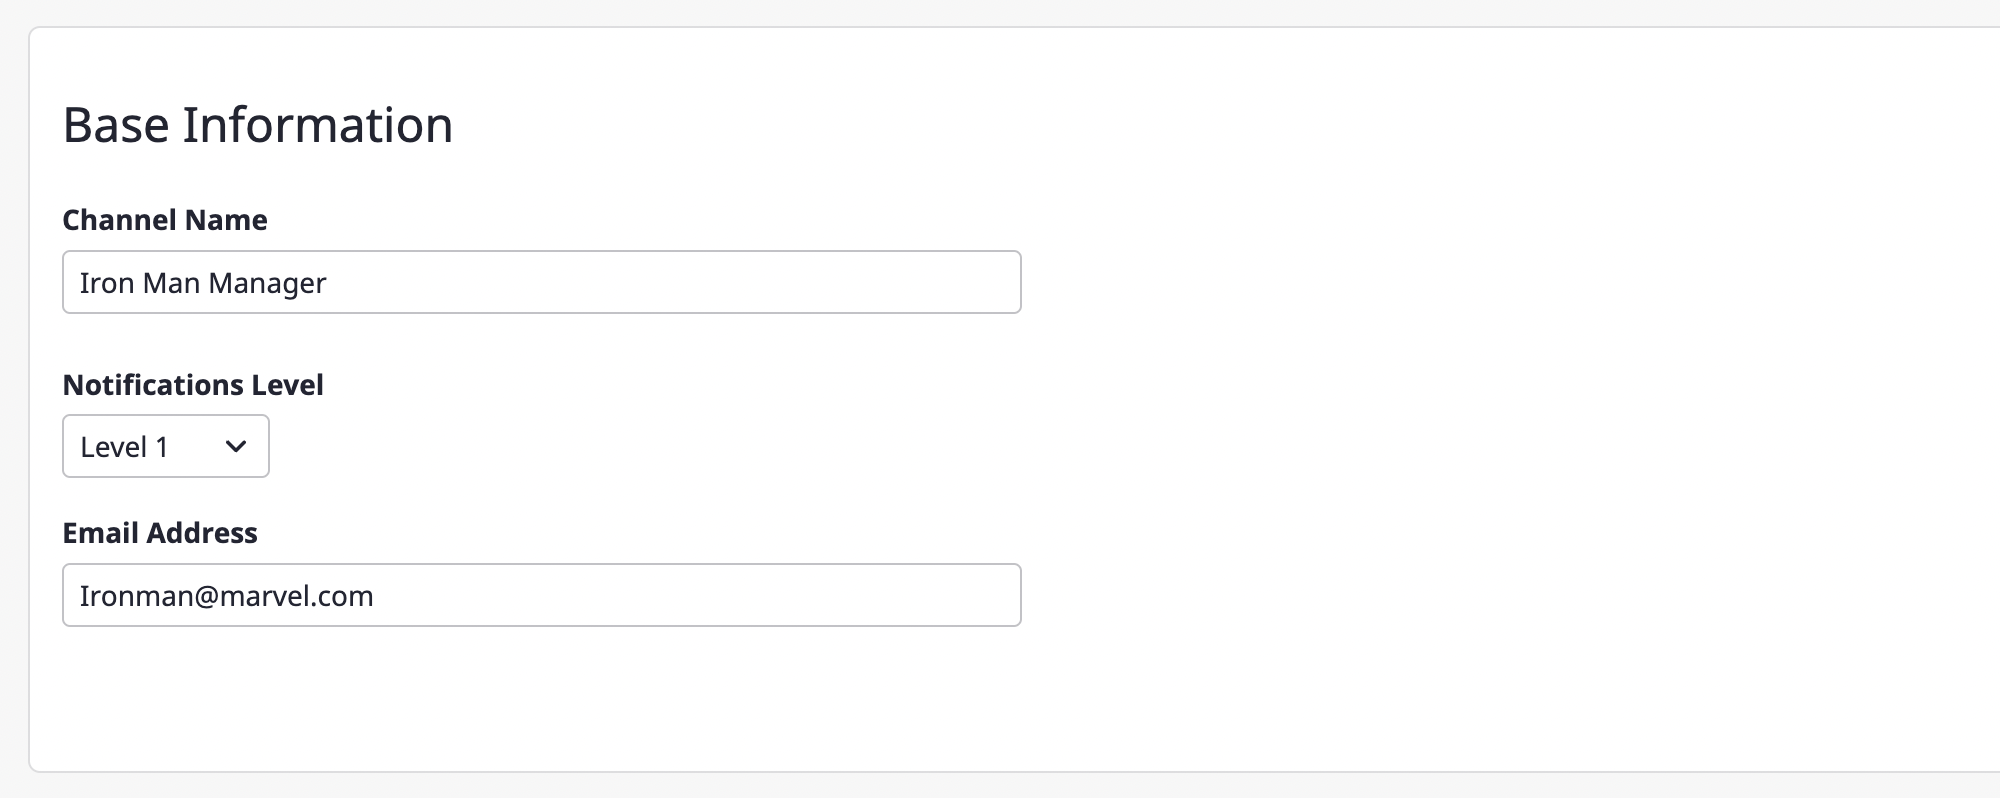
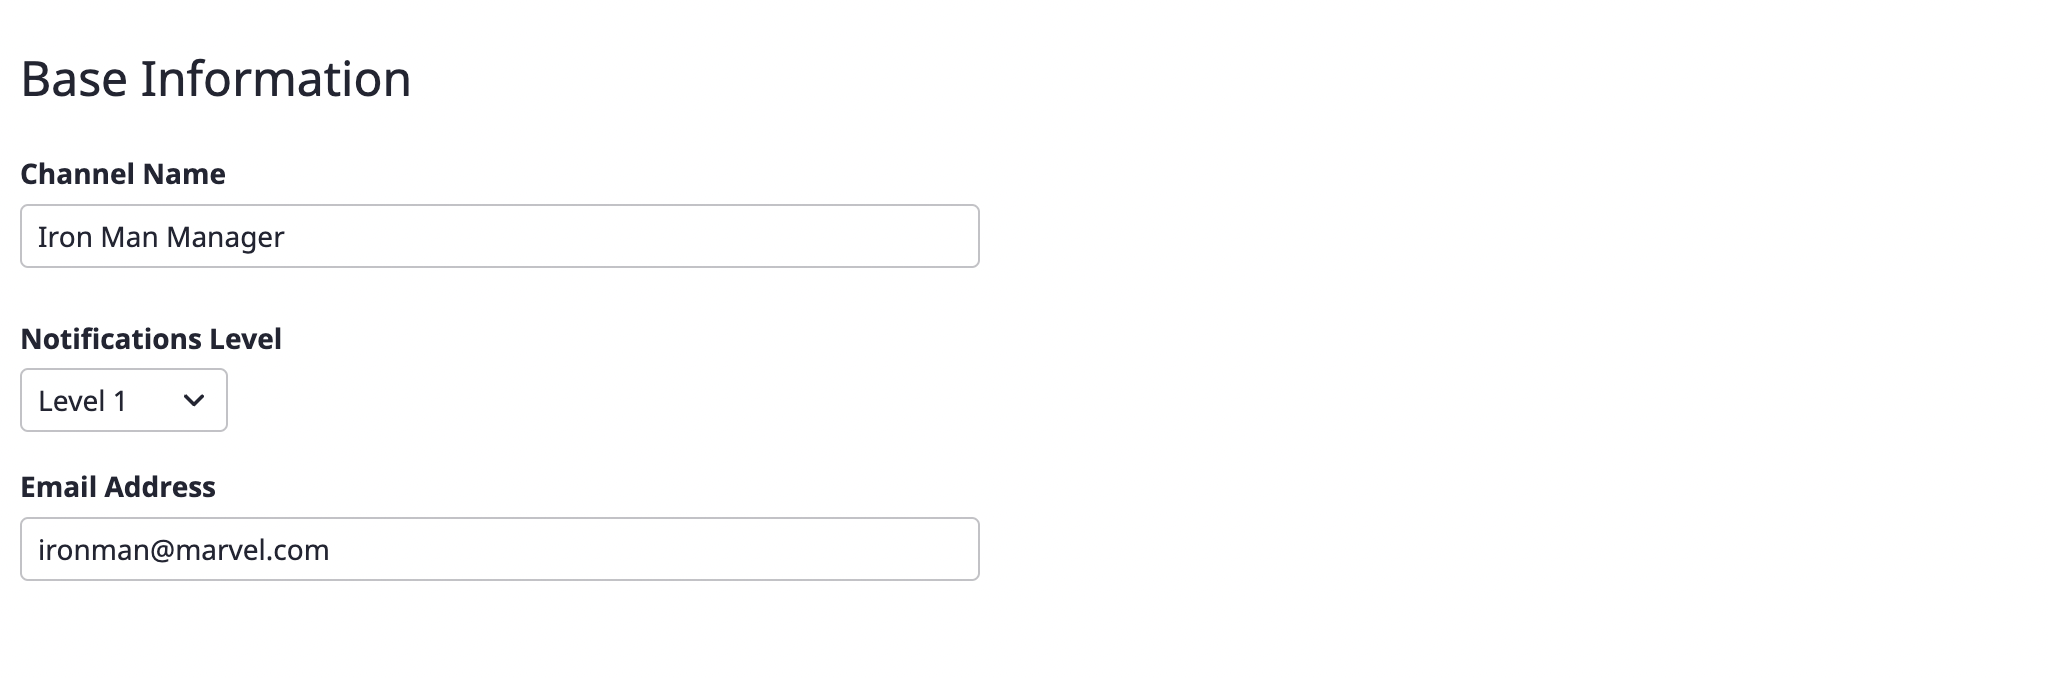
(2-1) Enter the basic information about the notifications channel you want to create, such as the required channel name and notification level. The [Channel name] and [Notification level] comprise the basic setting fields, and afterward, the remaining fields receive different information per channel.
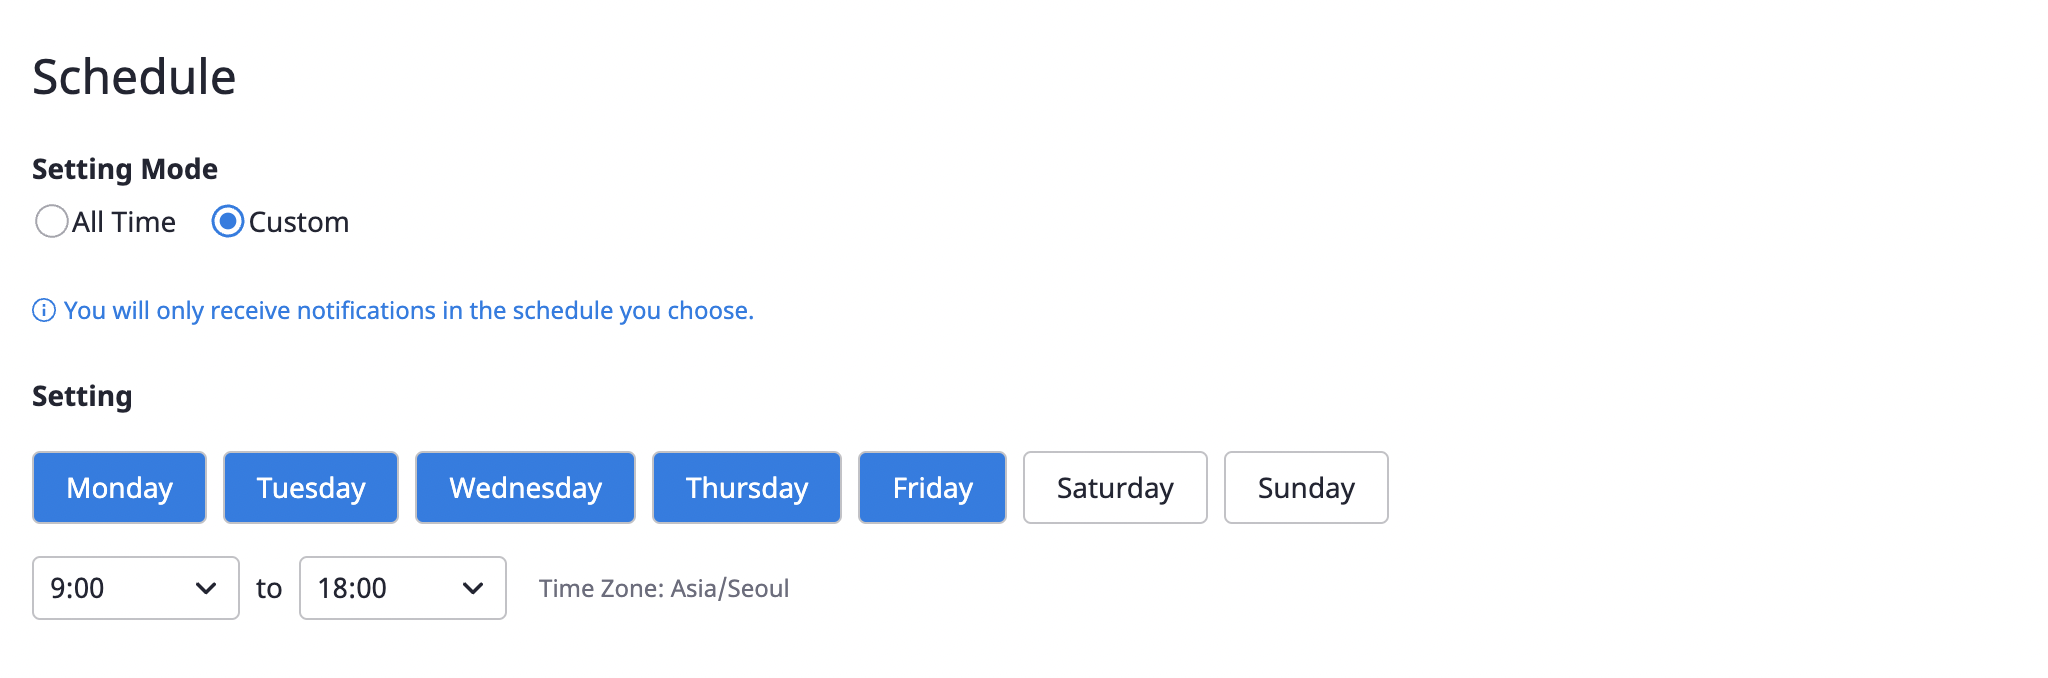
(2-2) You can set a schedule to receive notifications only at certain times.

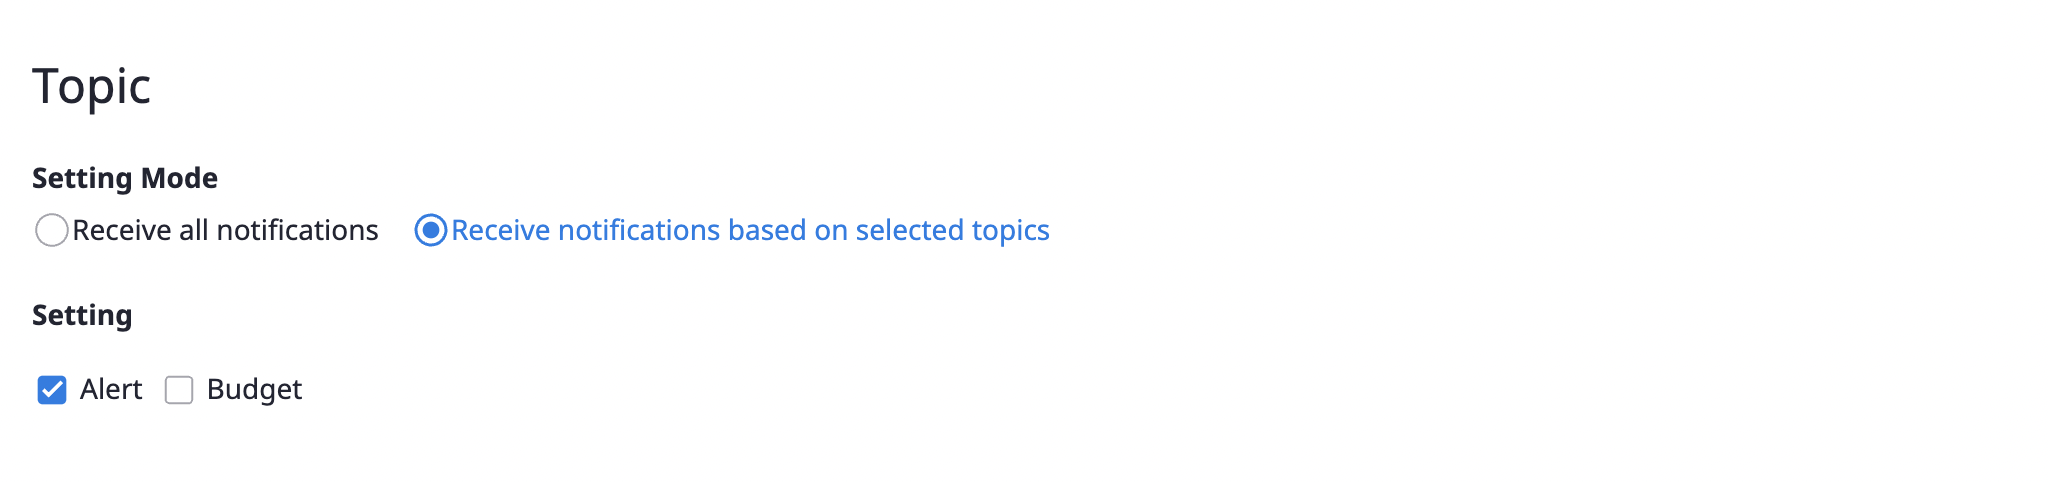
(2-3) Notifications can be received when an alert occurs or when a threshold for budget notifications was reached. You can set the occasions when you receive notifications in [Topic].
(3) Click the [Save] button to complete the notifications channel creation.
(4) Notifications channels that have been created can be checked at the bottom of the [Notification] tab.
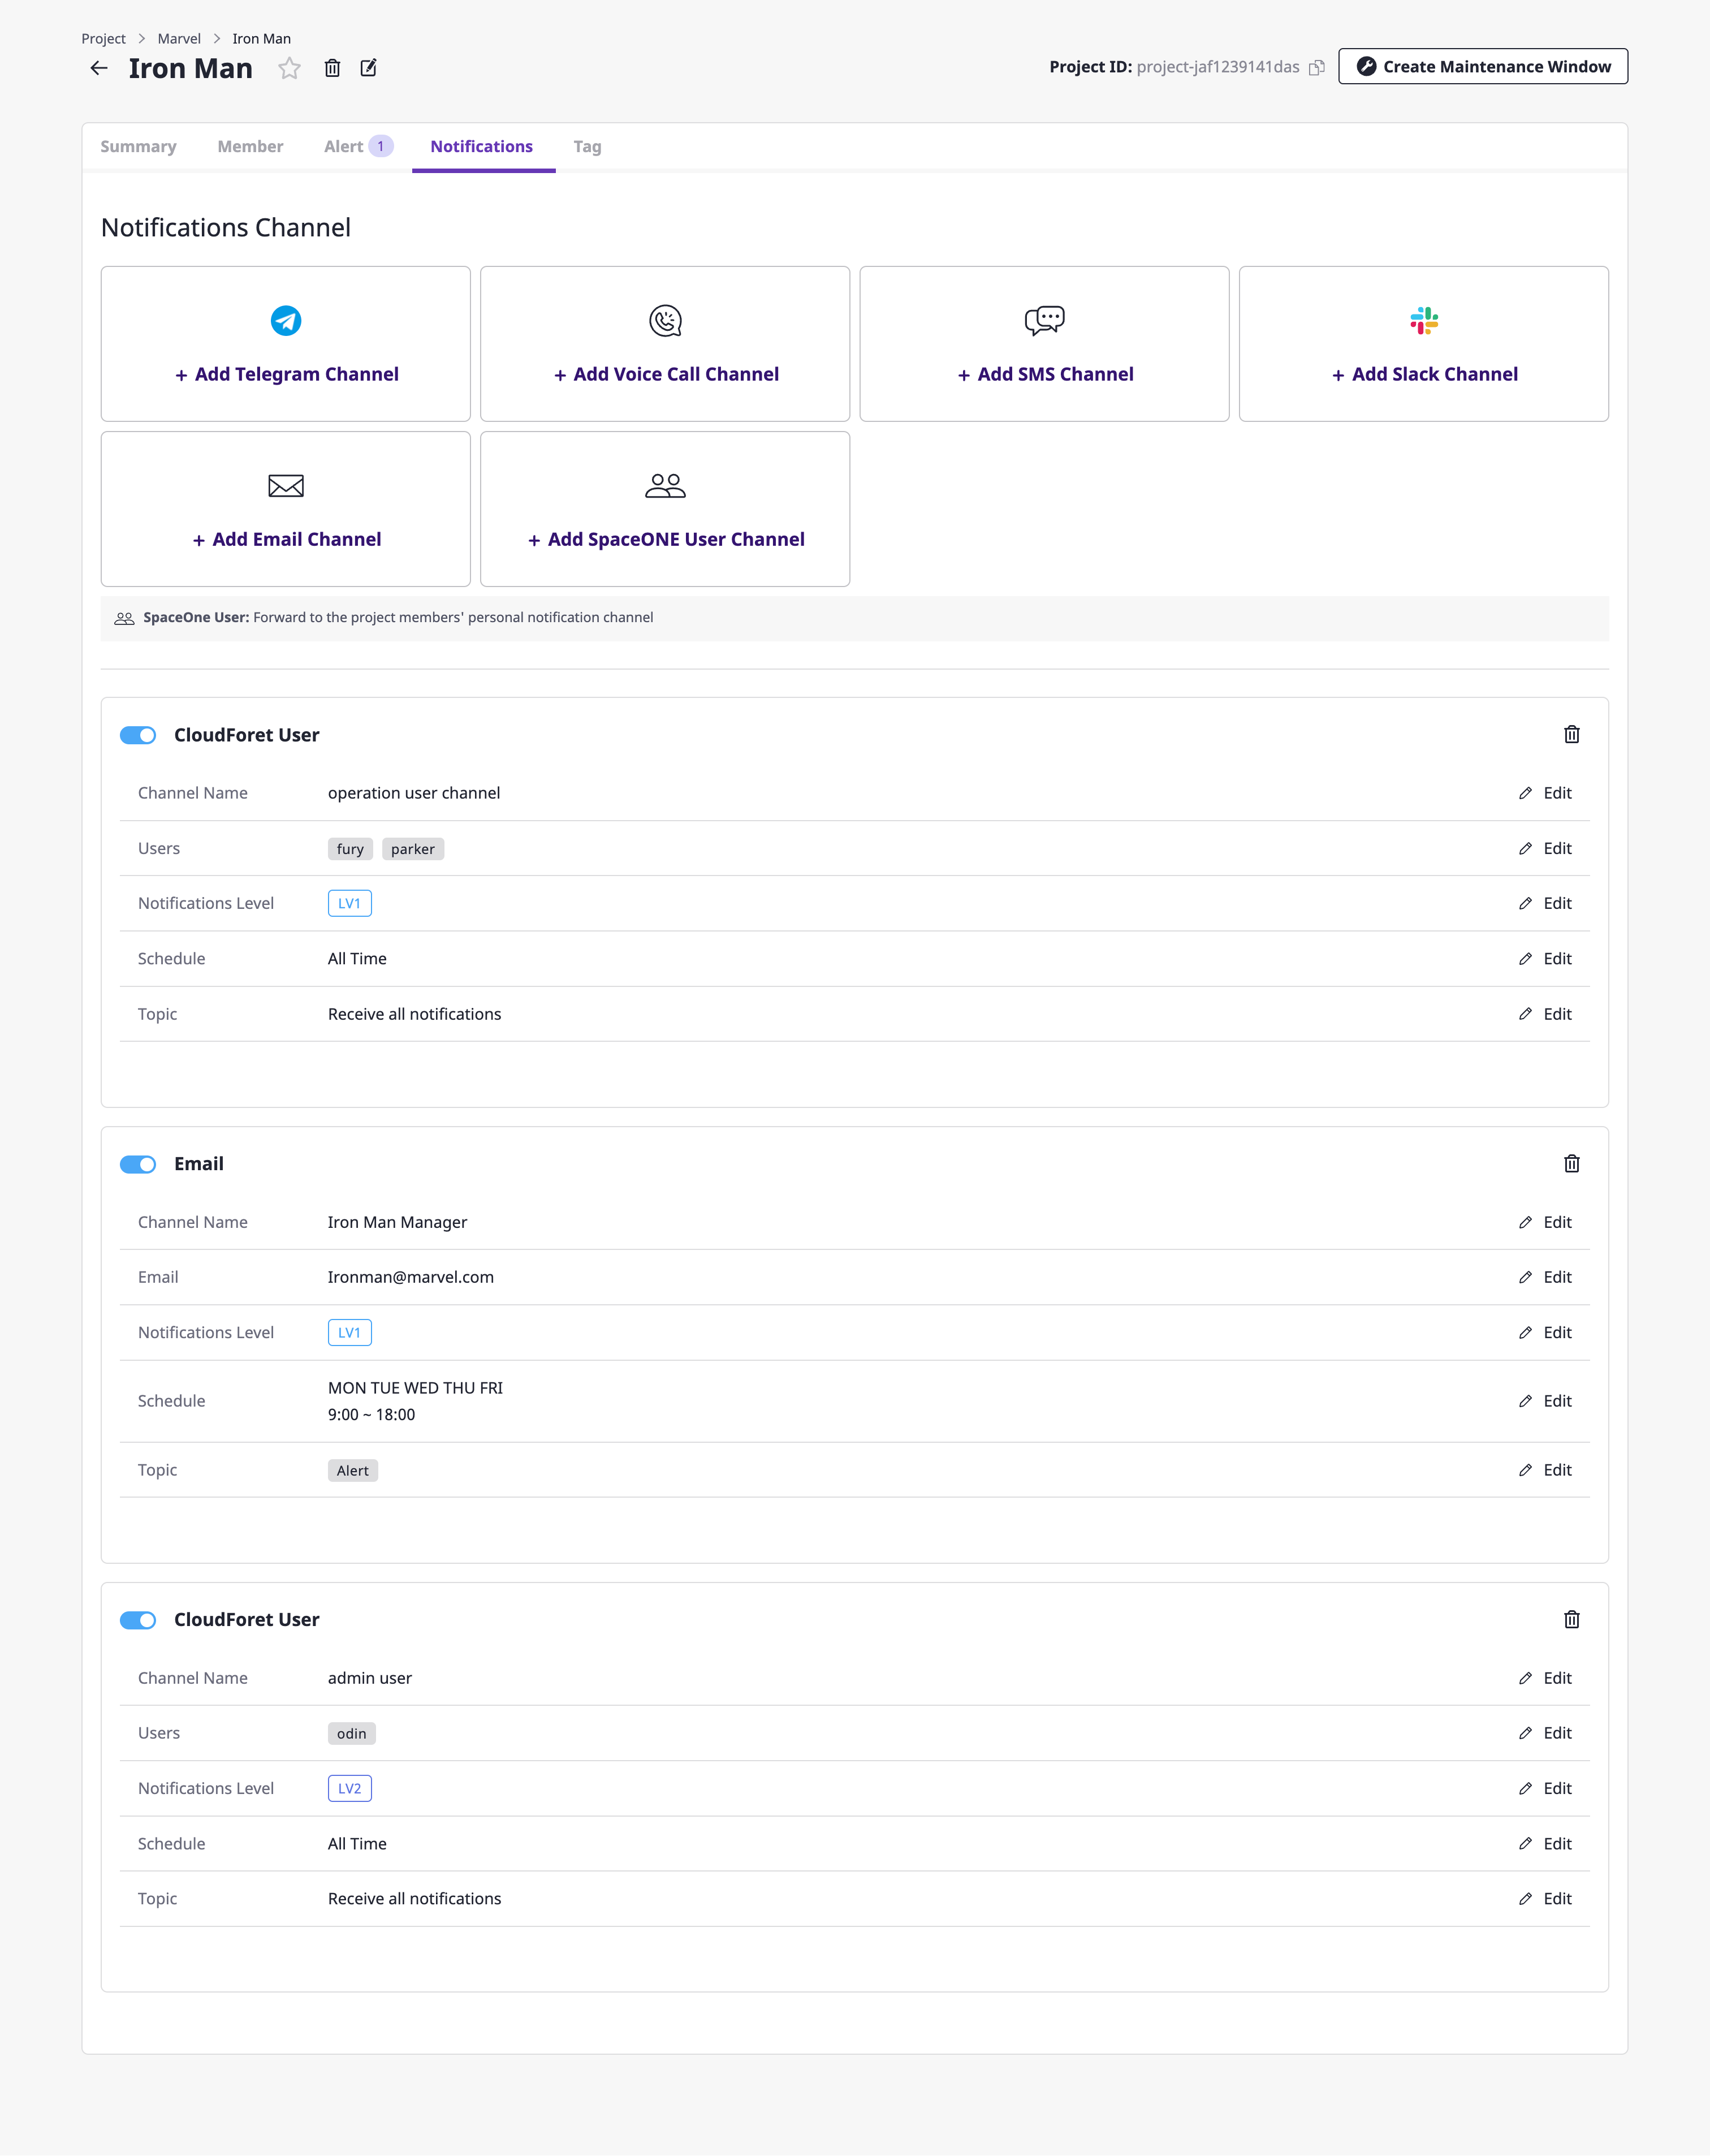
You can control whether to activate the corresponding notifications channel through the toggle button at the top left. Even if there is a level set up under the escalation policy, without activating the notifications channel, notifications will not go out.
2 - Dashboard
You can check alerts for each of the three main parts, as follows:
Check alerts by state
At the top of the dashboard, you can view alerts by State.
Click each item to go to the Alert details page, where you can check detailed information or implement detailed settings.

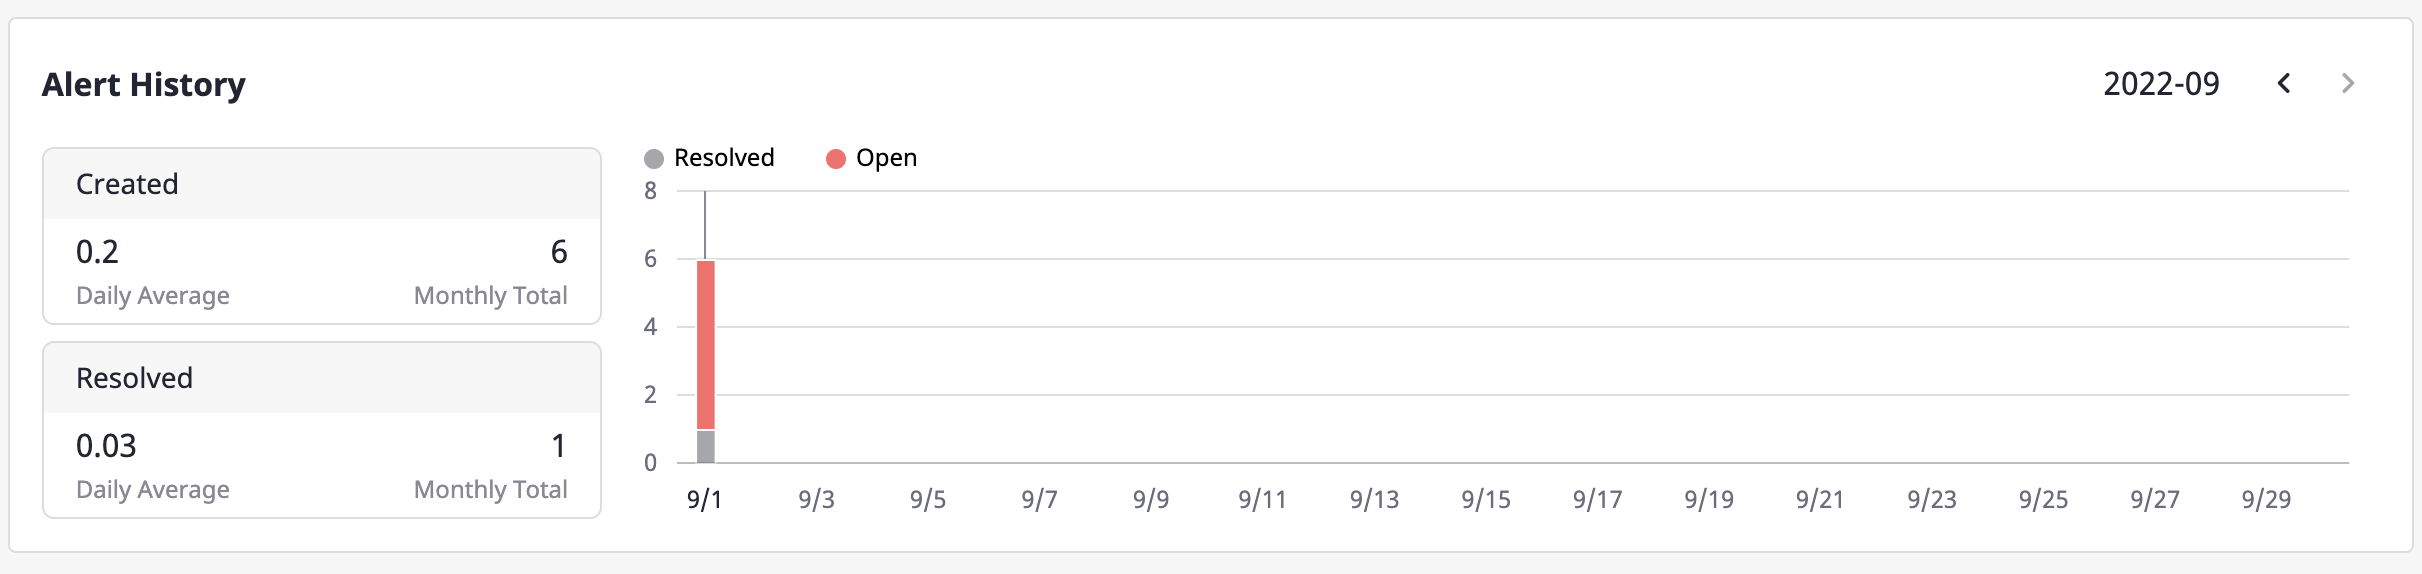
Alerts history
Alert history occurred in Project is displayed.
You can see the daily data on the chart, and the increase/decrease in alerts on the card compared to the previous month.
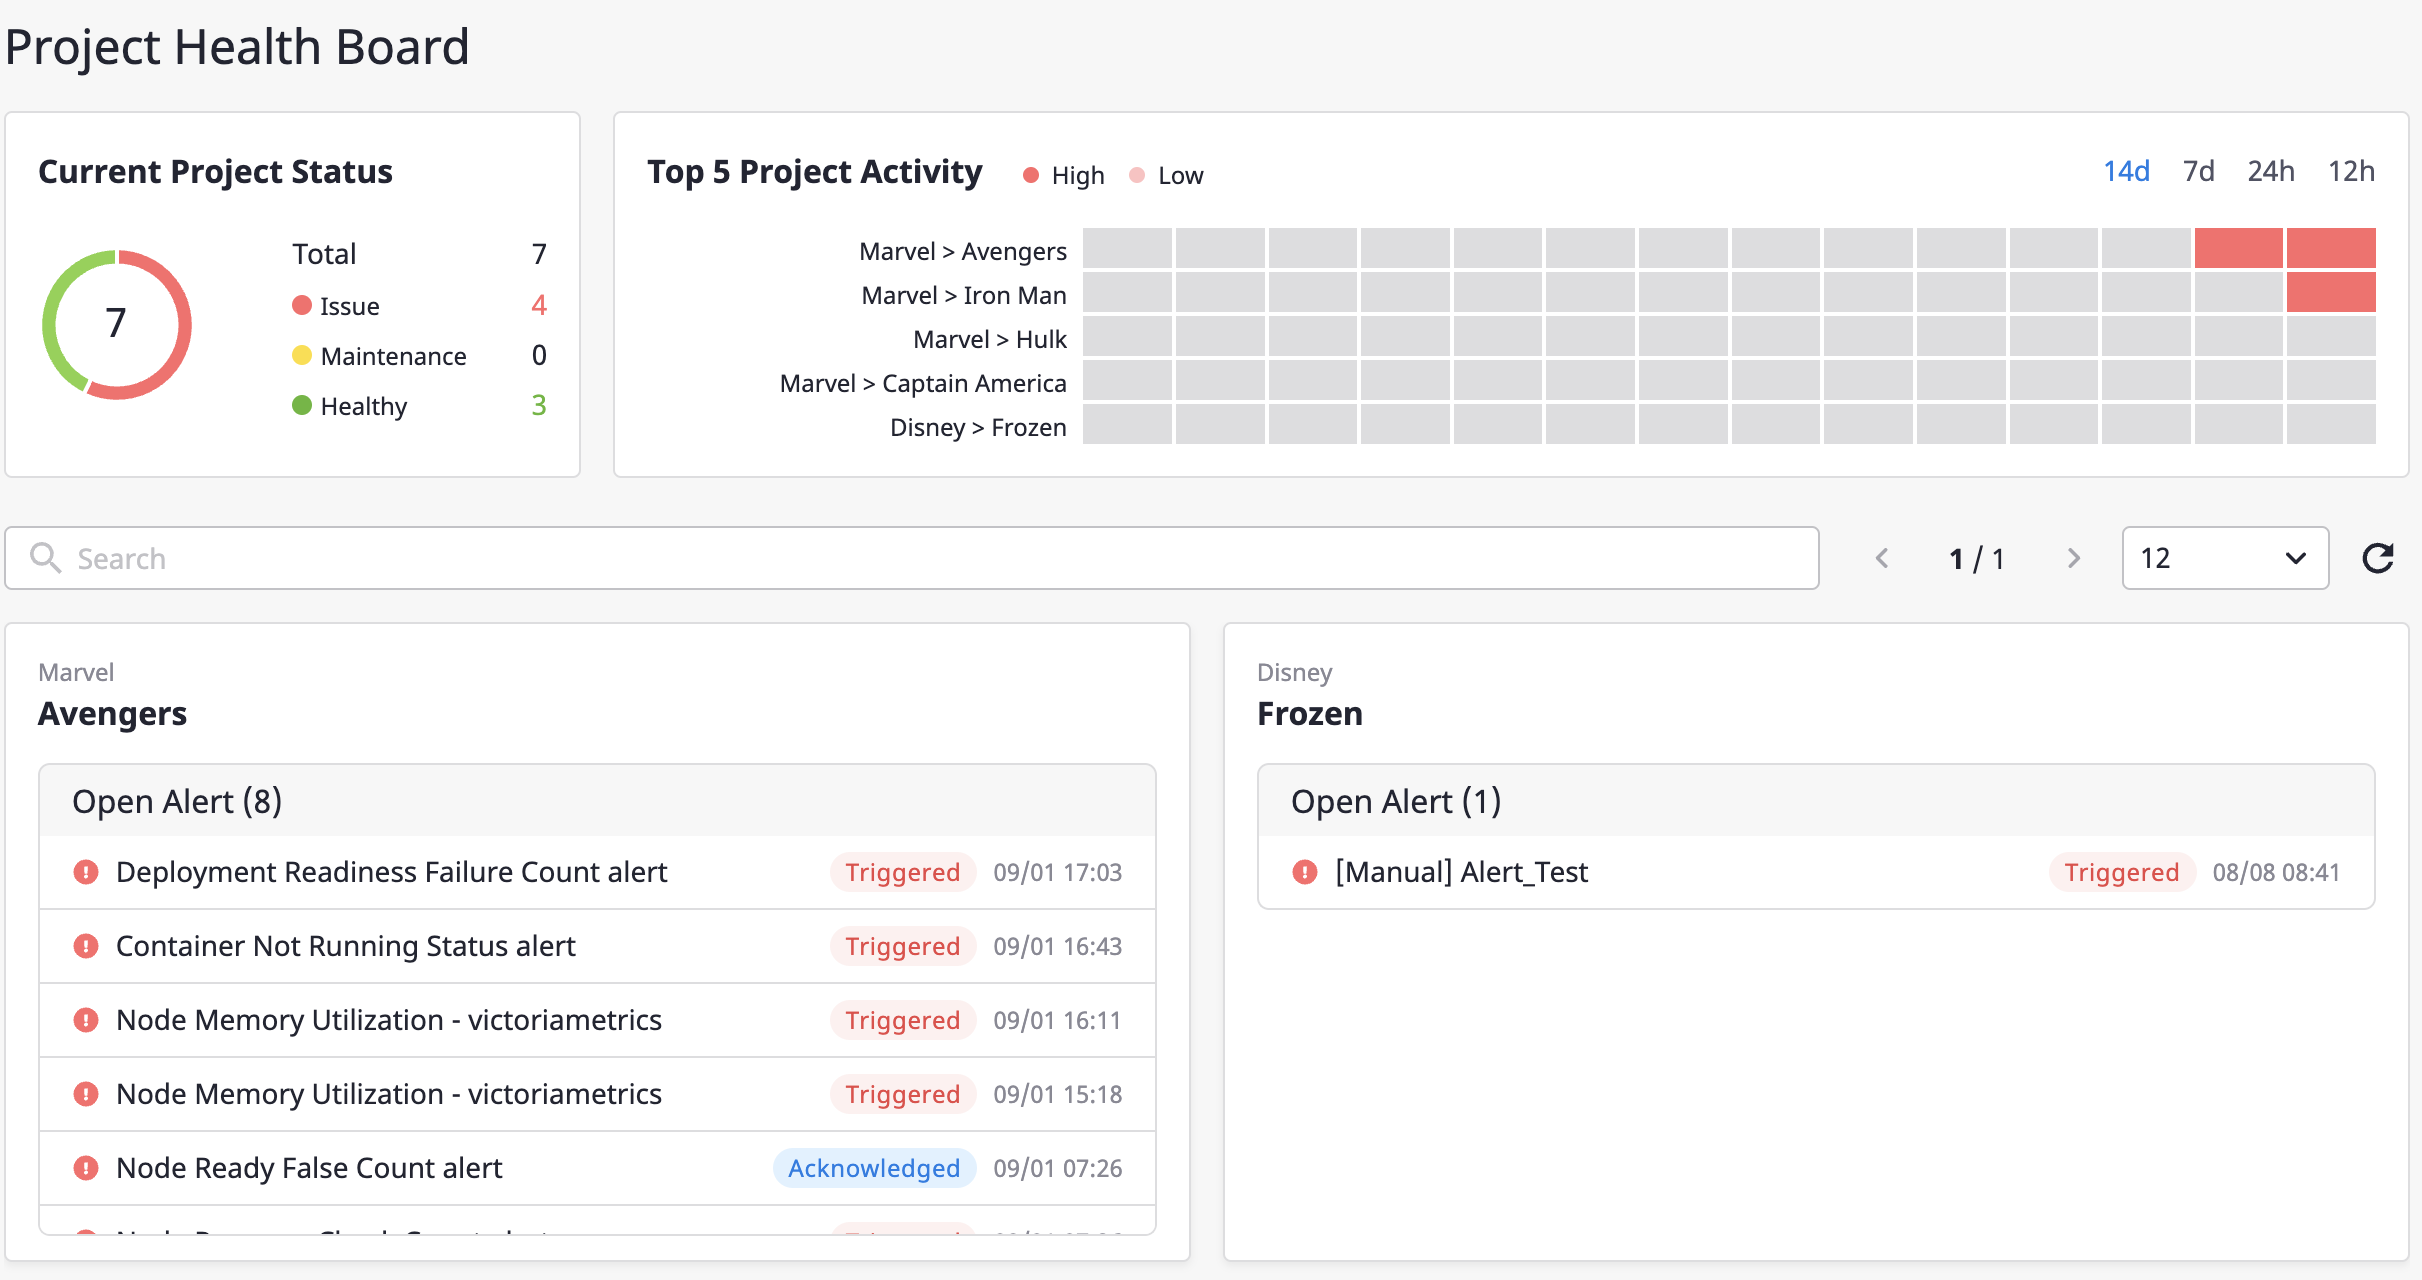
Project dashboard
[Project dashboard] shows the alert information of each project related to a user.
In the case of [Top 5 project activities], projects are displayed in the order of having the most alerts in the [Open] state.
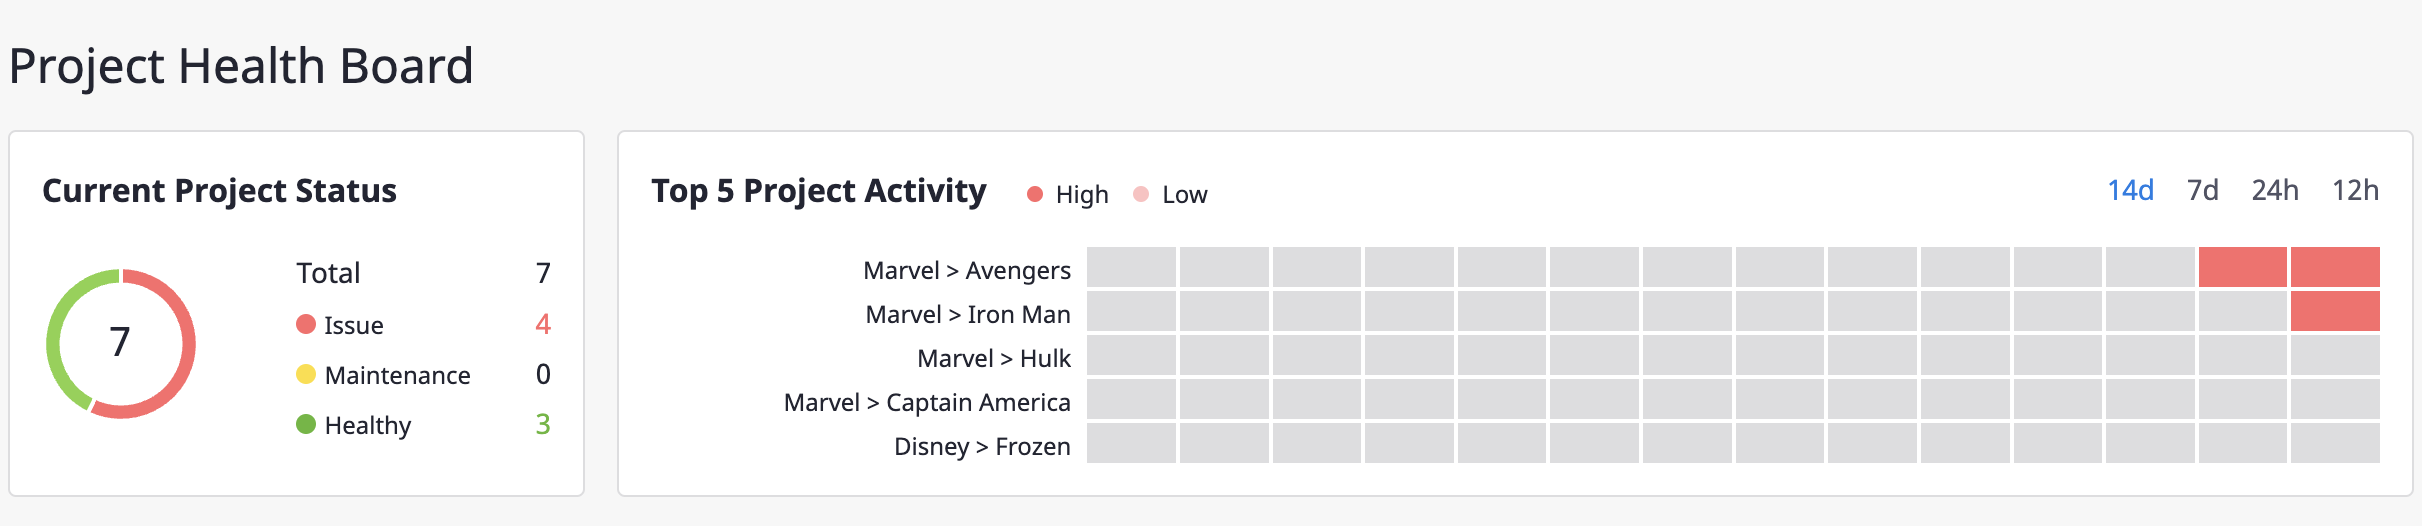
At the bottom of the search bar, the alerted projects are displayed in the order of highest activity.
Only projects marked with an issue status are visible, and when all the alerts reach a cleared status, they are changed to normal status and are no longer visible on the dashboard.
3 - Alert
State
Alerts have one of the following states:
| State | Description |
|---|---|
| OK | State in which an alert has been assigned and is being processed |
| Created | State in which alert was first registered |
| Resoled | State in which the contents of alerts such as faults, inspection, etc., have been resolved |
| Error | State in which an event has been received through webhook connections but alerts were not normally registered due to error |
Urgency
There are two types of urgent alerts in Cloudforet: high and low.
Whereas in the case of the Manual creation of alerts, it is created as one of two types, high and low, in the case of automatic creation through webhook connections, urgency is measured according to Severity.
Severity
Severity indicates the intensity of the risk of an event coming from a typical external monitoring hook.
There are five severity levels: critical, error, warning, info,andnot_available,` and, when creating alerts from them, Cloudforet sets the urgency level based on the following criteria:
• High : critical, error, and not available
• Low: warning and info
Creating alerts
Alerts can be created in two ways:
- Manual creation: create an alert manually in the Cloudforet console.
- Auto generation: create a webhook and receives events from an external monitoring service connected to the webhook. And it automatically generates an alert by purifying the received event message.
Creating an alert manually from a console
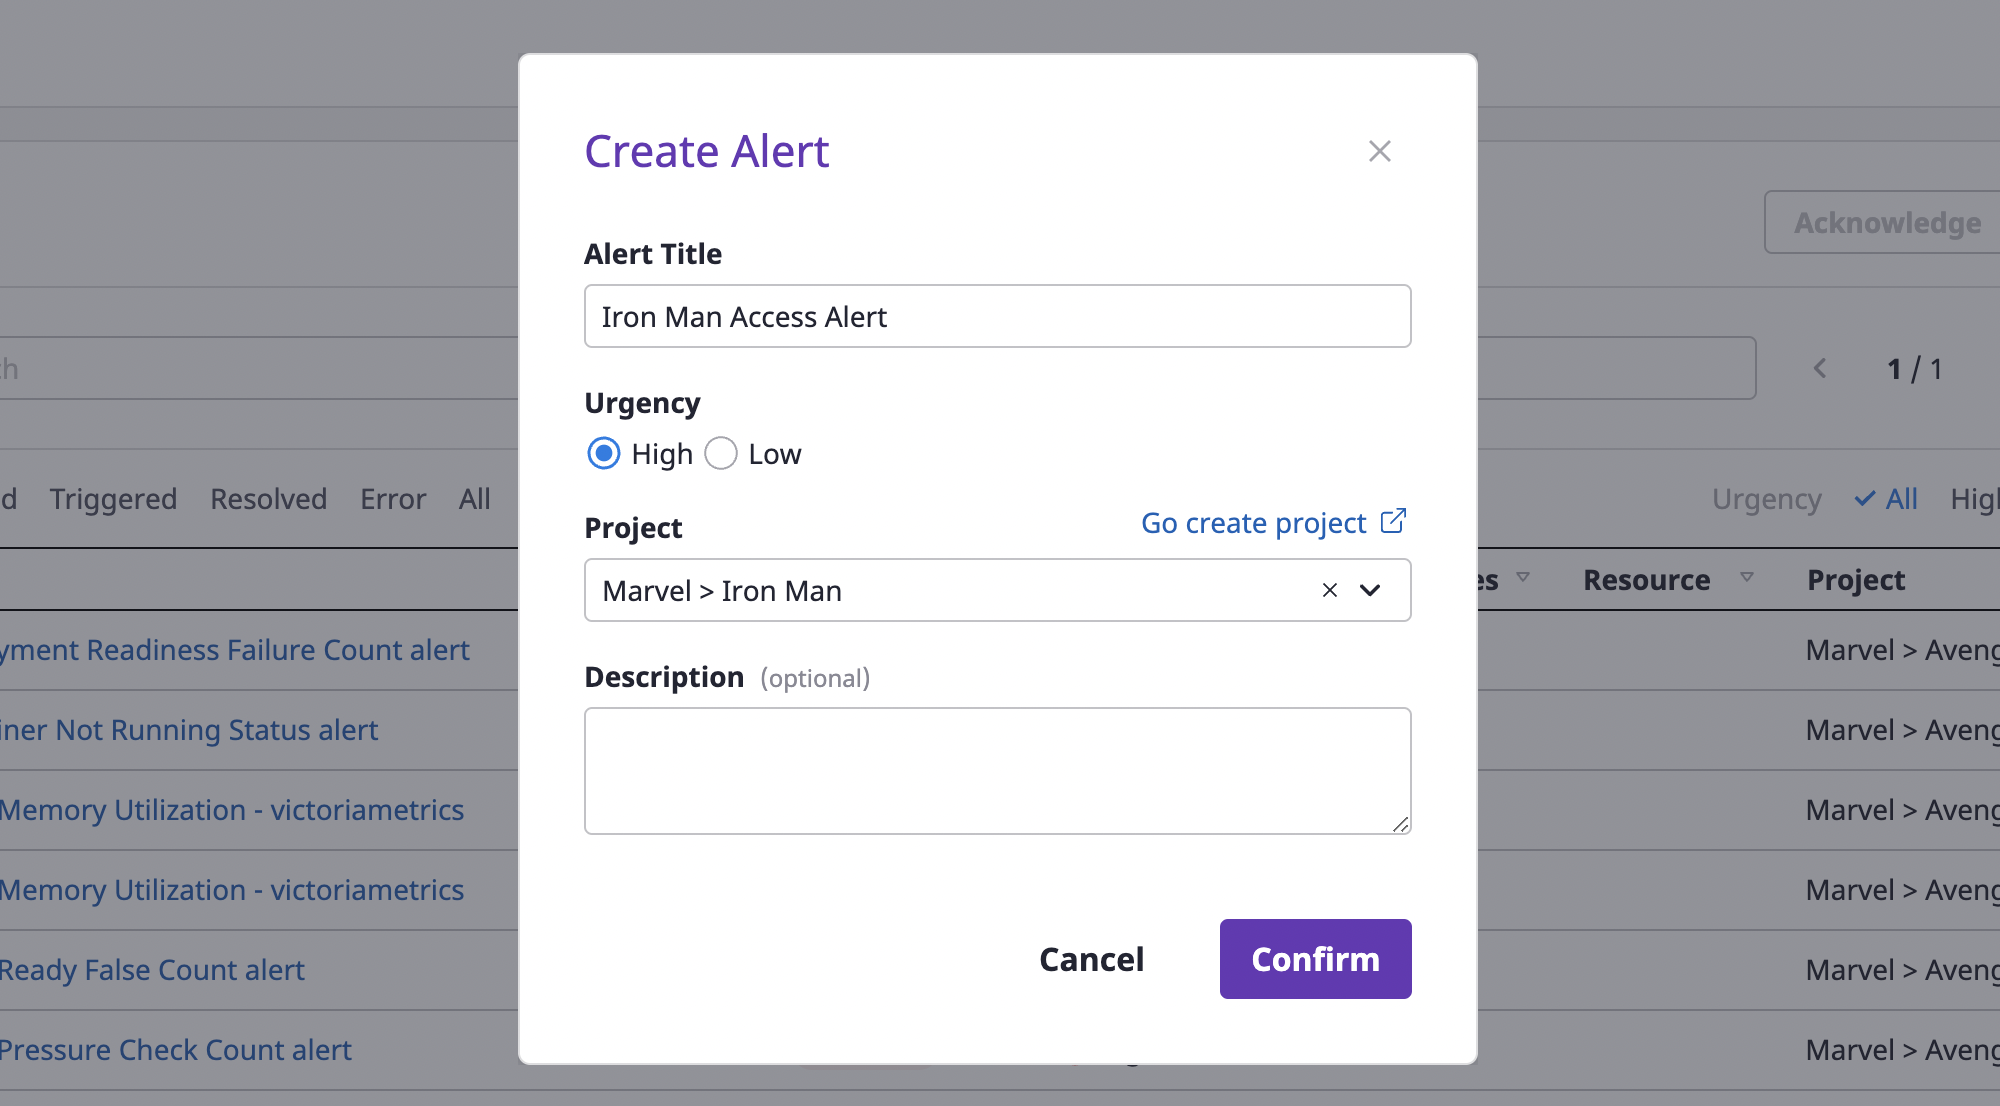
(1) Go to the [Alert manager > Alerts] page and click the [Create] button.
(2) When the [Create alert] modal dialog opens, fill in the input form.
(2-1) Enter an [Alert title] and select [Urgency].
(2-2) Designate the project for which the alert occurred.
(2-3) Write [Comment] if an additional explanation is needed.
(3) Click the [OK] button to complete alert creation.
Connecting to an external monitoring service to receive alerts
When an external monitoring service is connected, an event message occurring in the service is automatically generated as an alert.
To receive alerts from the external monitoring, Webhook creation and Connection settings are required.
Webhook creation is performed in the Cloudforet console, but Connection settings must be done directly in the Cloud Service console that provides external monitoring services.
For more on how to connect an external monitoring service, see here.
Creating a webhook
To receive event messages from an external monitoring service, you need to create a webhook.
Webhooks can be created on the project detail page.
(1) Go to the [Alerts] tab of the project detail page and select the [Webhook] tab.
(2) Click the [Add] button.
(3) Write a name in an [Add webhook] modal dialog and select the plug-in of the external monitoring service to be connected.
(4) Click the [OK] button to complete set up.
Using Alerts
Let's take a brief look at various ways to use the alert features in Cloudforet.
- Notifications channel: set up how and when to send alerts to which users.
- Escalation policy: apply step-by-step rules to effectively forward received alerts to project members.
- Event rules: events received through webhooks are generated as Alerts according to the circumstances.
- Maintenance period: register regular and irregular system task schedules to guide tasks and block Alerts that occur between tasks.
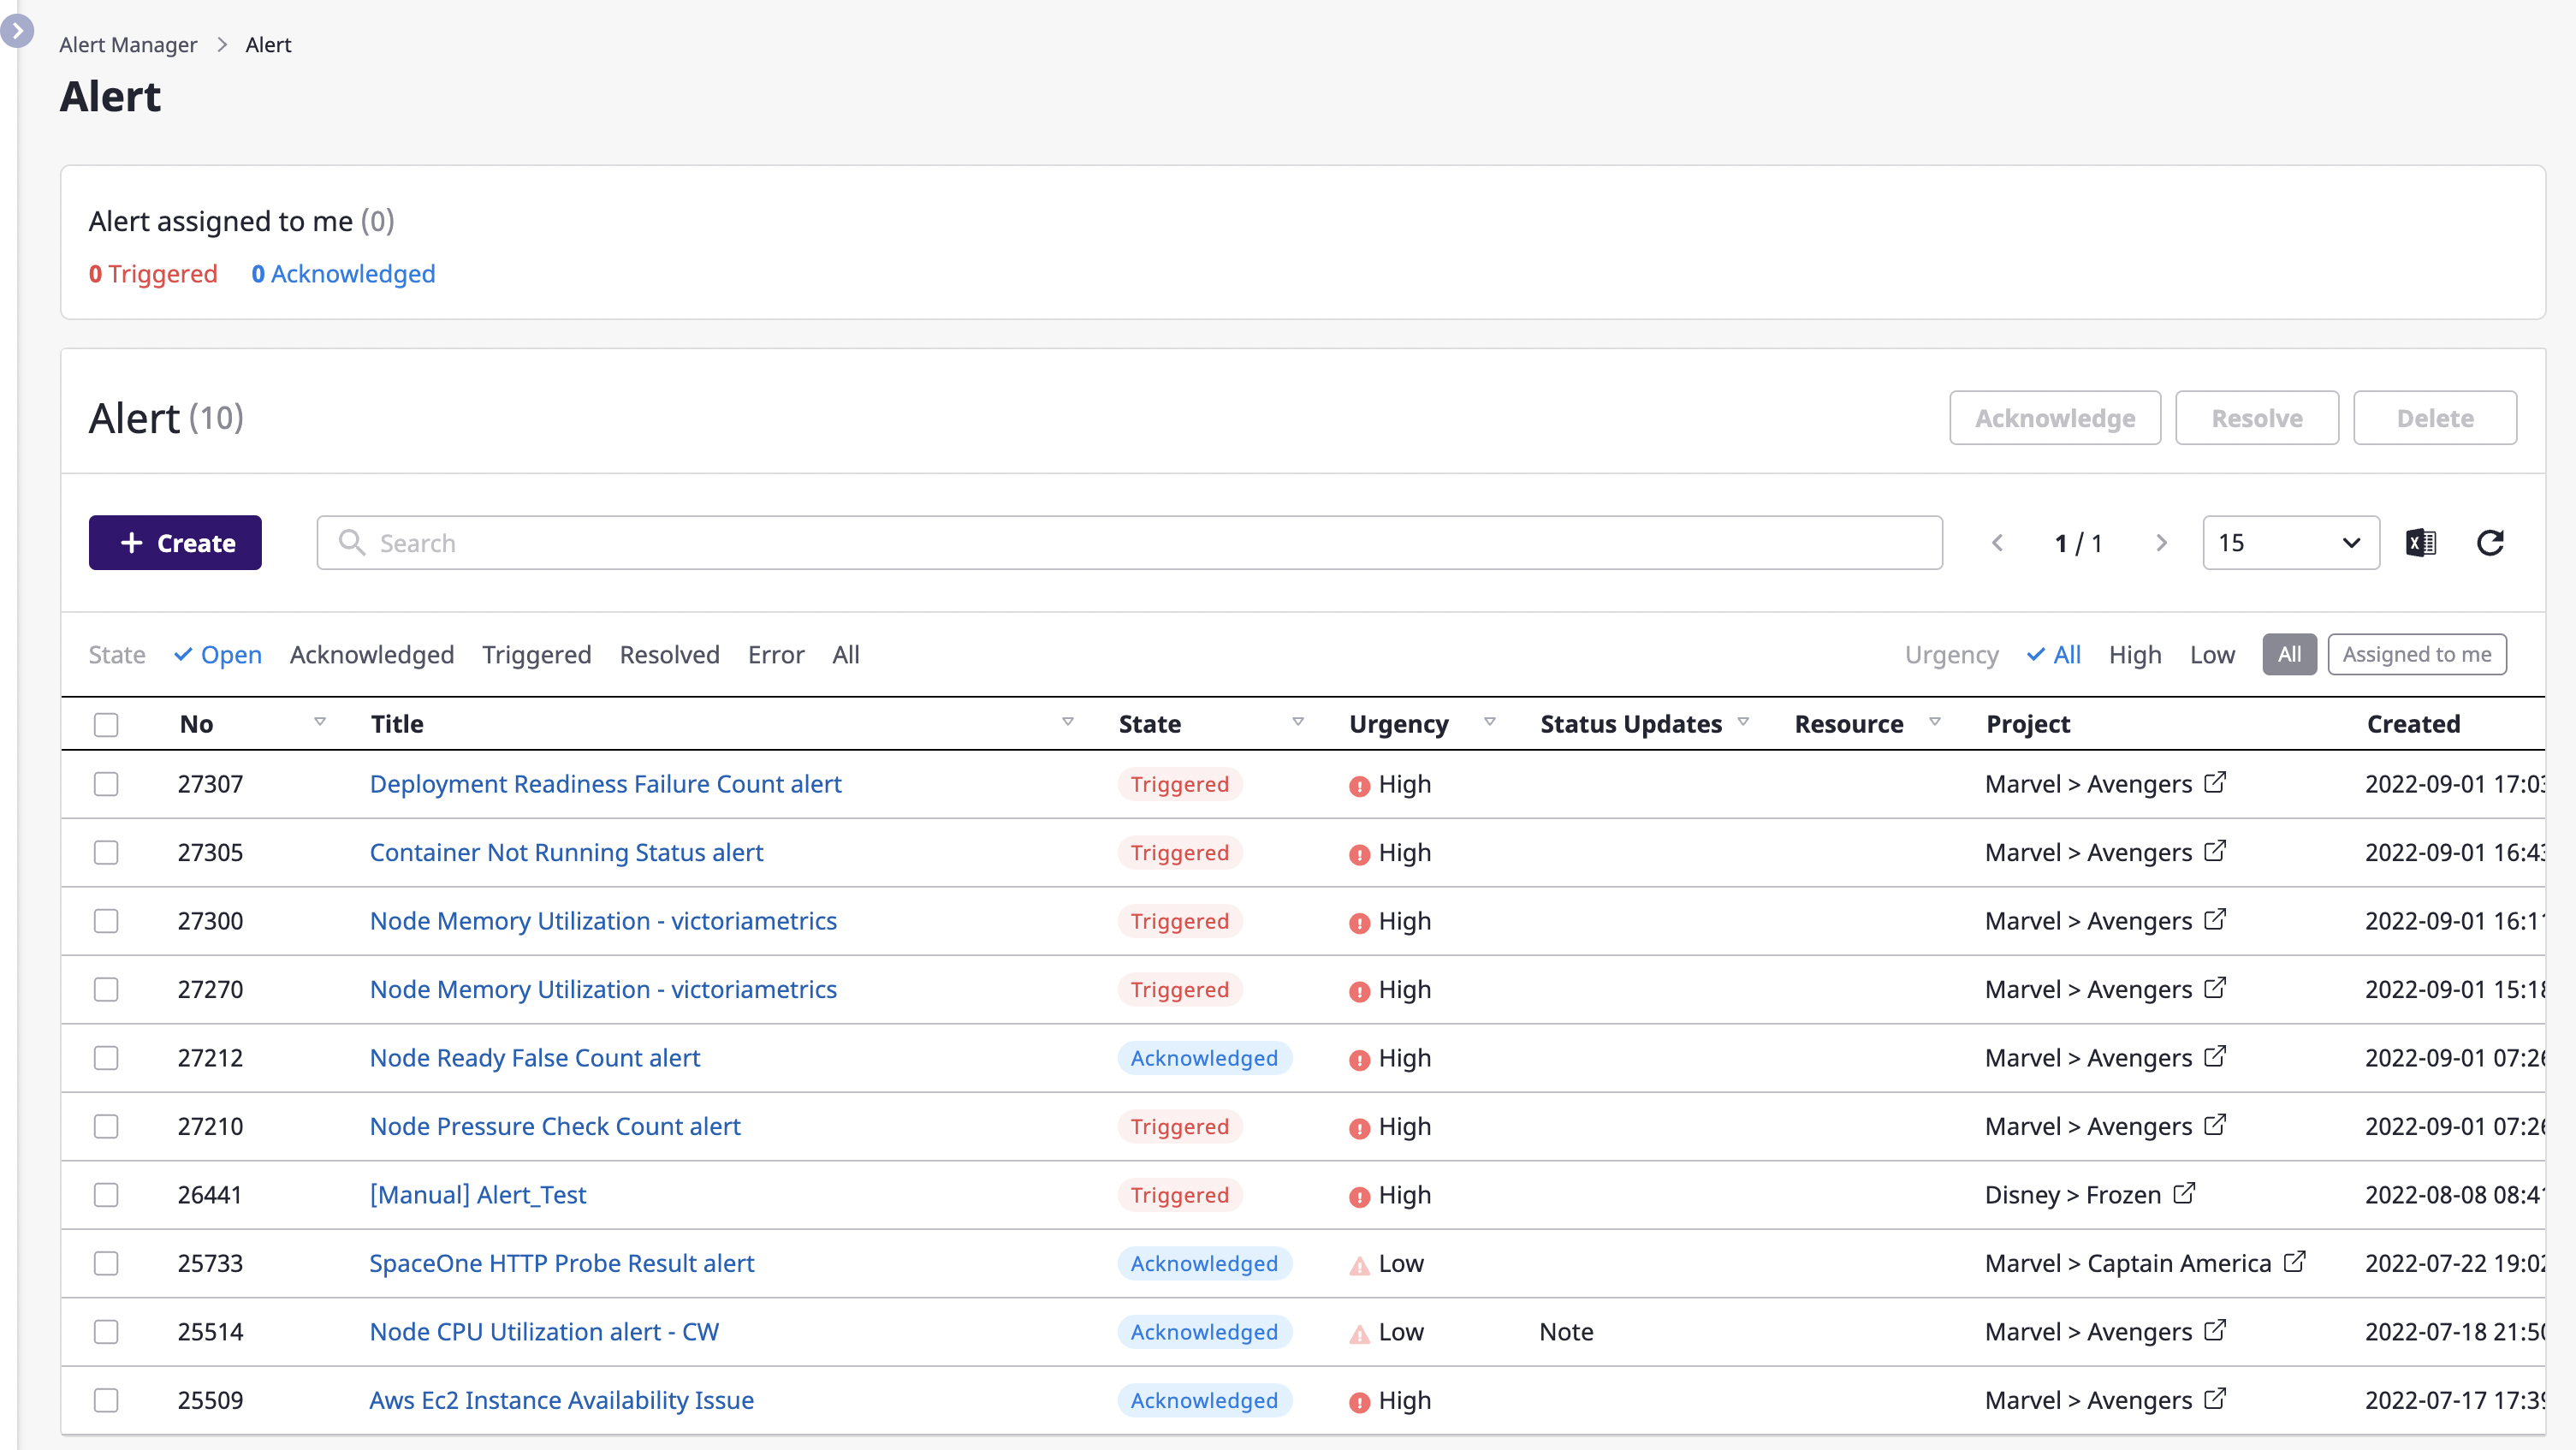
Getting a list of alerts
You can view alerts from all projects on the [Alert manager > Alerts] page.
You can search for alerts or change the state of an alert.
Searching for alerts
You can enter a search term to see a list of alerts that match your criteria and click the title of an alert you want to check on an alert detail page.
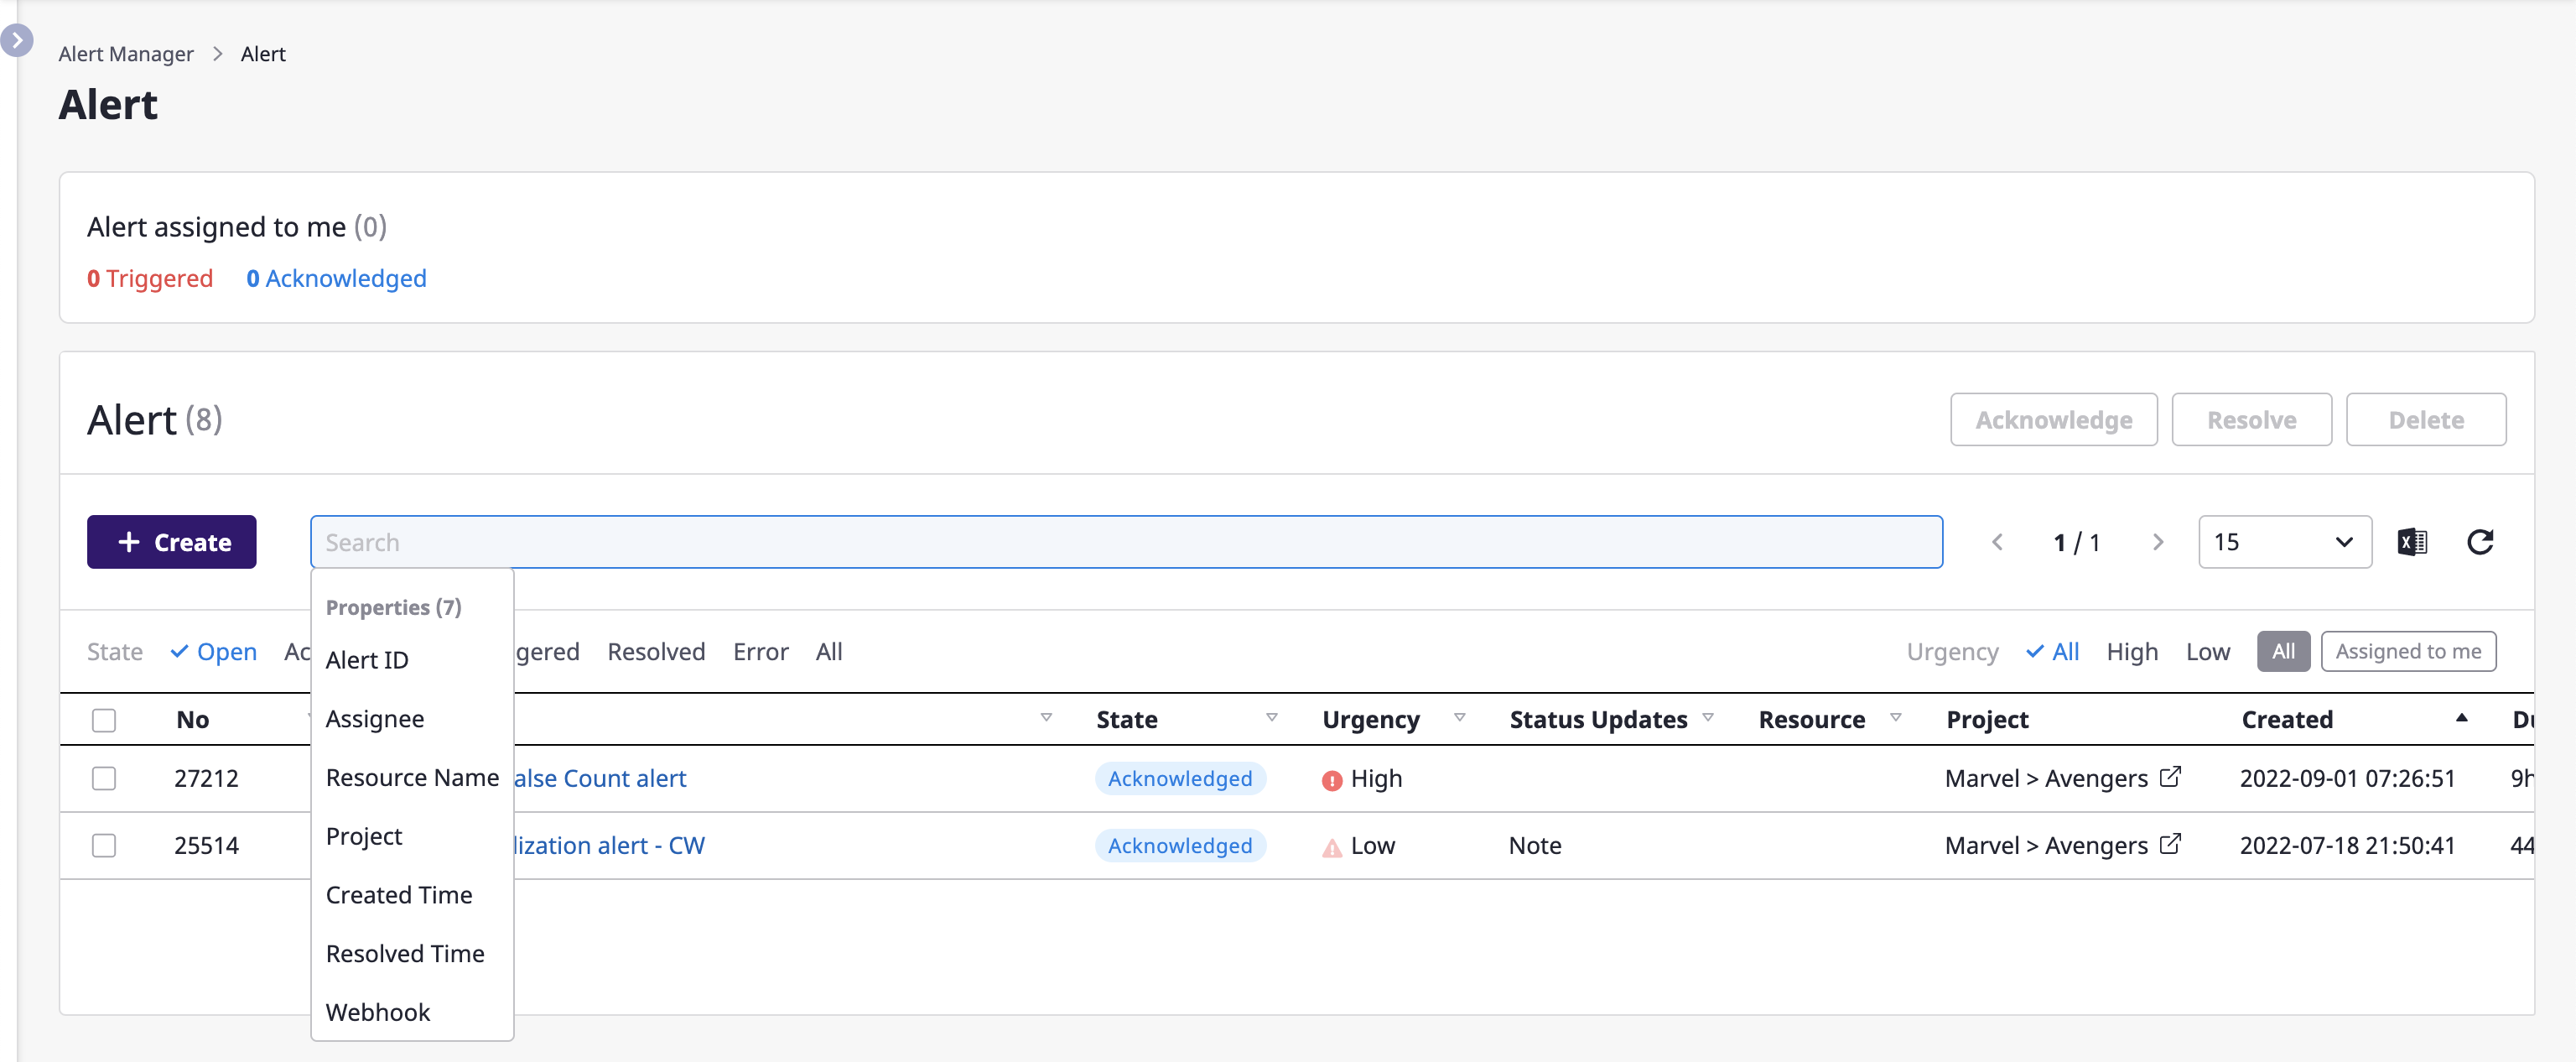
Also, the built-in filtering feature makes it convenient to filter alerts.
For a detailed description on advanced search, see here.
Changing alert state in lists
You can edit an alert state right from the list.
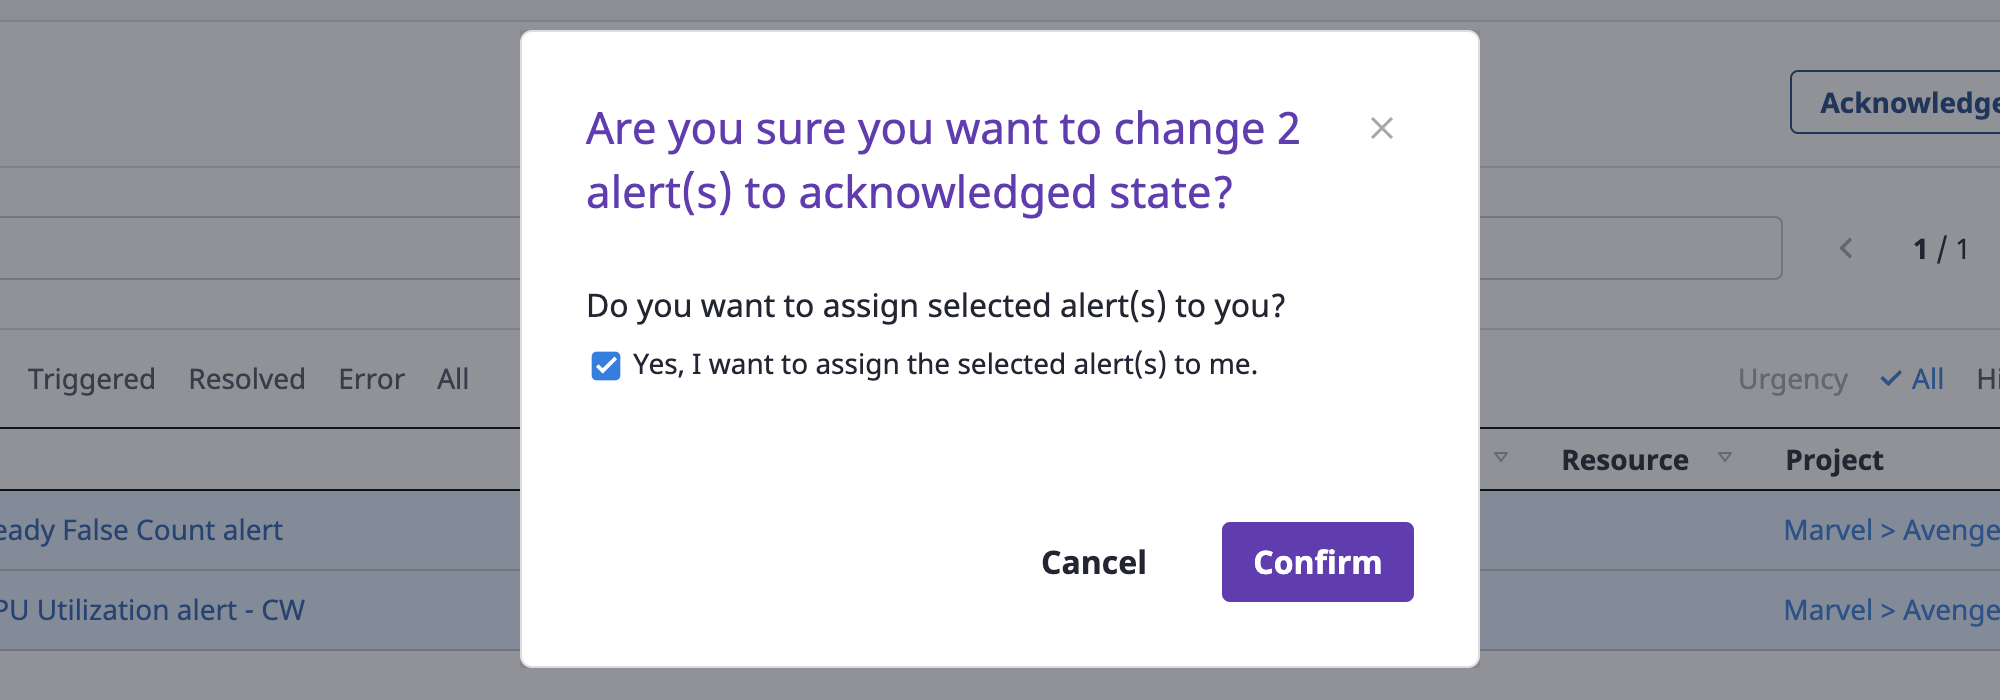
(1) Select an alert to edit the state, and click the desired button from among [OK], [Resolved], and [Delete] in the upper right corner.

(1-1) Click the [OK] button to change the state to OK
The OK state is a state in which the alert has been assigned and is being processed by a person in charge.
As soon as you change the state, you can set the person in charge of the selected alert to yourself, and click the [OK] button to complete.
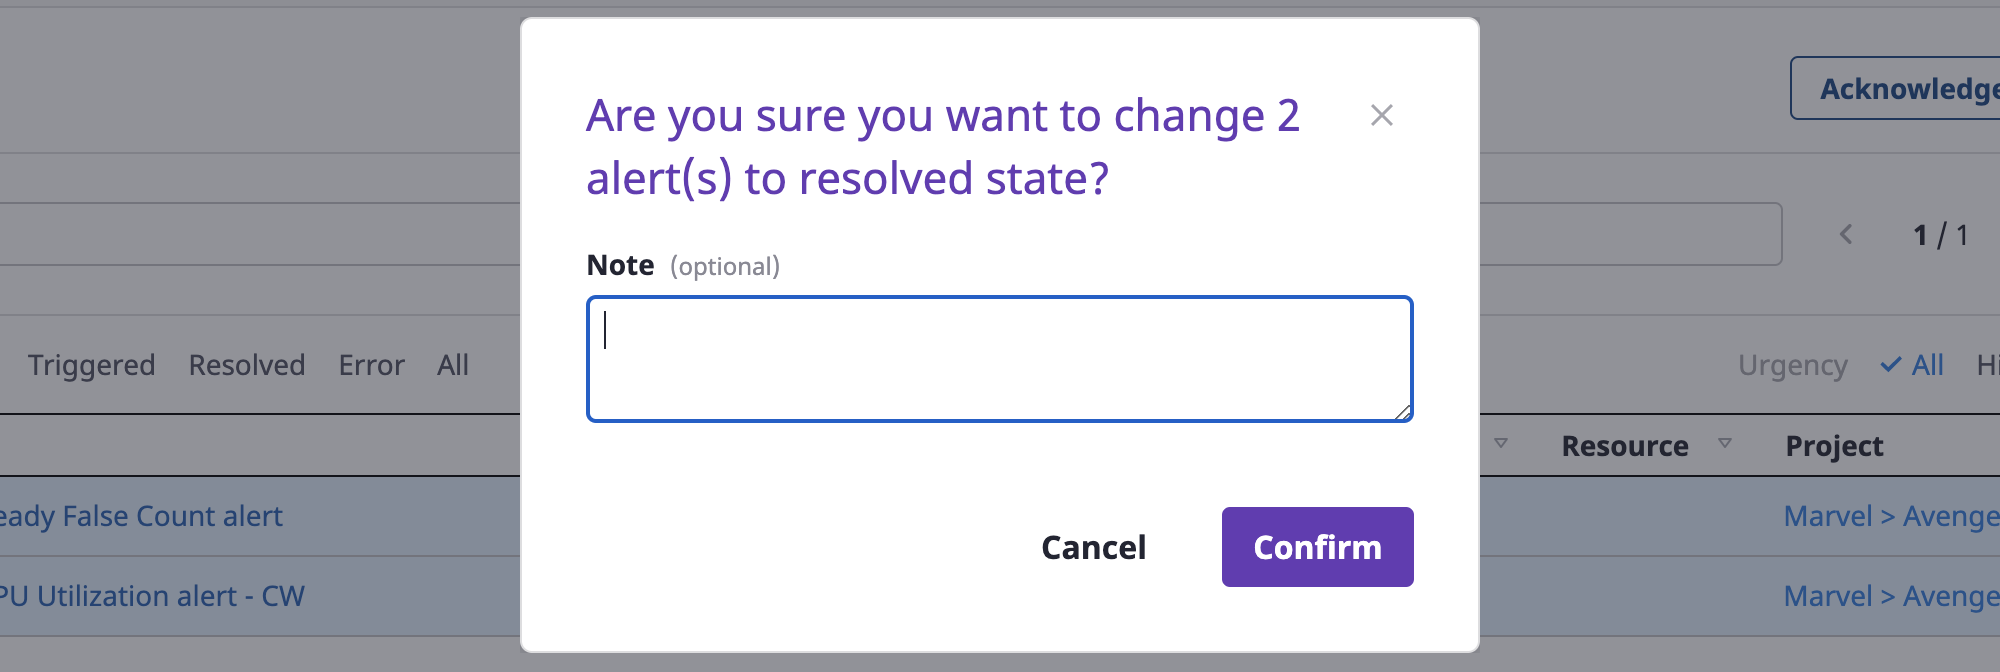
(1-2) Click the [Revolved] button to change the state to `resolved’
The resolved state means that the issue that caused the alert has been processed.
You can write a note as soon as the state changes, and click the [OK] button to complete.
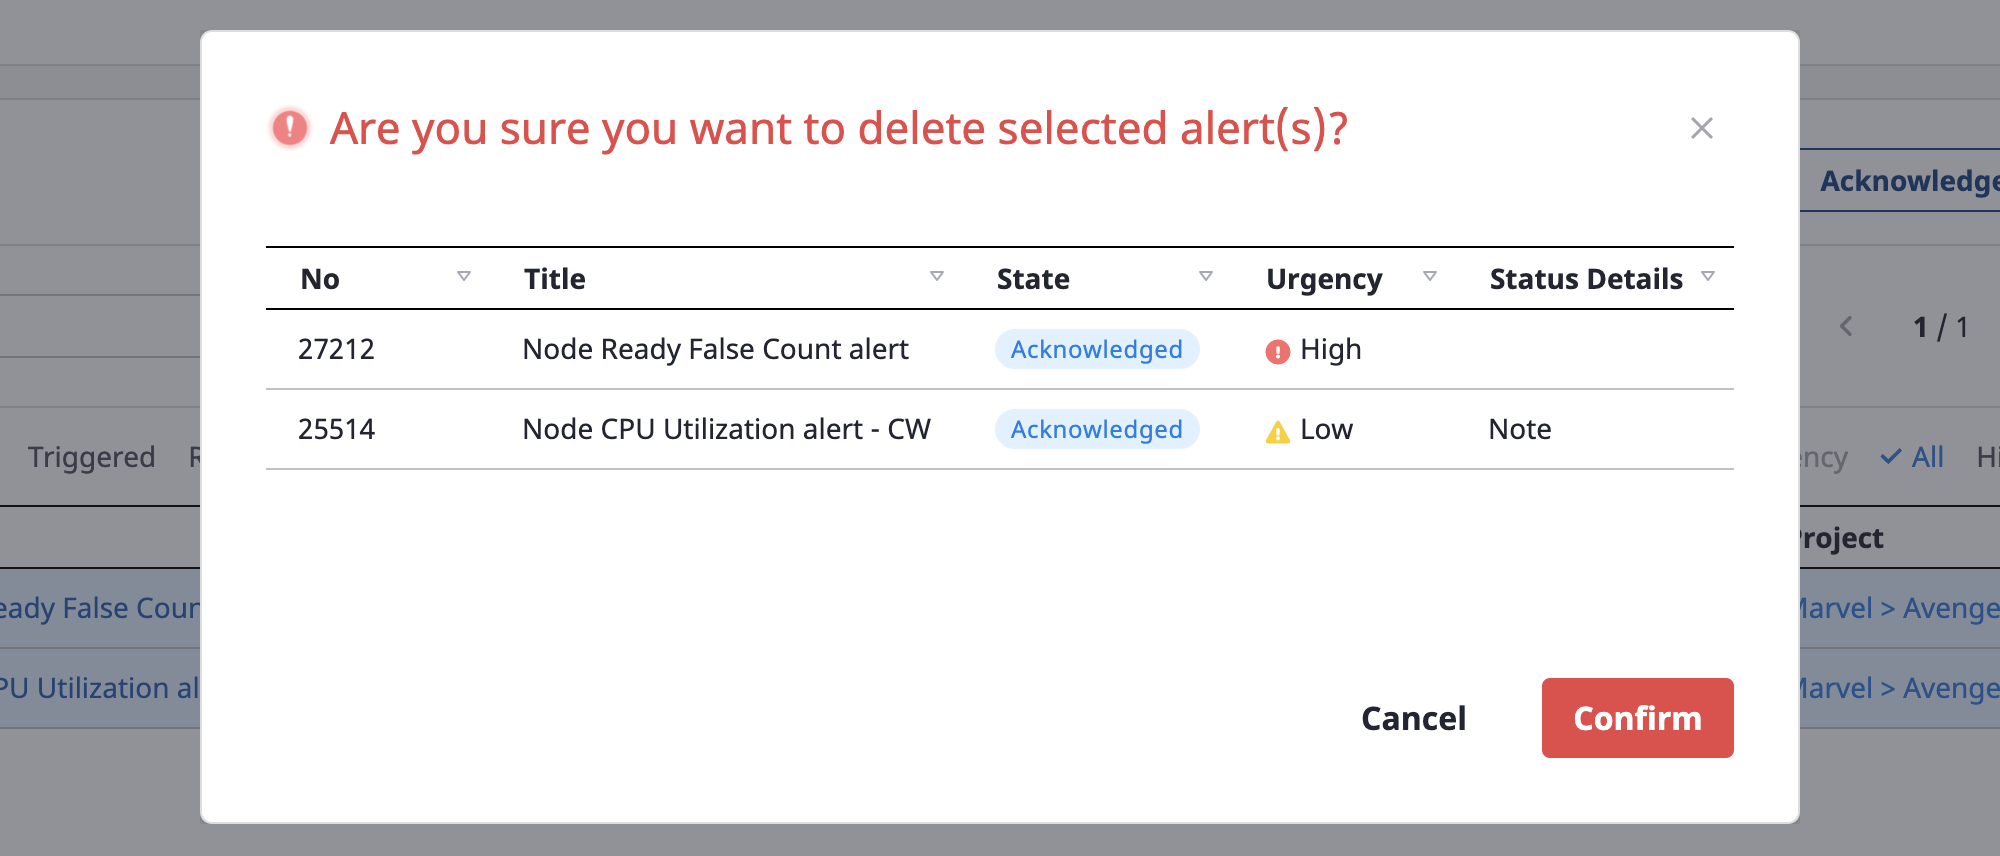
(1-3) Click the [Delete] button to delete an alert
You can check the alert list to be deleted once again, and click the [OK] button to delete it.
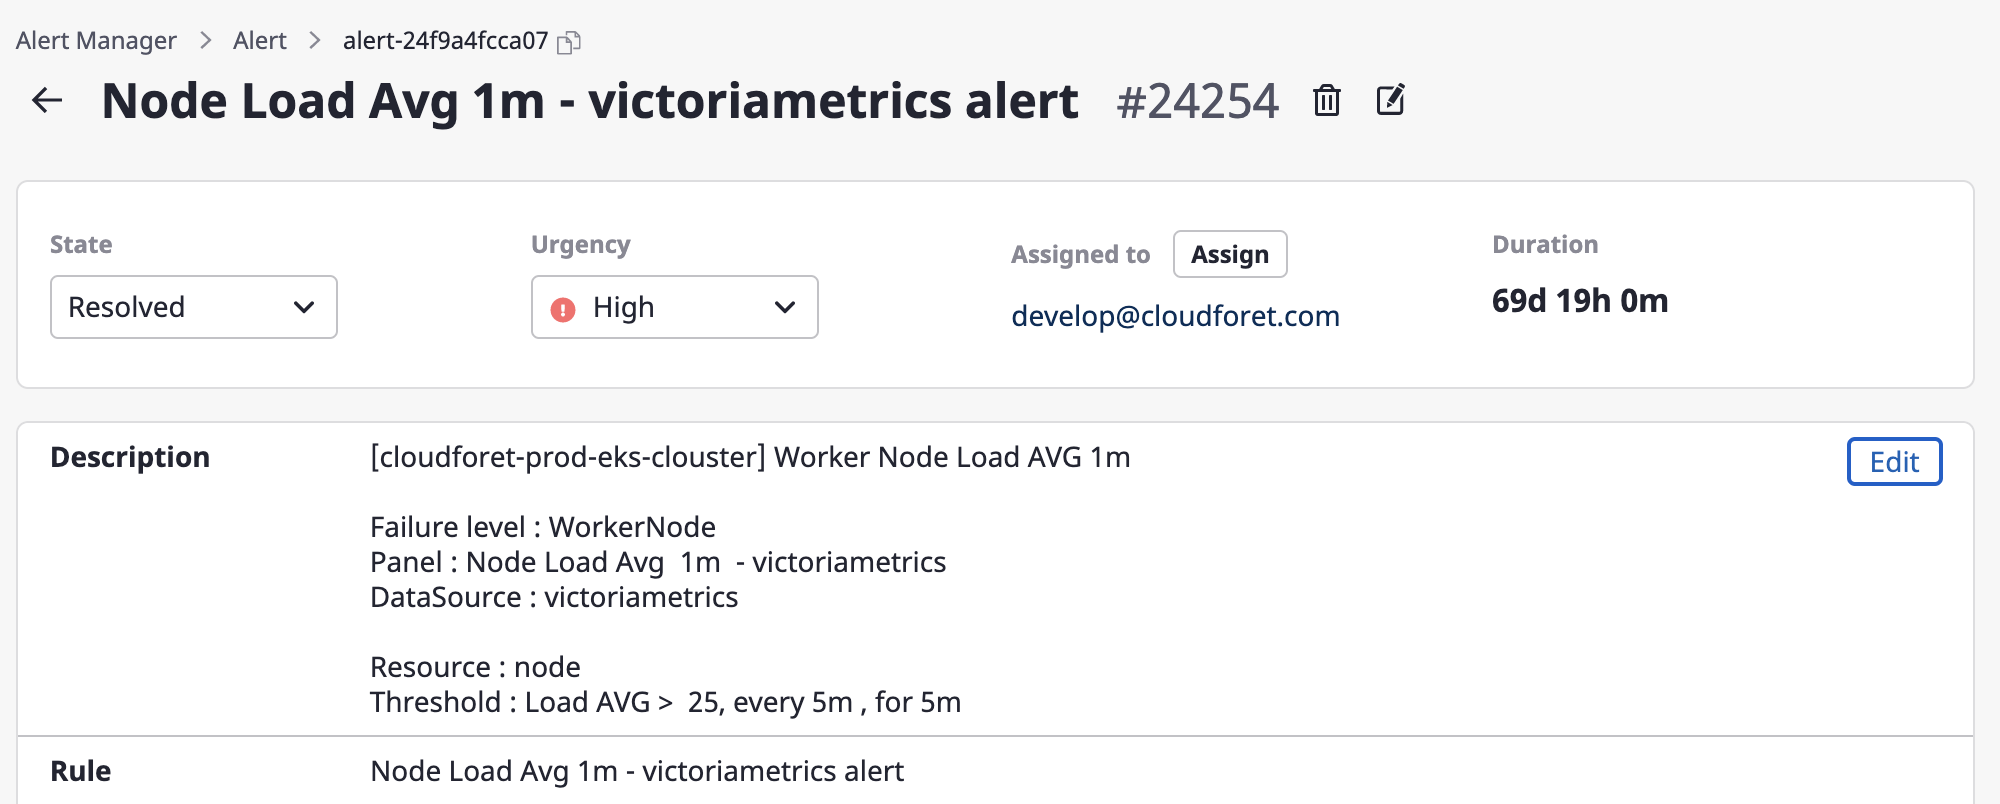
Viewing alerts
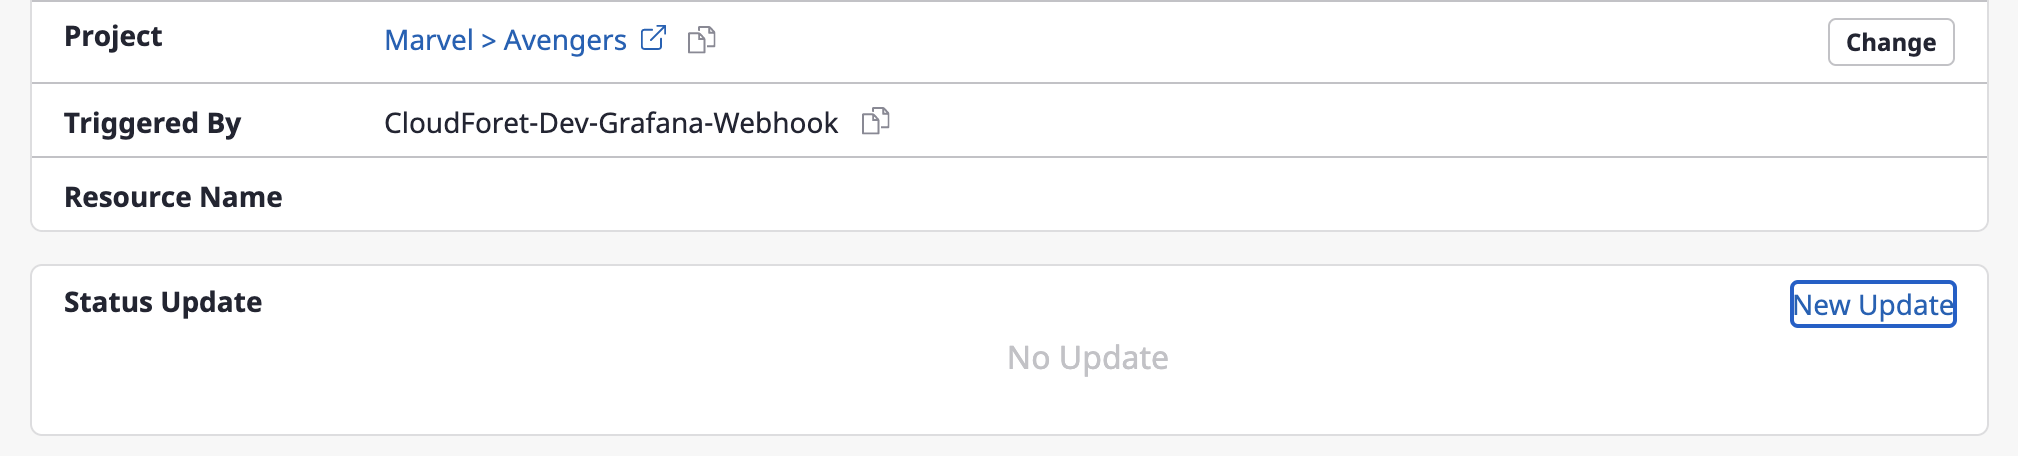
You can view and manage details and alert history on the alert detail page.
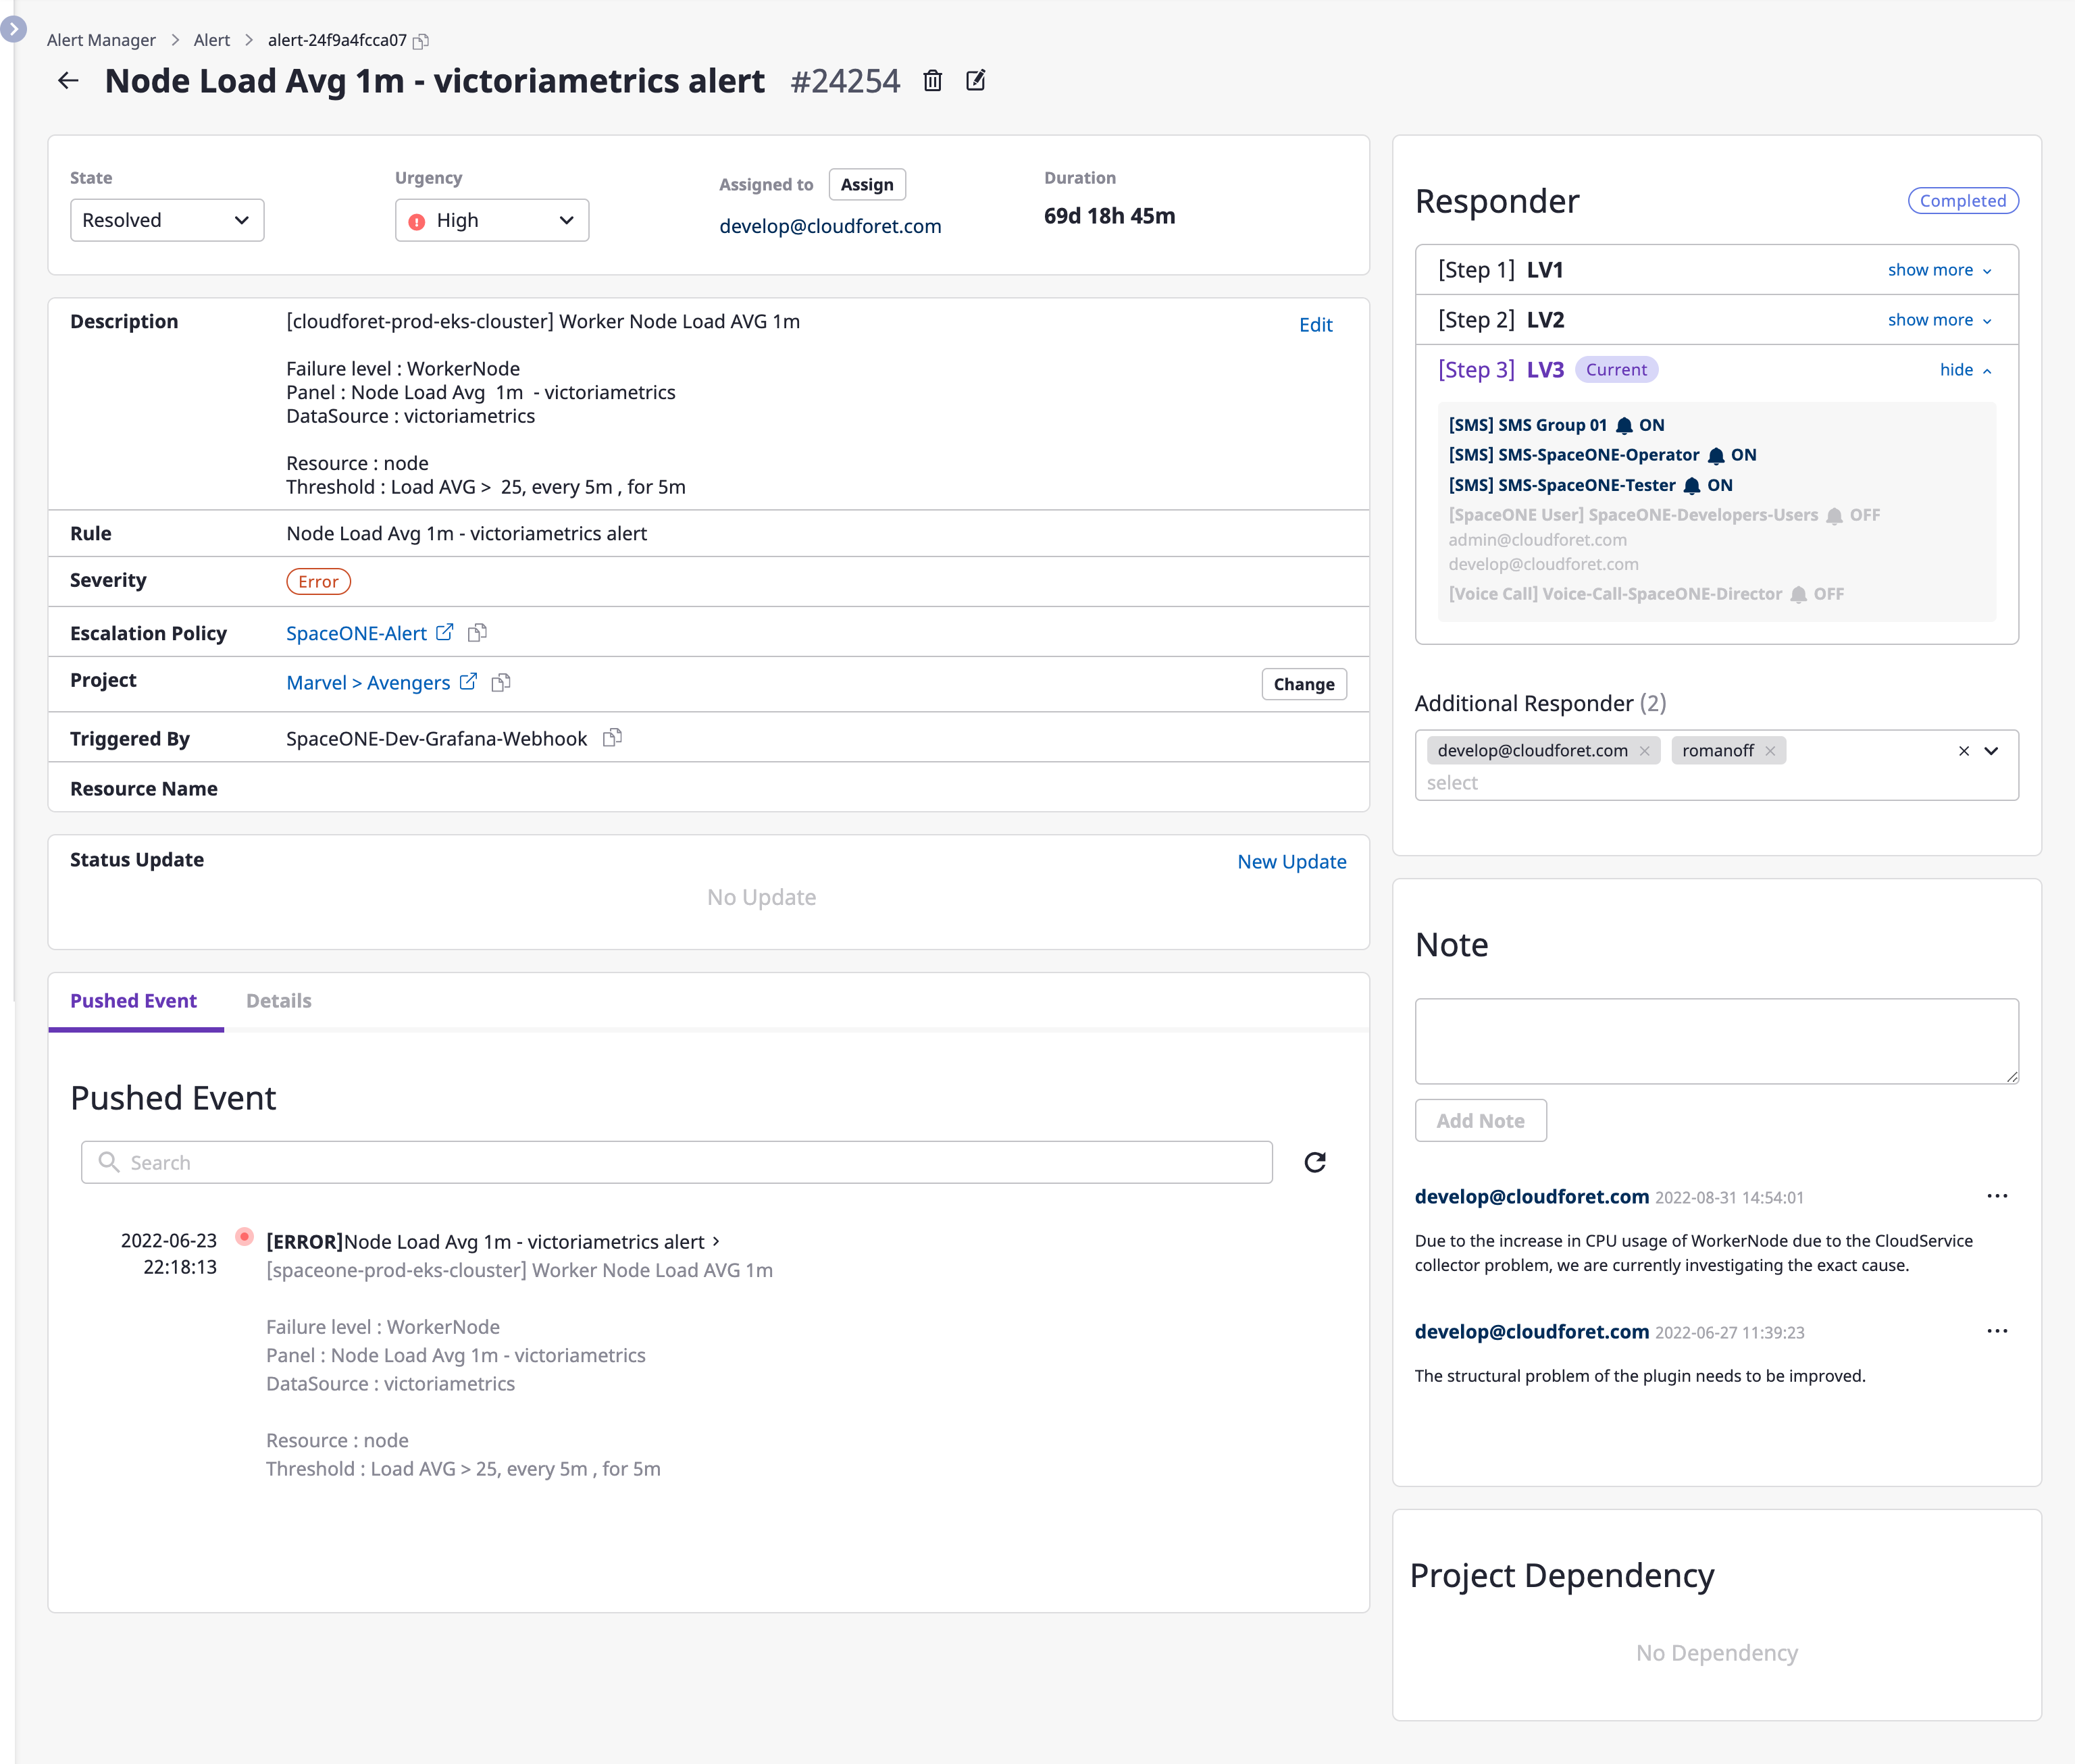
| Items | Description |
|---|---|
| Duration | Time during which an alert lasted |
| Description | As a description of an alert, the content written by a user or that of an event received from an external monitoring service |
| Rules | Conditions alerted by an external monitoring service |
| Severity | Level of seriousness of data received from a webhook event |
| Escalation policy | Applied escalation policy |
| Project | Alerted project(s) |
| Create | Monitoring services that sent alerts |
| Resource name | Alert occurrence target |
Renaming and deleting alerts
You can change the name of an alert or delete an alert through the [Edit] and [Delete] icon buttons for each.

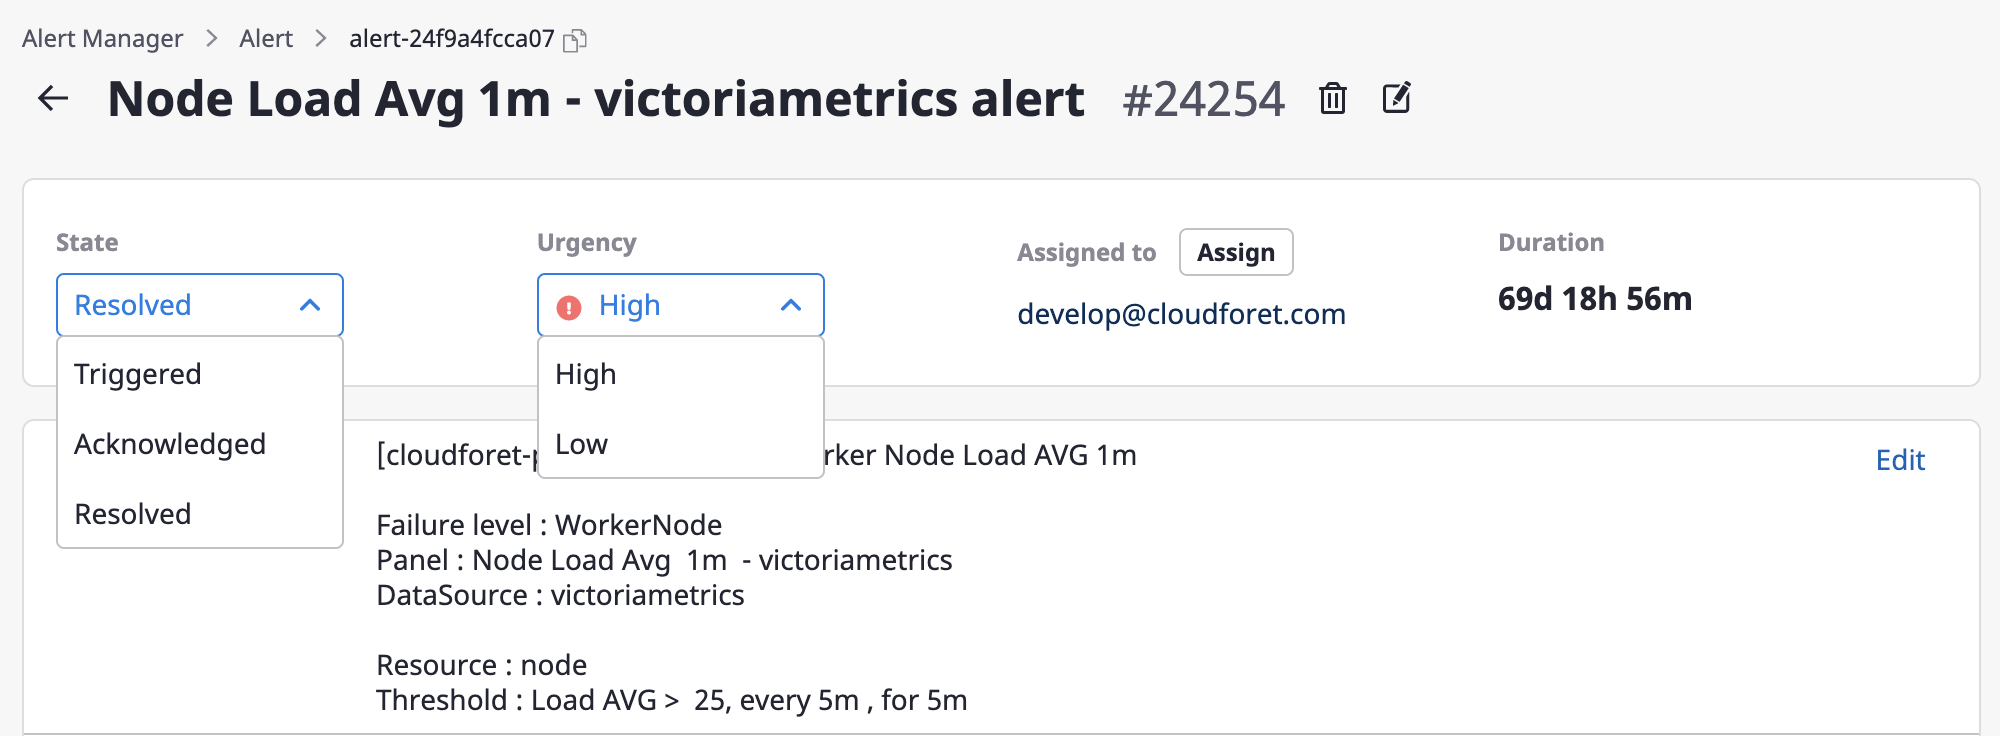
Changing state/urgency
State and urgency can be easily changed via the dropdown menus.
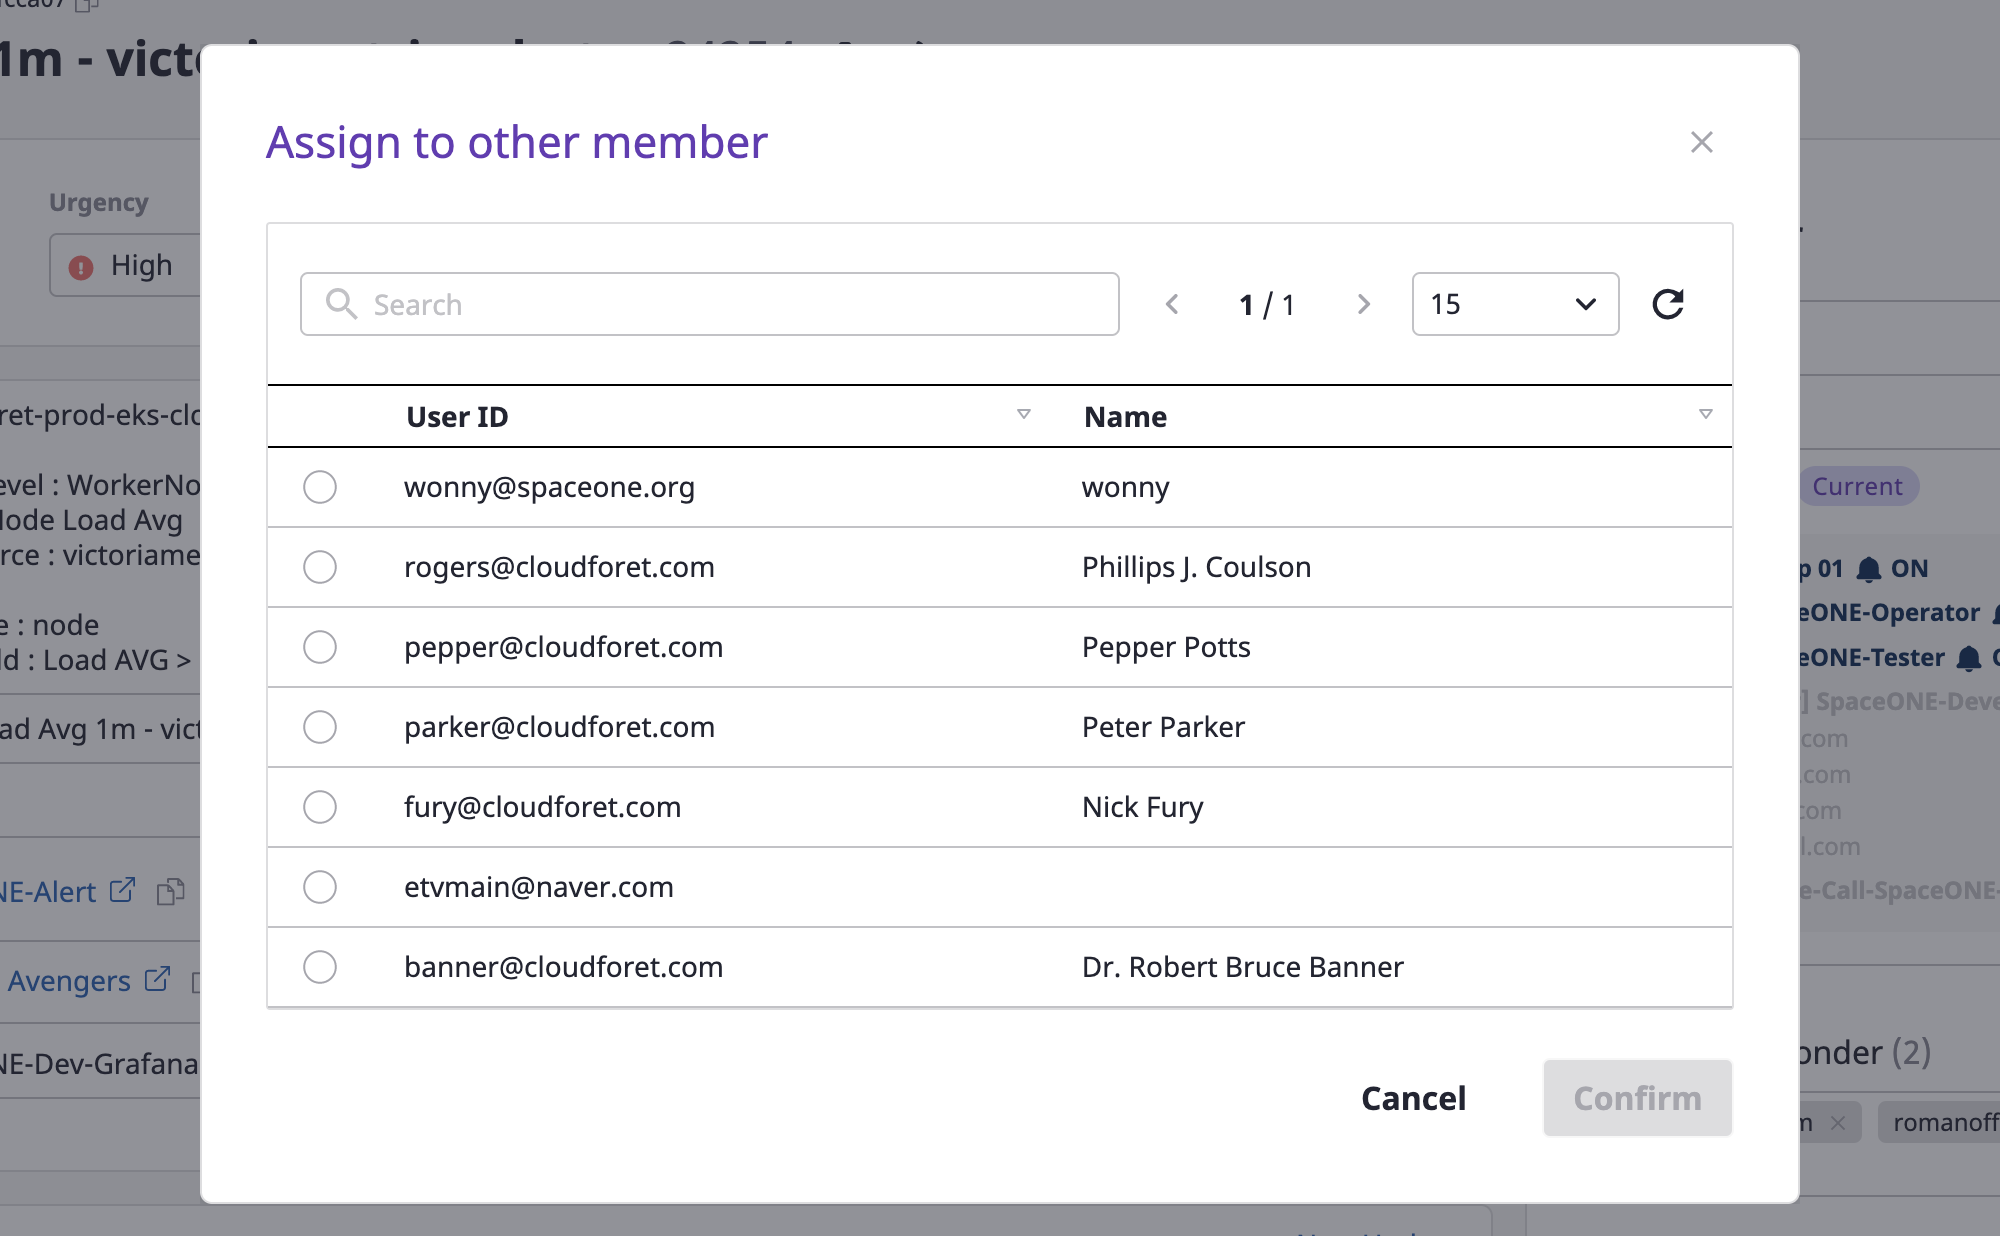
Changing the person in charge
(1) Click the [Assign] button.
(2) Select a person in mind and click the [OK] button to complete the assignment of the person in charge.
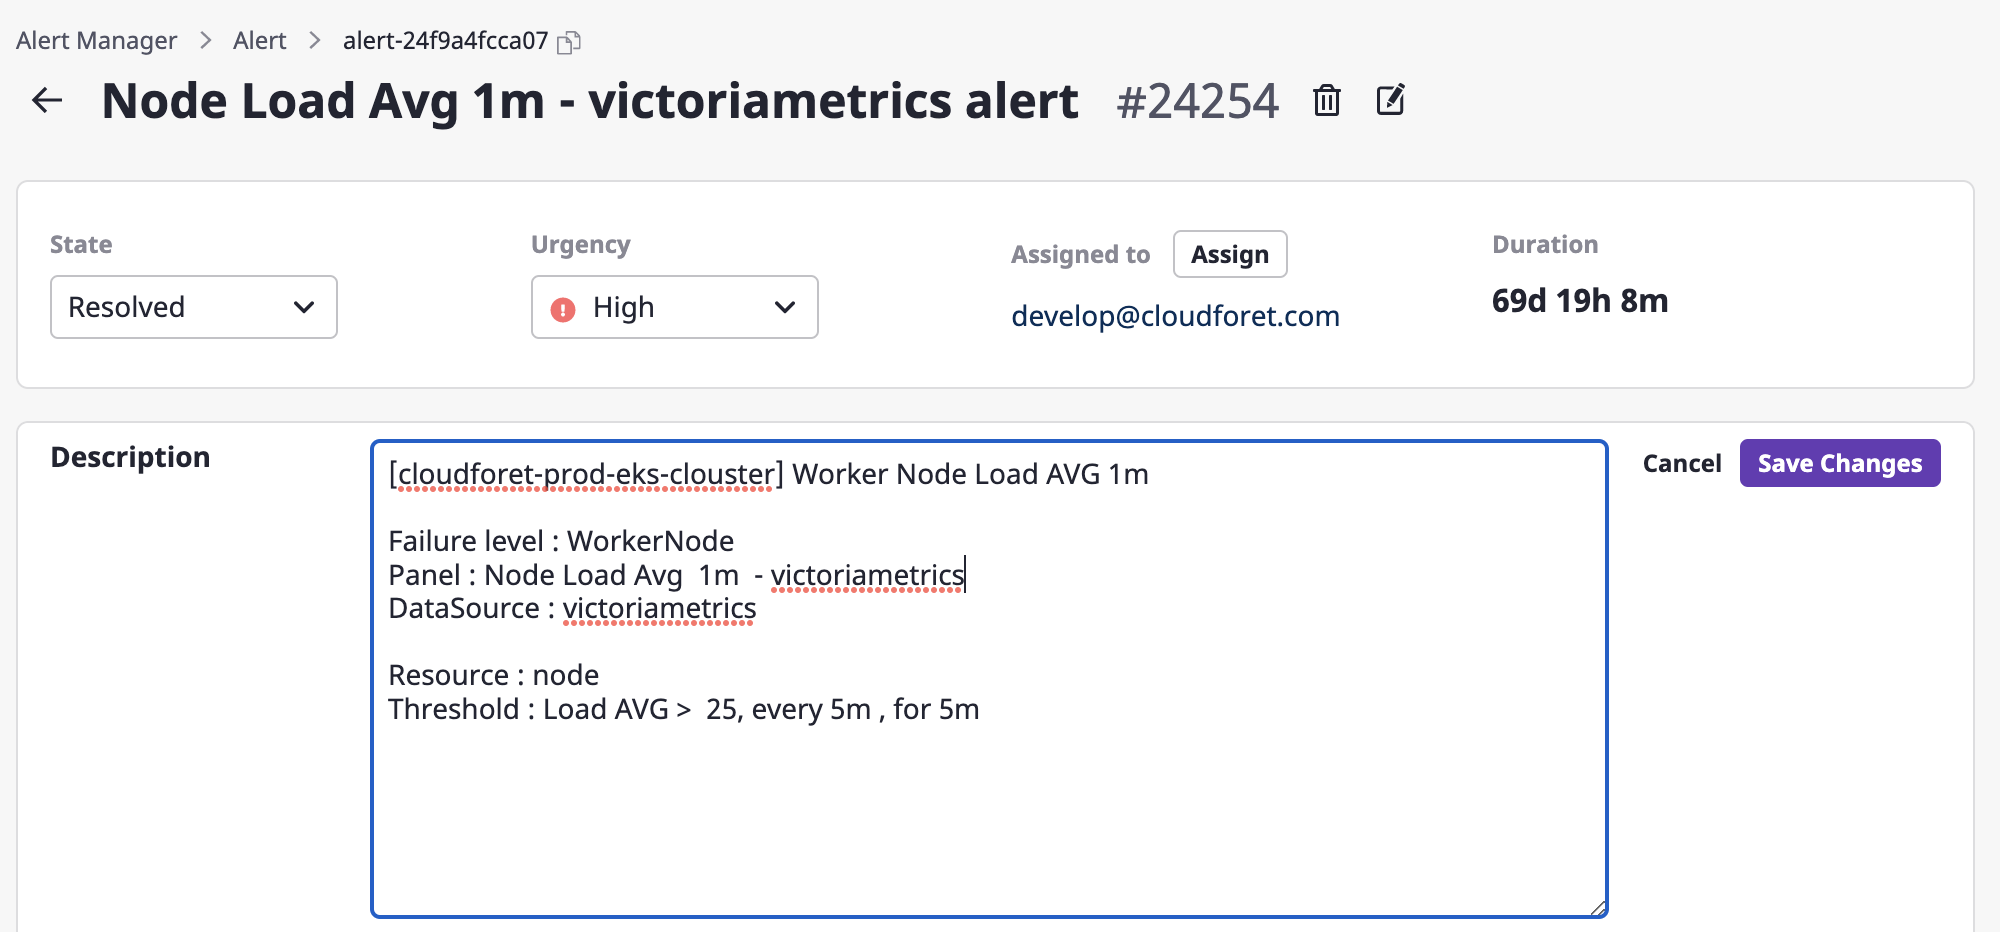
Editing description
Only users with an administrative role for the alert can edit it.
(1) Click the [Edit] button.
(2) Write changes through a form in an alert description field and click the [Save changes] button to complete such changes.
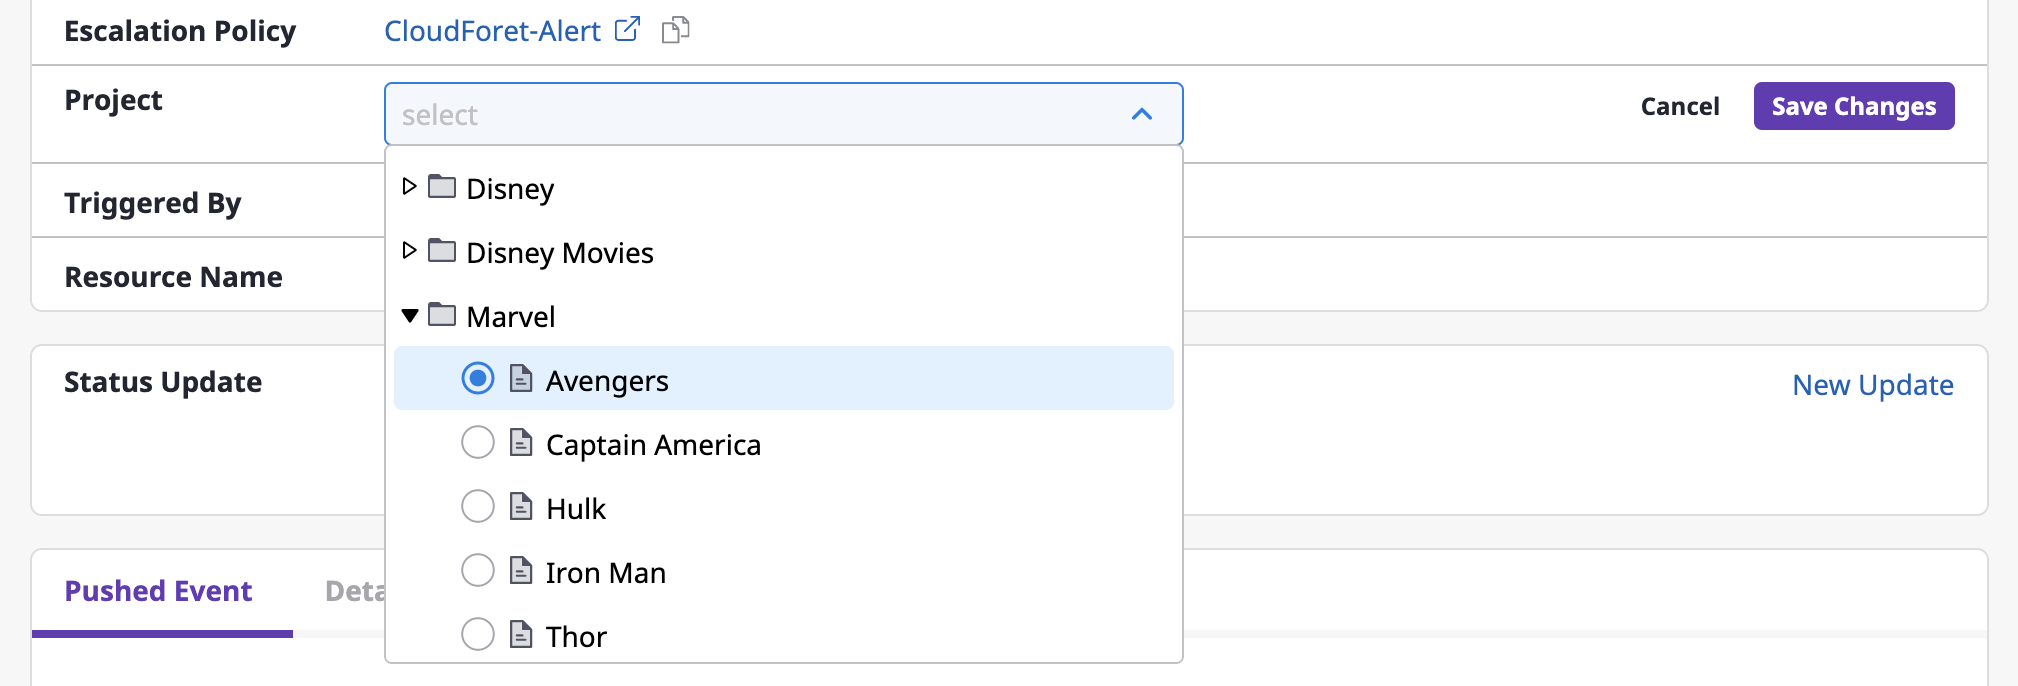
Changing a project
You can change the project linked with an alert.
(1) Click the [Change] button to change a project.
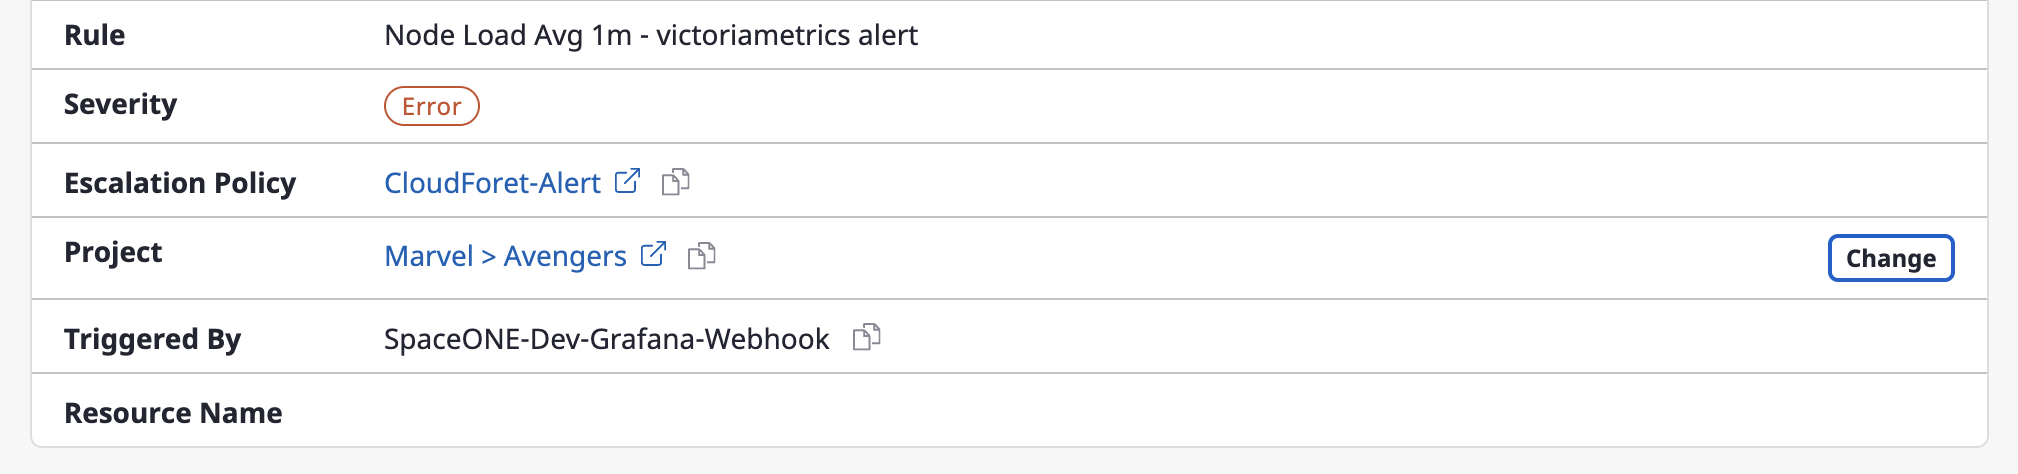
(2) After selecting a project from a [Select project] dropdown menu, click the [Save changes] button to complete the project change.
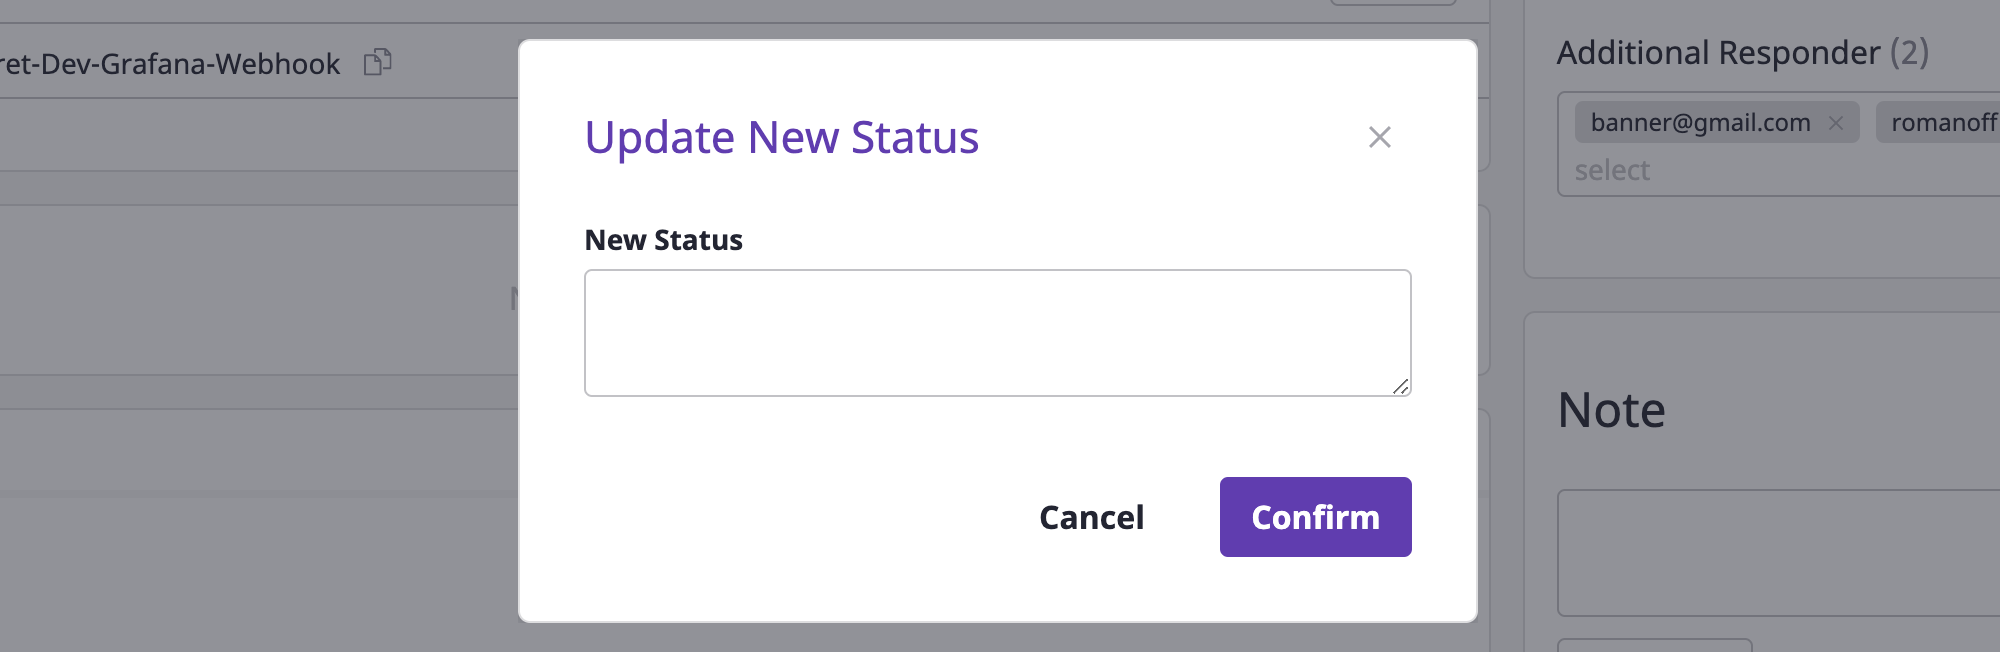
Updating to a new state
By recording the progress in the state of alerts field, you can quickly grasp their state.
If you change the content, the previous state history will be lost.
(1) Click the [New update] button.
(2) Input the state in the [New state update] modal dialog, and click the [OK] button to complete the state update.
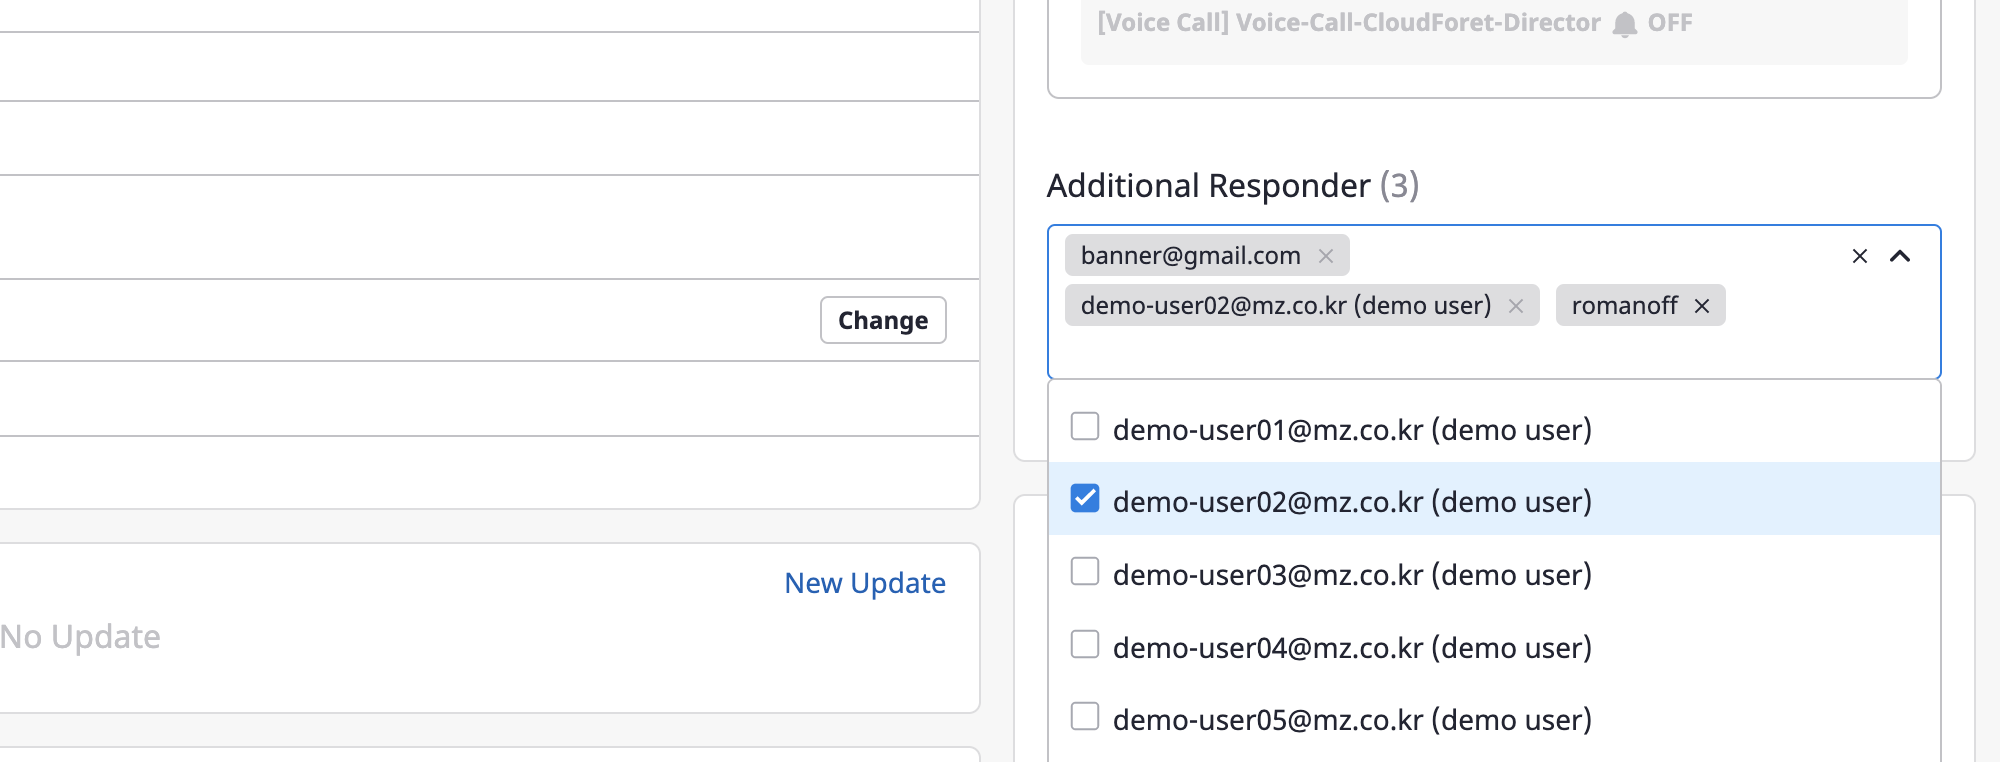
Adding recipients
Alerts are sent to recipients via Escalation policy.
If you need to send an alert to additional users for that alert, set up [Additional recipients].
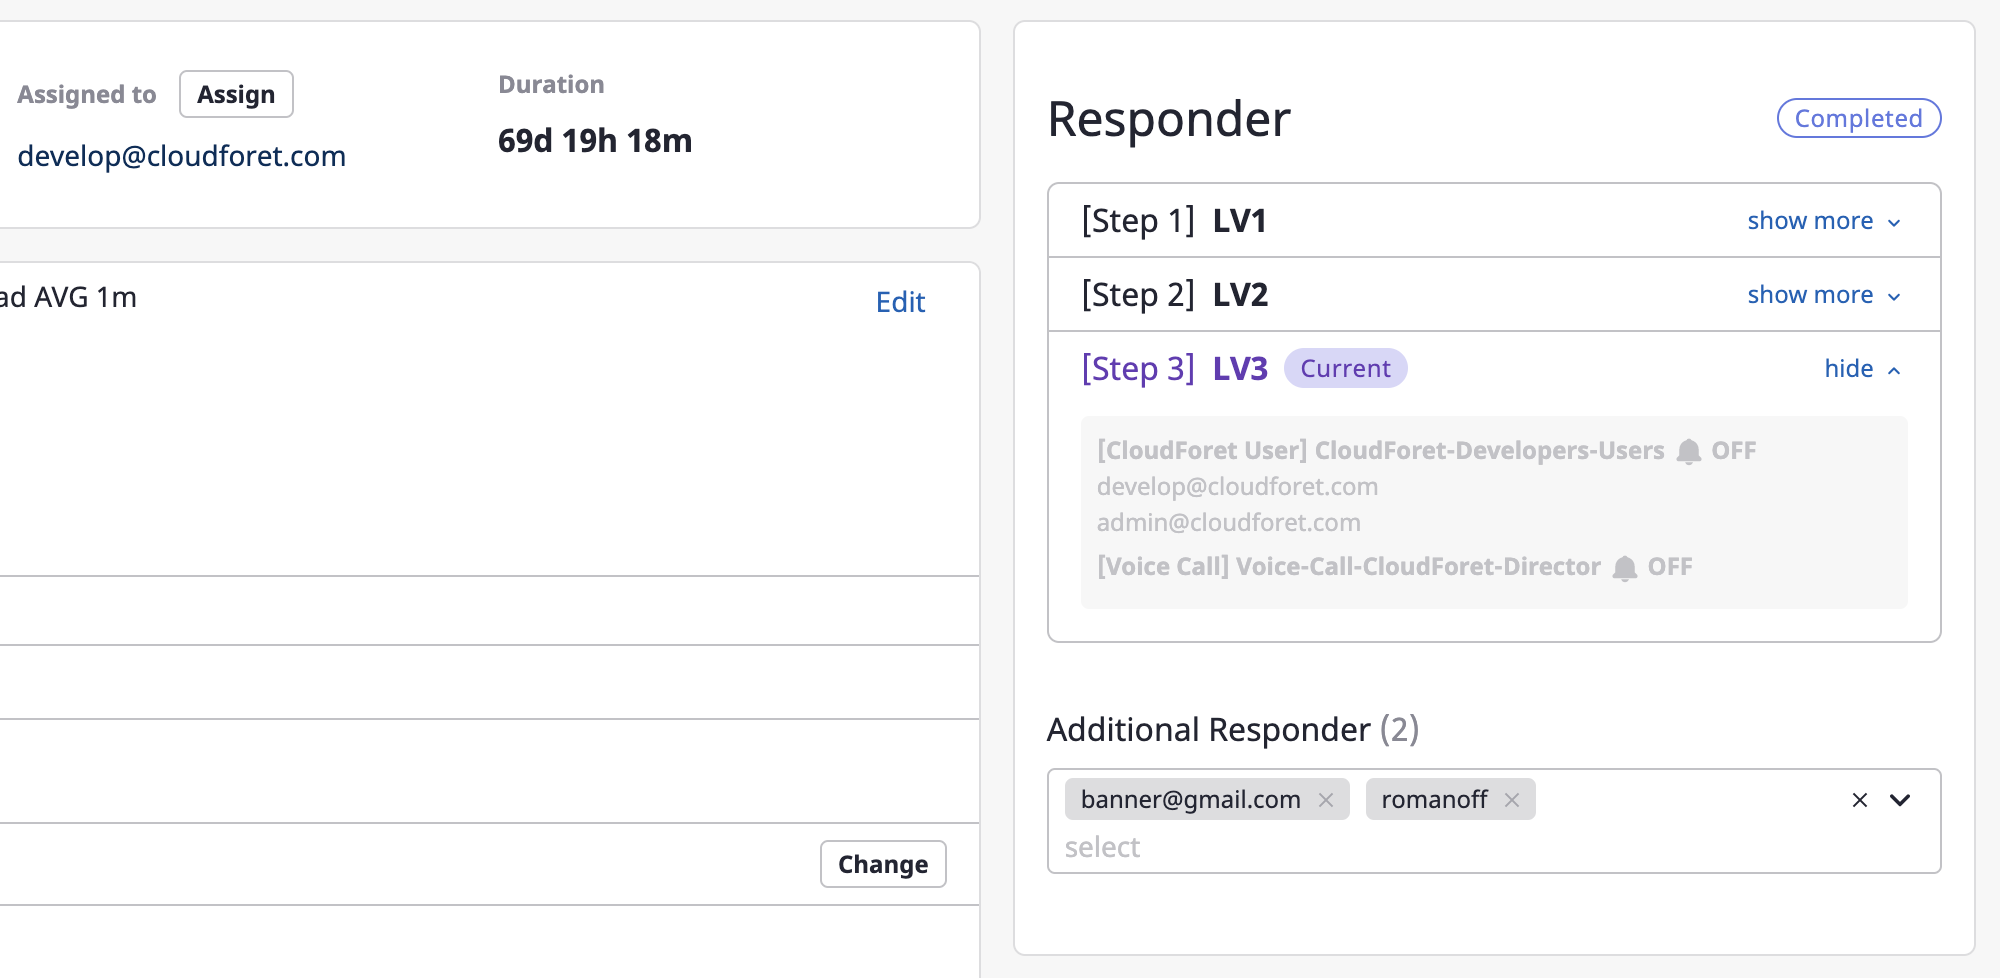
You can view and search a list of available users by clicking the search bar, where multiple selections are possible.
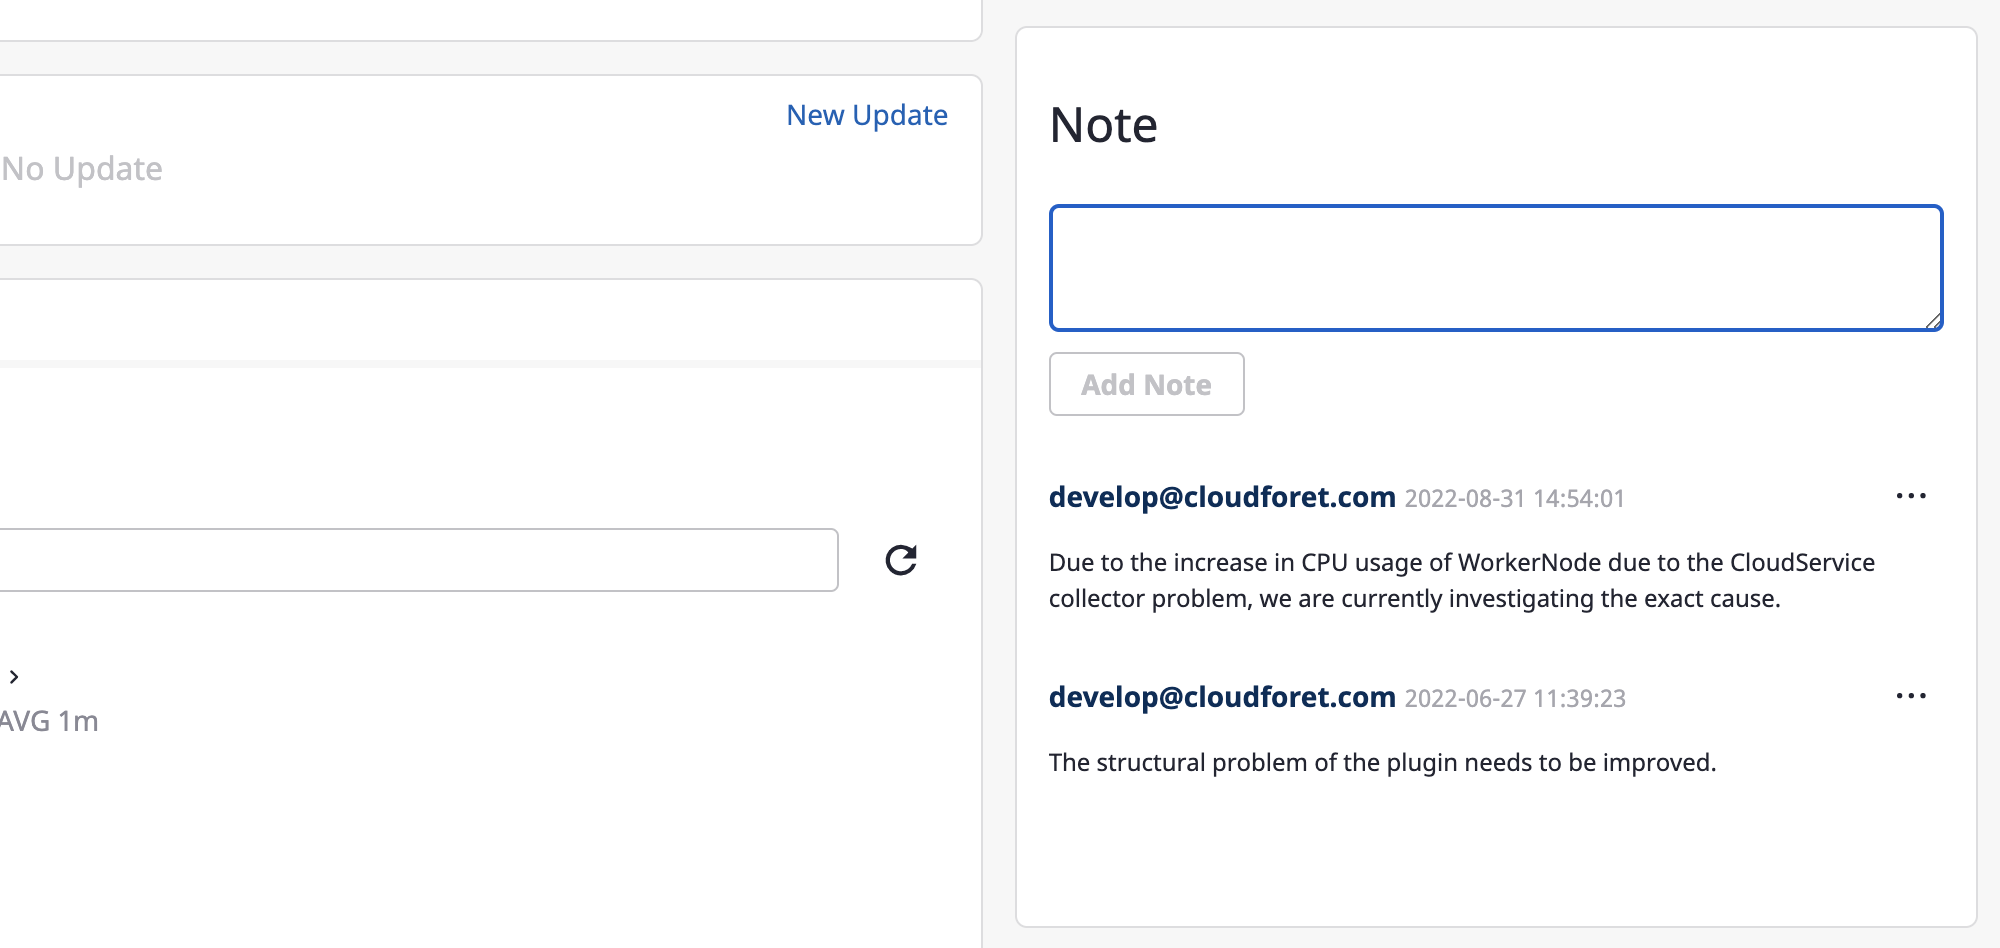
Adding notes
Members can communicate by leaving comments on alerts, registering inquiries and answers to those inquiries during processing.
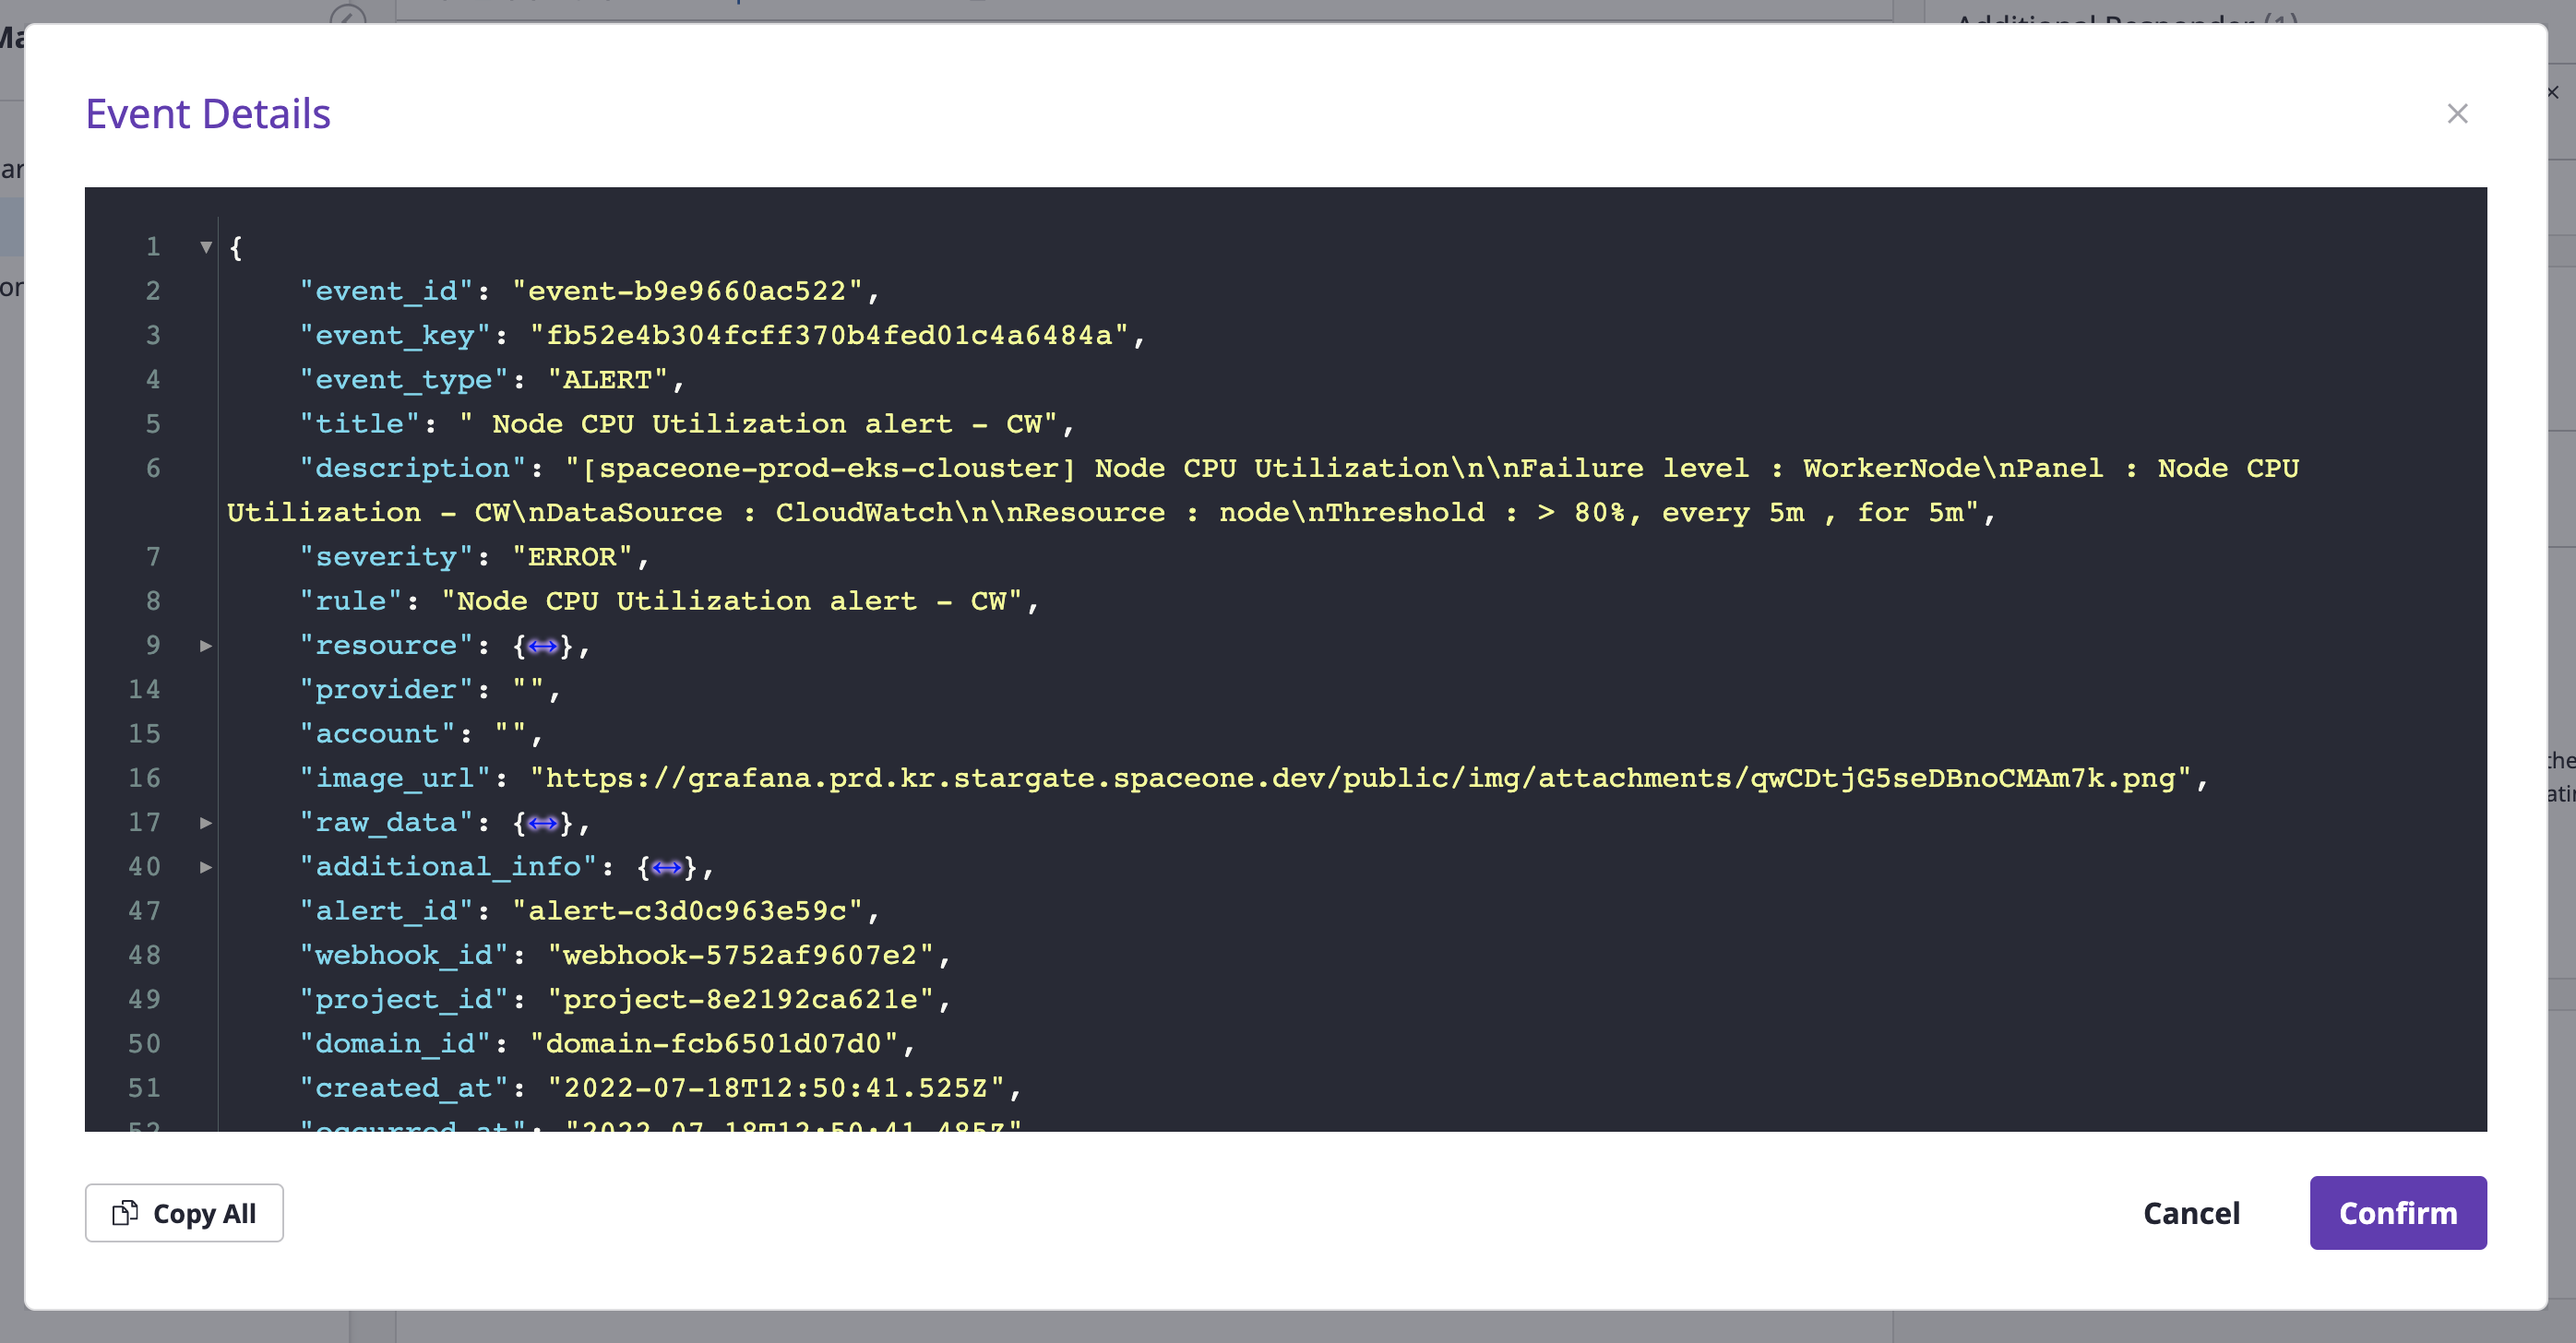
Viewing occurred events
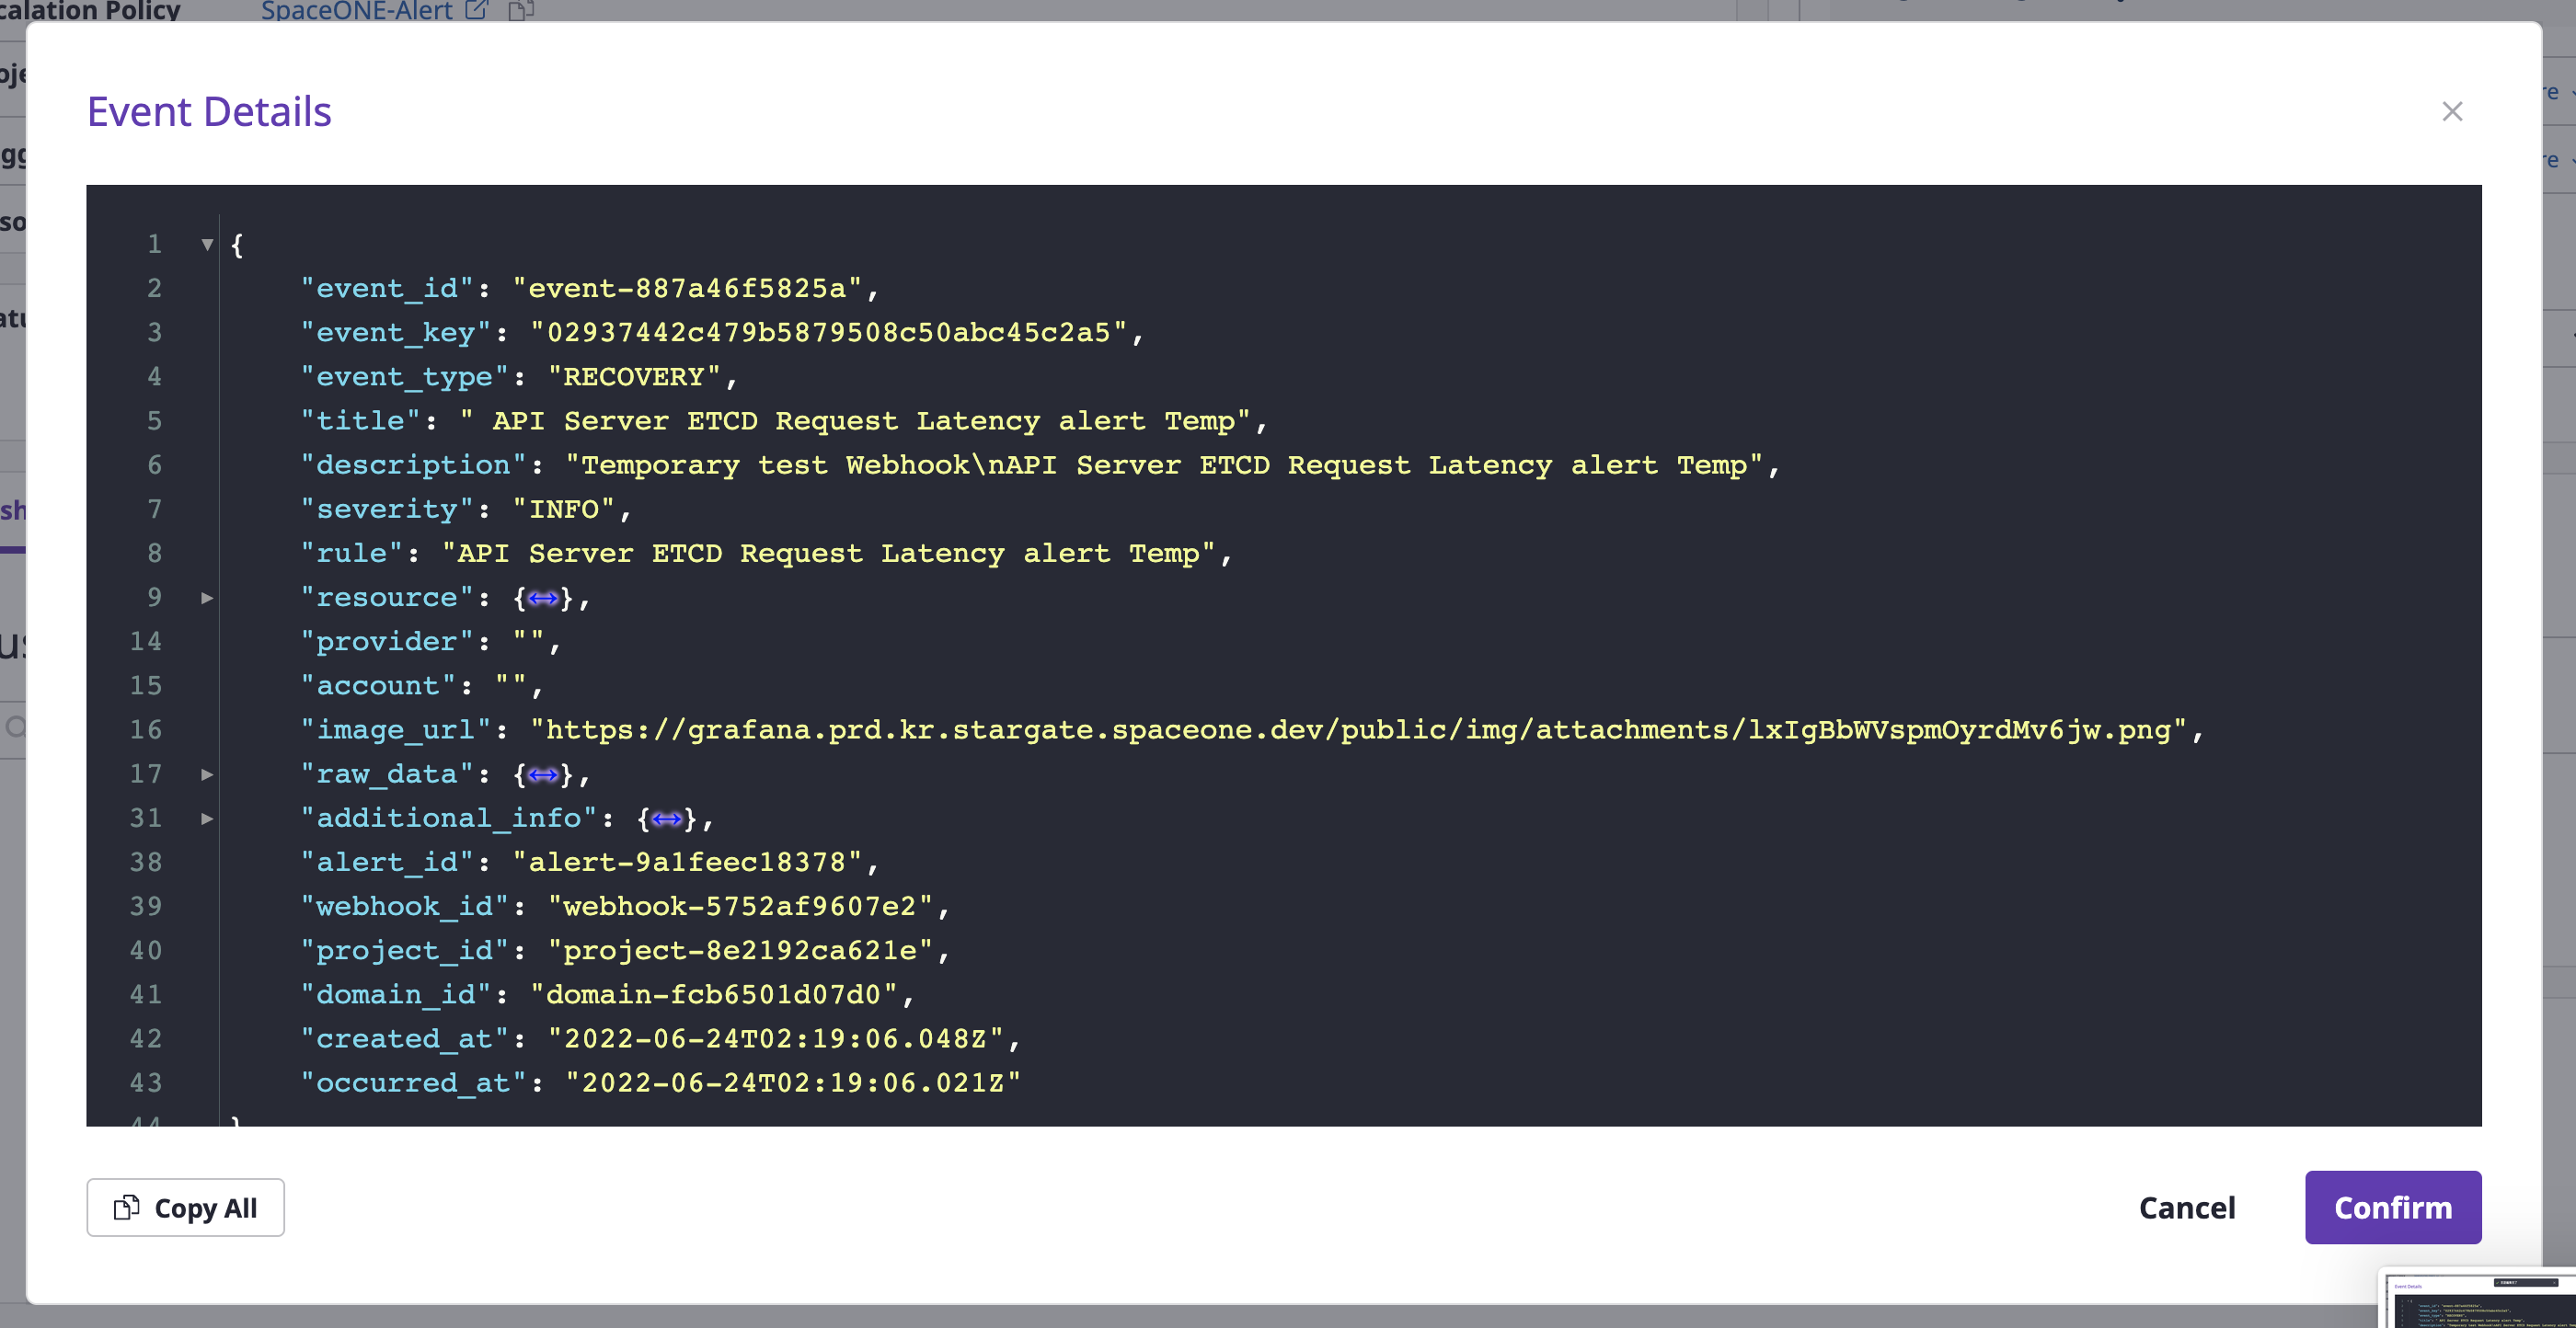
You can view history by logging events that occurred in one alert.
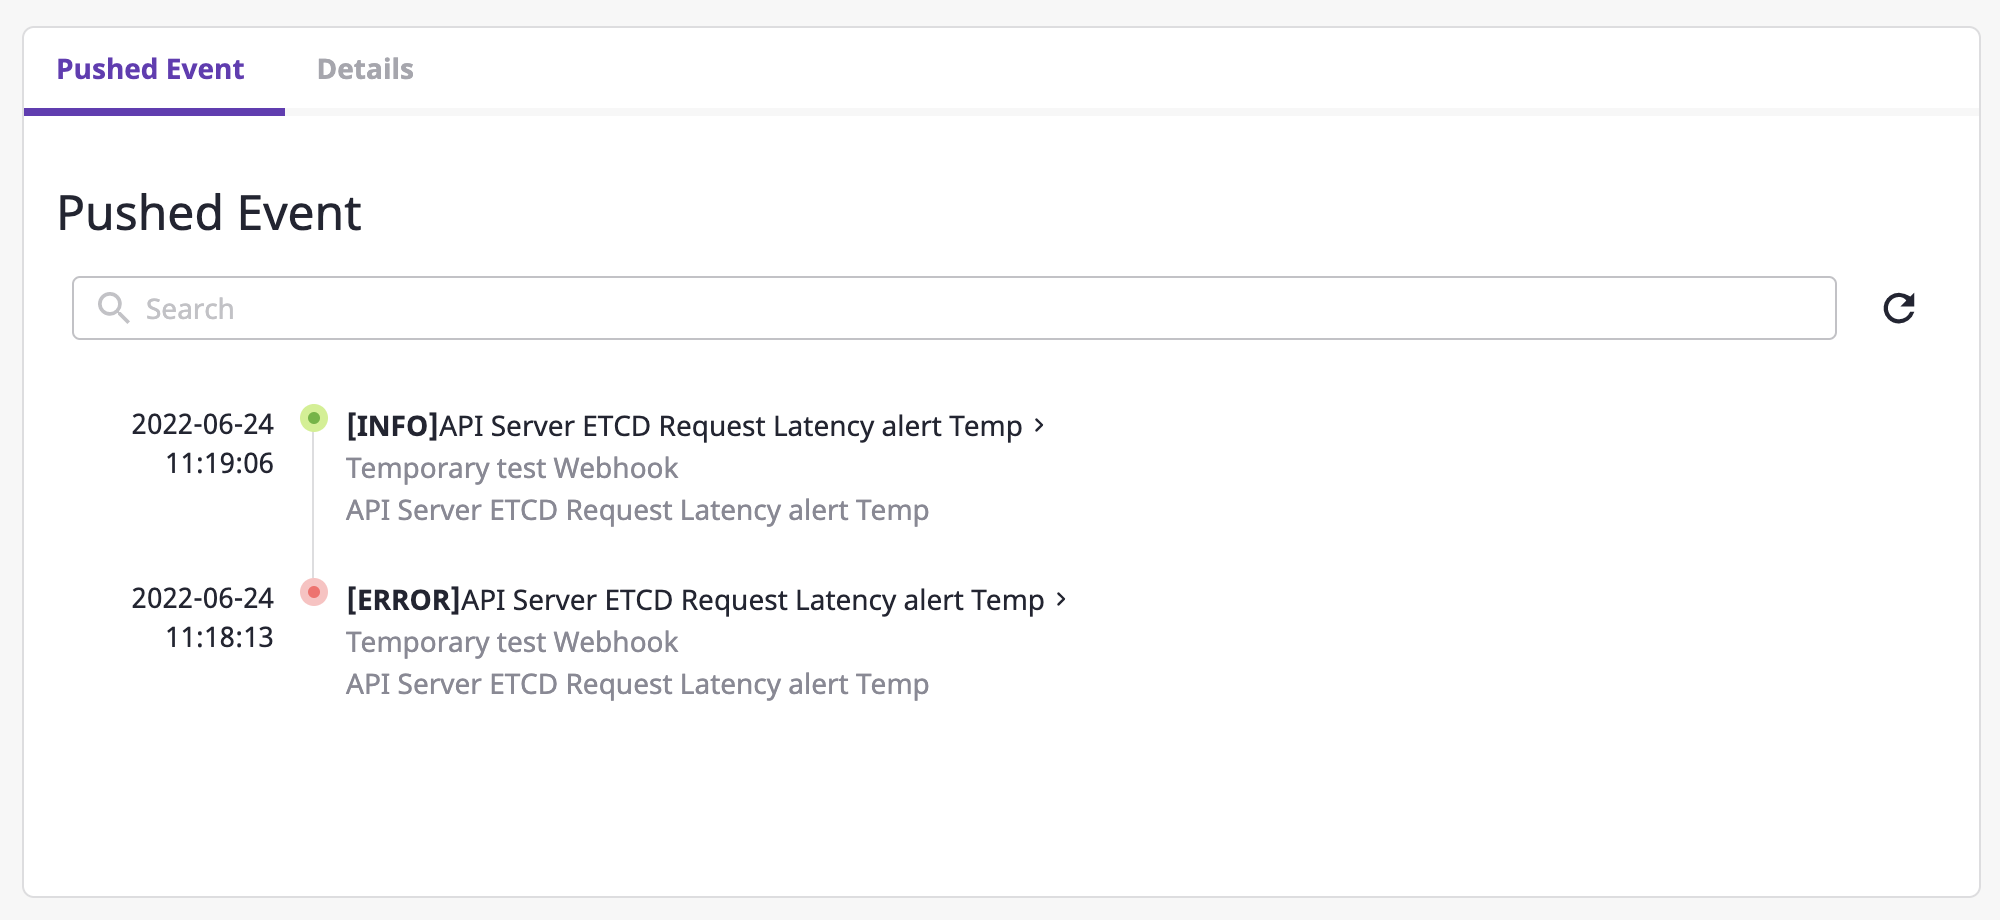
If you click one event from a list, you can view the details of that event.
Notification policy settings
You can set an alert to occur only when the urgency of the alert that has occurred in the project is urgent.
(1) Inside the [Alerts] tab of the project detail page, go to the [Settings] tab.
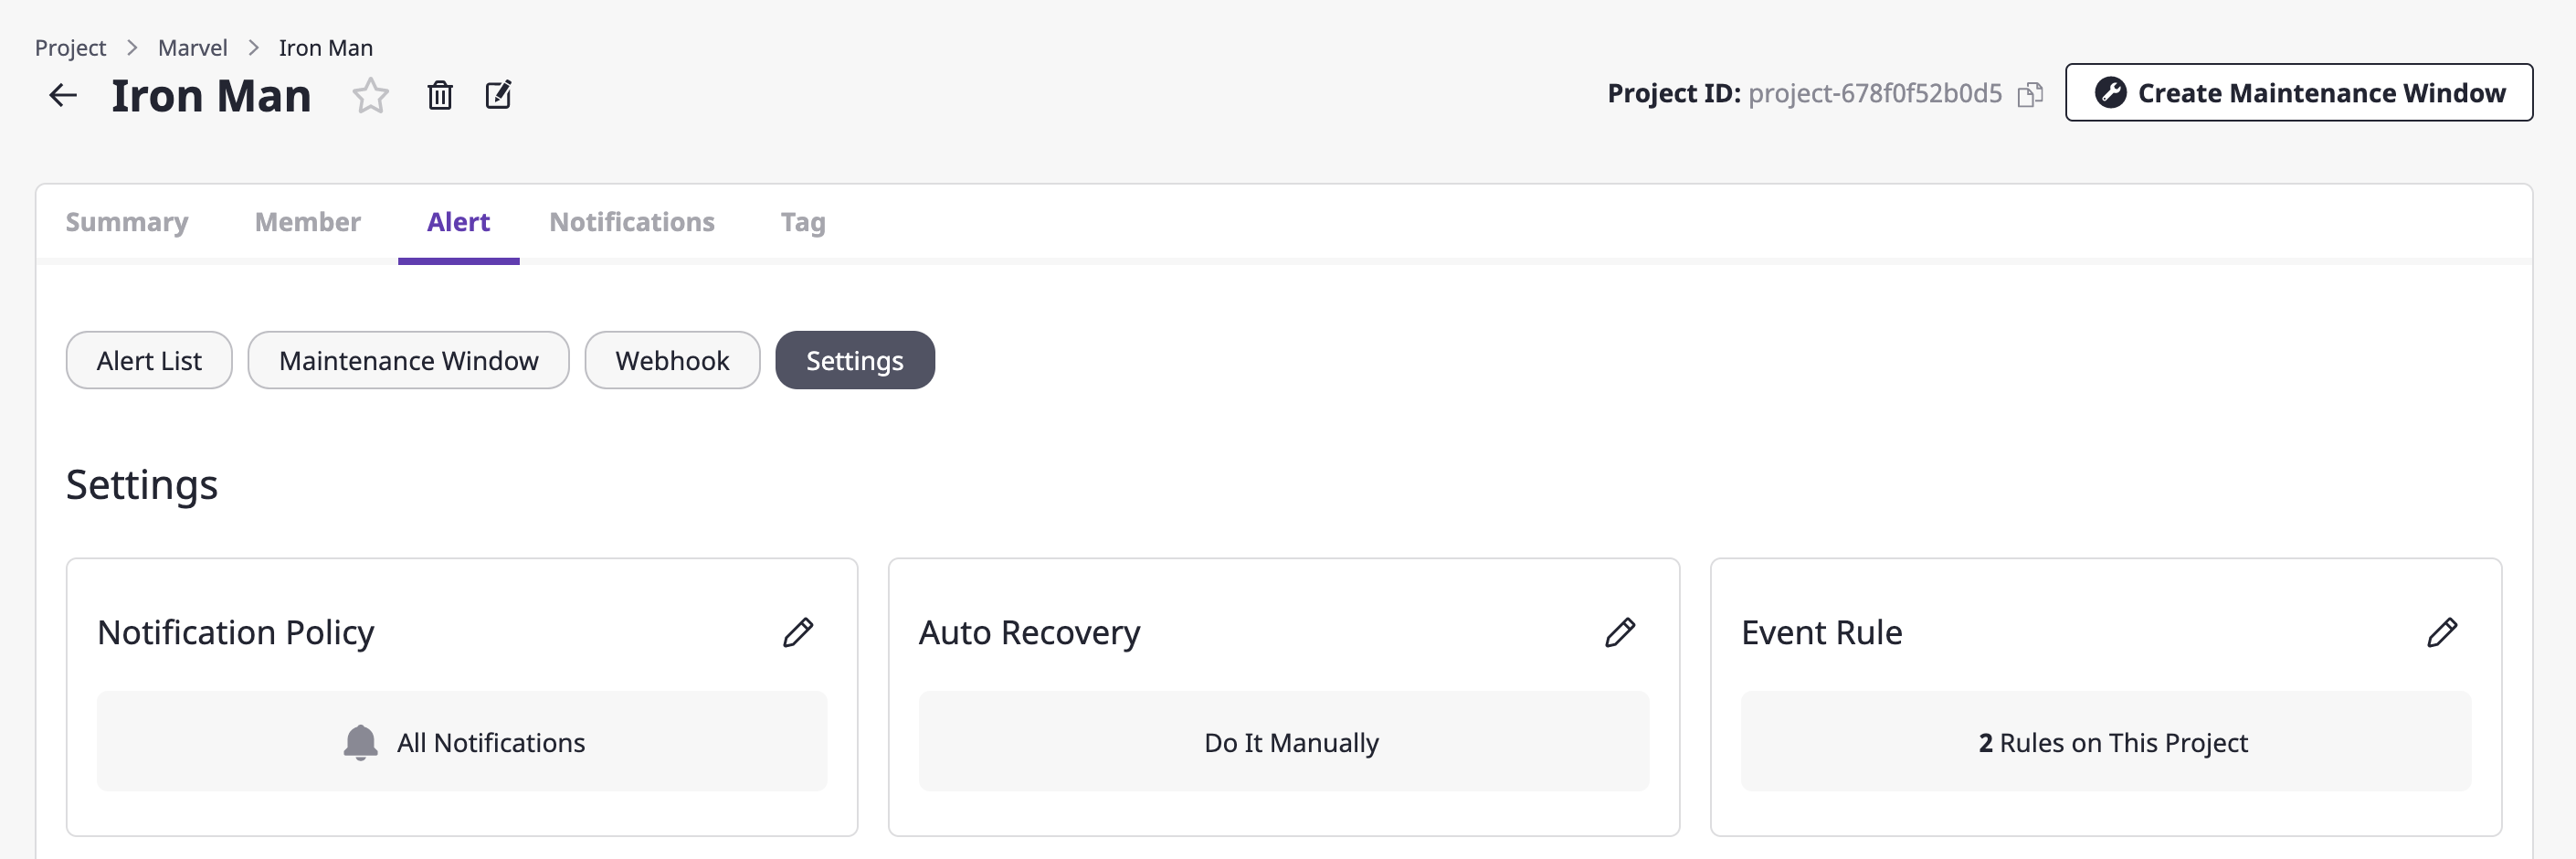
(2) Click the [Edit] icon button in the notification policy area.
(3) Select the desired notification policy.
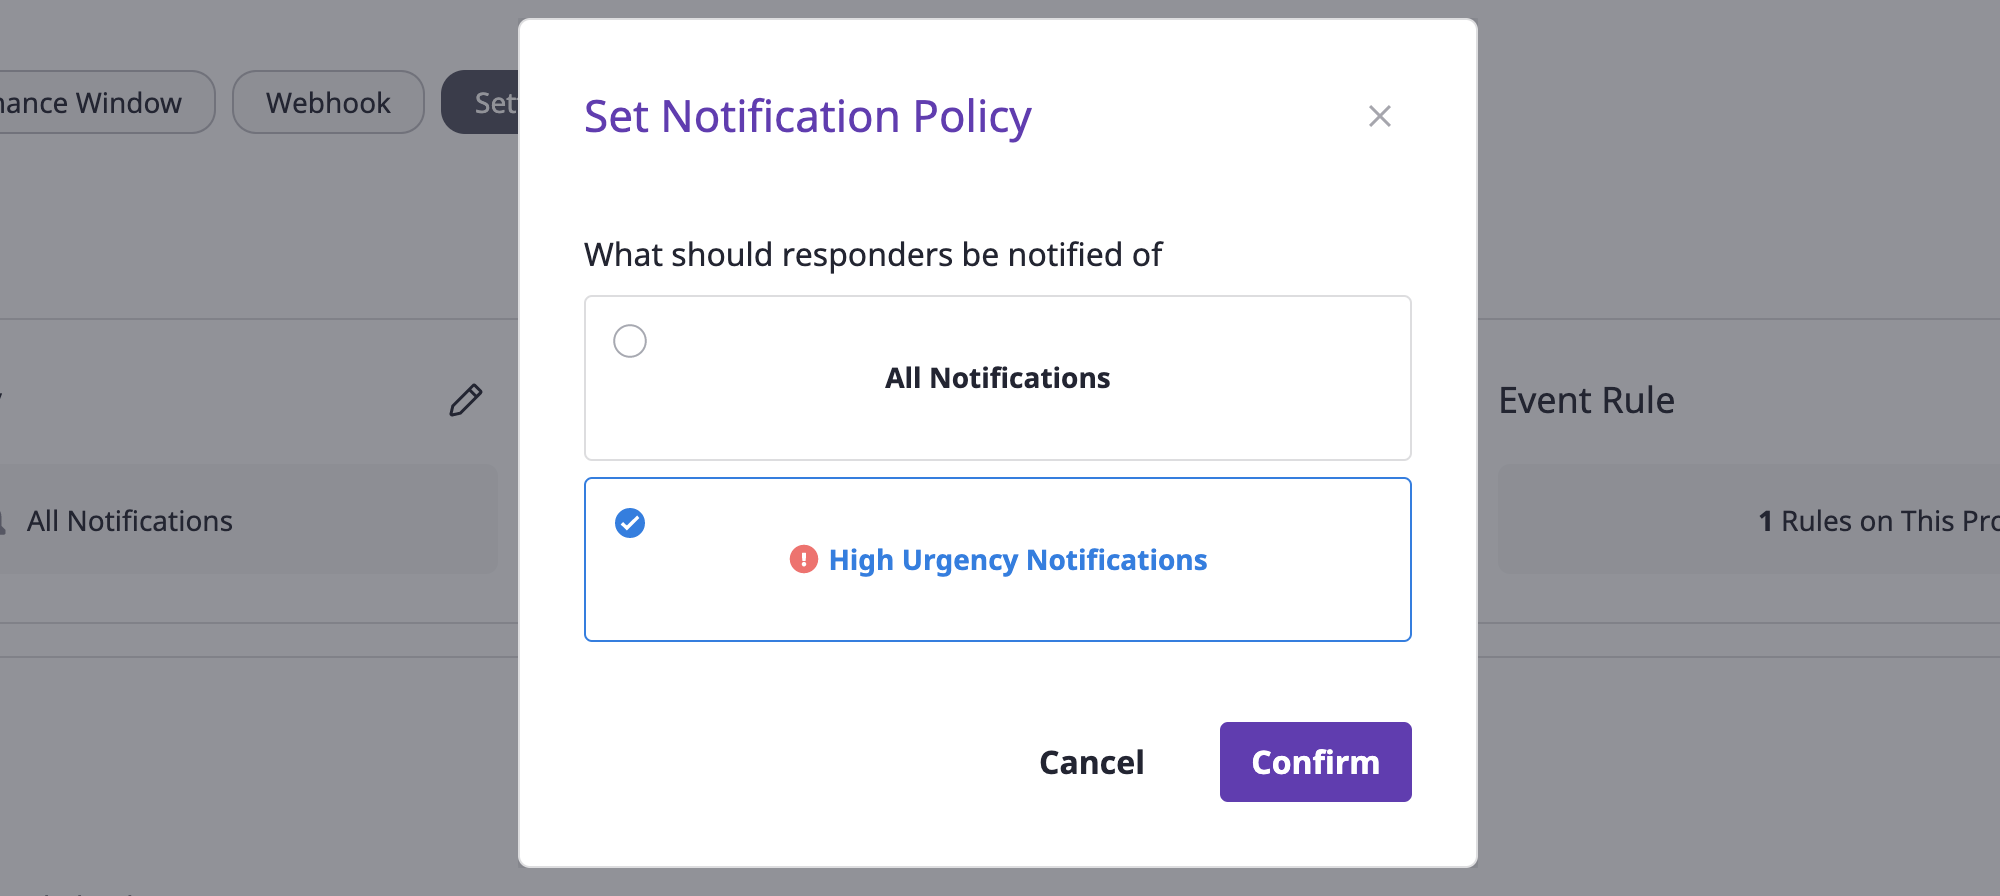
(4) Click the [OK] button to complete policy settings.
Auto recovery settings
The auto recovery feature automatically places the alert into a resolved state when the system crashes.
How auto recovery works
When an alert of the project for which the auto recovery is set receives an additional event, provided that the event type value of that event is recovery, the alert state is automatically switched to resolved.
(1) Inside the [Alerts] tab on the project detail page, move to the [Settings] tab.

(2) Click the [Edit] icon button in the auto recovery area.
(3) Select the desired auto recovery settings.

(4) Click the [OK] button to complete auto recovery settings
4 - Webhook
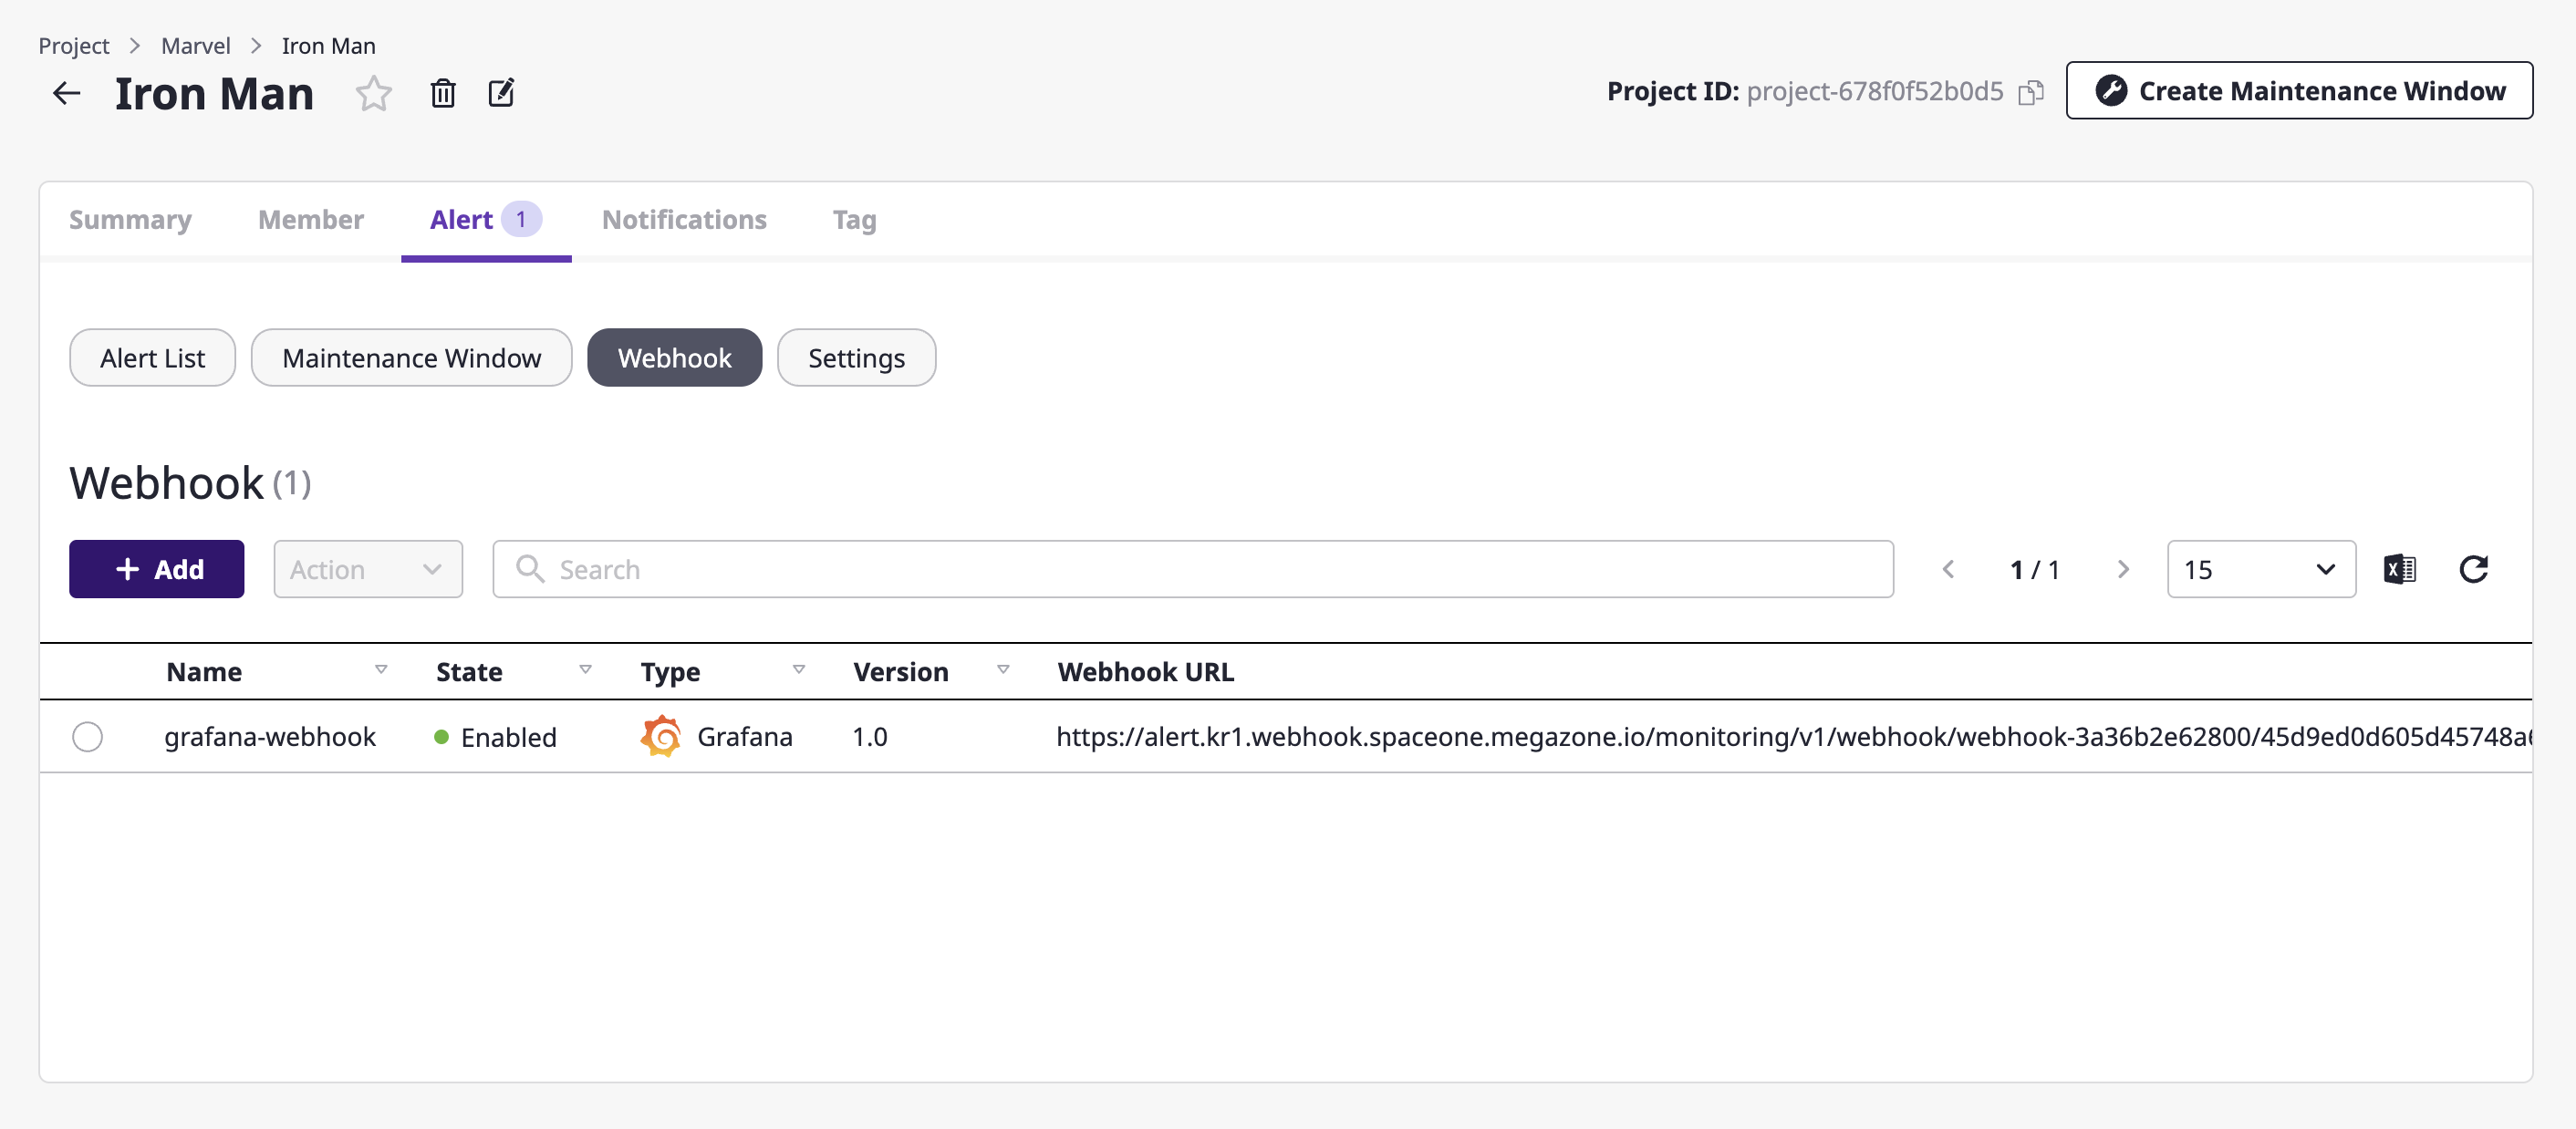
Creating a webhook
To receive event messages from an external monitoring service, you need to create a webhook.
Webhooks can be created on the project detail page.
(1) Go to the [Alerts] tab of the project detail page and select the [Webhook] tab.
(2) Click the [Add] button.
(3) Write a name in an [Add webhook] modal dialog and select the plug-in of the external monitoring service to be connected.
(4) Click the [OK] button to complete set up.
Connect external monitoring service
To use a webhook, you should connect to an external monitoring service through the URL of the created webhook.
For more on how to connect an external monitoring service, see here.
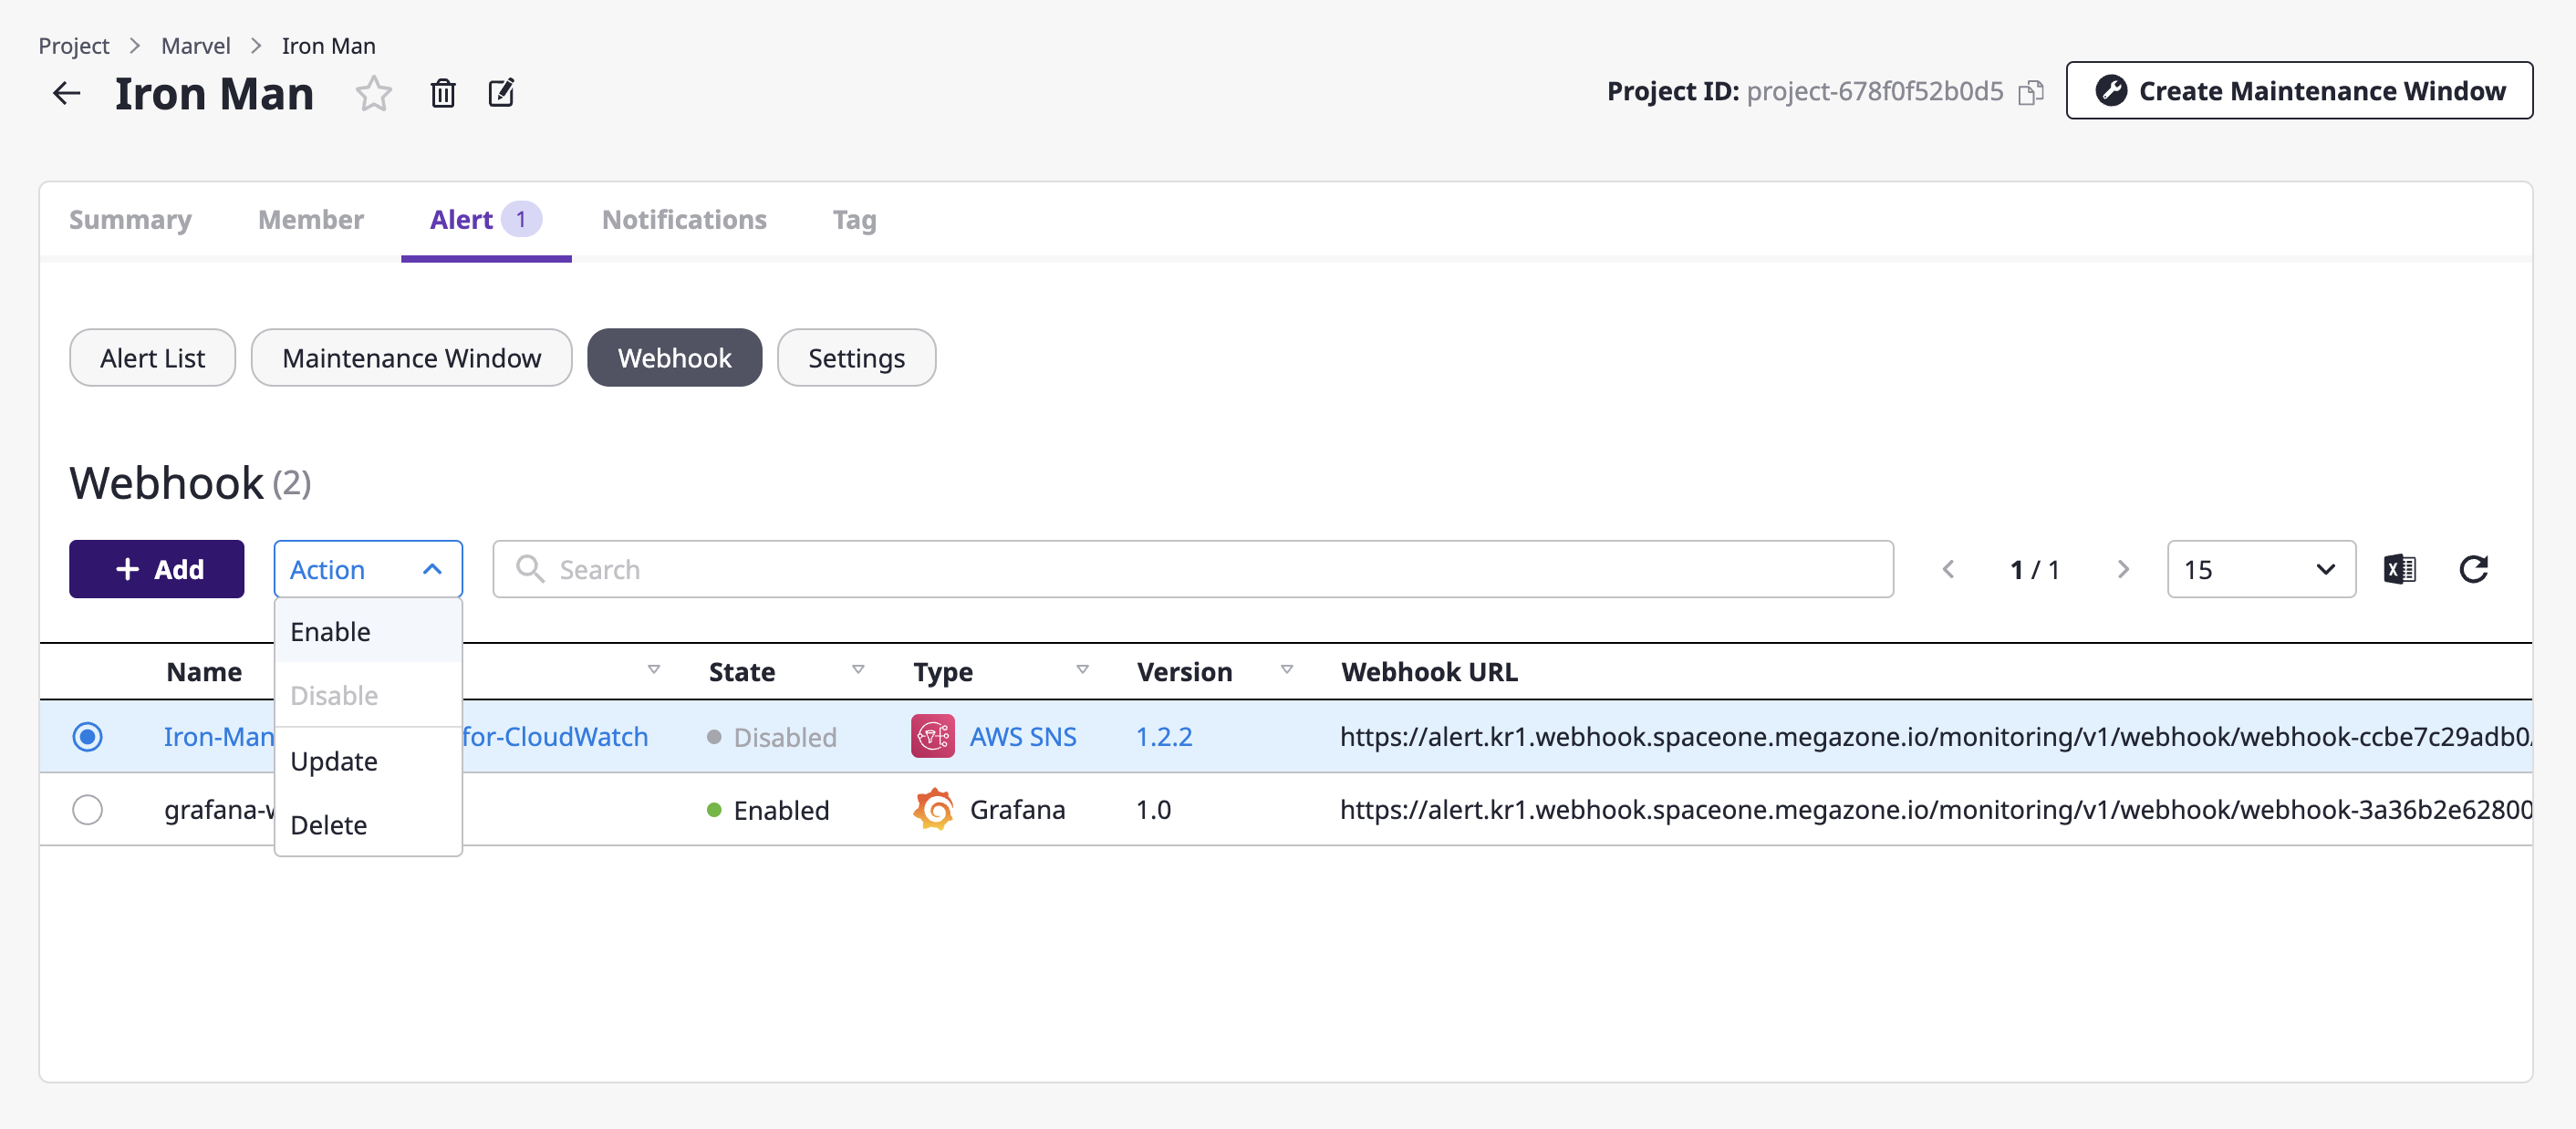
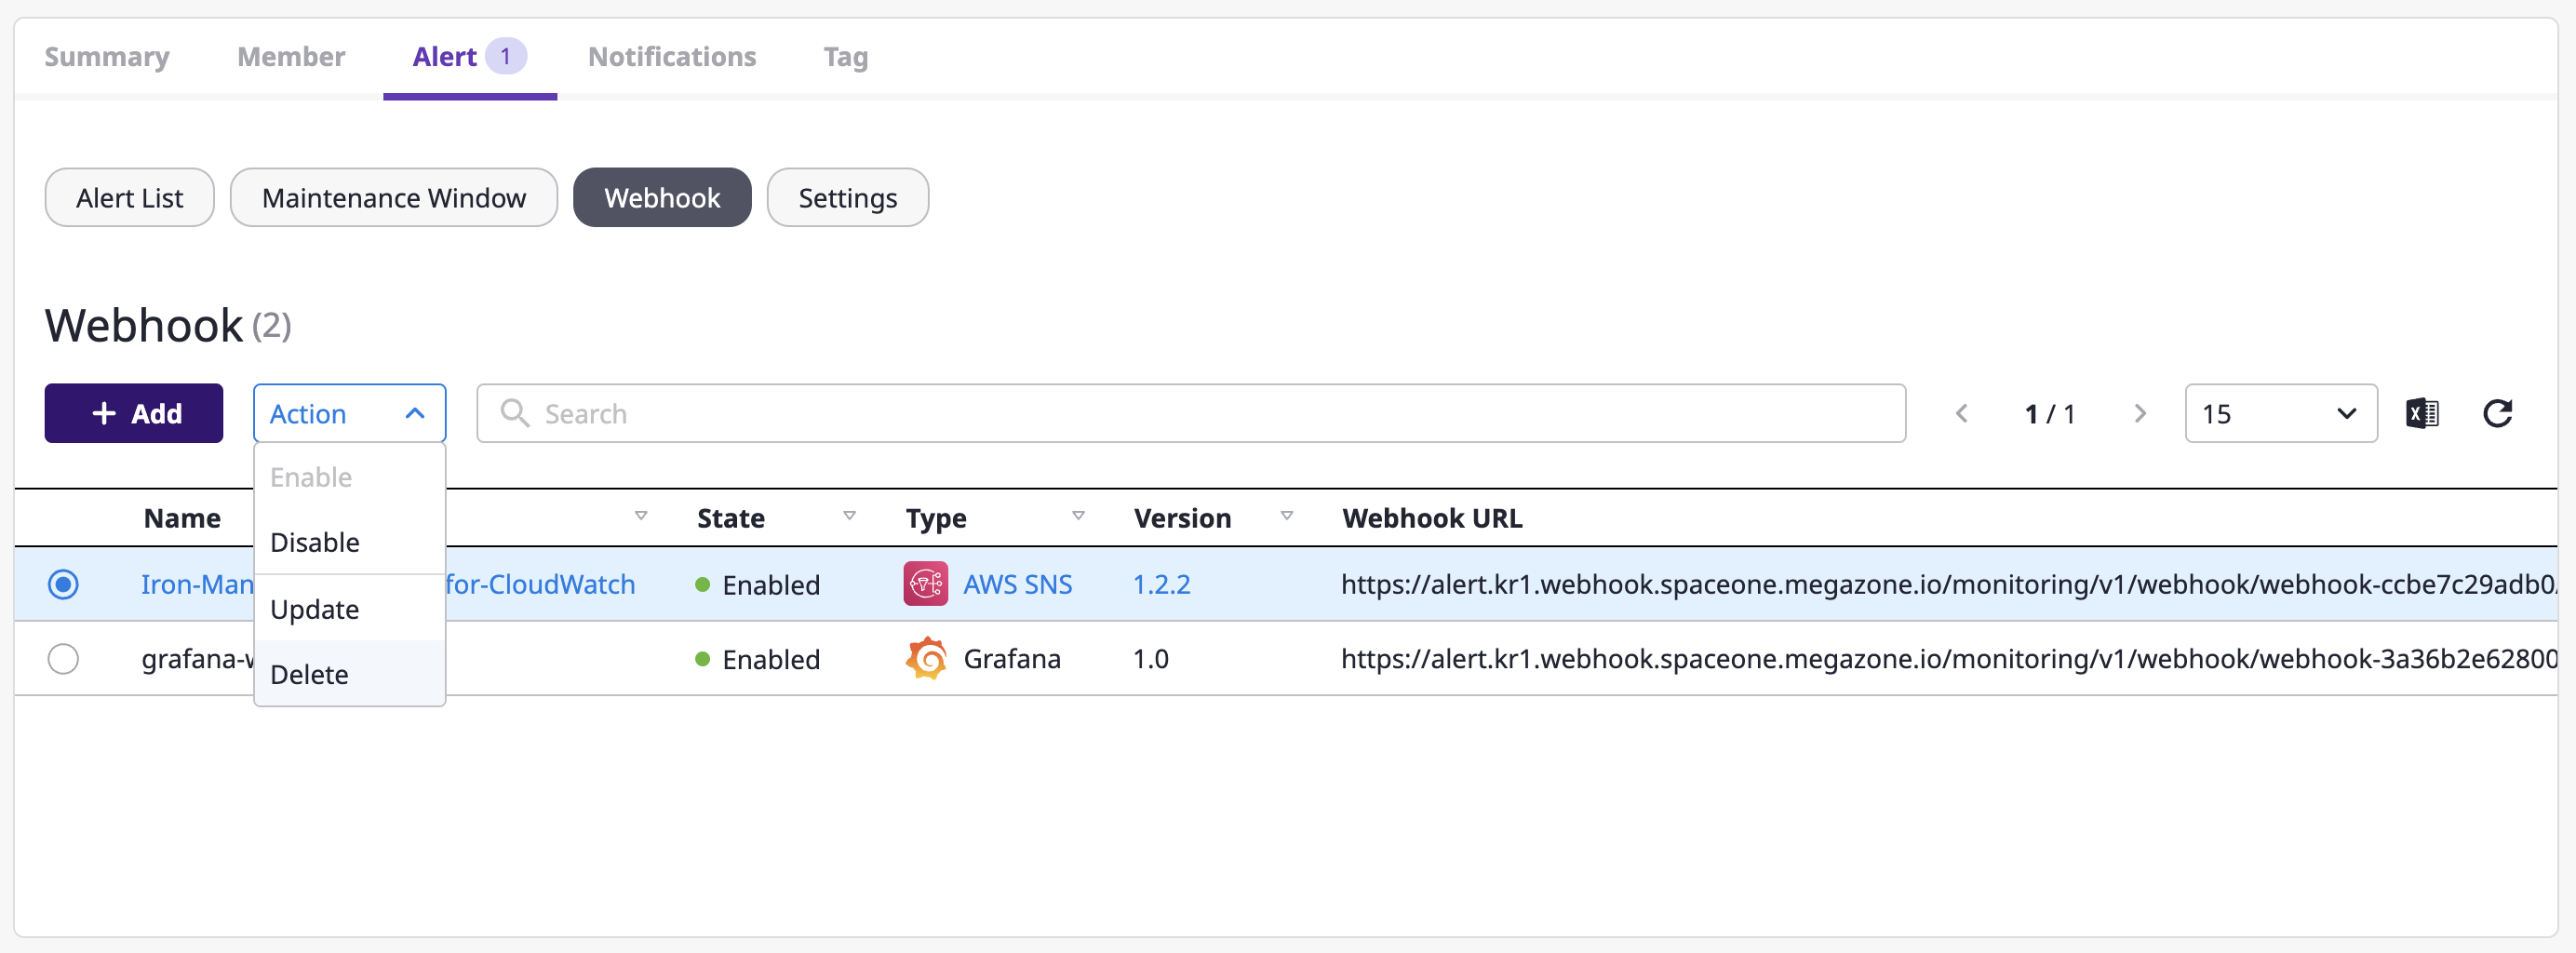
Getting a list of webhooks
Advanced search
You can enter a search word in the search bar to see a list of webhooks that match your criteria. For a detailed description on advanced search, see here.
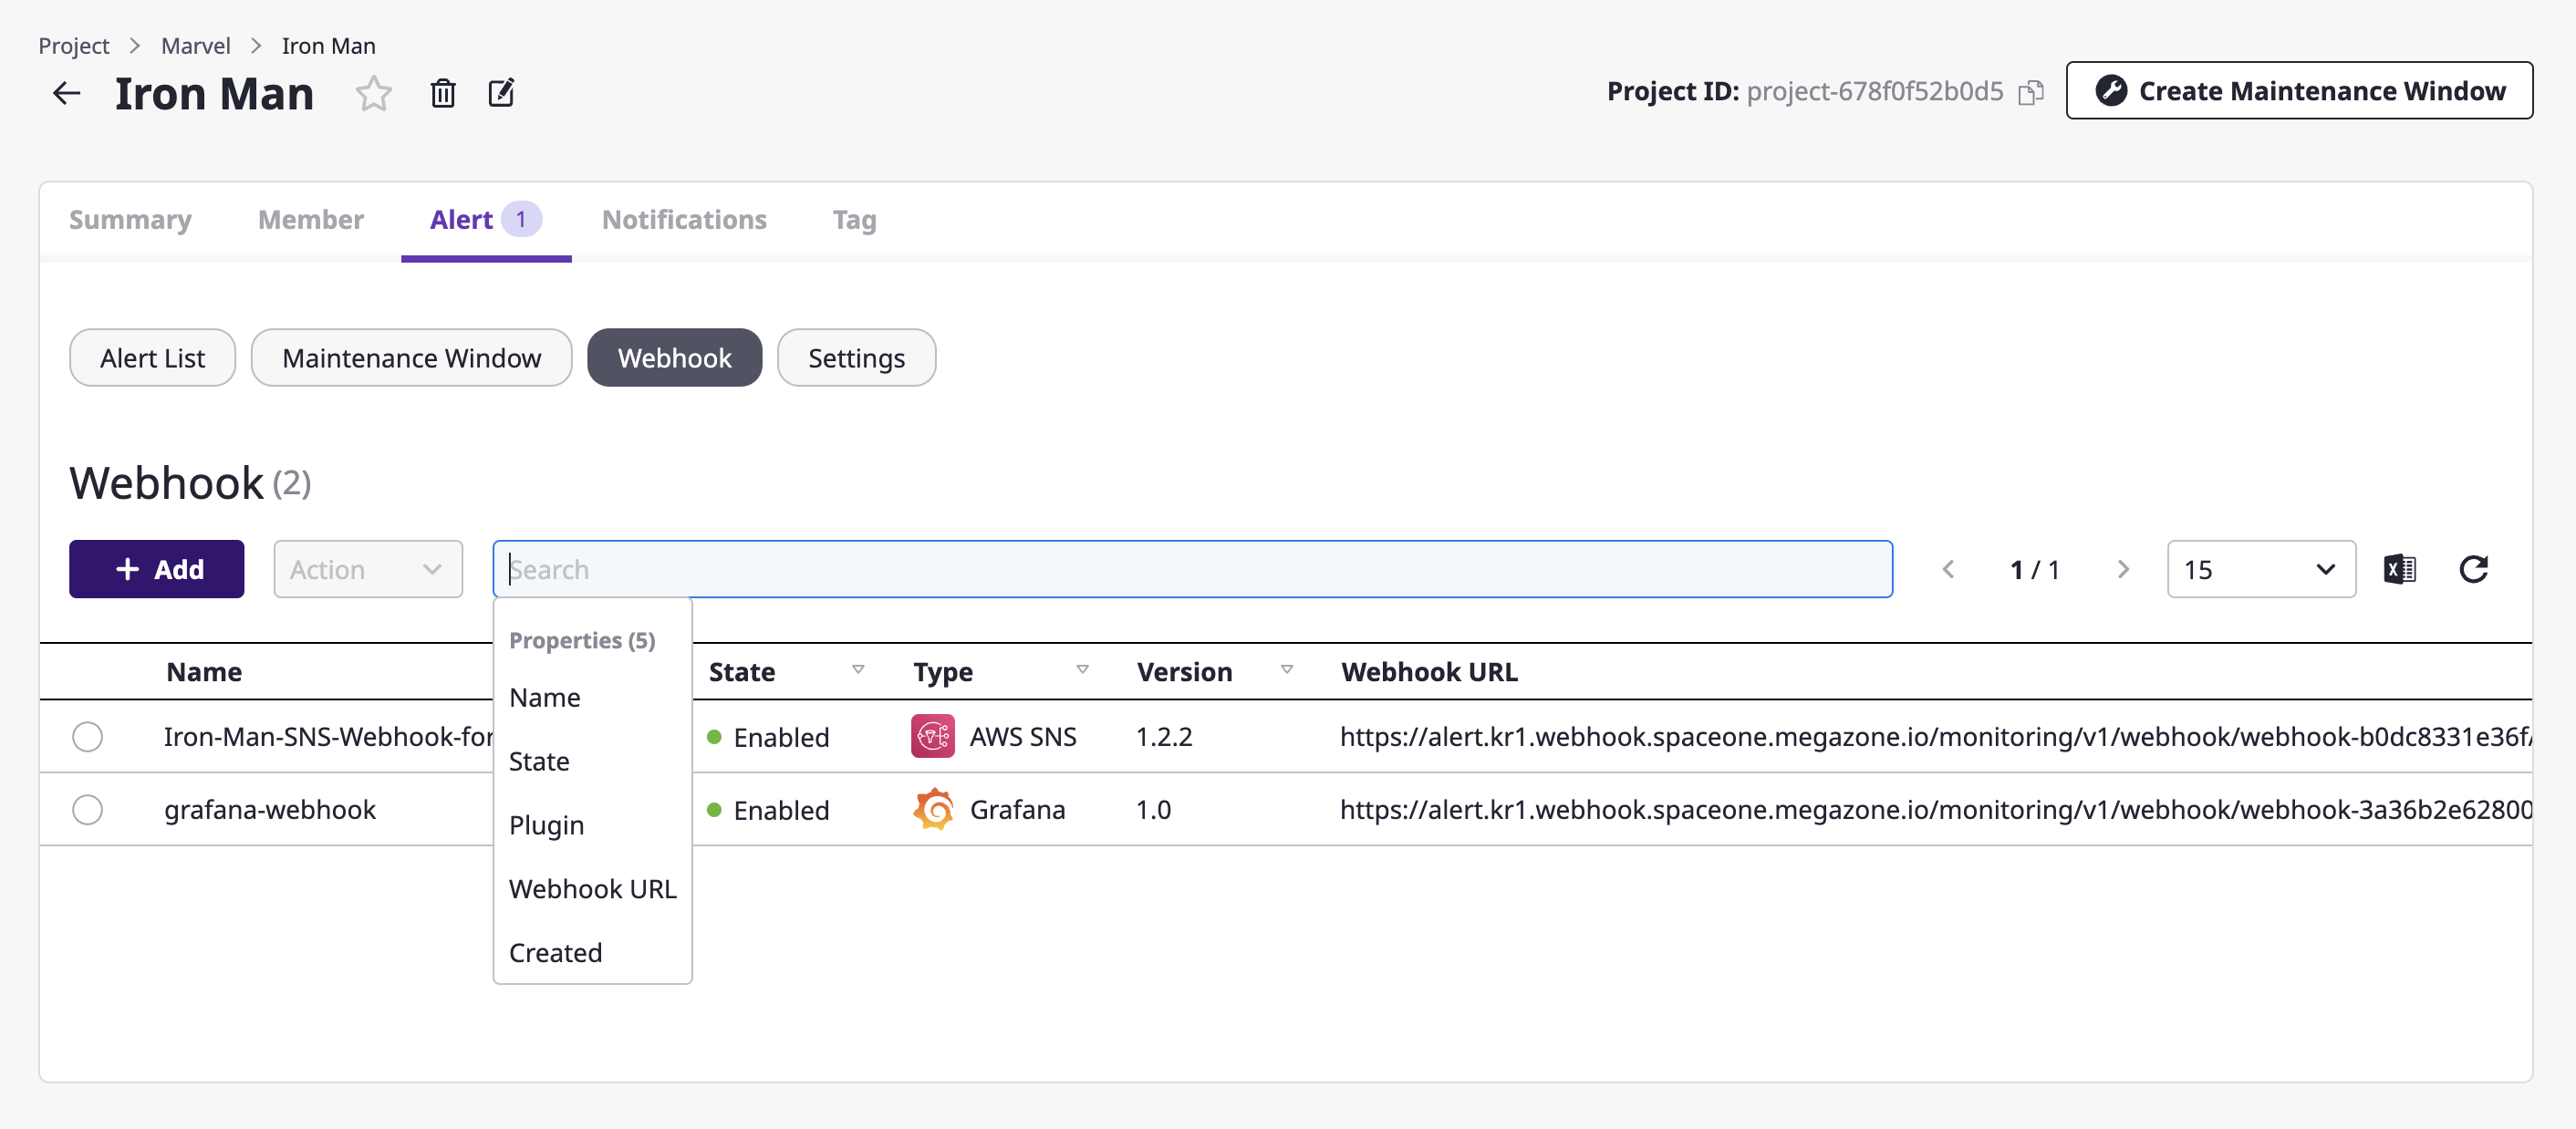
Editing and deleting webhook
You can enable, disable, change, or delete a webhook viewed from the list.
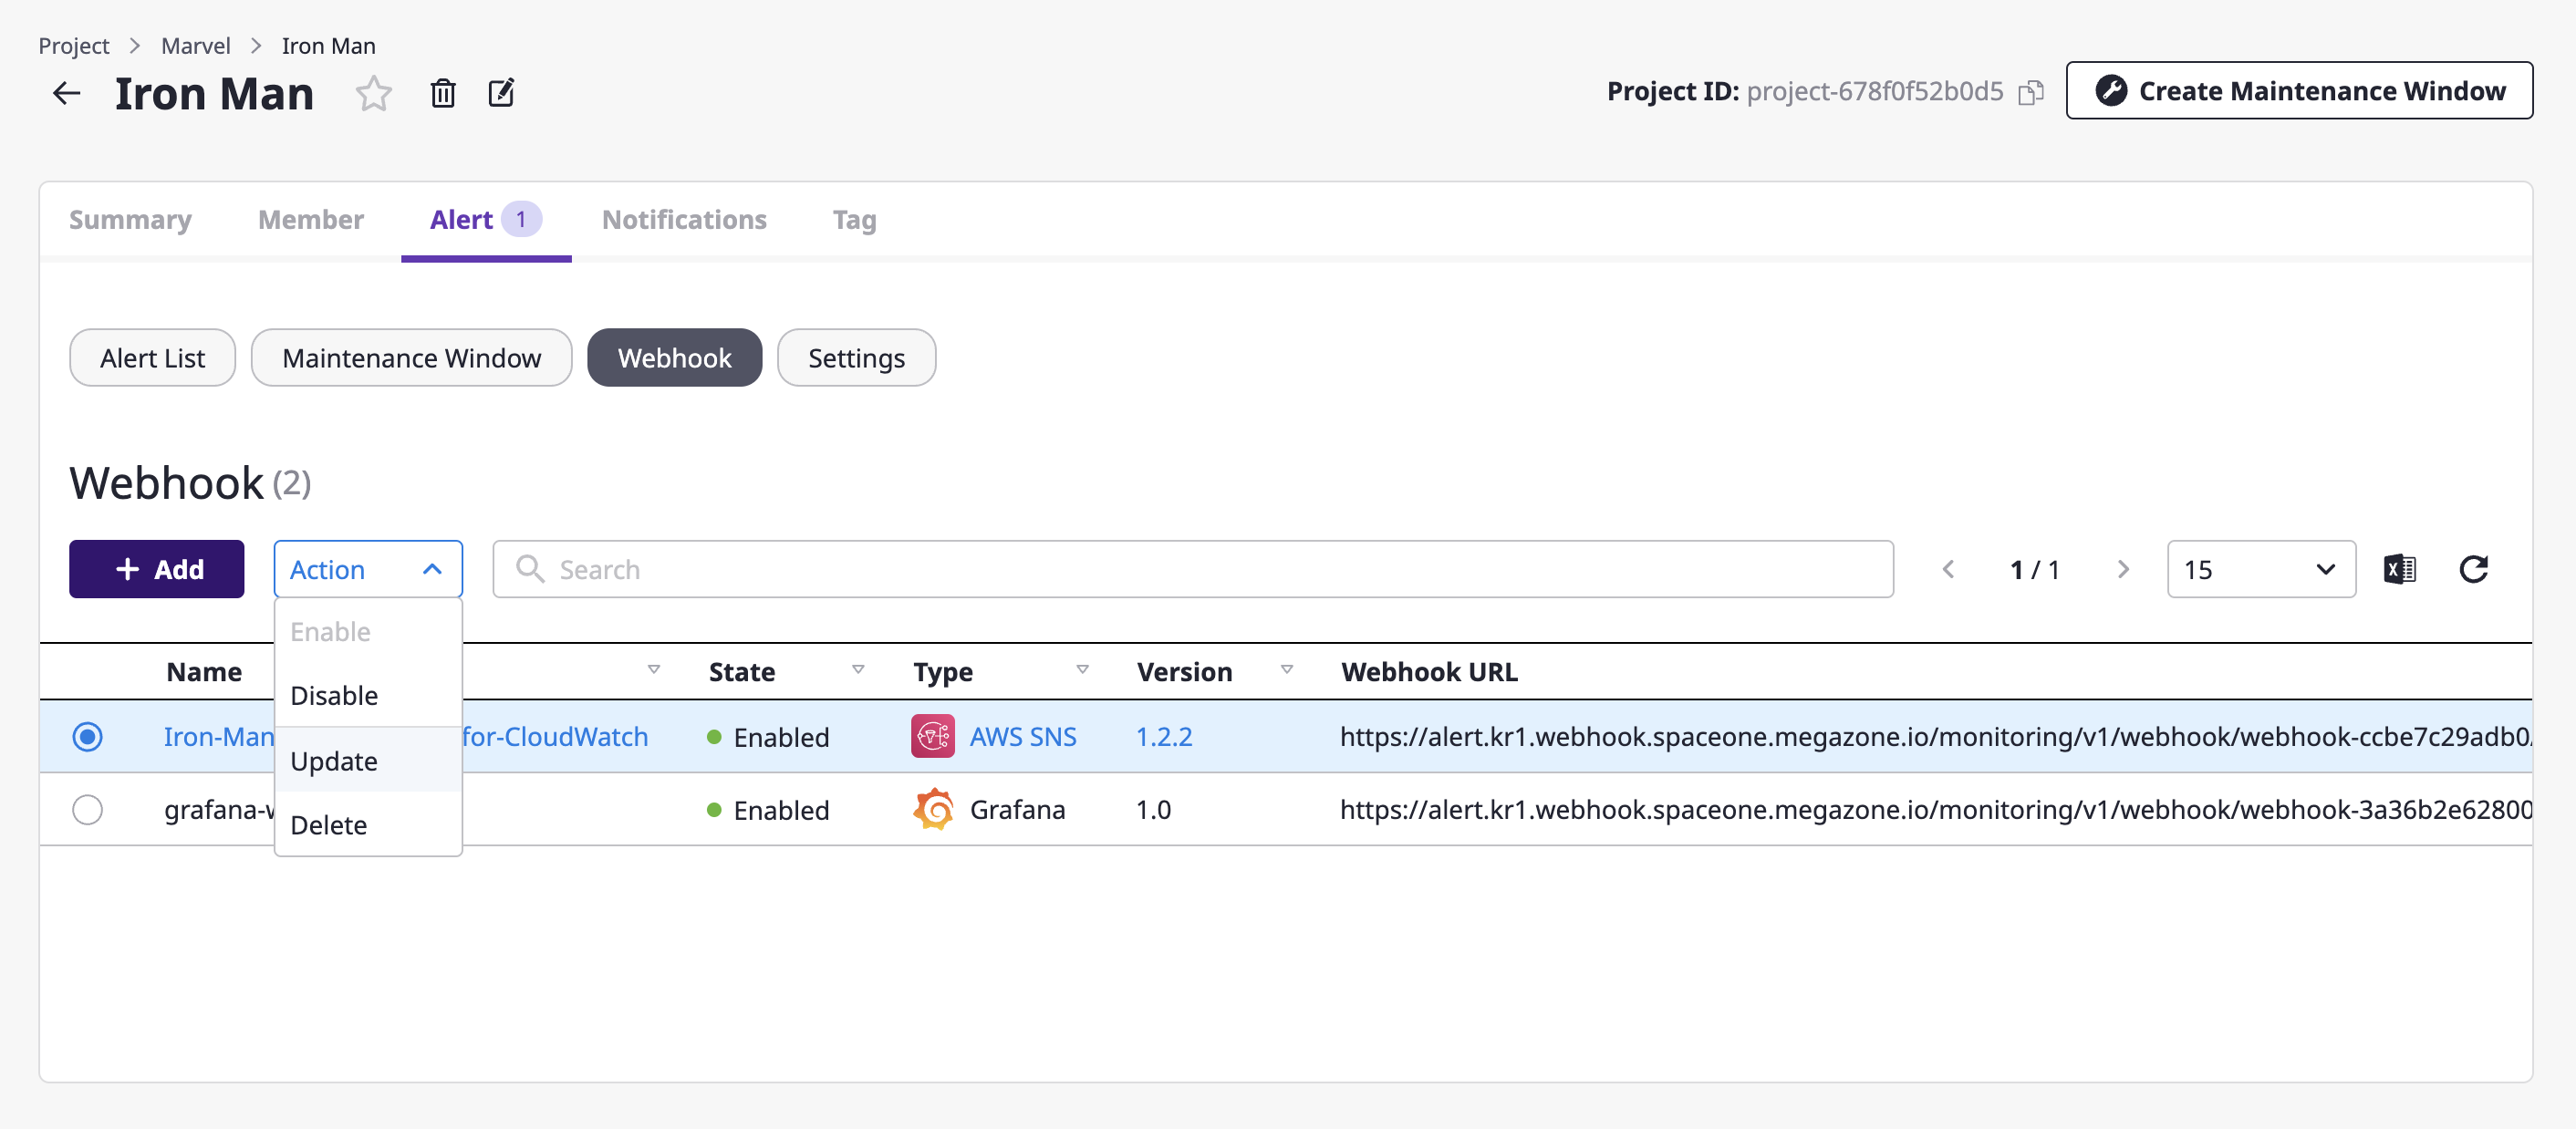
Enabling/disabling a webhook
If you enable a webhook, you can receive events from an external monitoring service connected to the webhook at Alerts.
On the contrary, if you disable a webhook, incoming events are ignored and no alerts are raised.
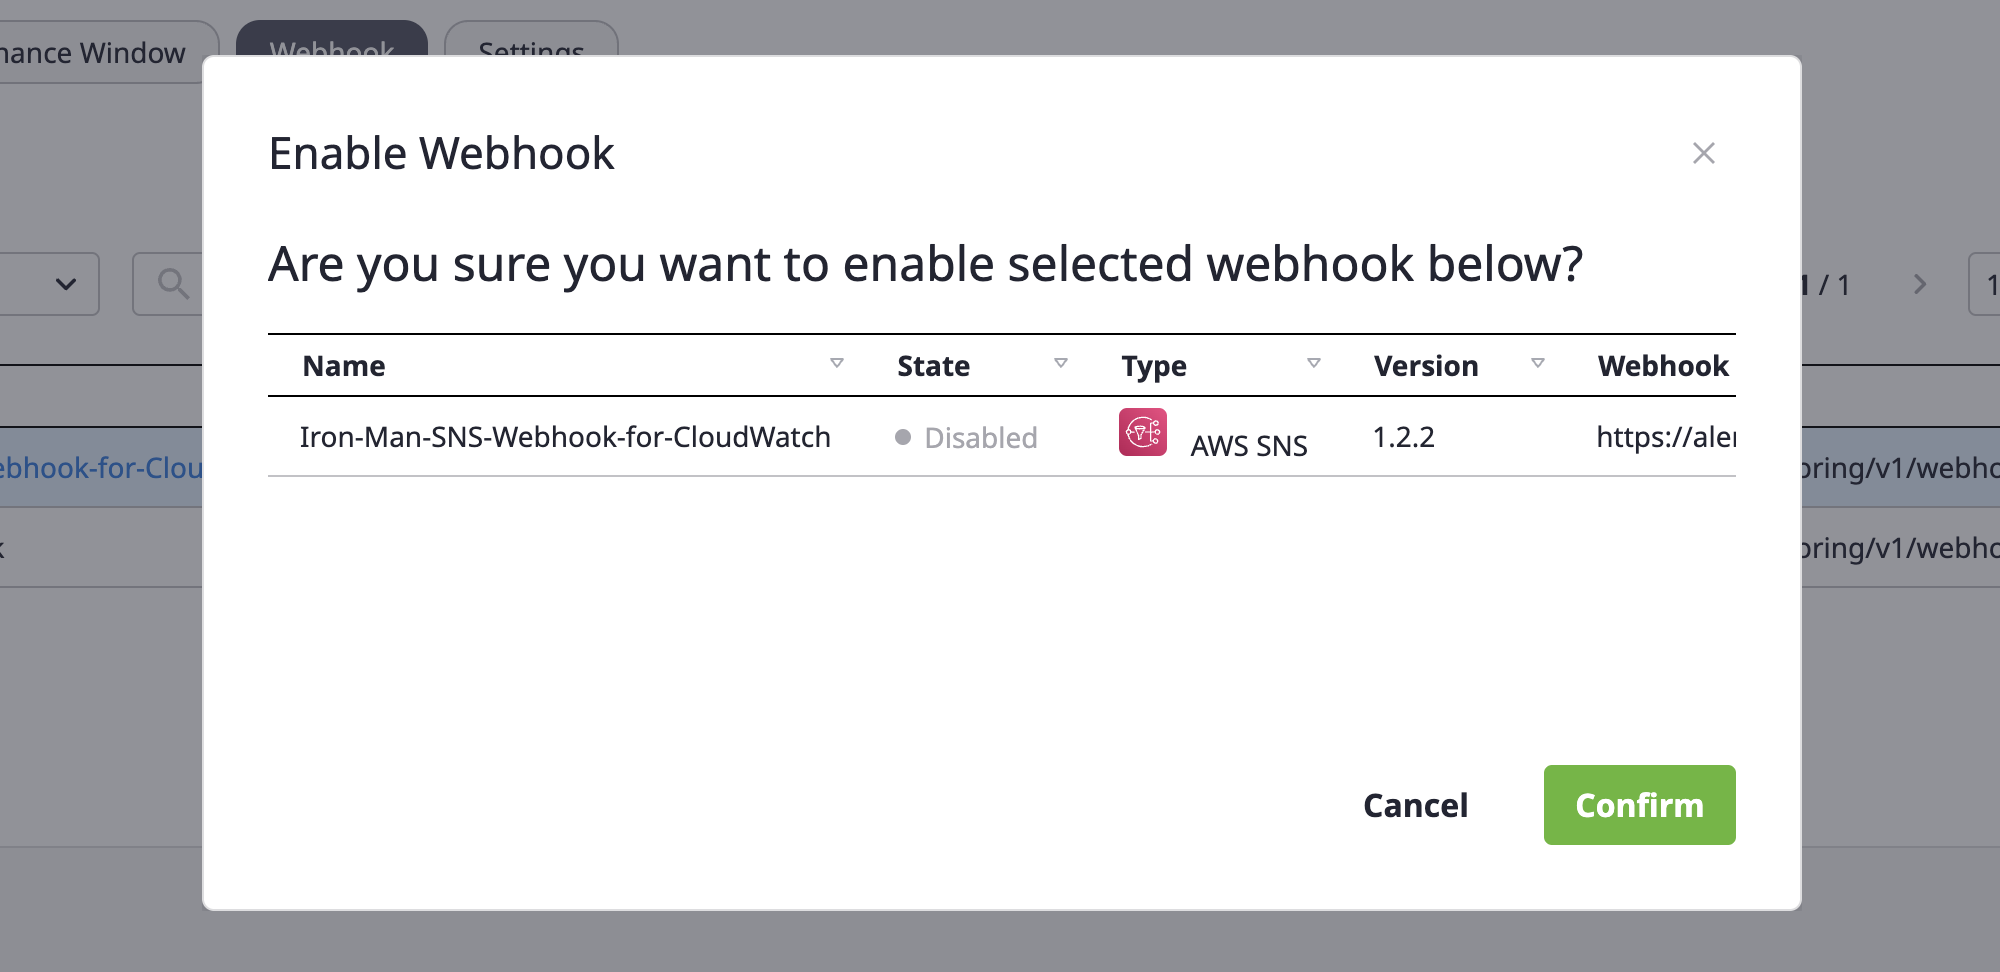
(1) Select the webhook to enable and choose the [Enable]/[Disable] menu from the [Action] dropdown.
(2) Check the content in the [Enable/disable a webhook] modal dialog and click the [OK] button.

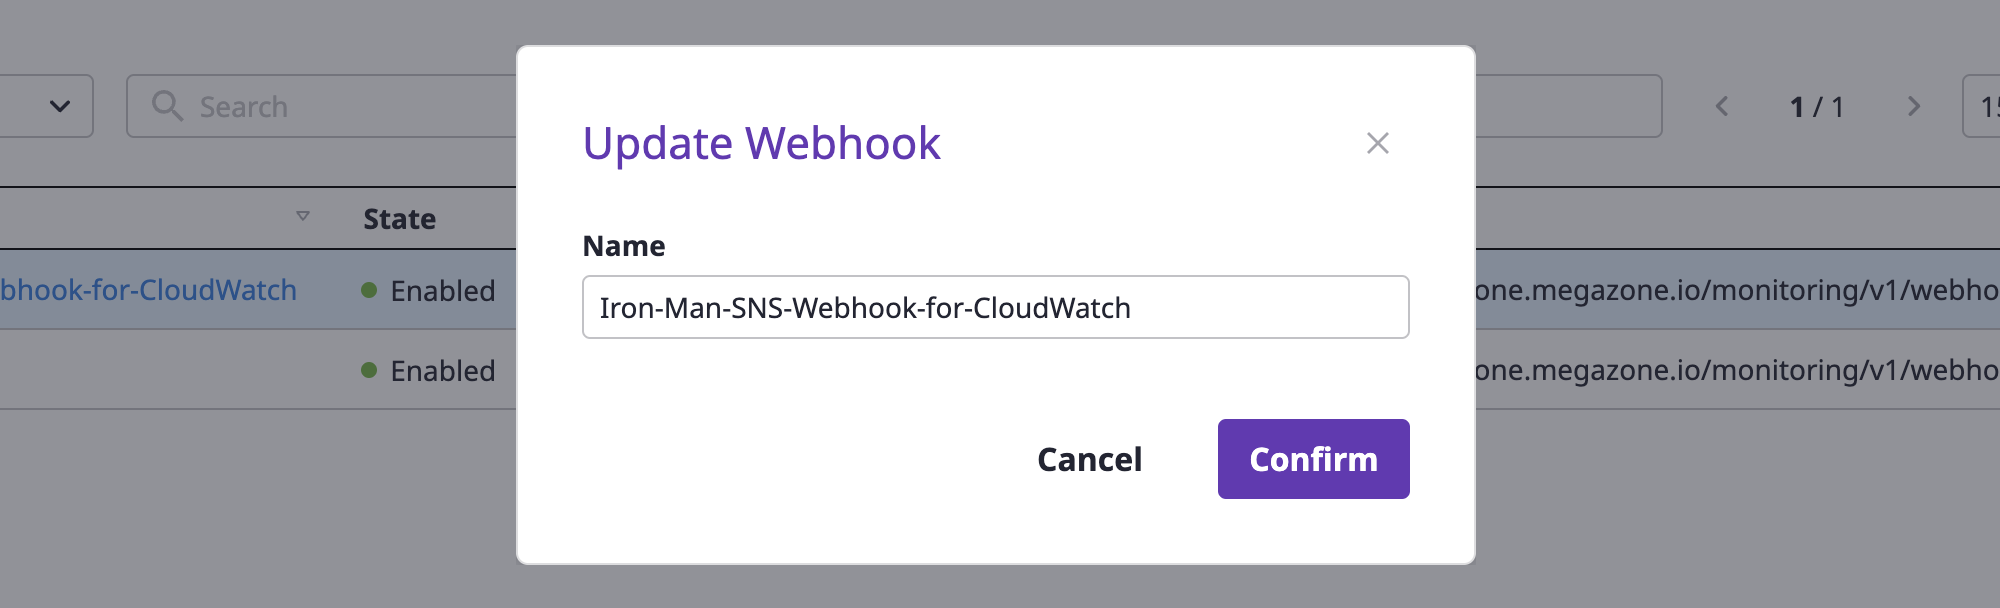
Renaming a webhook
(1) Select the webhook to change from the webhook list, and select the [Change] menu from the [Action] dropdown.

(2) Write a name to be changed and click the [OK] button to complete the change.
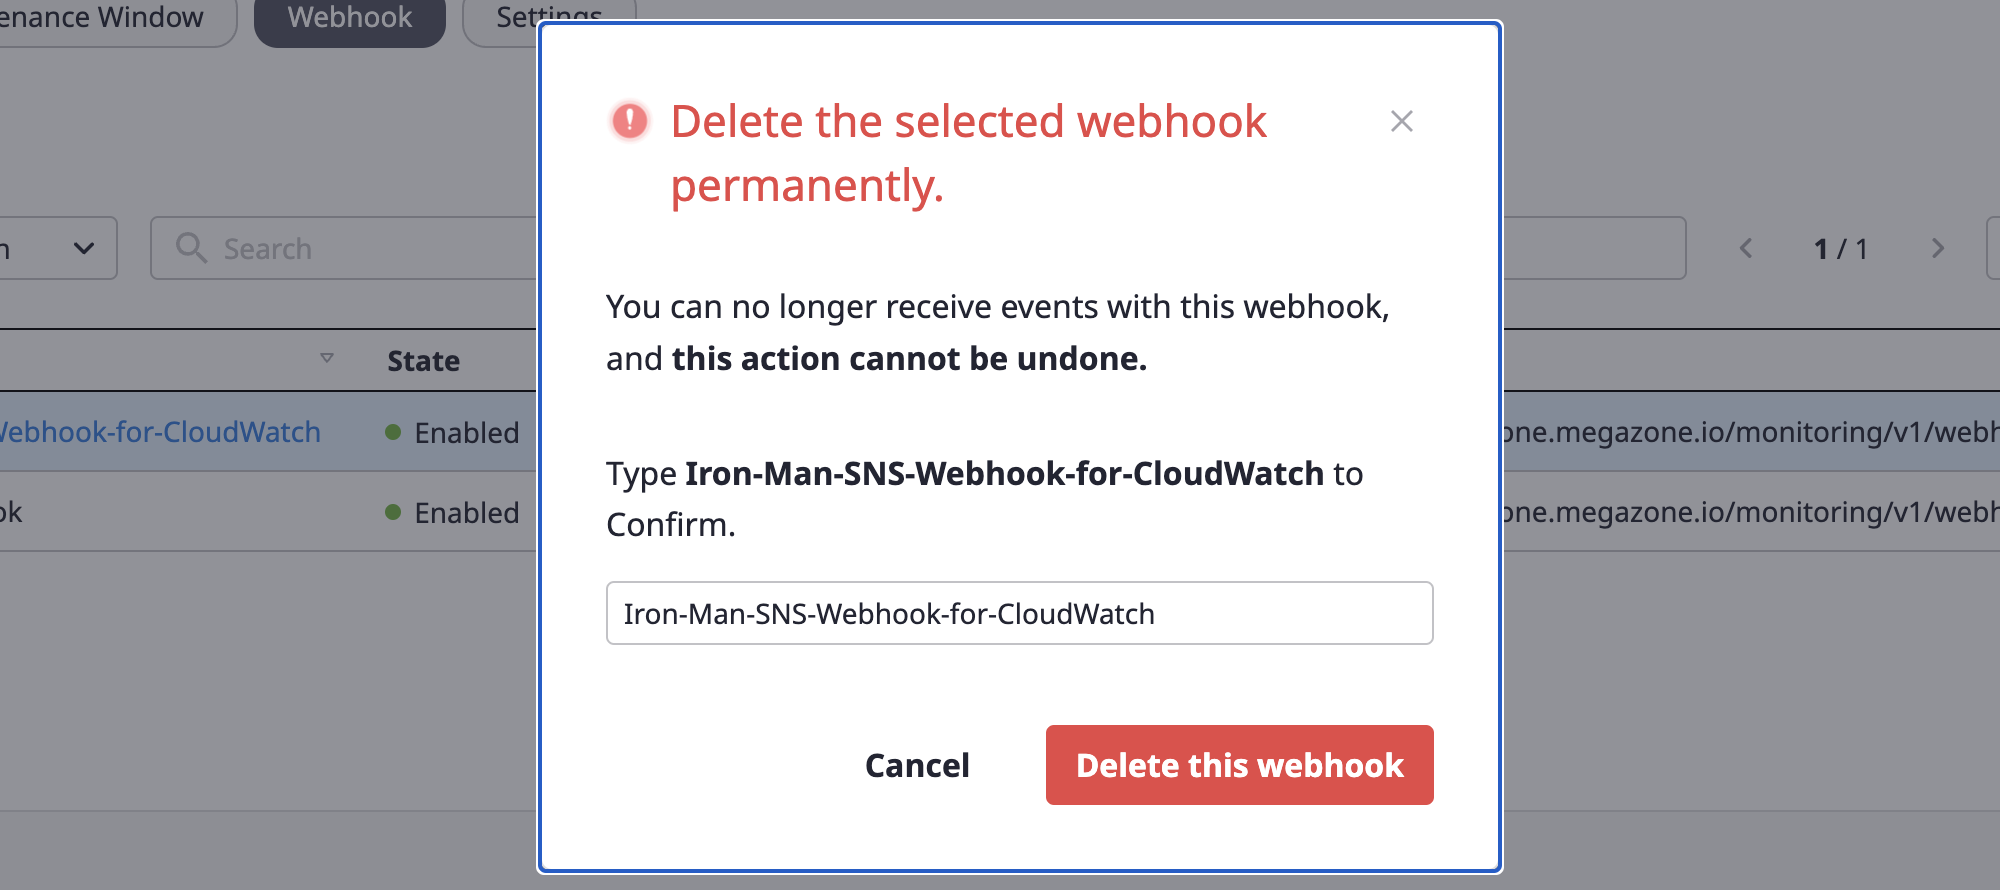
Deleting a webhook
(1) Select the webhook to delete from the webhook list, and choose the [Delete] menu from the [Action] dropdown.
(2) After entering the accurate name of the selected webhook, click the [Delete] button to delete the webhook.
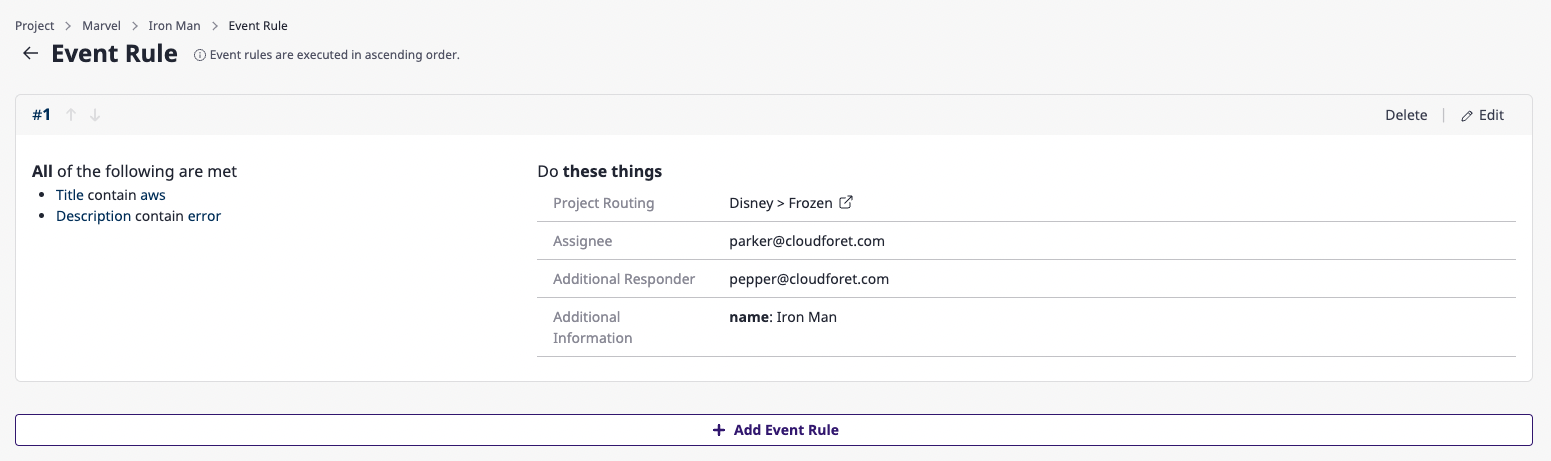
5 - Event rule
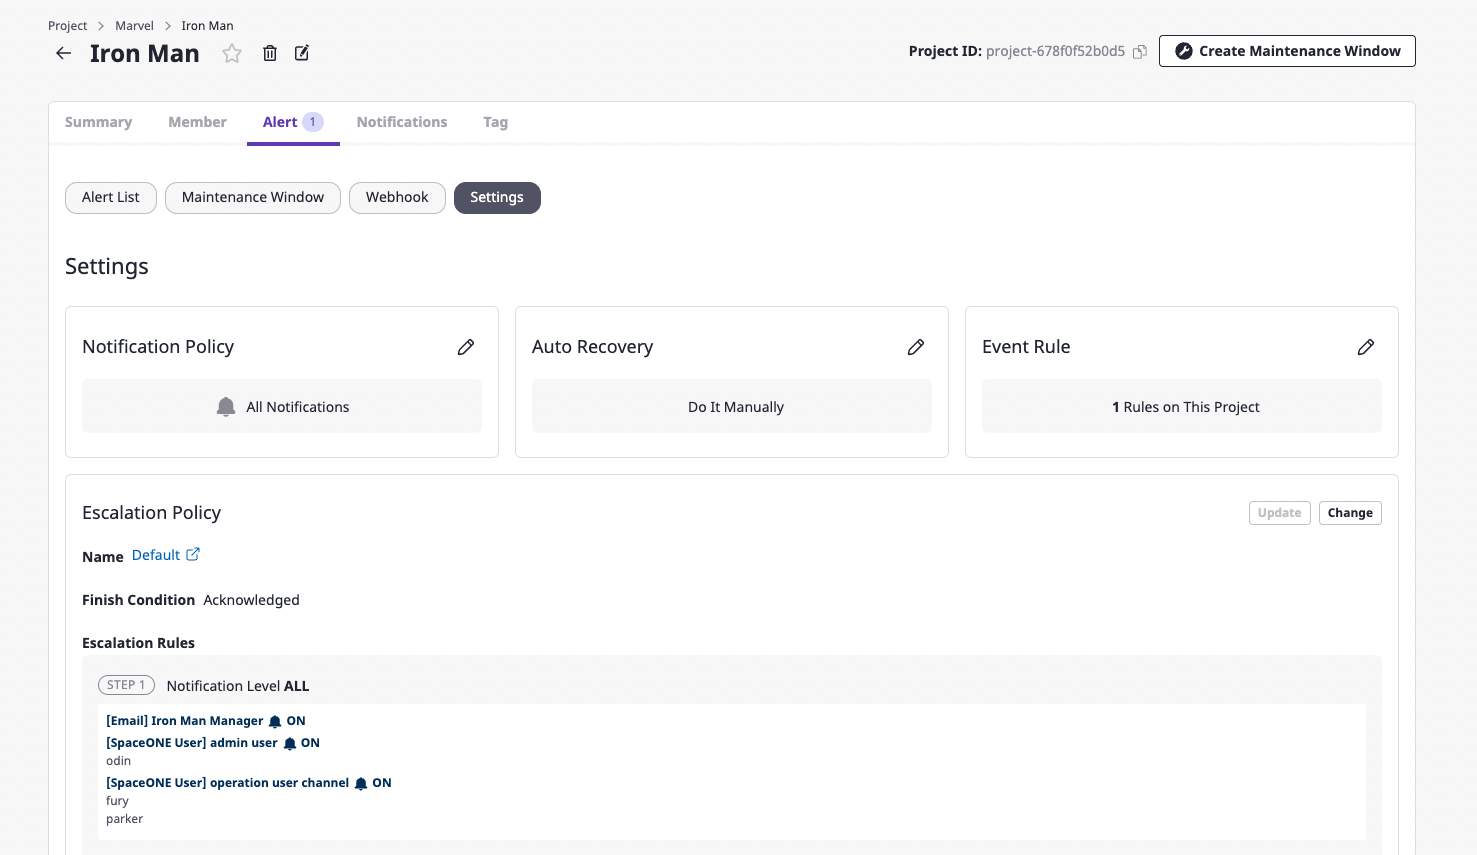
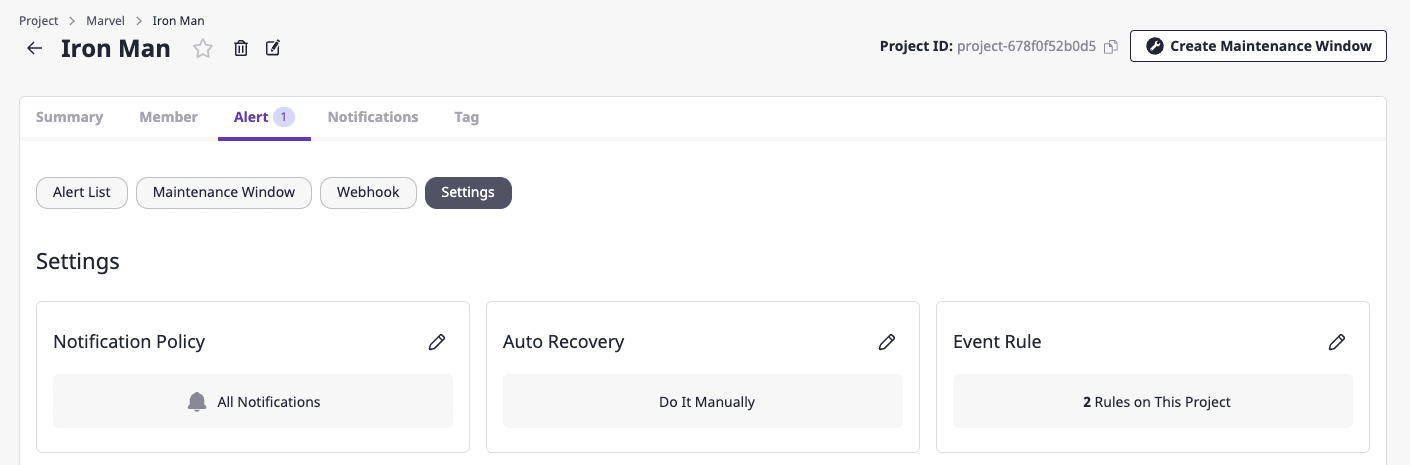
Event rules are project dependent and can be managed on the project detail page.
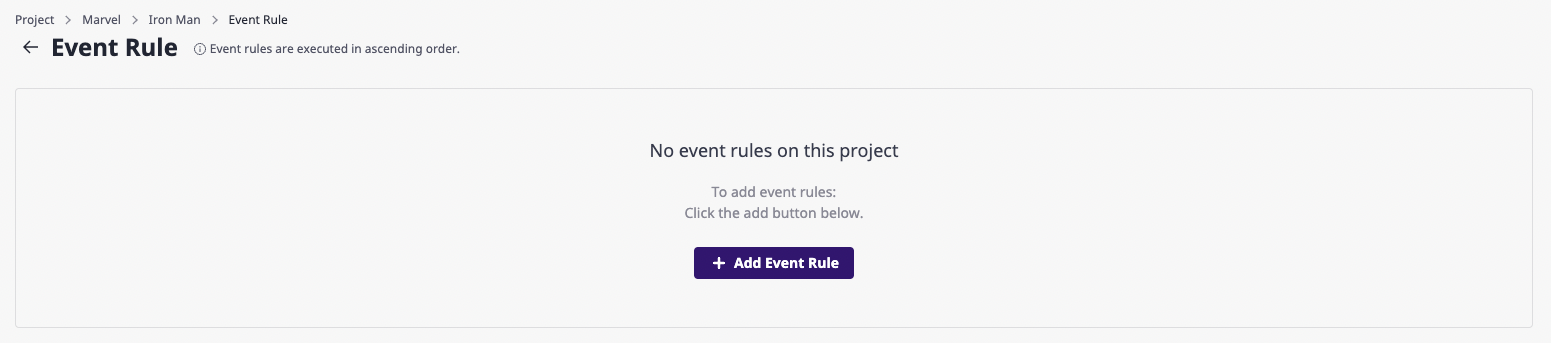
Create event rules
(1) In the [Settings] tab found in the [Alert] tab of the project detail page, click the [Edit] button of the event rule.
(2) Click the [Add event rule] button.
(3) Enter desired setting values on the event rule page.
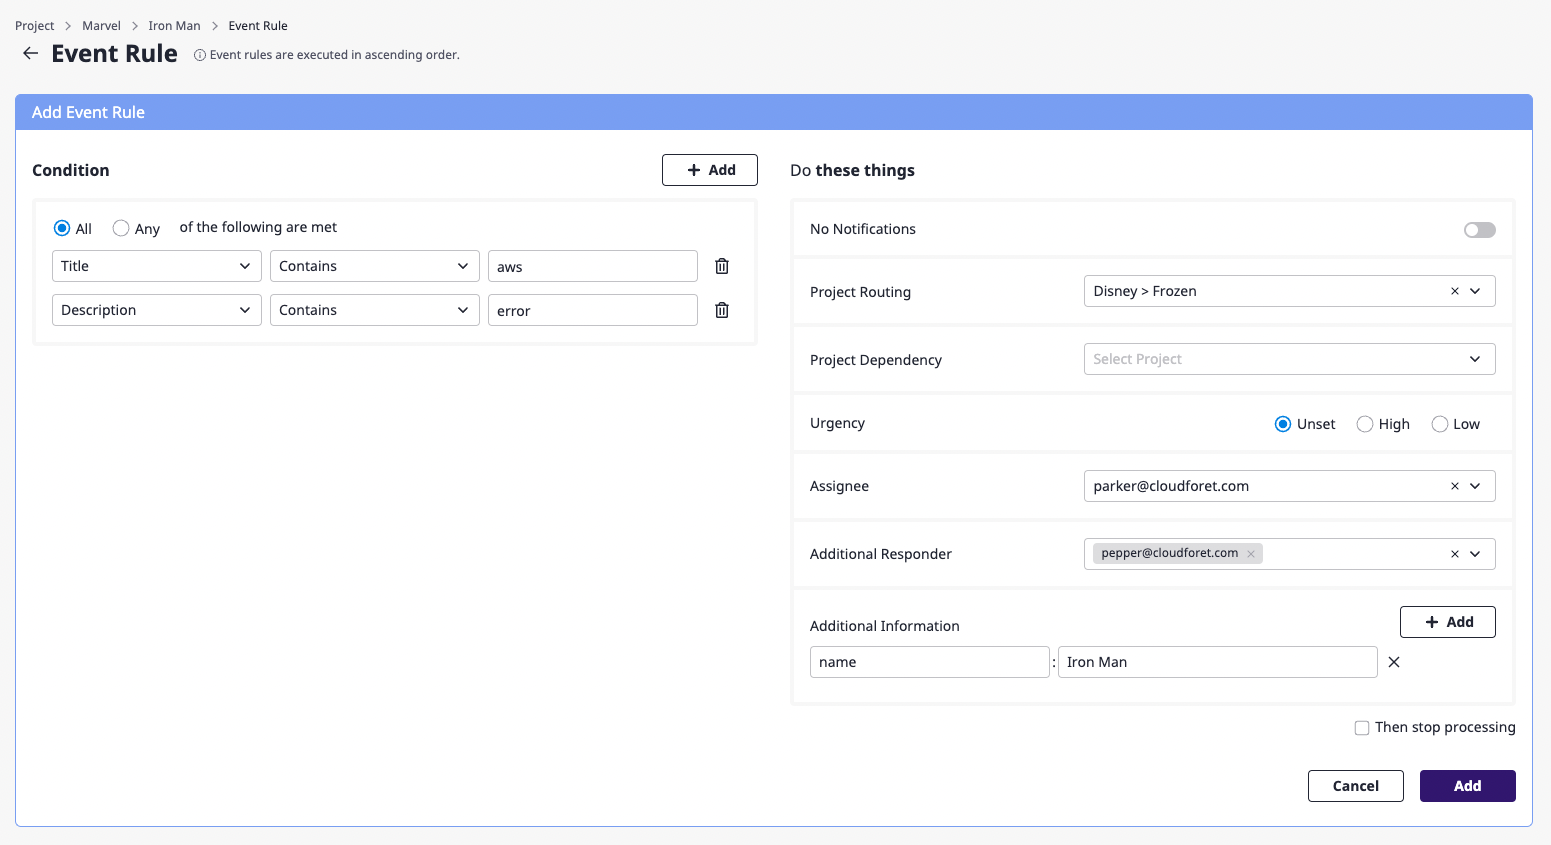
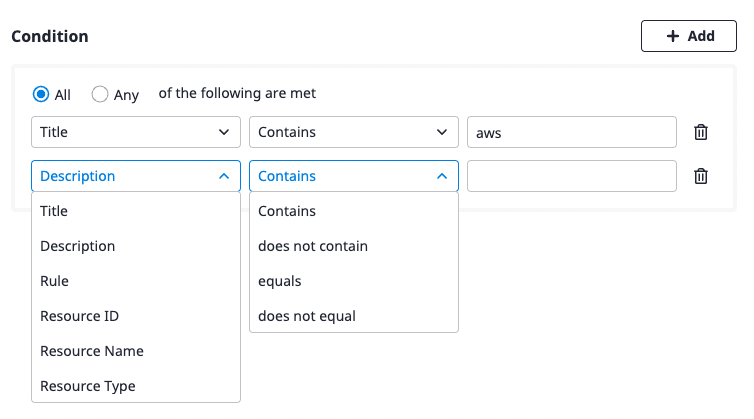
(3-1) Set the conditions to perform additional actions on the received alert.
At least one condition must be written, and you can add conditions by clicking the [Add] button on the right or delete them by clicking the [Delete] icon button.
(3-2) Specify the action to be performed on the alert that meets the conditions defined above.
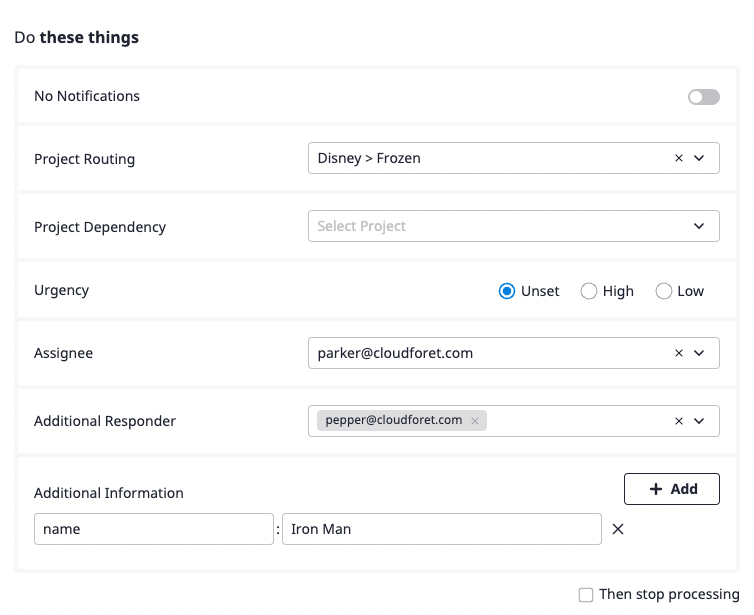
List of event rules settings
| Property | Description |
|---|---|
| Stop notifications | Suppress Notification for alerts for the corresponding conditions |
| Project routing | Alerts of the corresponding conditions are not received by current project but by project selected under project routing (no alert is created in the current project) |
| Project Dependencies | Alerts of the corresponding conditions can be viewed from the projects registered in project dependency. |
| Urgency | Automatically assign urgency to alerts of the corresponding conditionsHigh, low, or none-set can be specified and in case of none-set, rules are applied as follows• External monitoring alert: Urgency of an object • Direct creation: High (default) |
| Person in charge | Automatically assign a person in charge of the alert for the corresponding condition(s): |
| Additional recipients | When Notification occurs with the alert of the corresponding condition(s), send a notification to specified users together |
| Additional information | Automatically add information to alerts for the corresponding conditions |
| Stop executing further actions | If the event rule is executed, subsequent event rules are ignored (See Ways and order of event rules action) |
Edit event rules
(1) Click the [Edit] button on the event rules page.

(2) Enter the setting values you wantfor the event rule.
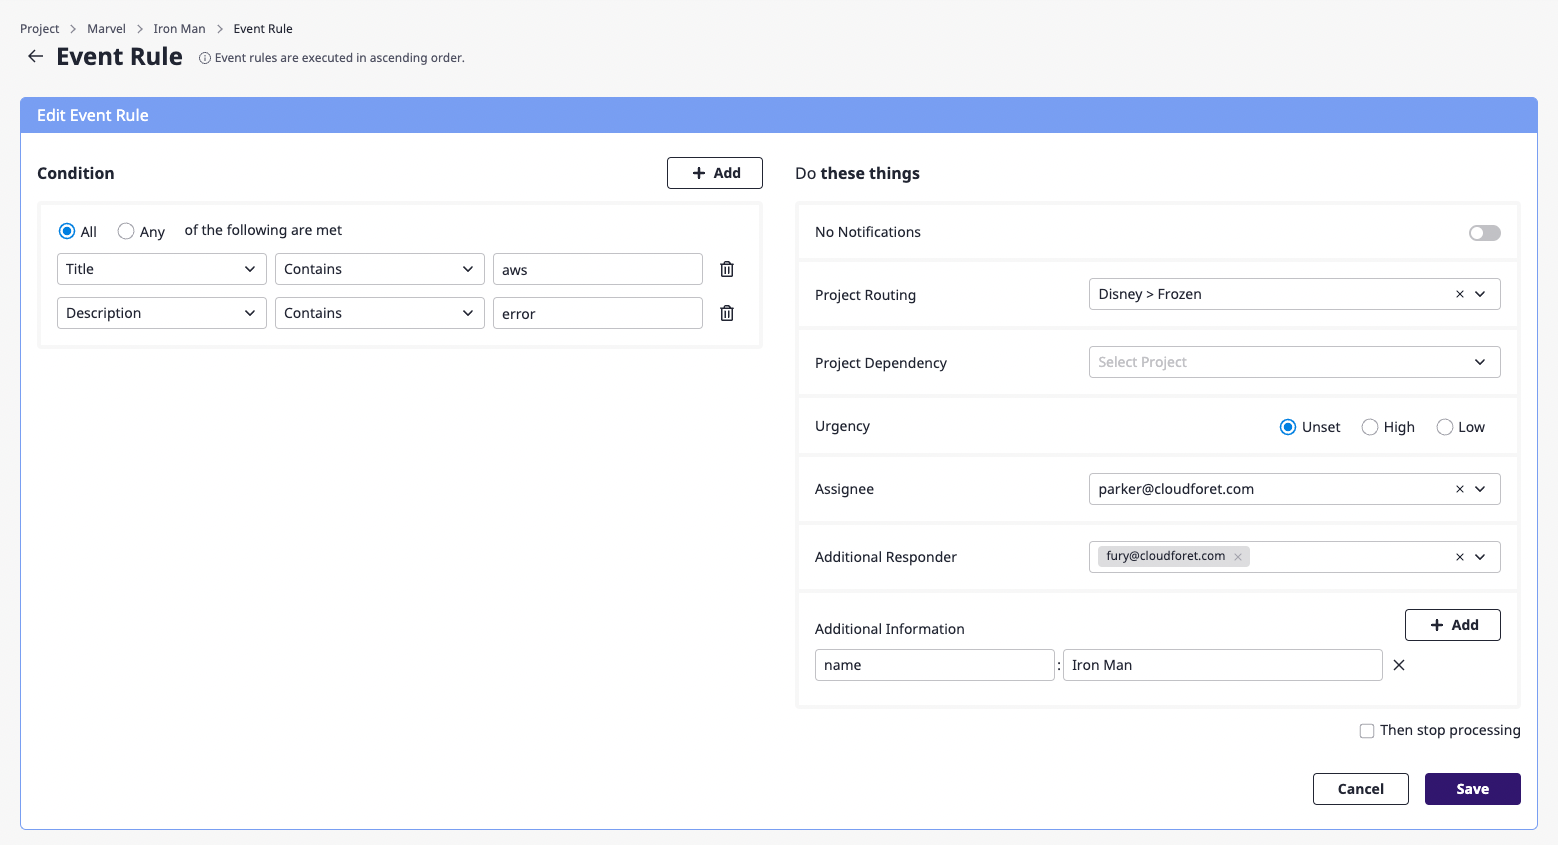
(3) Click the [Save] button to complete editing the event rules.
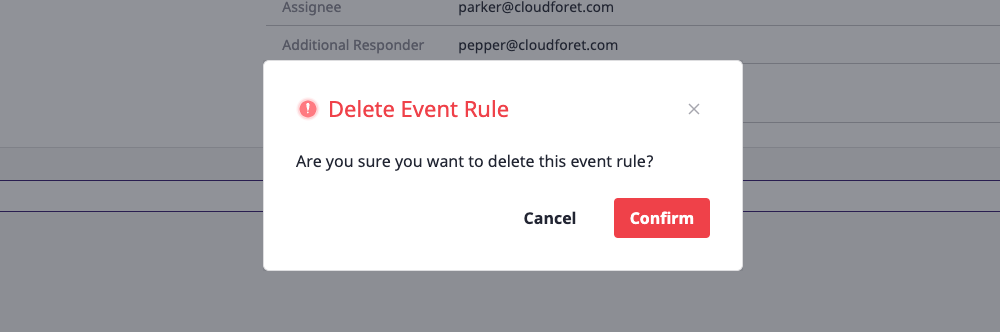
Delete event rules
(1) Click the [Delete] button on the event rules page.
(2) In the [Delete event rule] modal dialog, click the [OK] button to complete the deletion.
Ways and order of event rules action
Event rules set by a user for when an alert occurs will be executed sequentially.
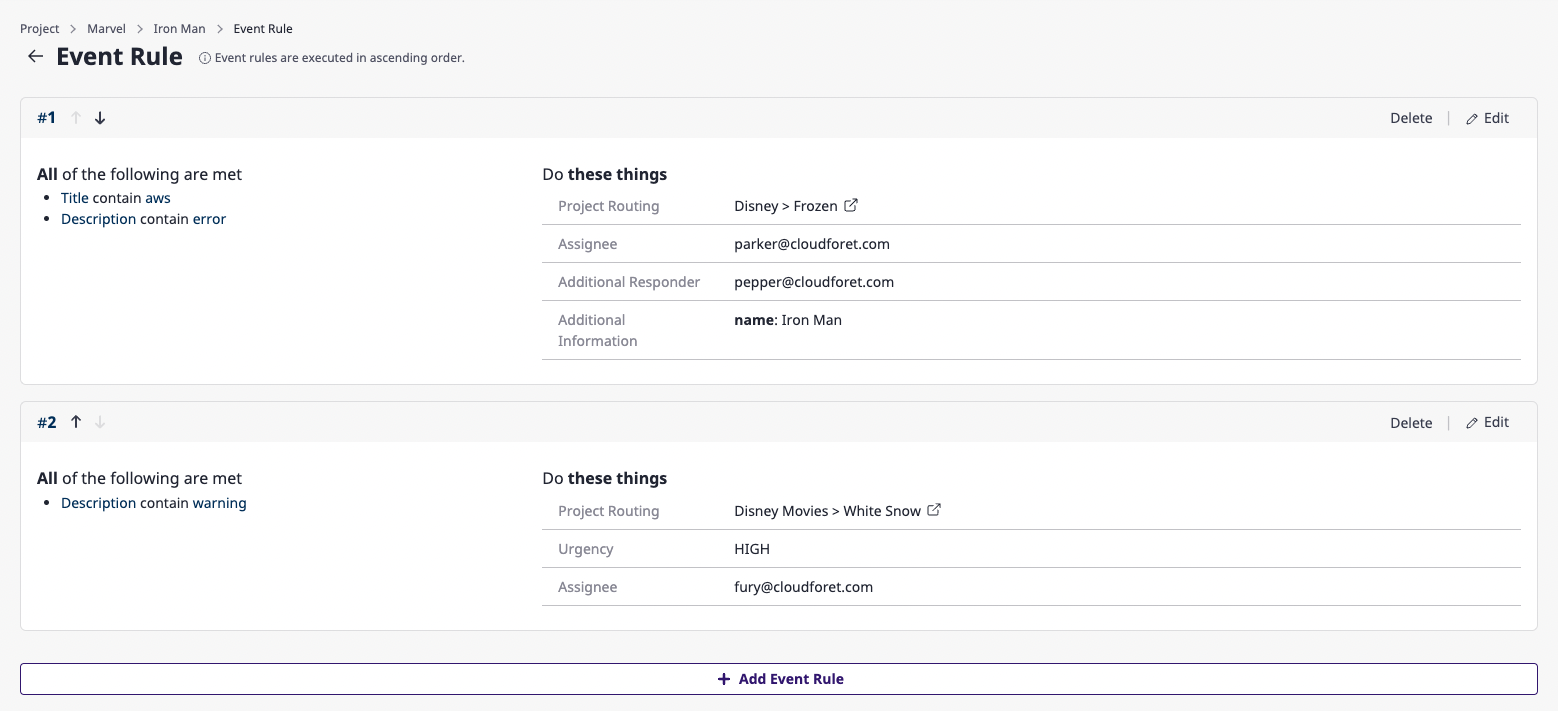
If event rules are created as in the example above, they are executed in the order of [#1], [#2], etc., starting from the highest event rule.
You can easily change the order of the event rules by clicking the [↑] and the [↓] buttons.
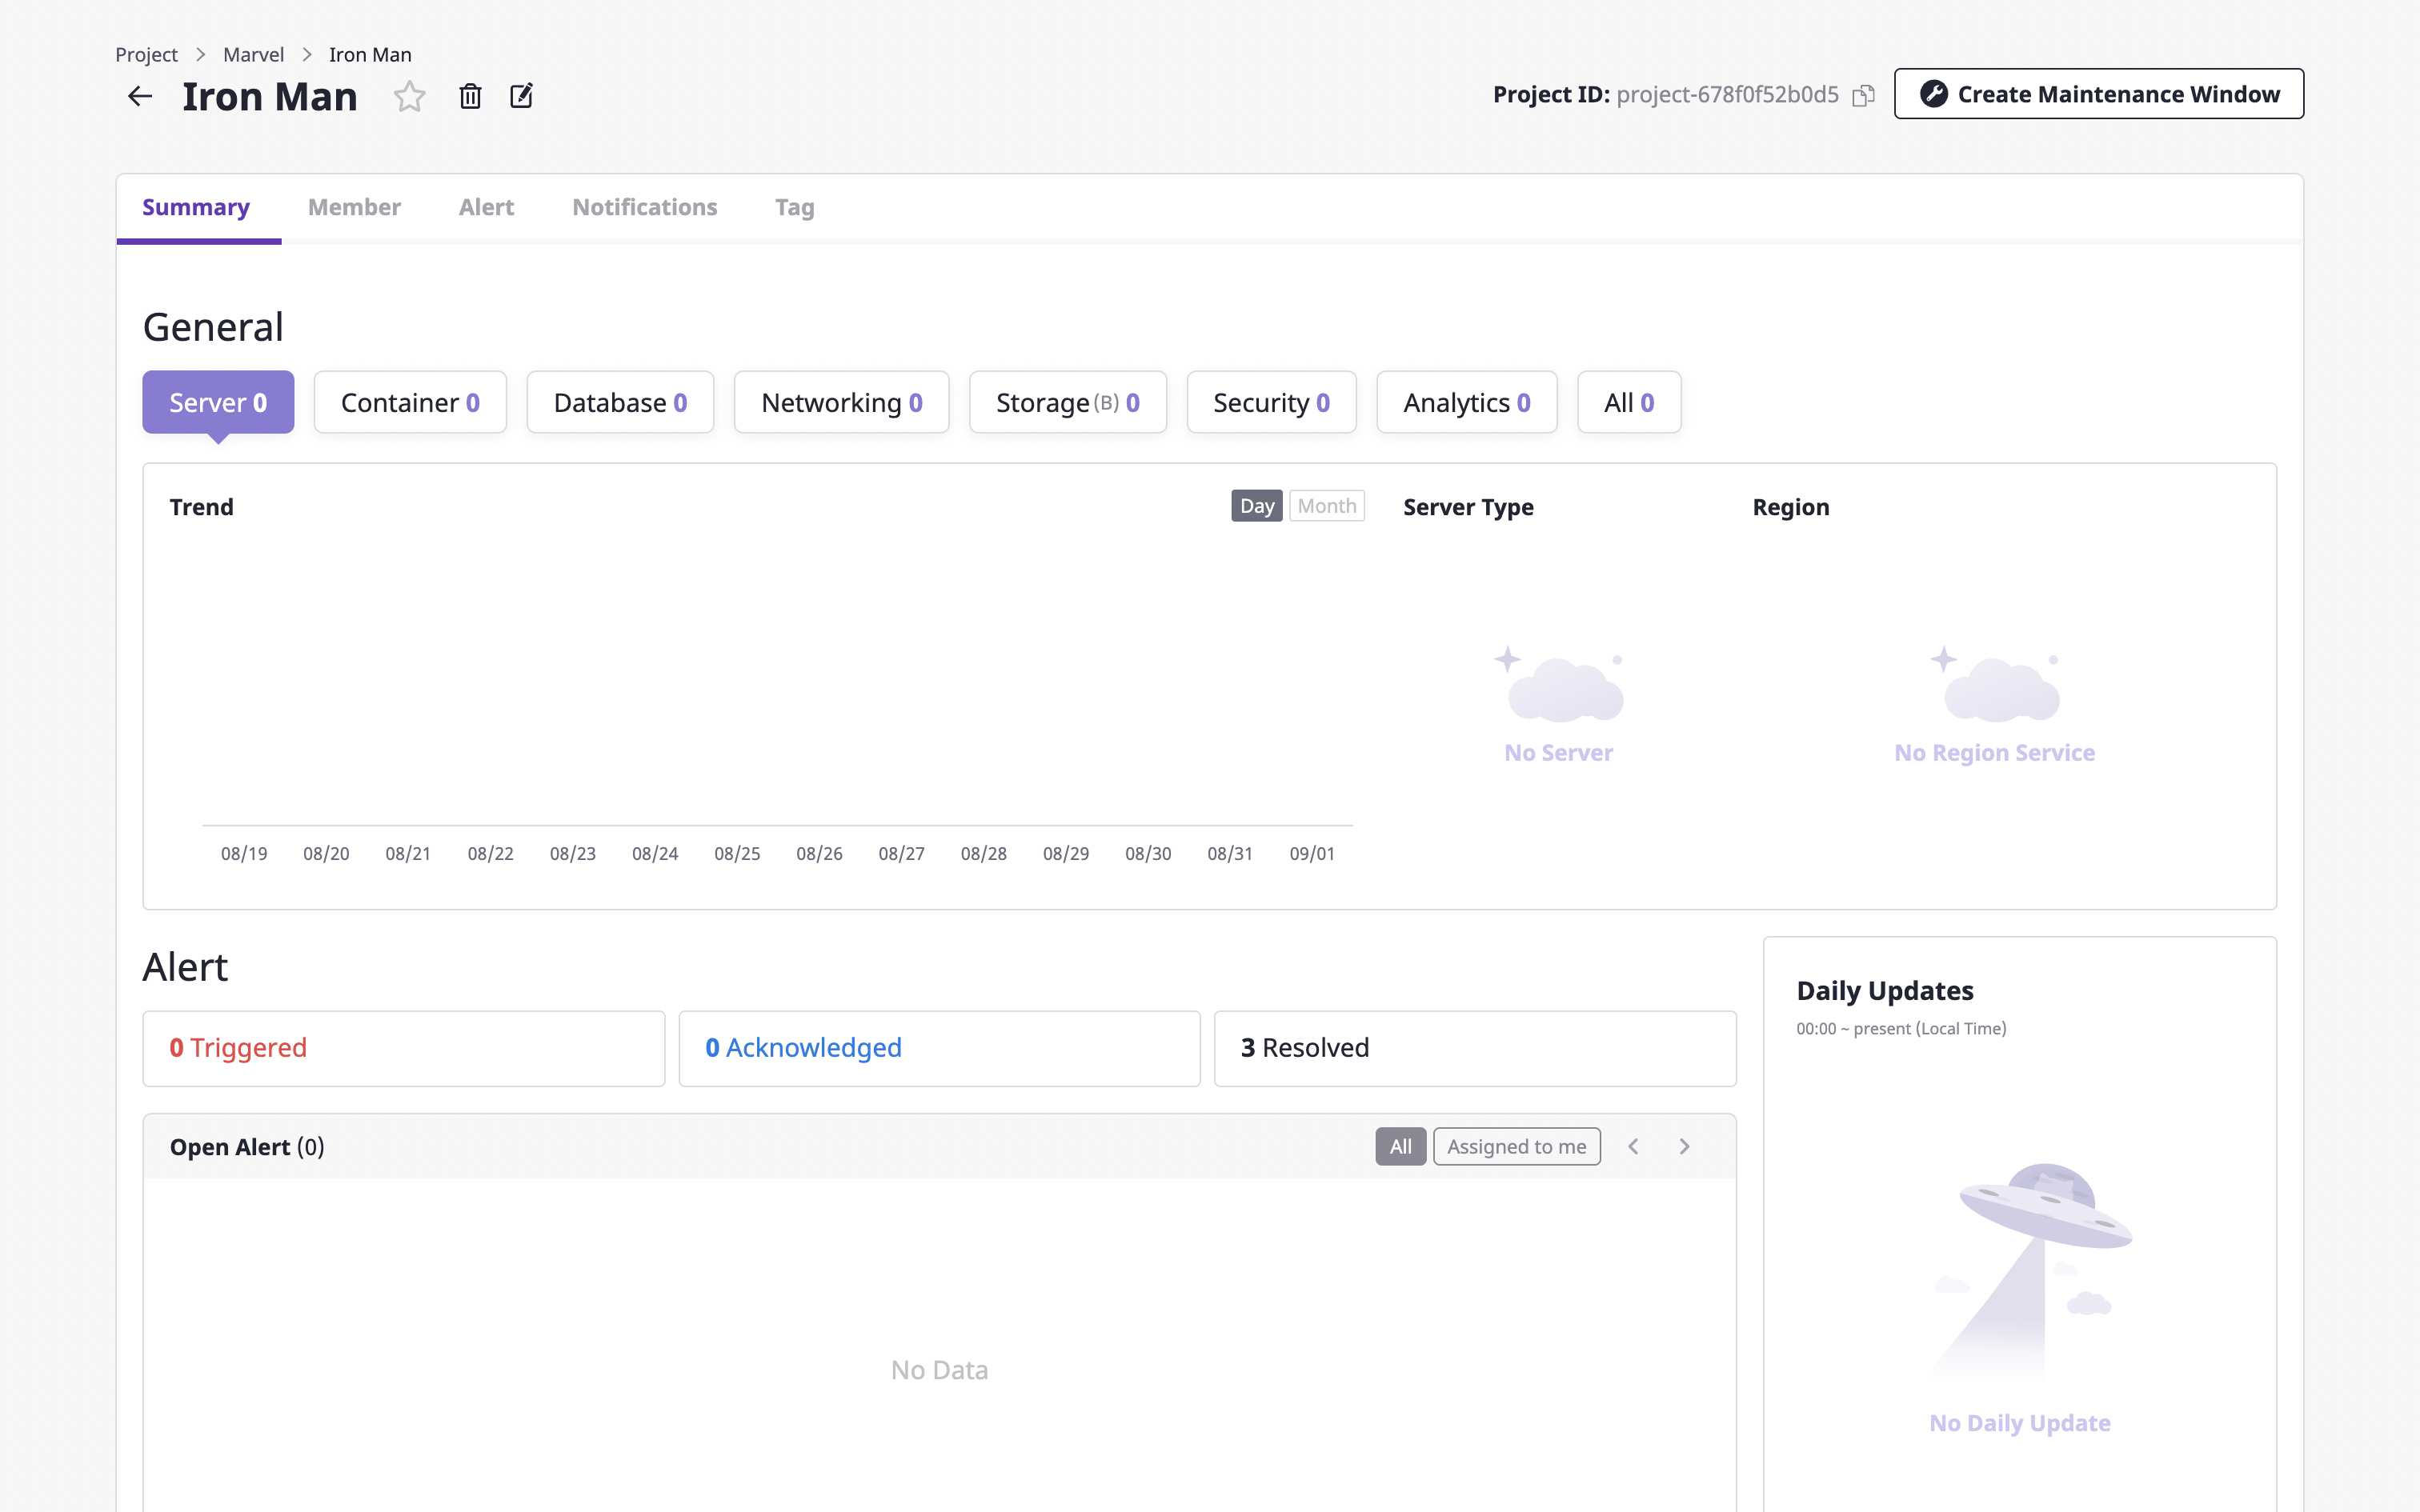
6 - Maintenance window
Setting a Maintenance window allows you to block sending notifications during that period.
The maintenance window is project dependent and can be managed on the project detail page.
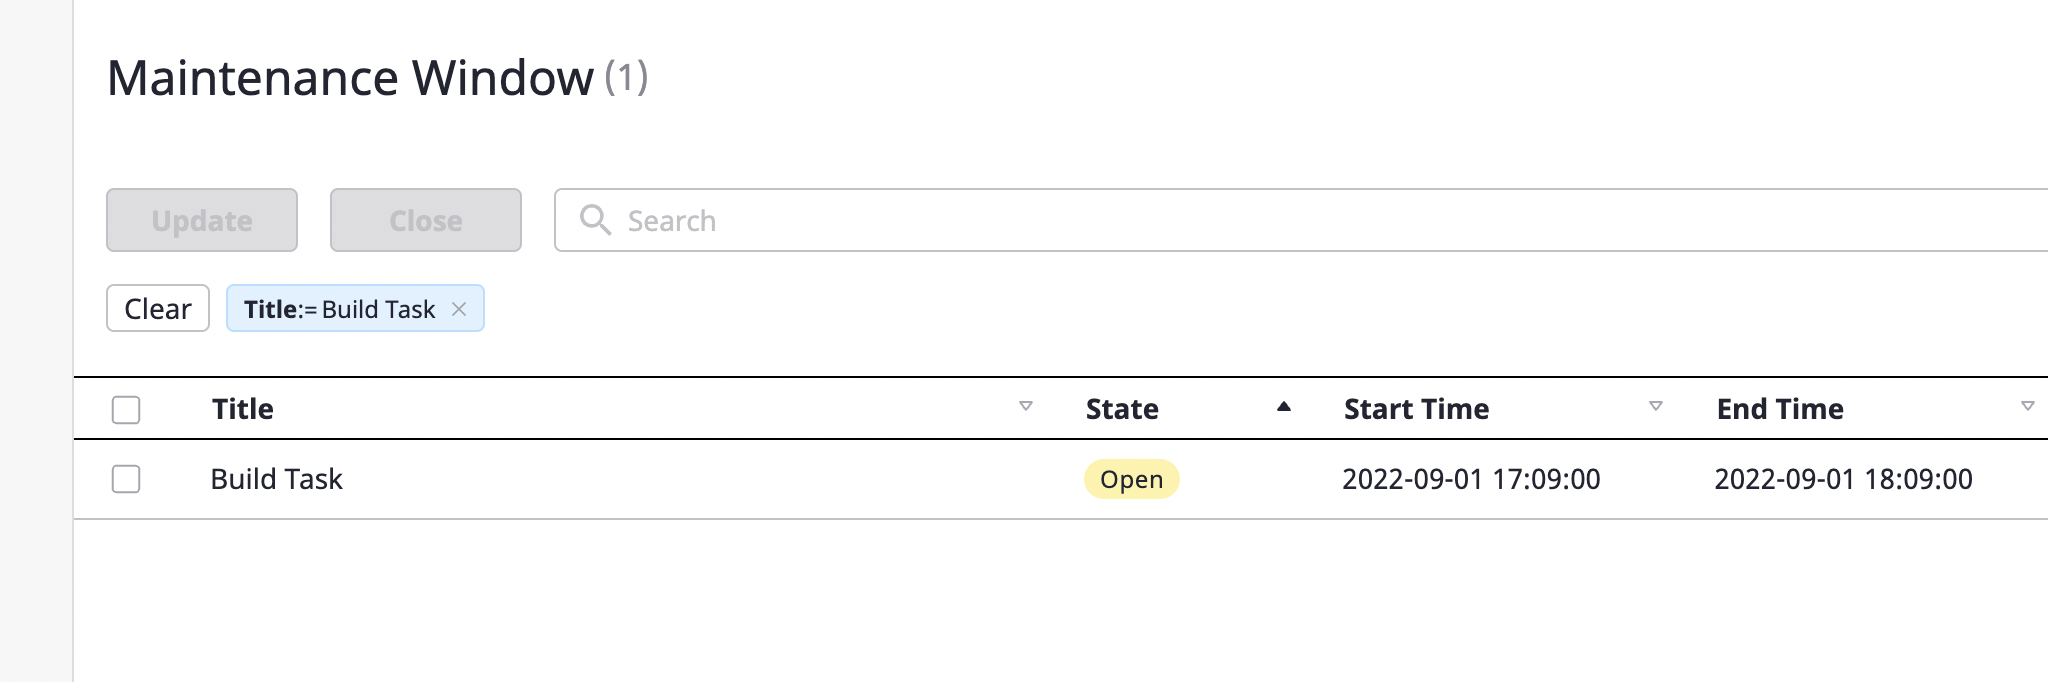
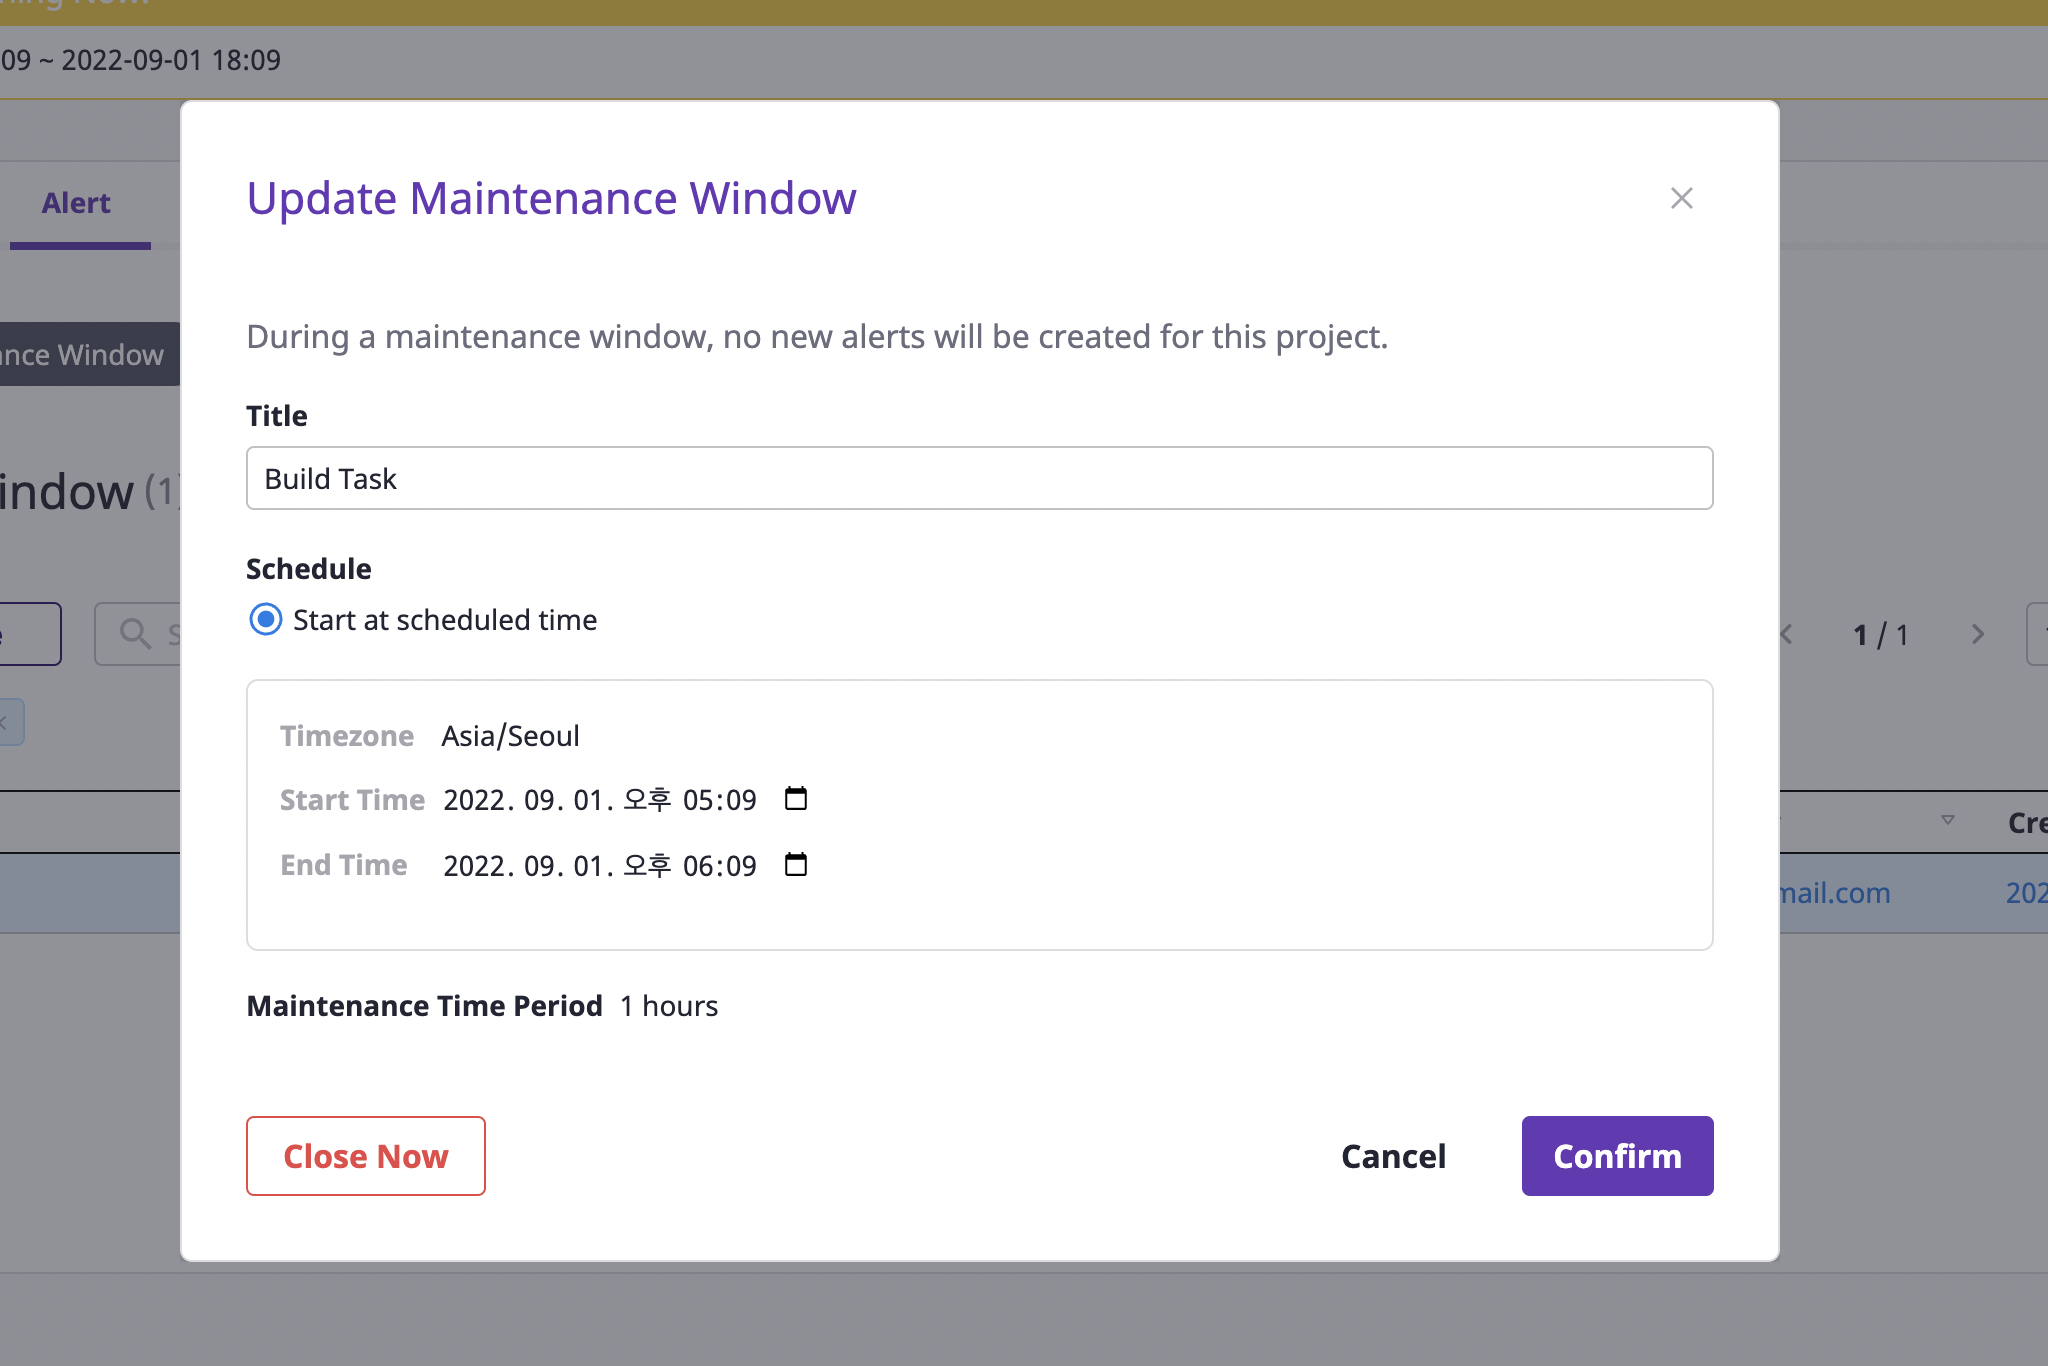
Create maintenance window
(1) Click the [Create maintenance window] button at the top right of the project detail page.
(2) Enter a [Title] for a maintenance window and set the schedule to limit the occurrence of the alert.
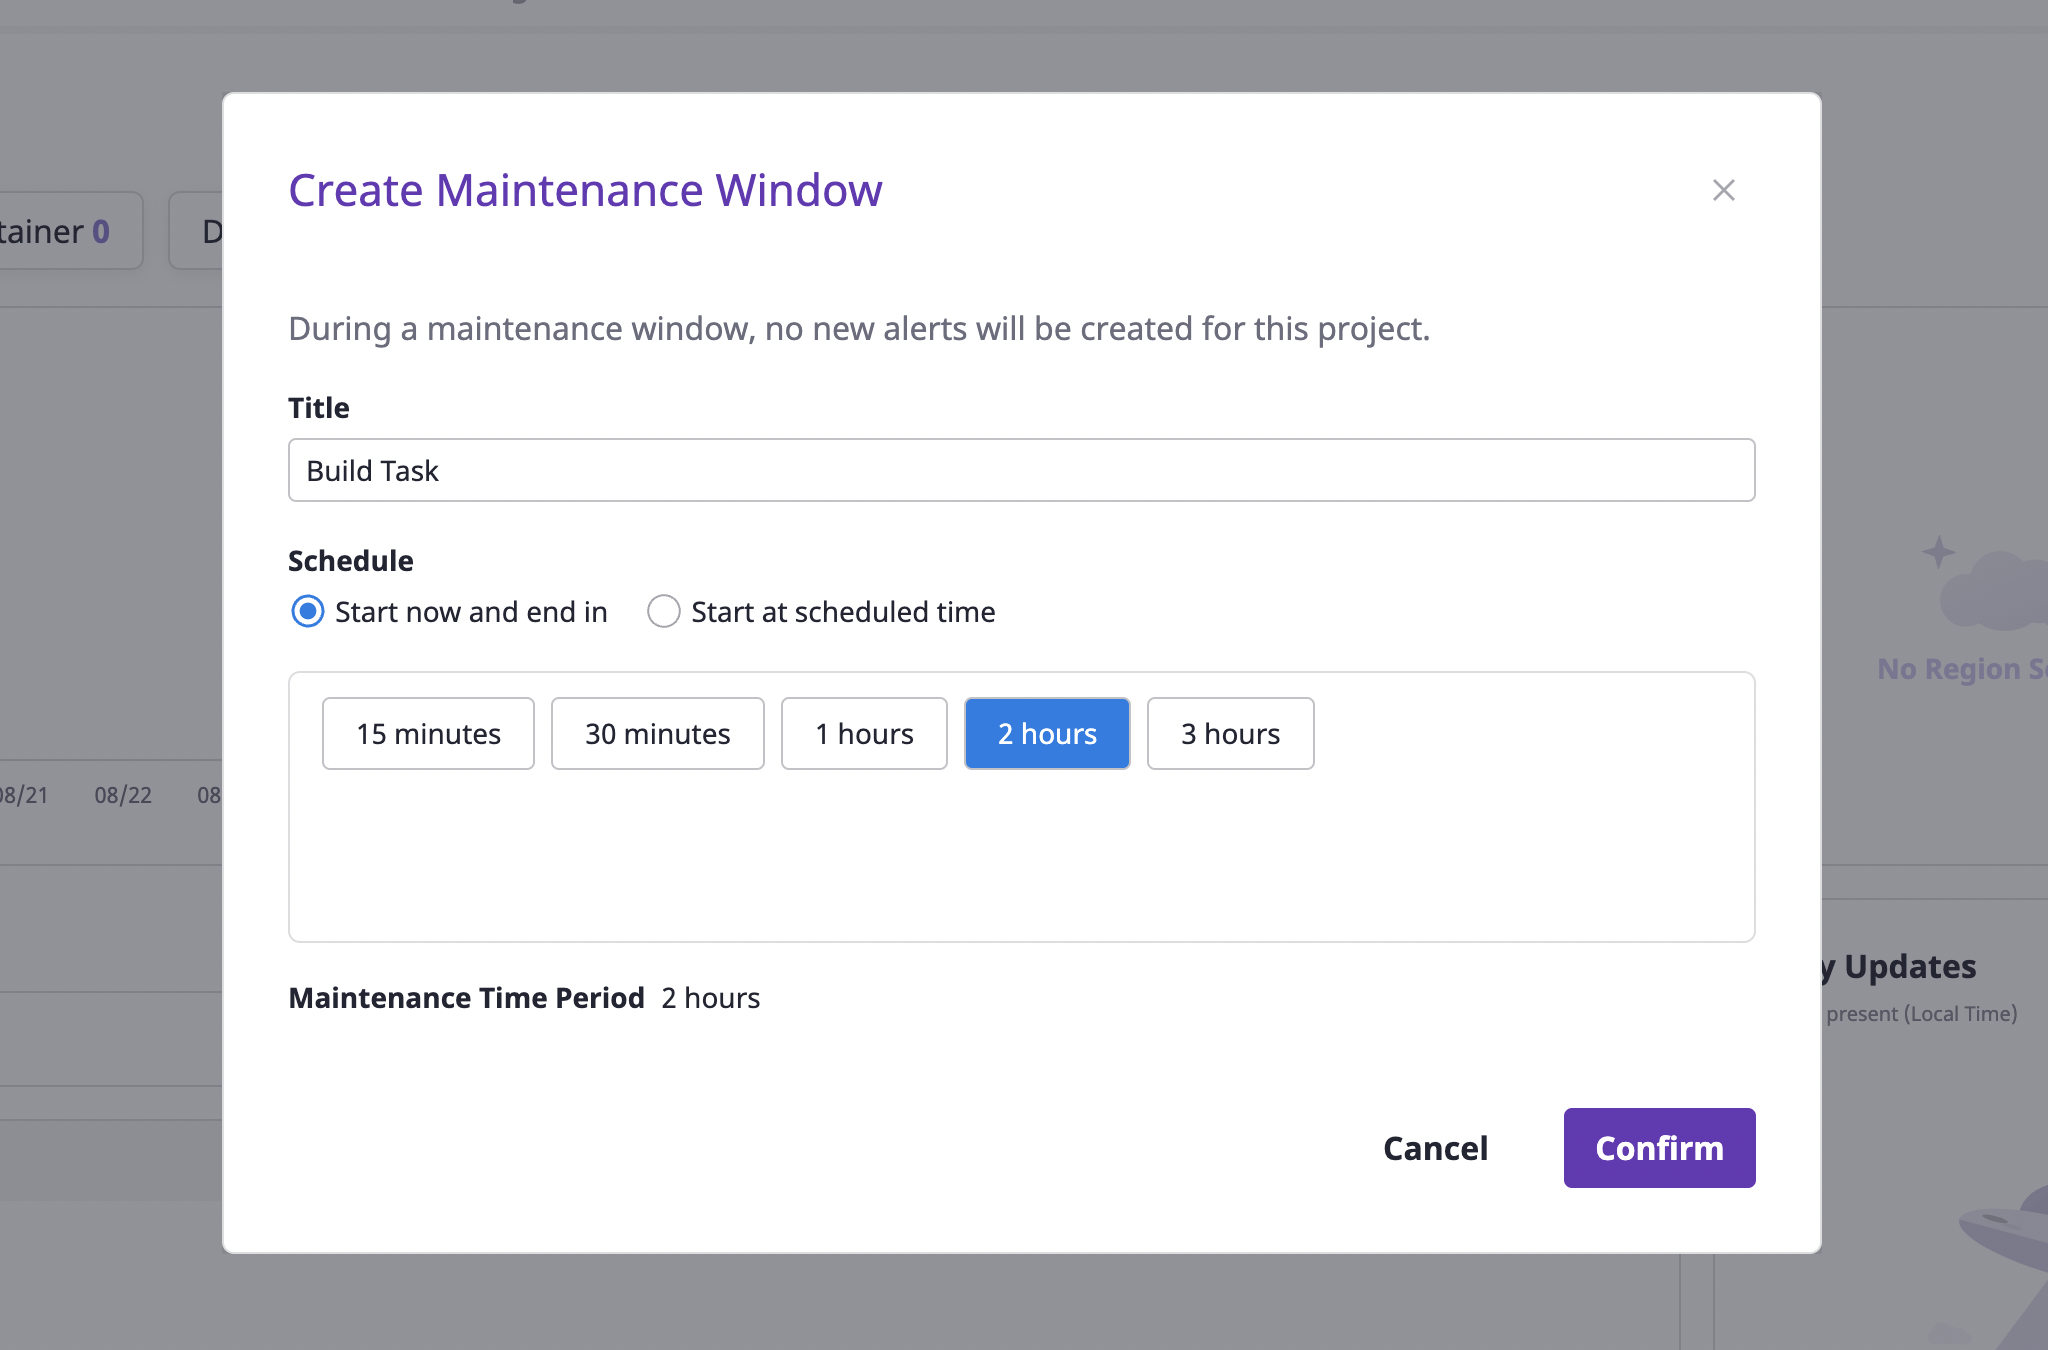
When you set the schedule, you can start right away or have it start at a scheduled time.
Select the [Start and end now] option if you want to start immediately, or the [Start at scheduled time] option if you want to schedule an upcoming task
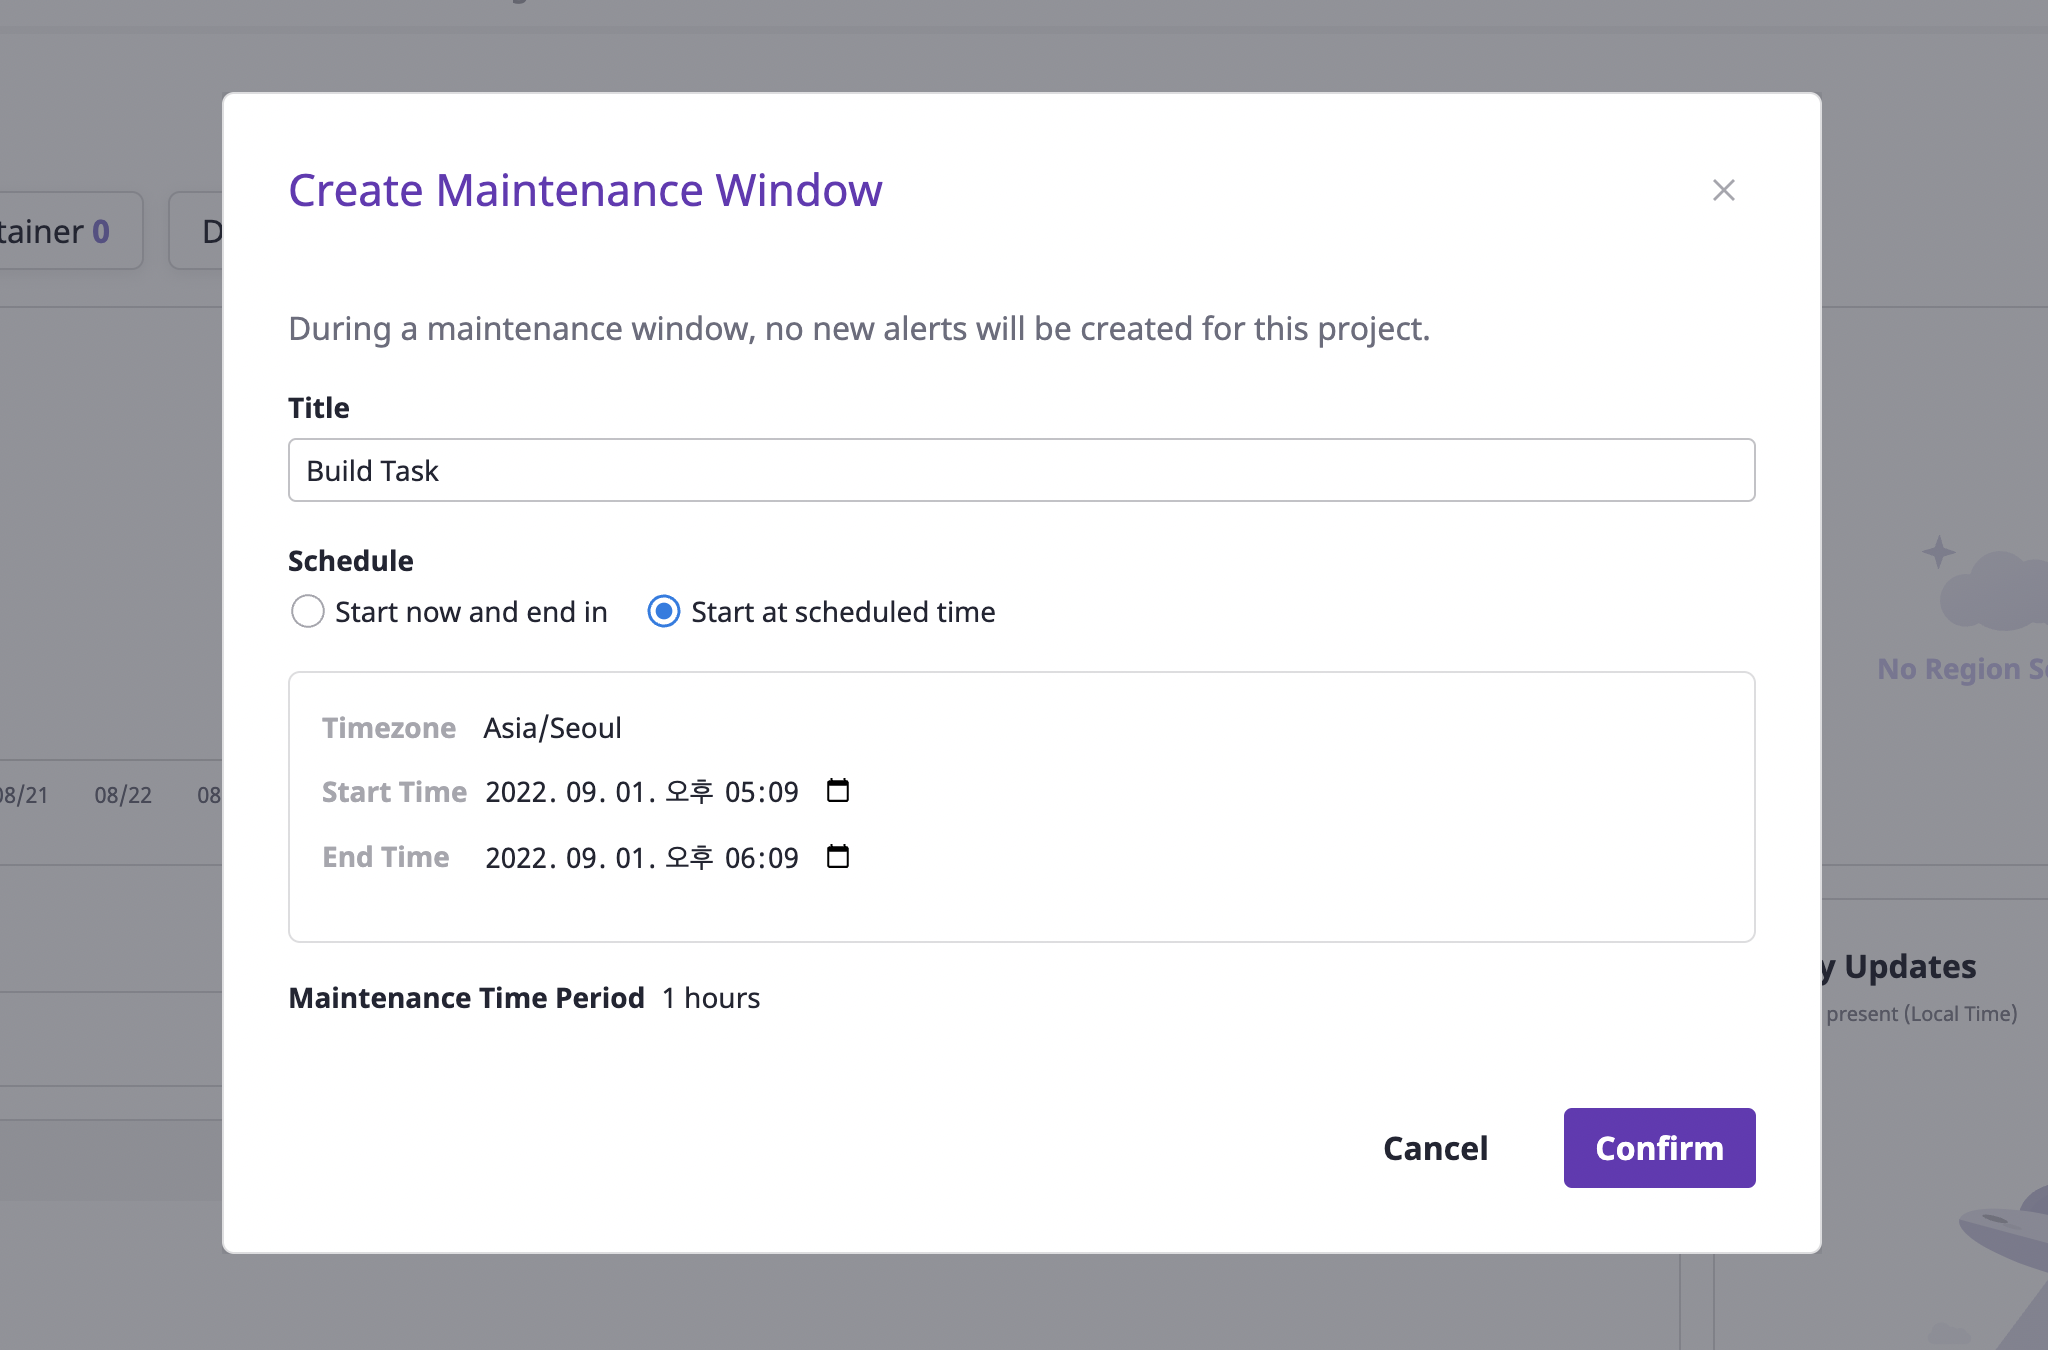
(3) Click the [OK] button to complete the creation.
Edit maintenance window
You can only edit maintenance windows that have not yet ended.
(1) Select the [Maintenance window] tab under the [Alerts] tab on the project detail page.
(2) Select the object you want to edit and click the [Edit] button.
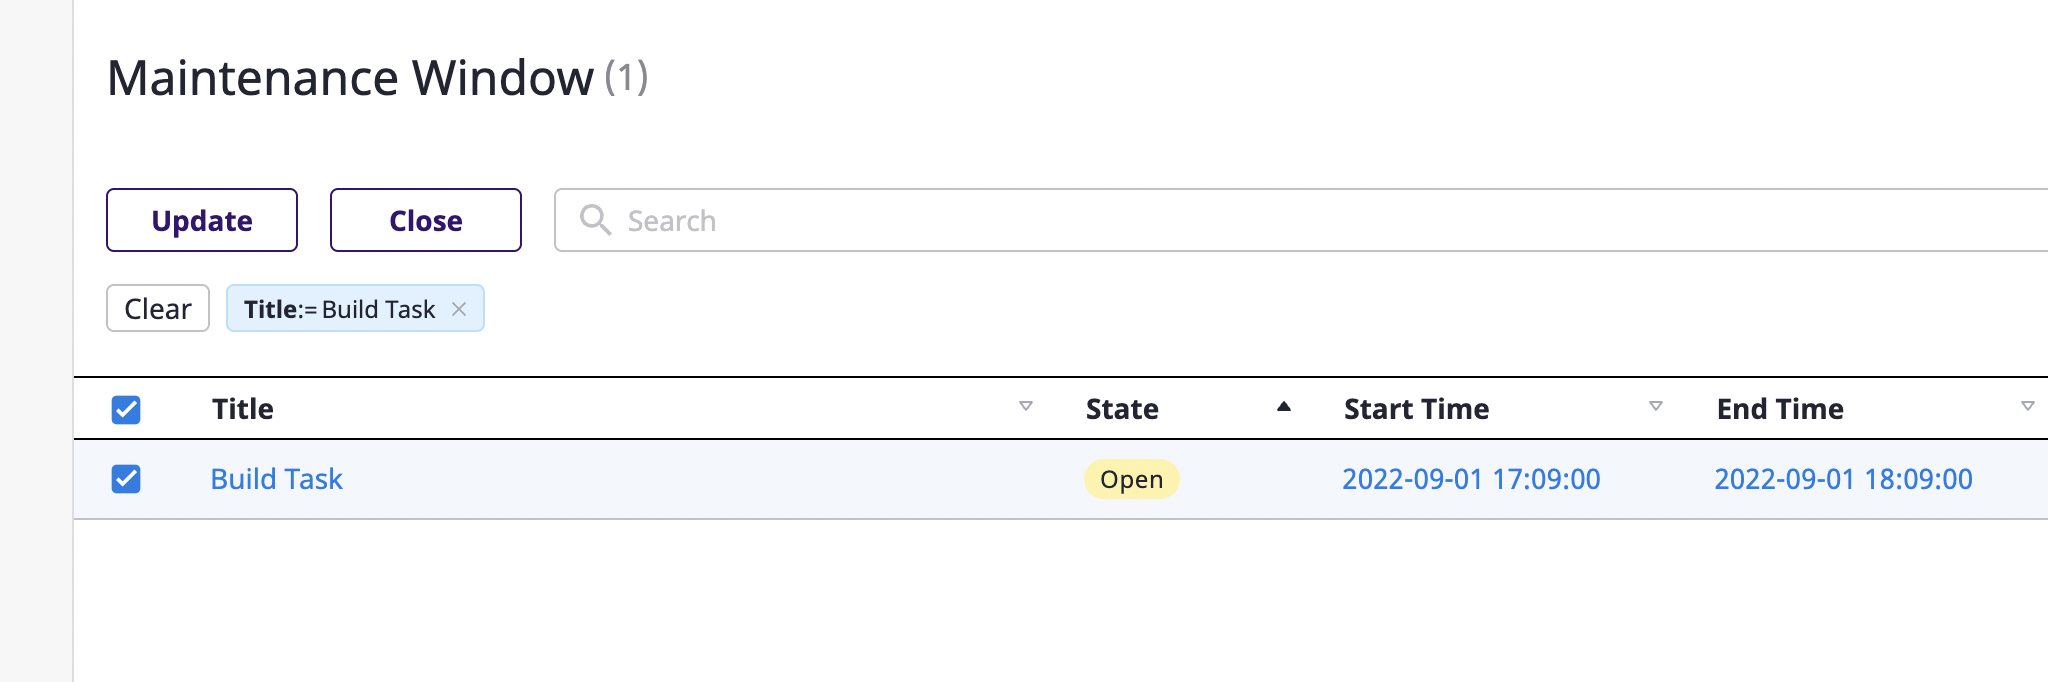
(3) After changing the desired items, click the [OK] button to complete.
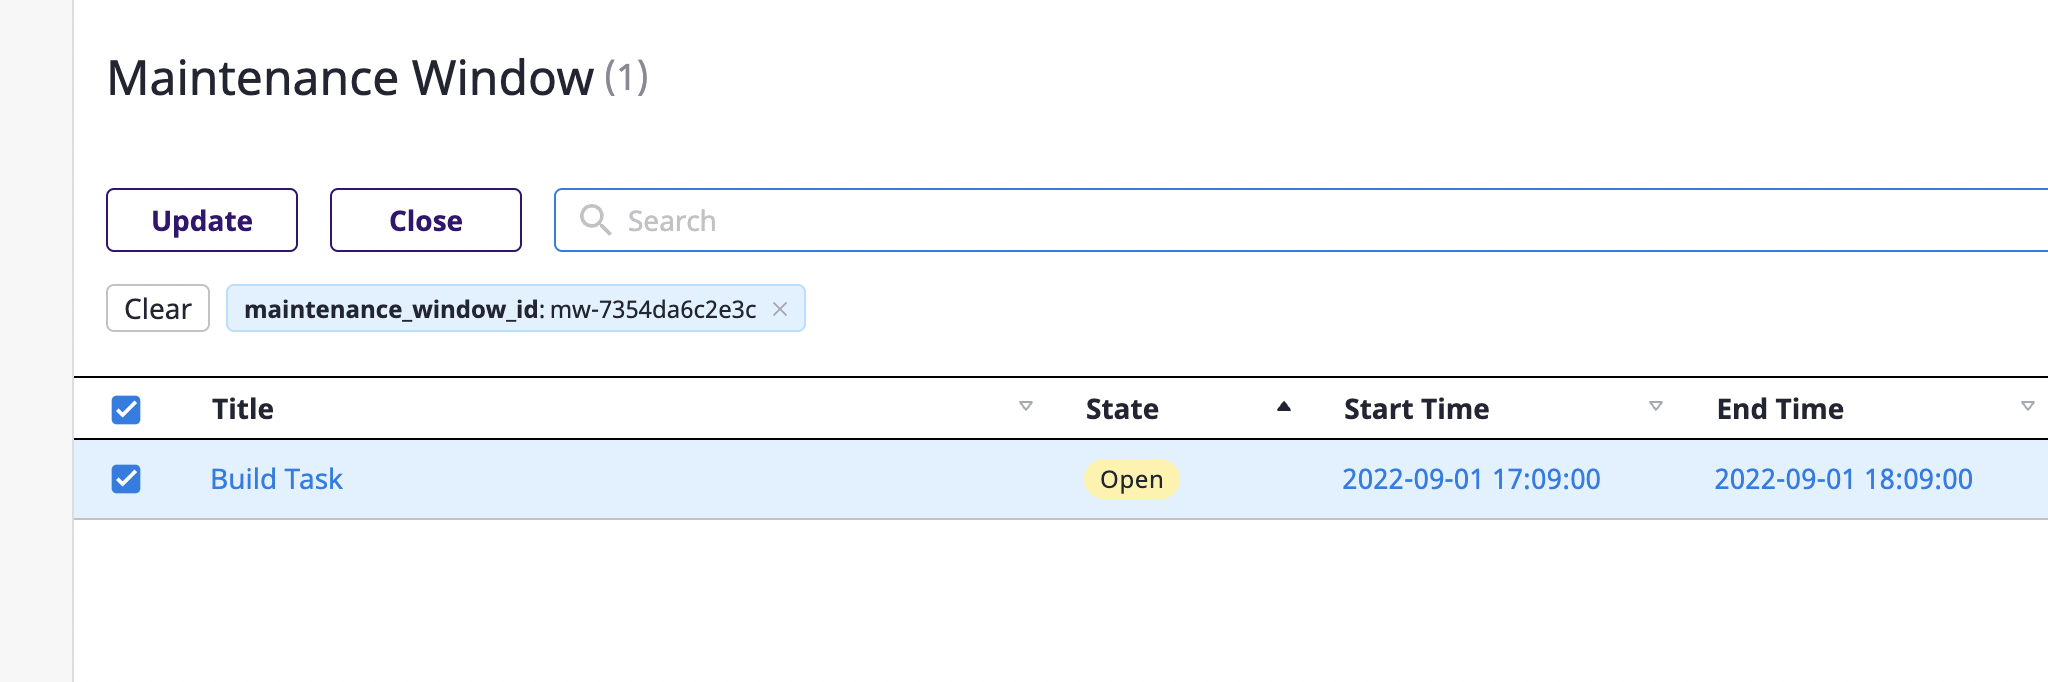
Closing maintenance window
(1) Select the [Maintenance window] tab under the [Alerts] tab on the project detail page.
(2) Select the object to be edited and click the [Exit] button to exit.
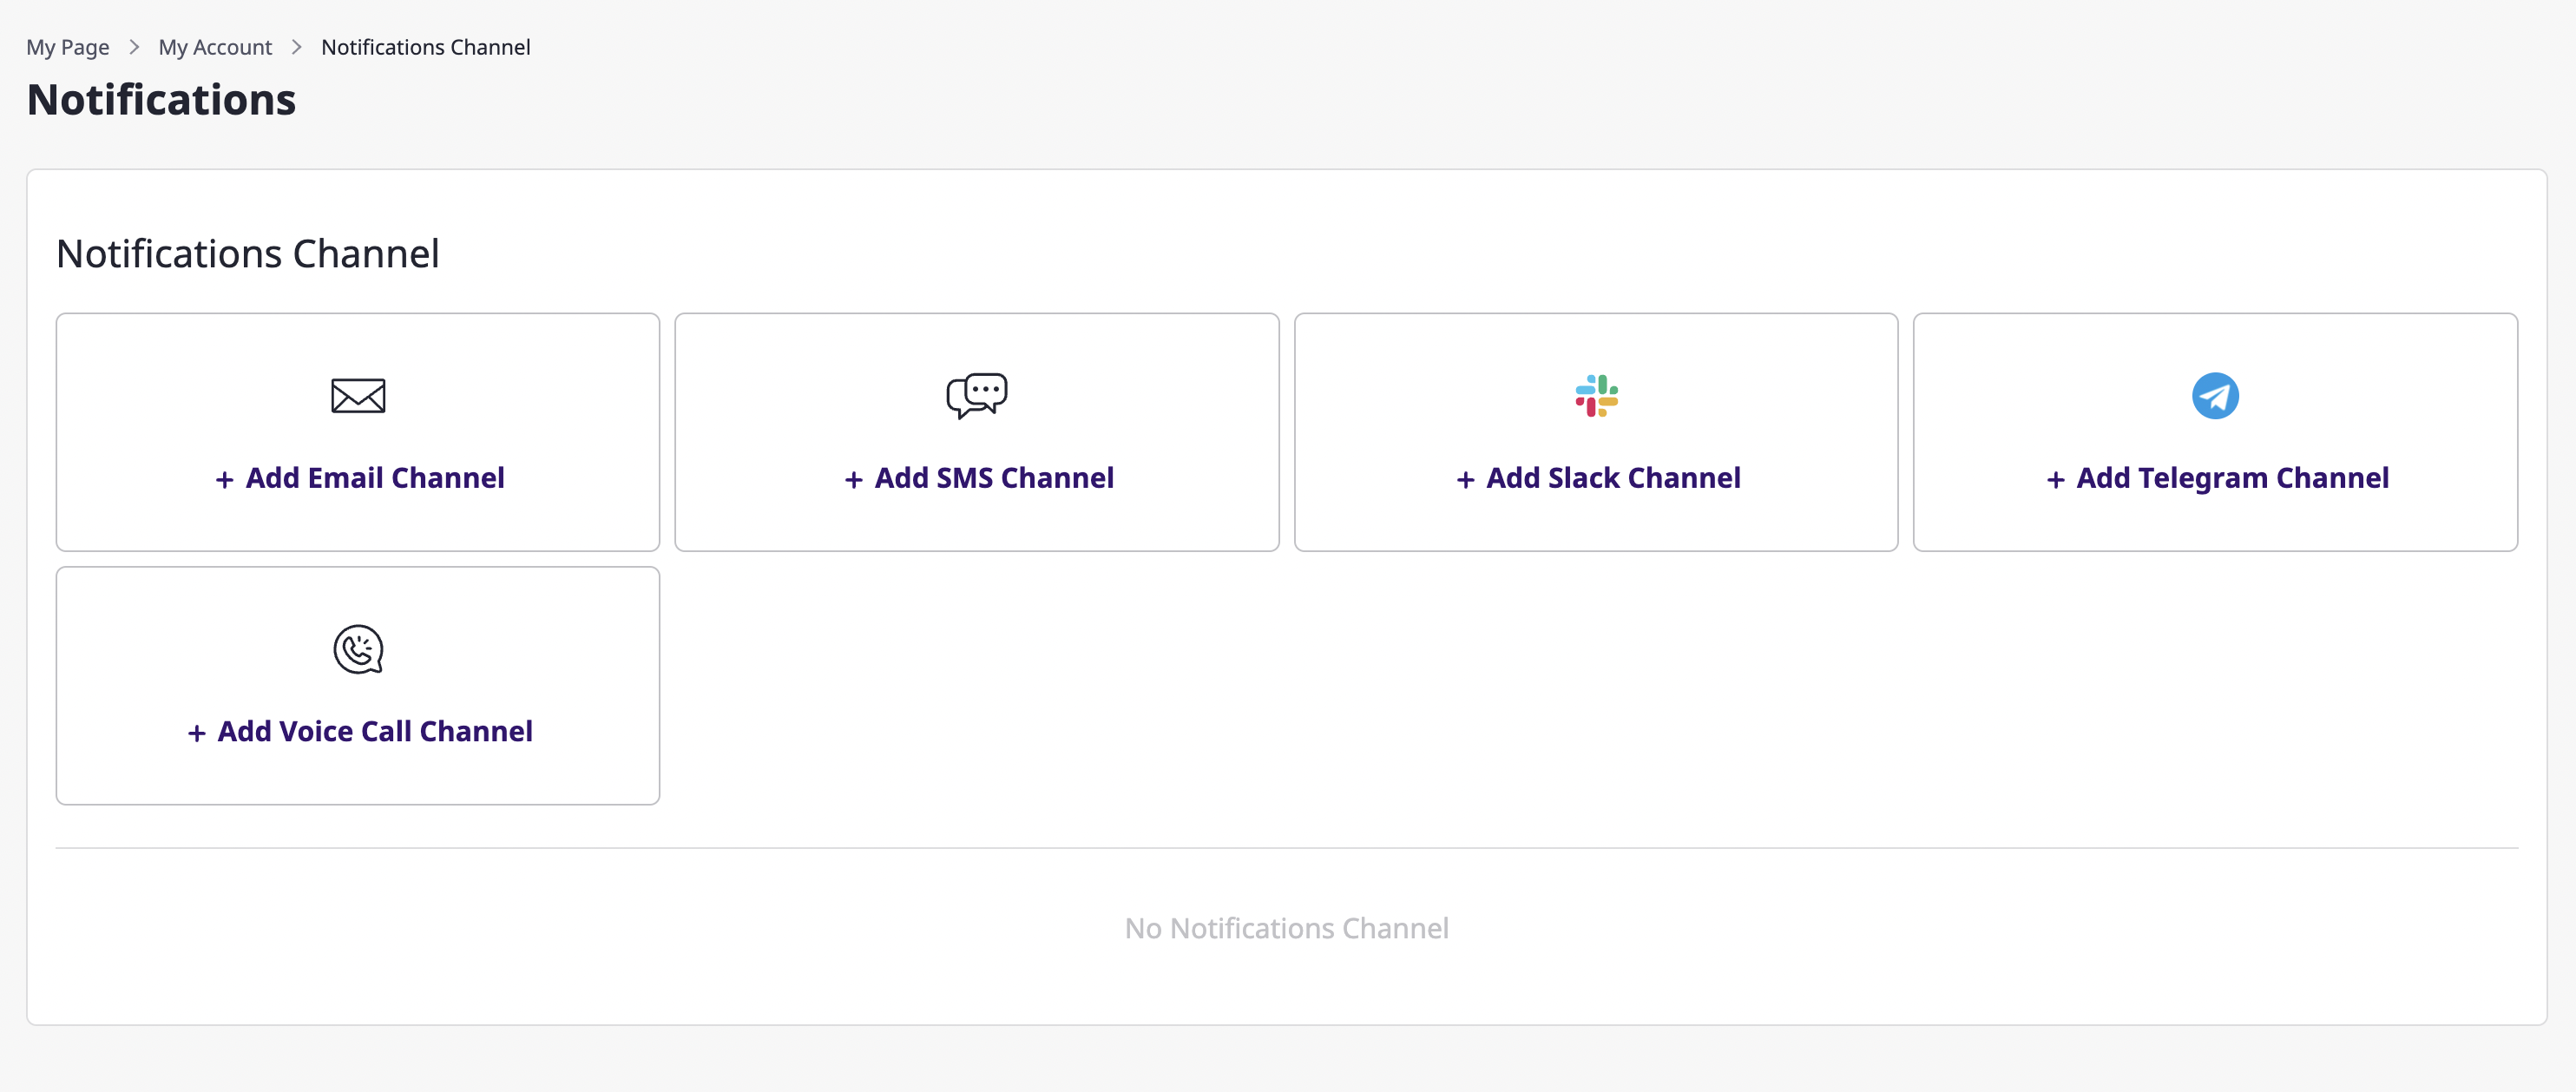
7 - Notification
Notifications are a means to deliver alerts.
In the Notifications channel page, you can set up how and when to send alerts to which users.
The notifications channel is project dependent and can be managed on the project detail page.
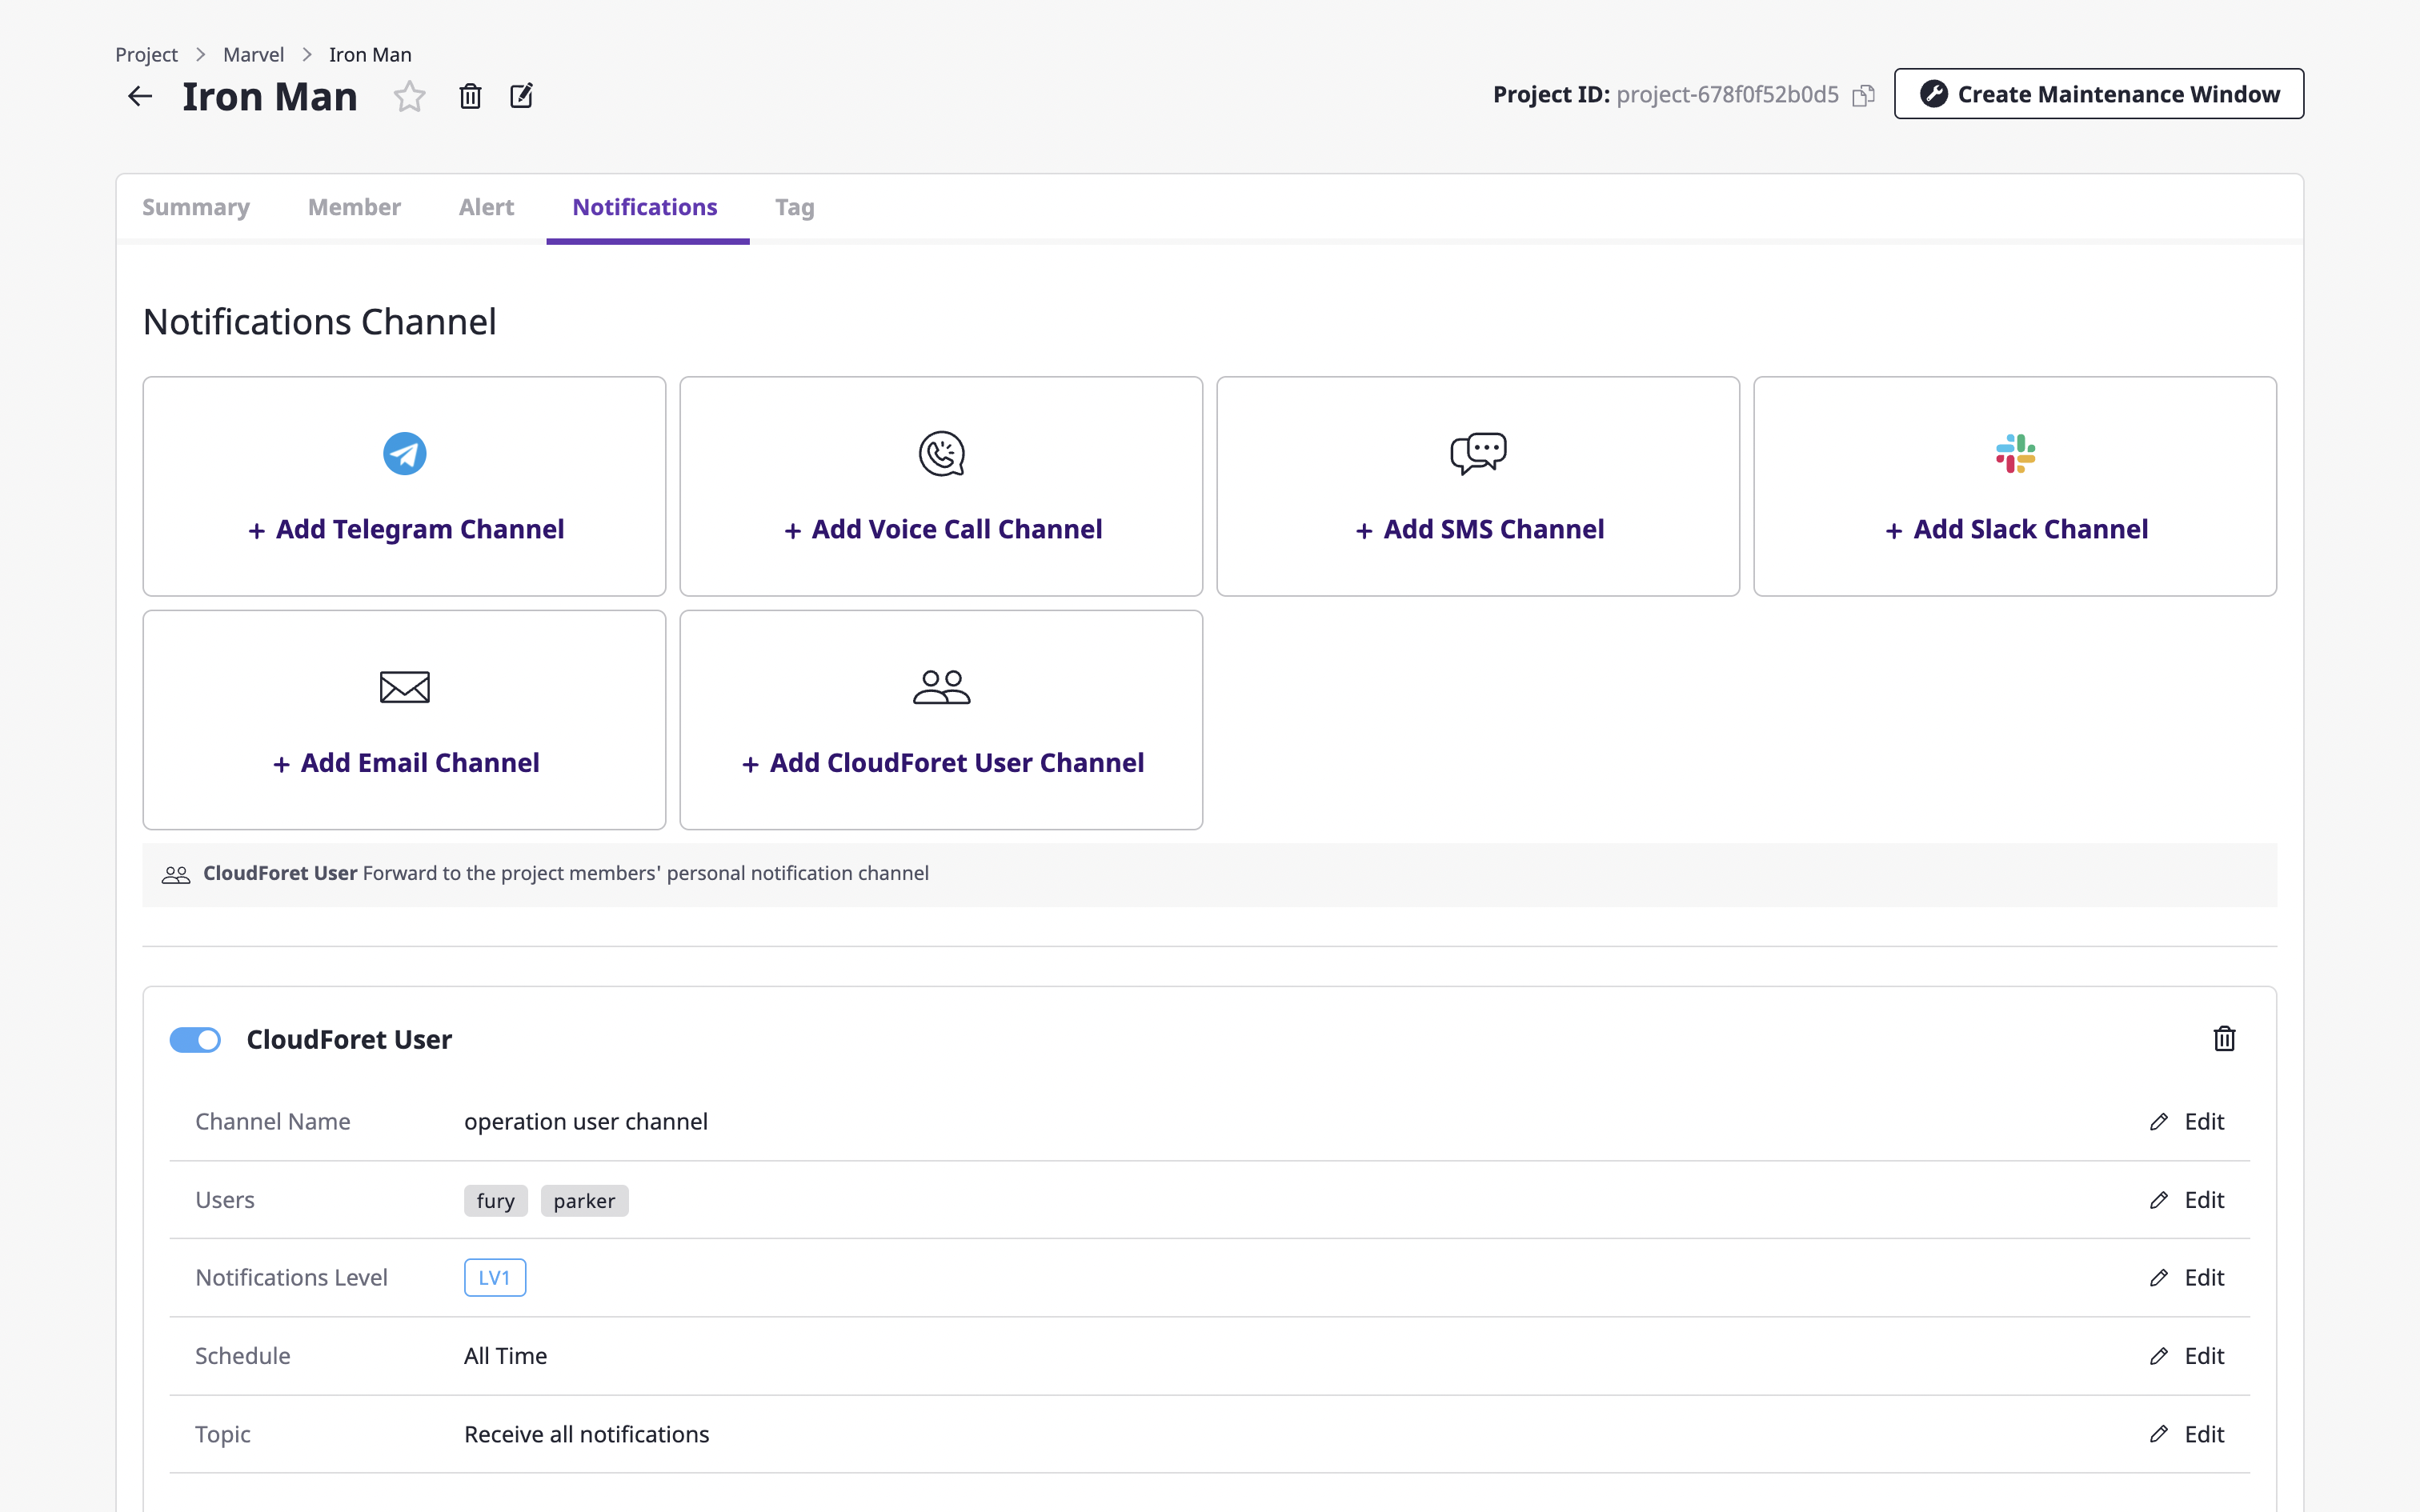
Creating a notifications channel
In the [Notification] tab of the project detail page, you can decide whether or not to Create a notifications channel and enable it.
Notifications channel is a unit that expresses the systematic recipient area, including the method and level of notifications transmission. It helps to transmit alerts according to the level set in the escalation rule.
(1) On the project detail page, select the [Notification] tab and click the [Add channel] button of the desired notifications channel.
(2) On the notification creation page, enter the settings to create a notifications channel.
(2-1) Enter the basic information about the notifications channel you want to create, such as the required channel name and notification level. The [Channel name] and [Notification level] comprise the basic setting fields, and afterward, the remaining fields receive different information per channel.
Notification level
Notification levels correlate to the escalation policy (/ko/docs/guides/alert-manager/escalation-policy/) that defines rules for spreading alerts.
Based on the notification level specified in the escalation policy, the alert is spread to the notifications channel belonging to that level.
(2-2) You can set a schedule to receive notifications only at certain times.
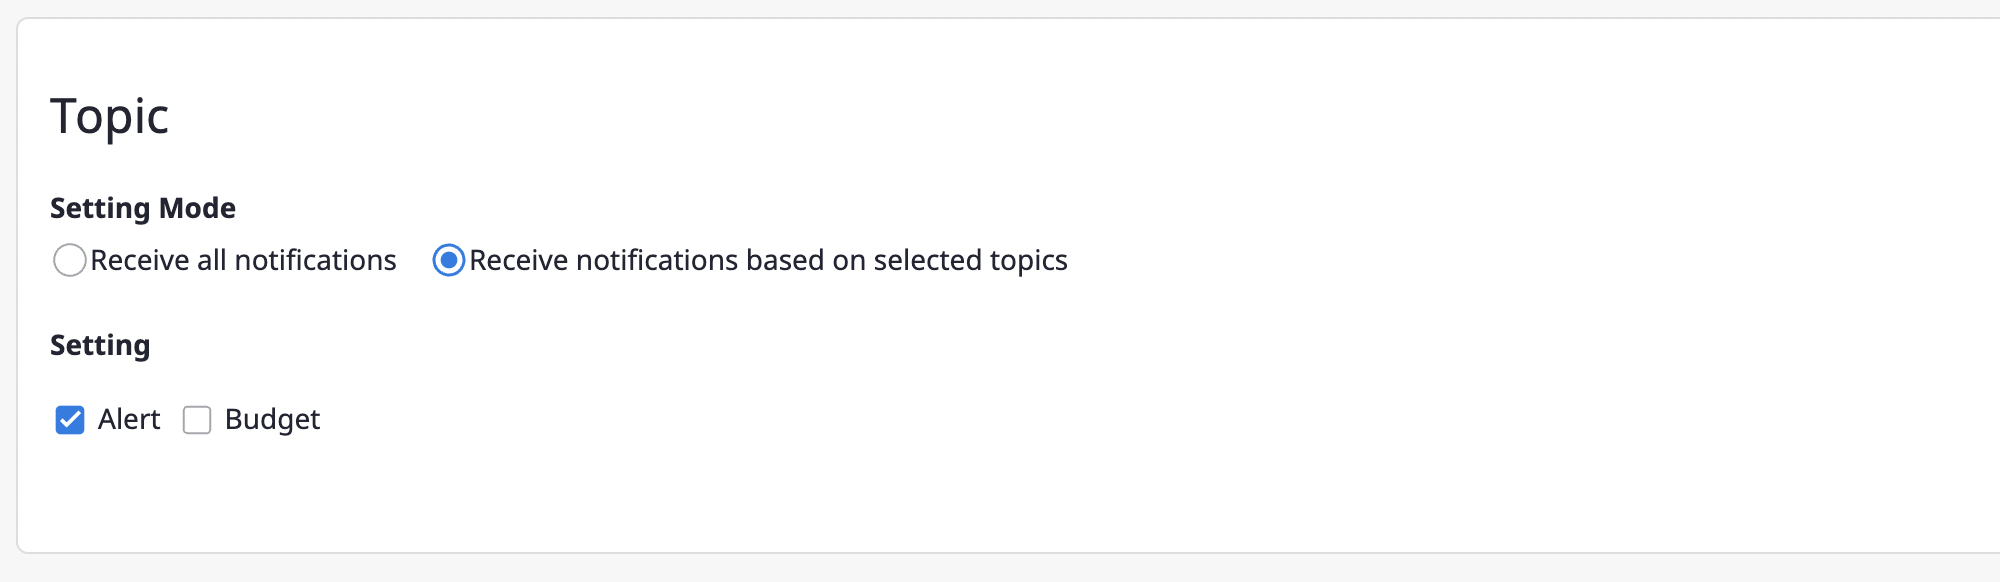
(2-3) Notifications can be received when an alert occurs or when a threshold for budget notifications was reached. By setting up topics, you can choose which notifications you want to receive.
If you select [Receive all notifications], you will receive both types of notifications, and if you select [Receive notifications on selected topics], you will receive only notifications related to what you selected.
(3) Click the [Save] button to complete the notifications channel creation.
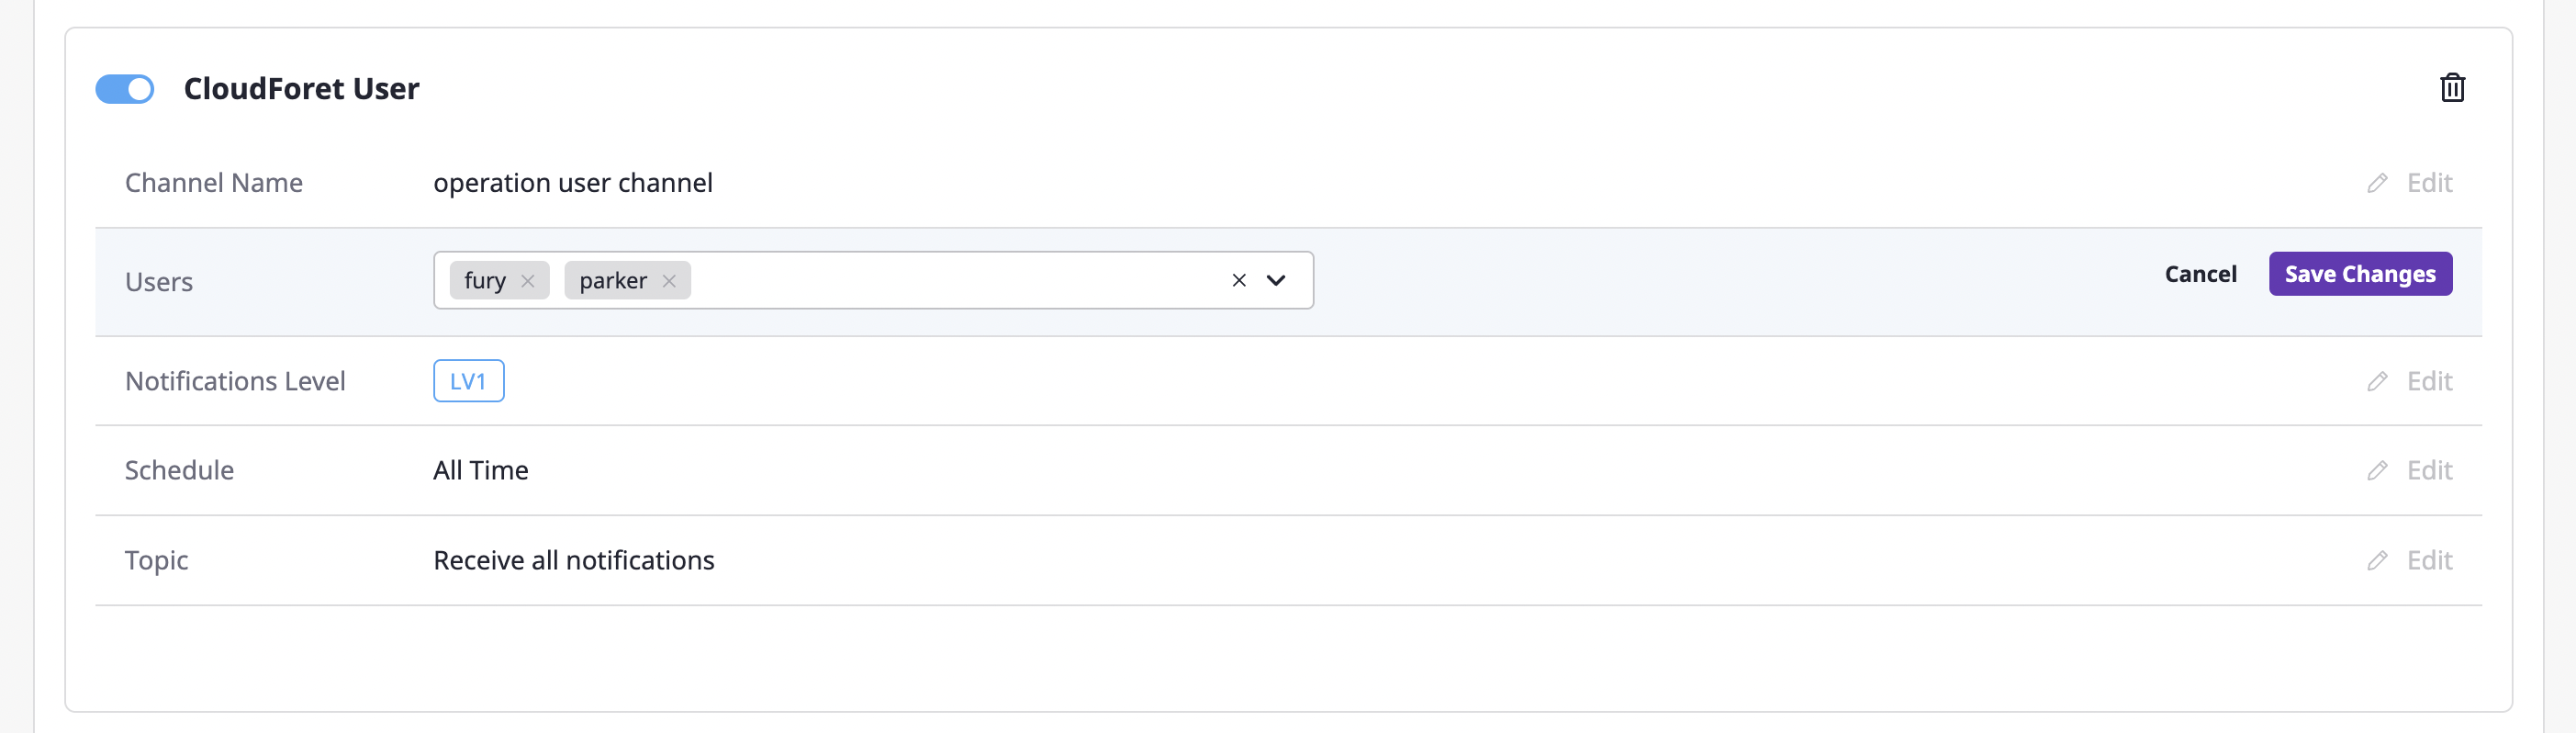
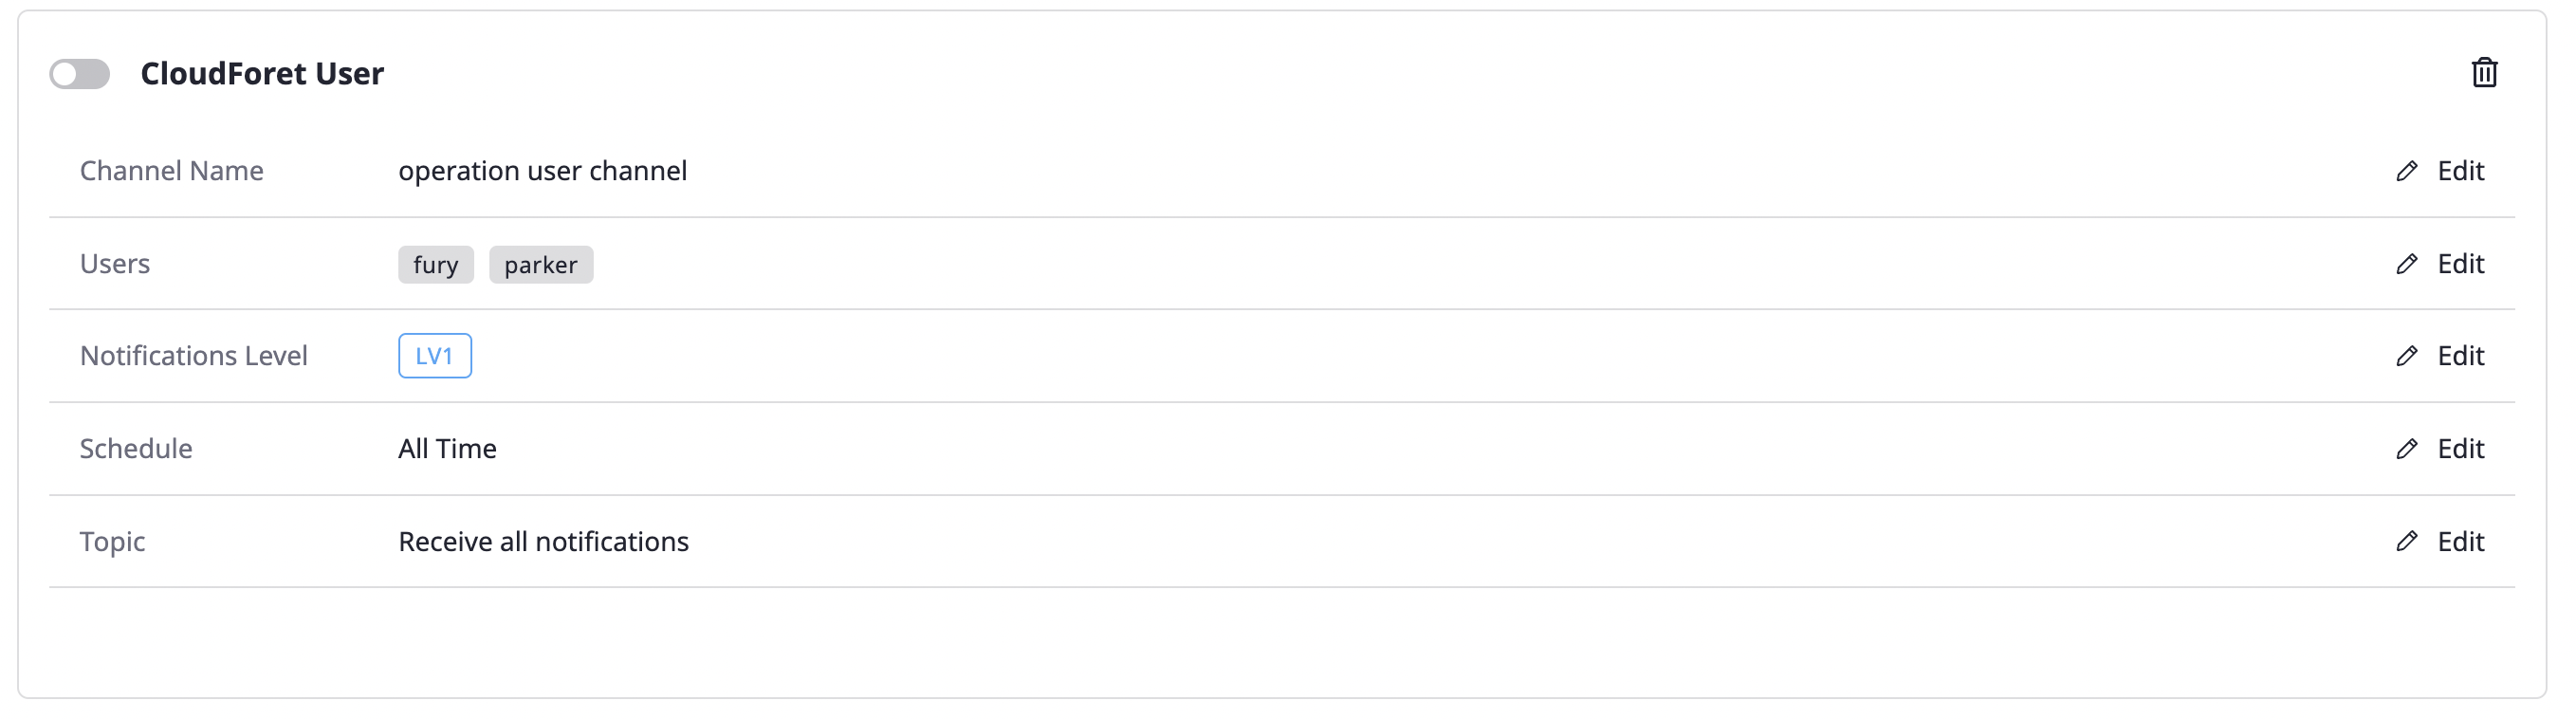
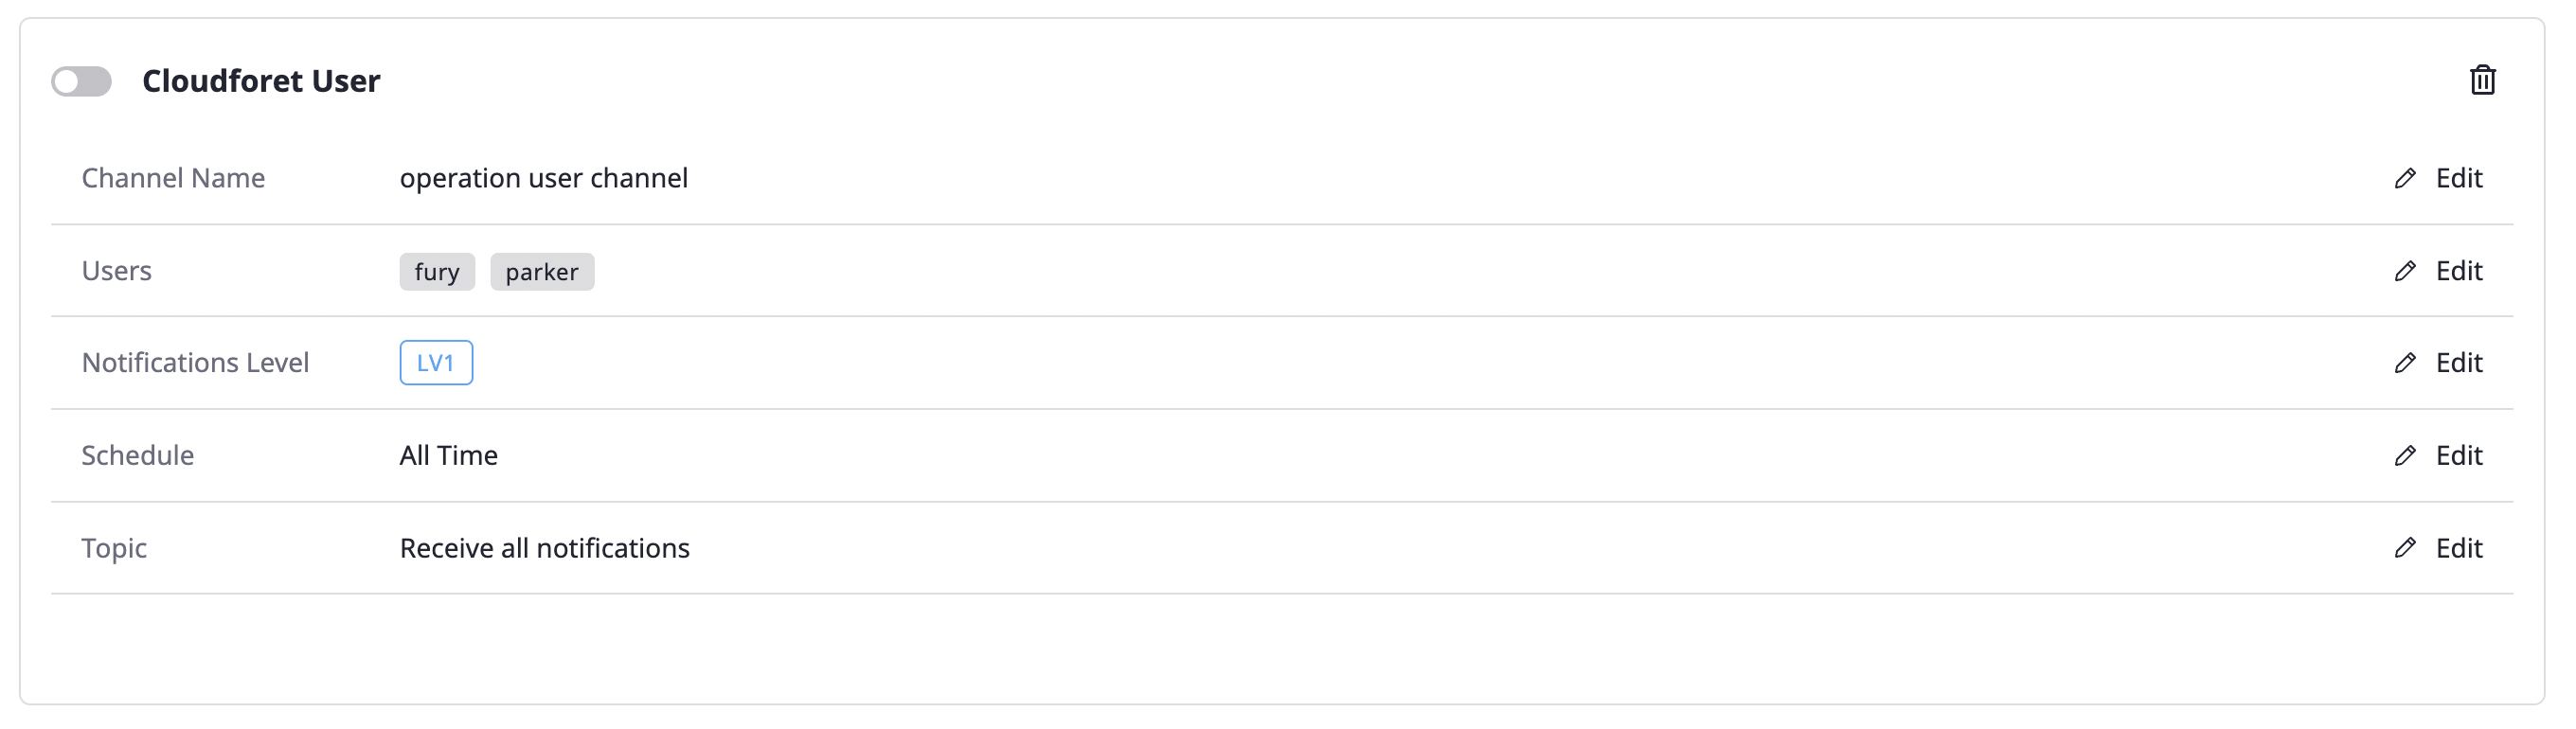
Editing and deleting the notifications channel
Editing the notifications channel
Created notifications channels can be checked under each notifications channel selection.
You can change the active/inactive status through the toggle button at the top left, and you can edit each item by clicking the [Edit] button of each notifications channel.
When you complete inputting the information, click the [Save changes] button to complete the editing.
Deleting the notifications channel
You can delete the notifications channels by clicking the [Delete icon] button in the upper right corner.
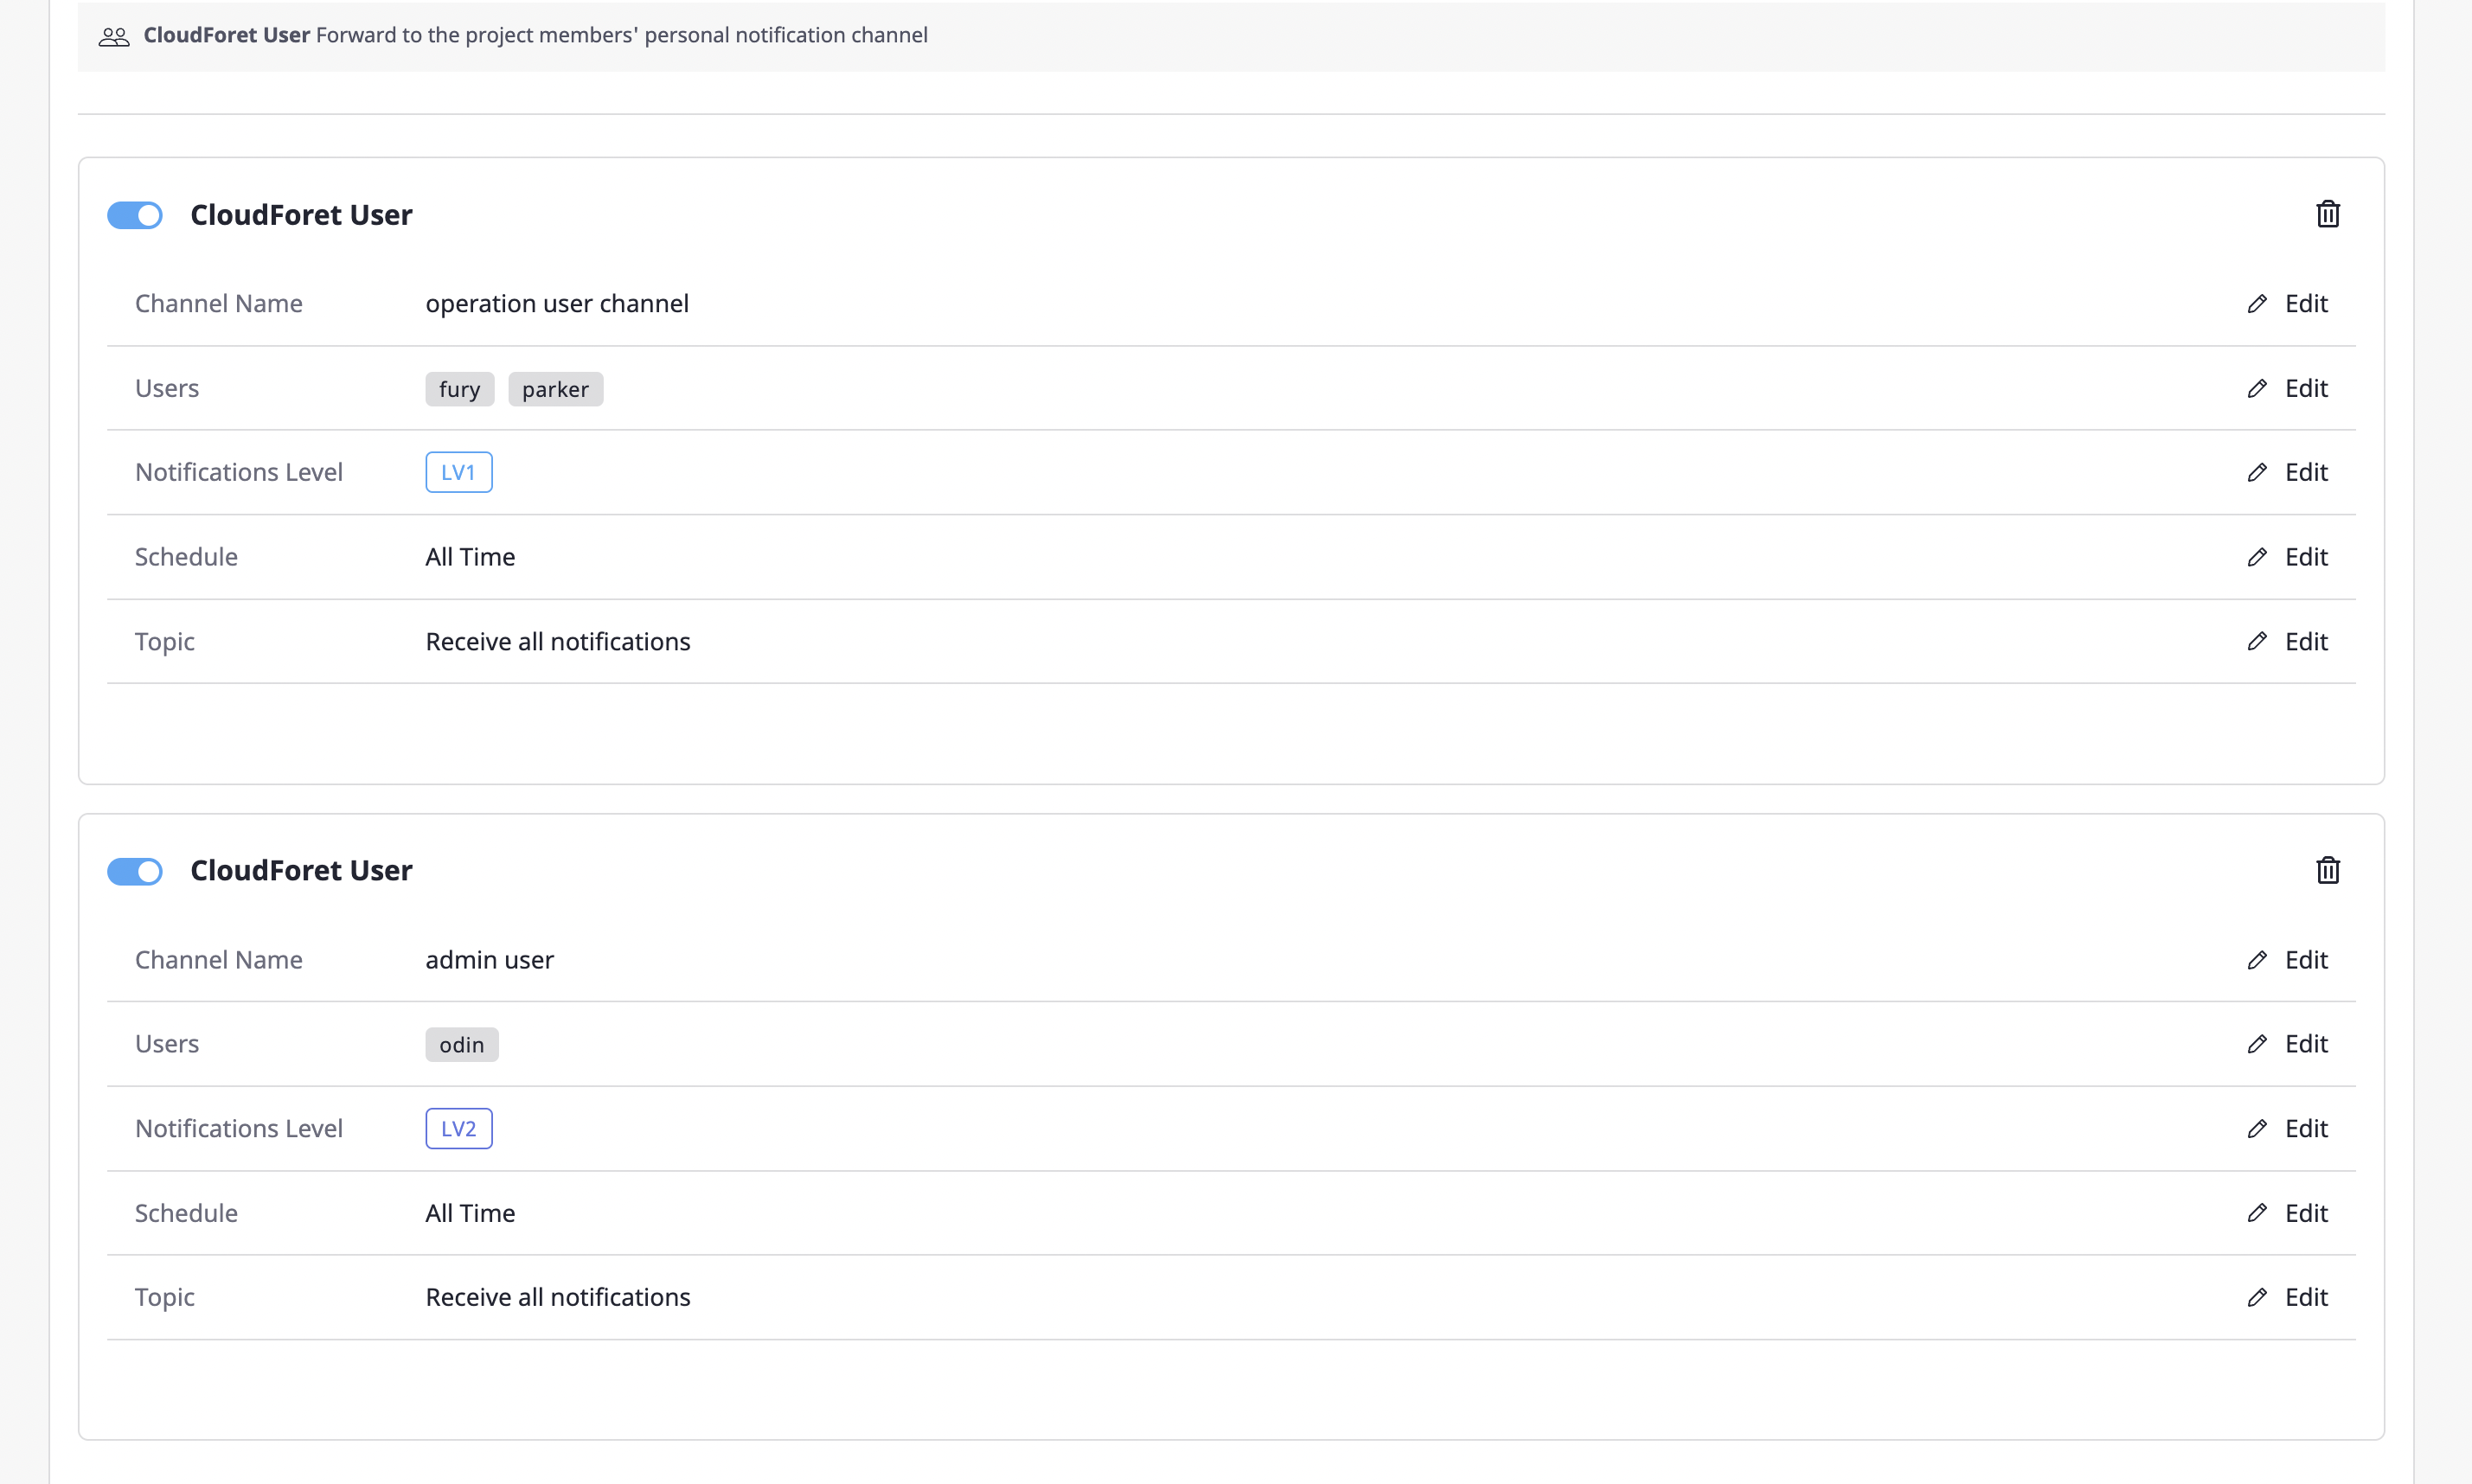
Cloudforet user channel
The [Add Cloudforet user channel] button exists in the [Notifications channel] item in the project.

If you add a Cloudforet user channel, an alert is spread to the personal channels of project members. Afterward, alerts are forwarded via the Cloudforet user notifications channel of the user who has received it.
Creating a Cloudforet user notifications channel
A user notifications channel can be created in [My page > Notifications channel].
Unlike creating a project notifications channel, there are no notification level settings, and other creation procedures are the same as Creating a project notifications channel.
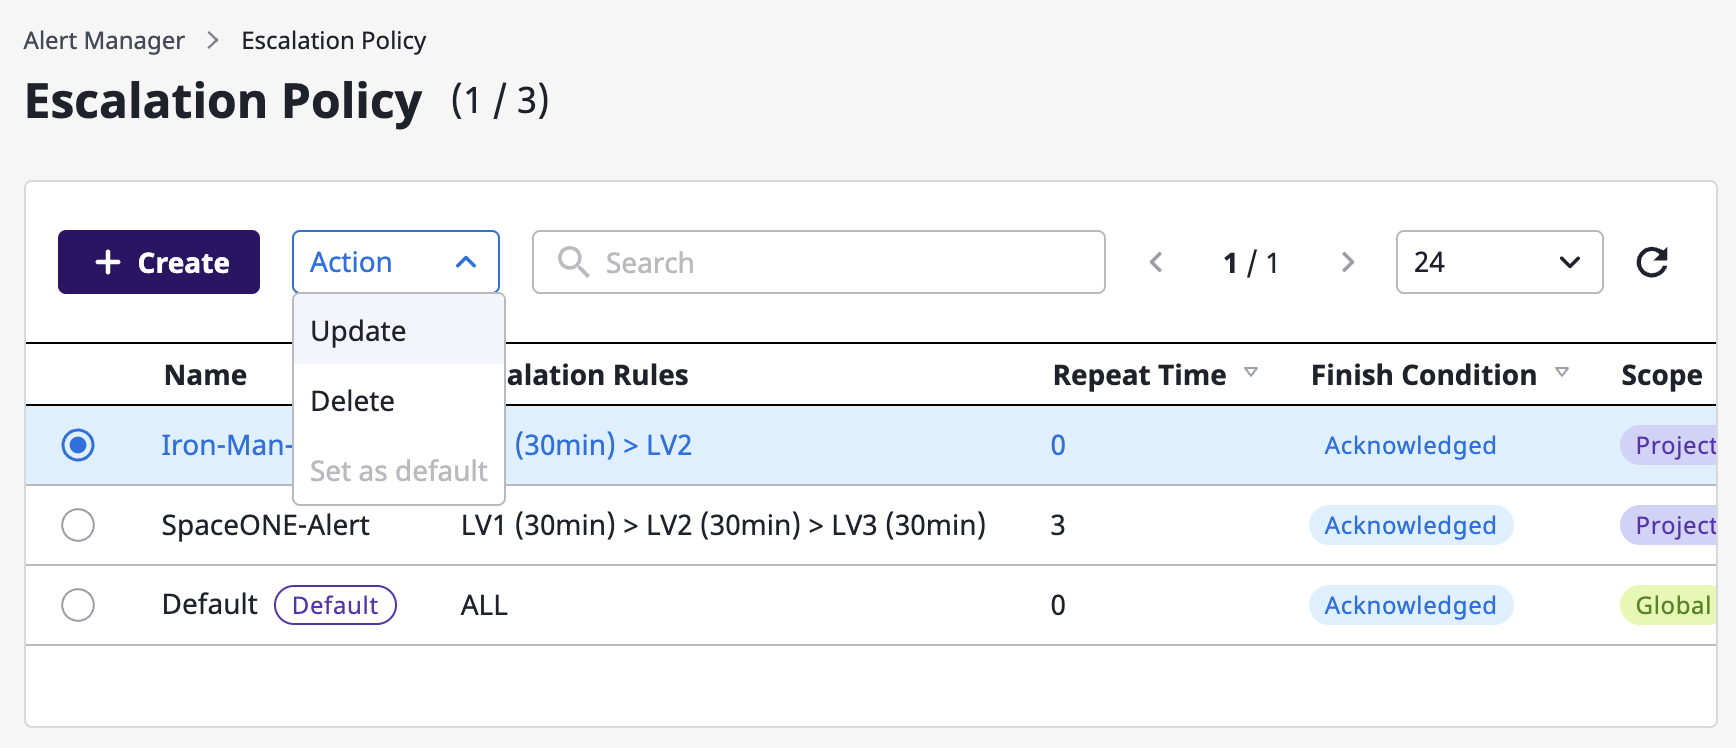
8 - Escalation policy
By applying stage-by-stage rules to alerts through escalation policies, alerts that have been received are effectively sent to members of the project.
Each rule has a set level, and an alert is spread to the corresponding notifications channel for each level.
Whether an alert received via a webhook is to be sent as a notification to project members is determined by Escalation policy.
Escalation policy can be managed in two places:
- [Alert manager > Escalation policy] page: Manage escalation policy under the scope of
globalandproject - [Project] detail page: Manage escalation policy under the scope of
project
Create escalation policy
If you are a user with manage permission on the [Escalation policy] page, you can create an escalation policy.
Create in an [Escalation policy] page
(1) Click the [Create] button on the [Alert manager > Escalation policy] page.

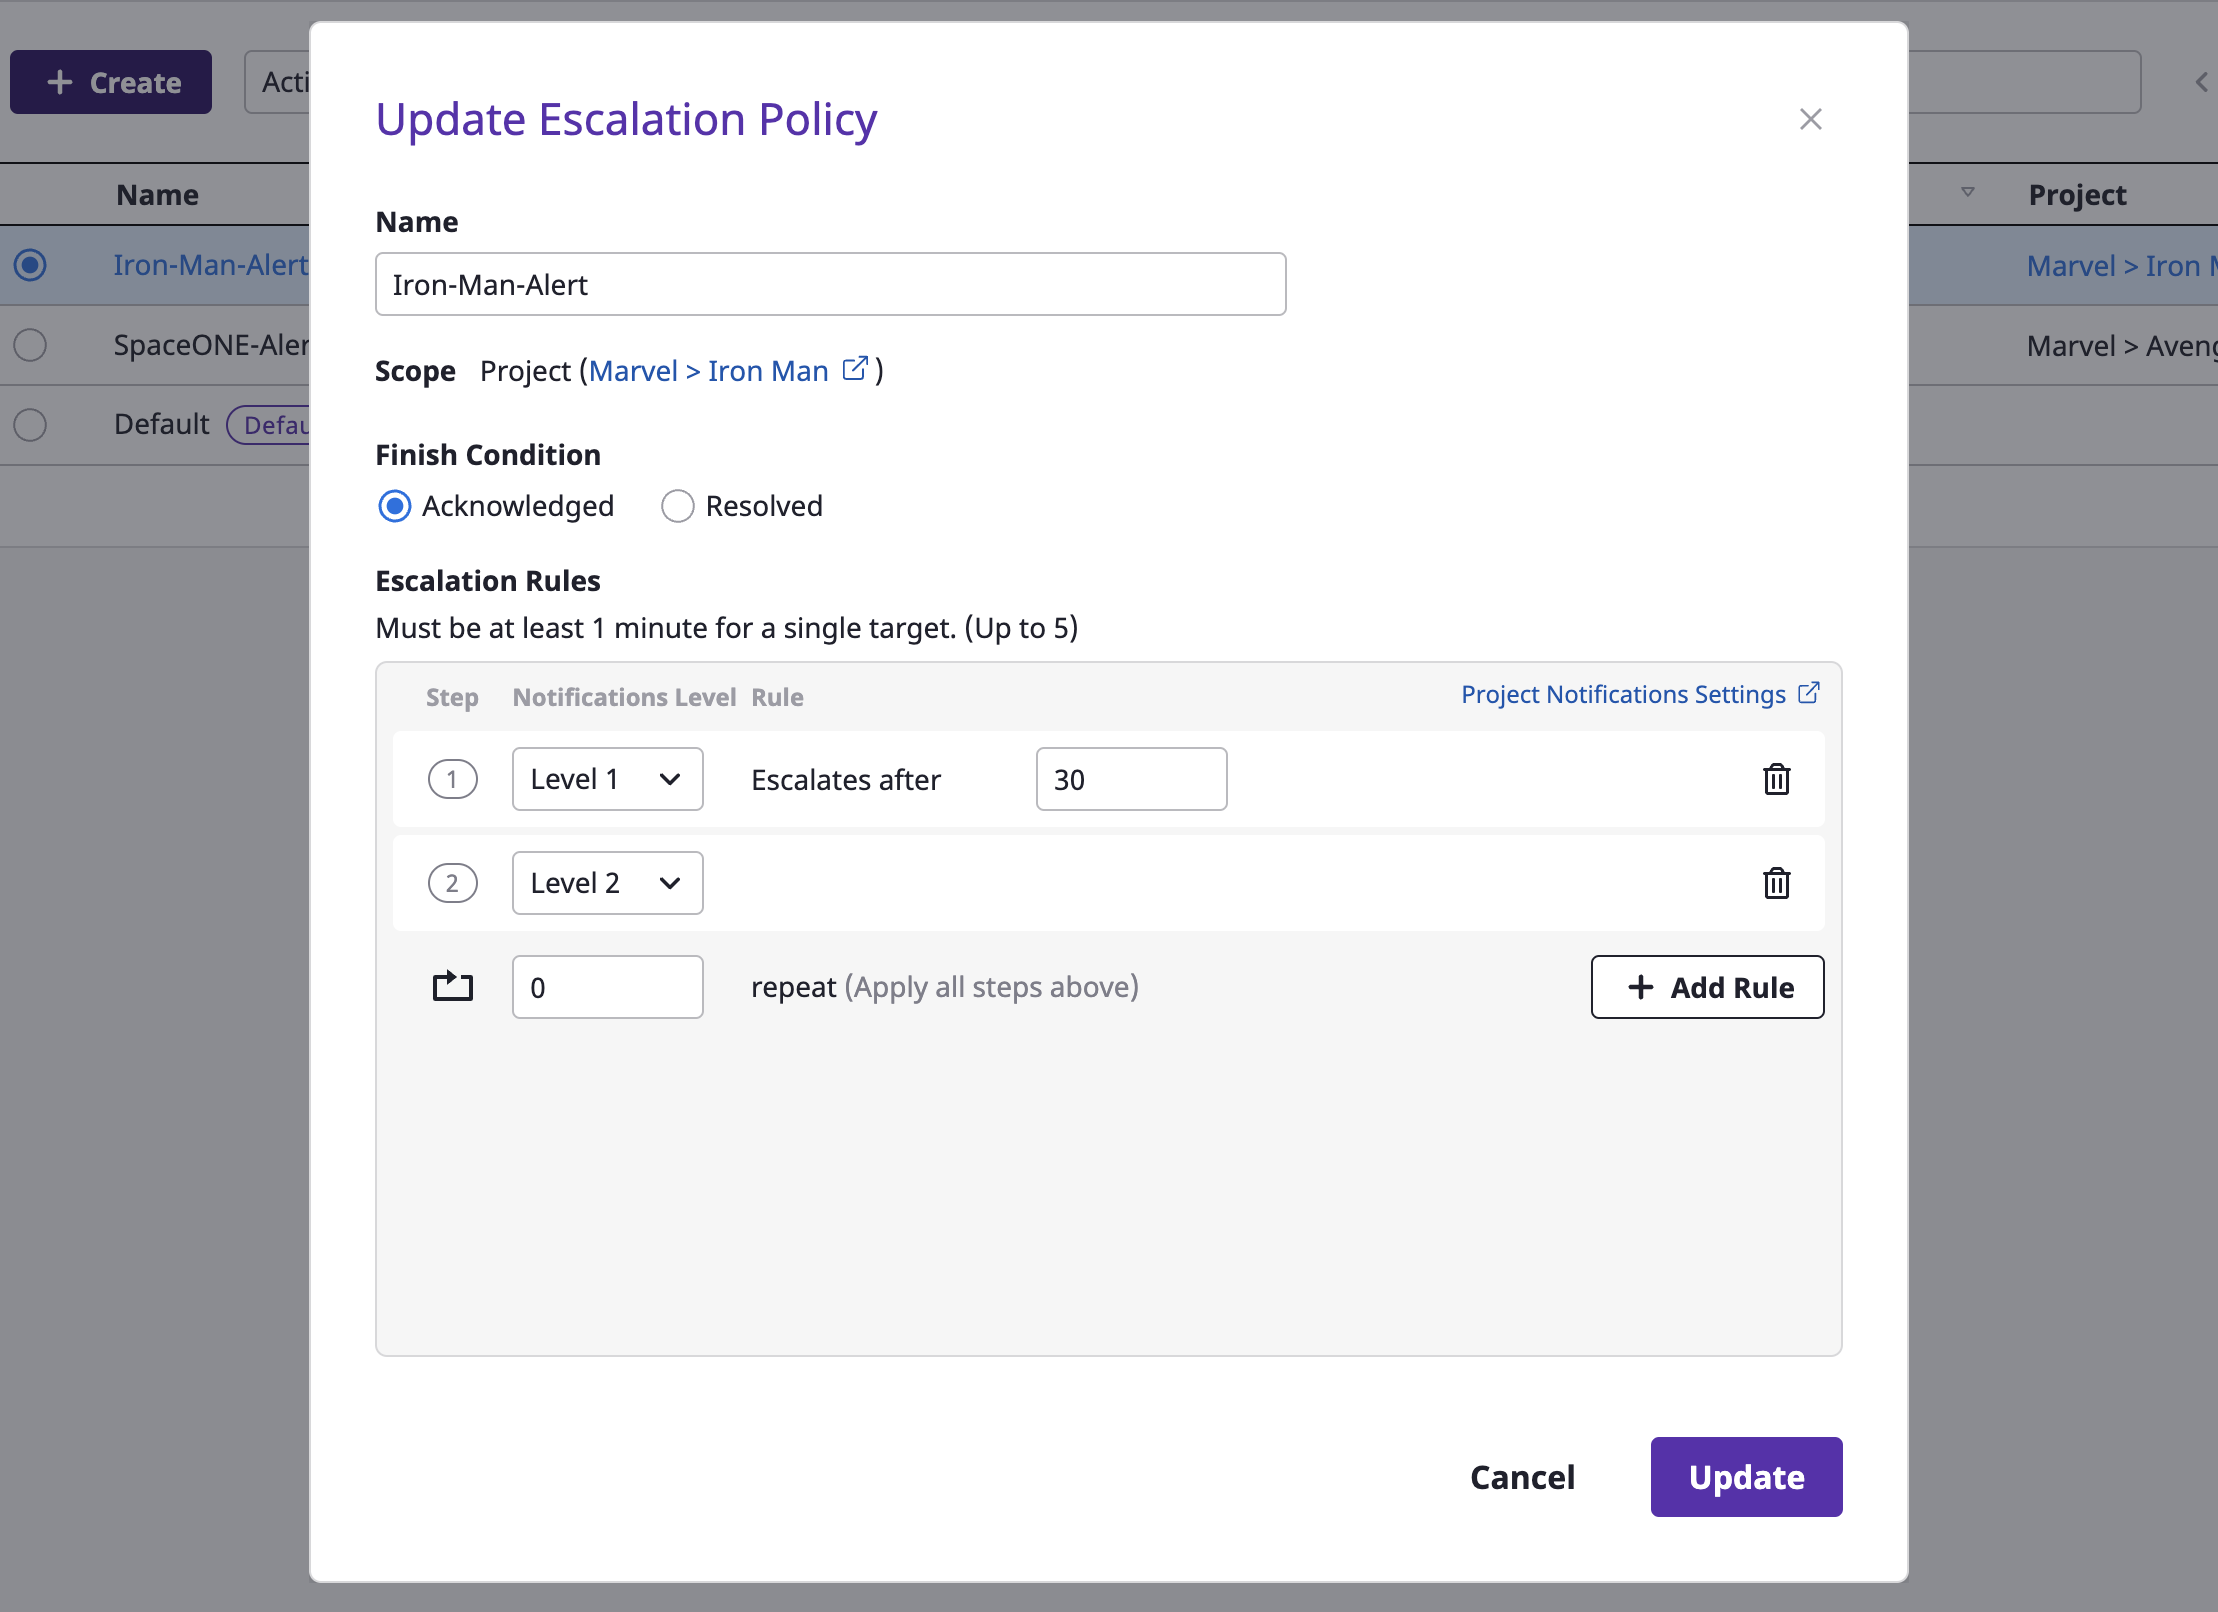
(2) Enter the settings to create an escalation policy.
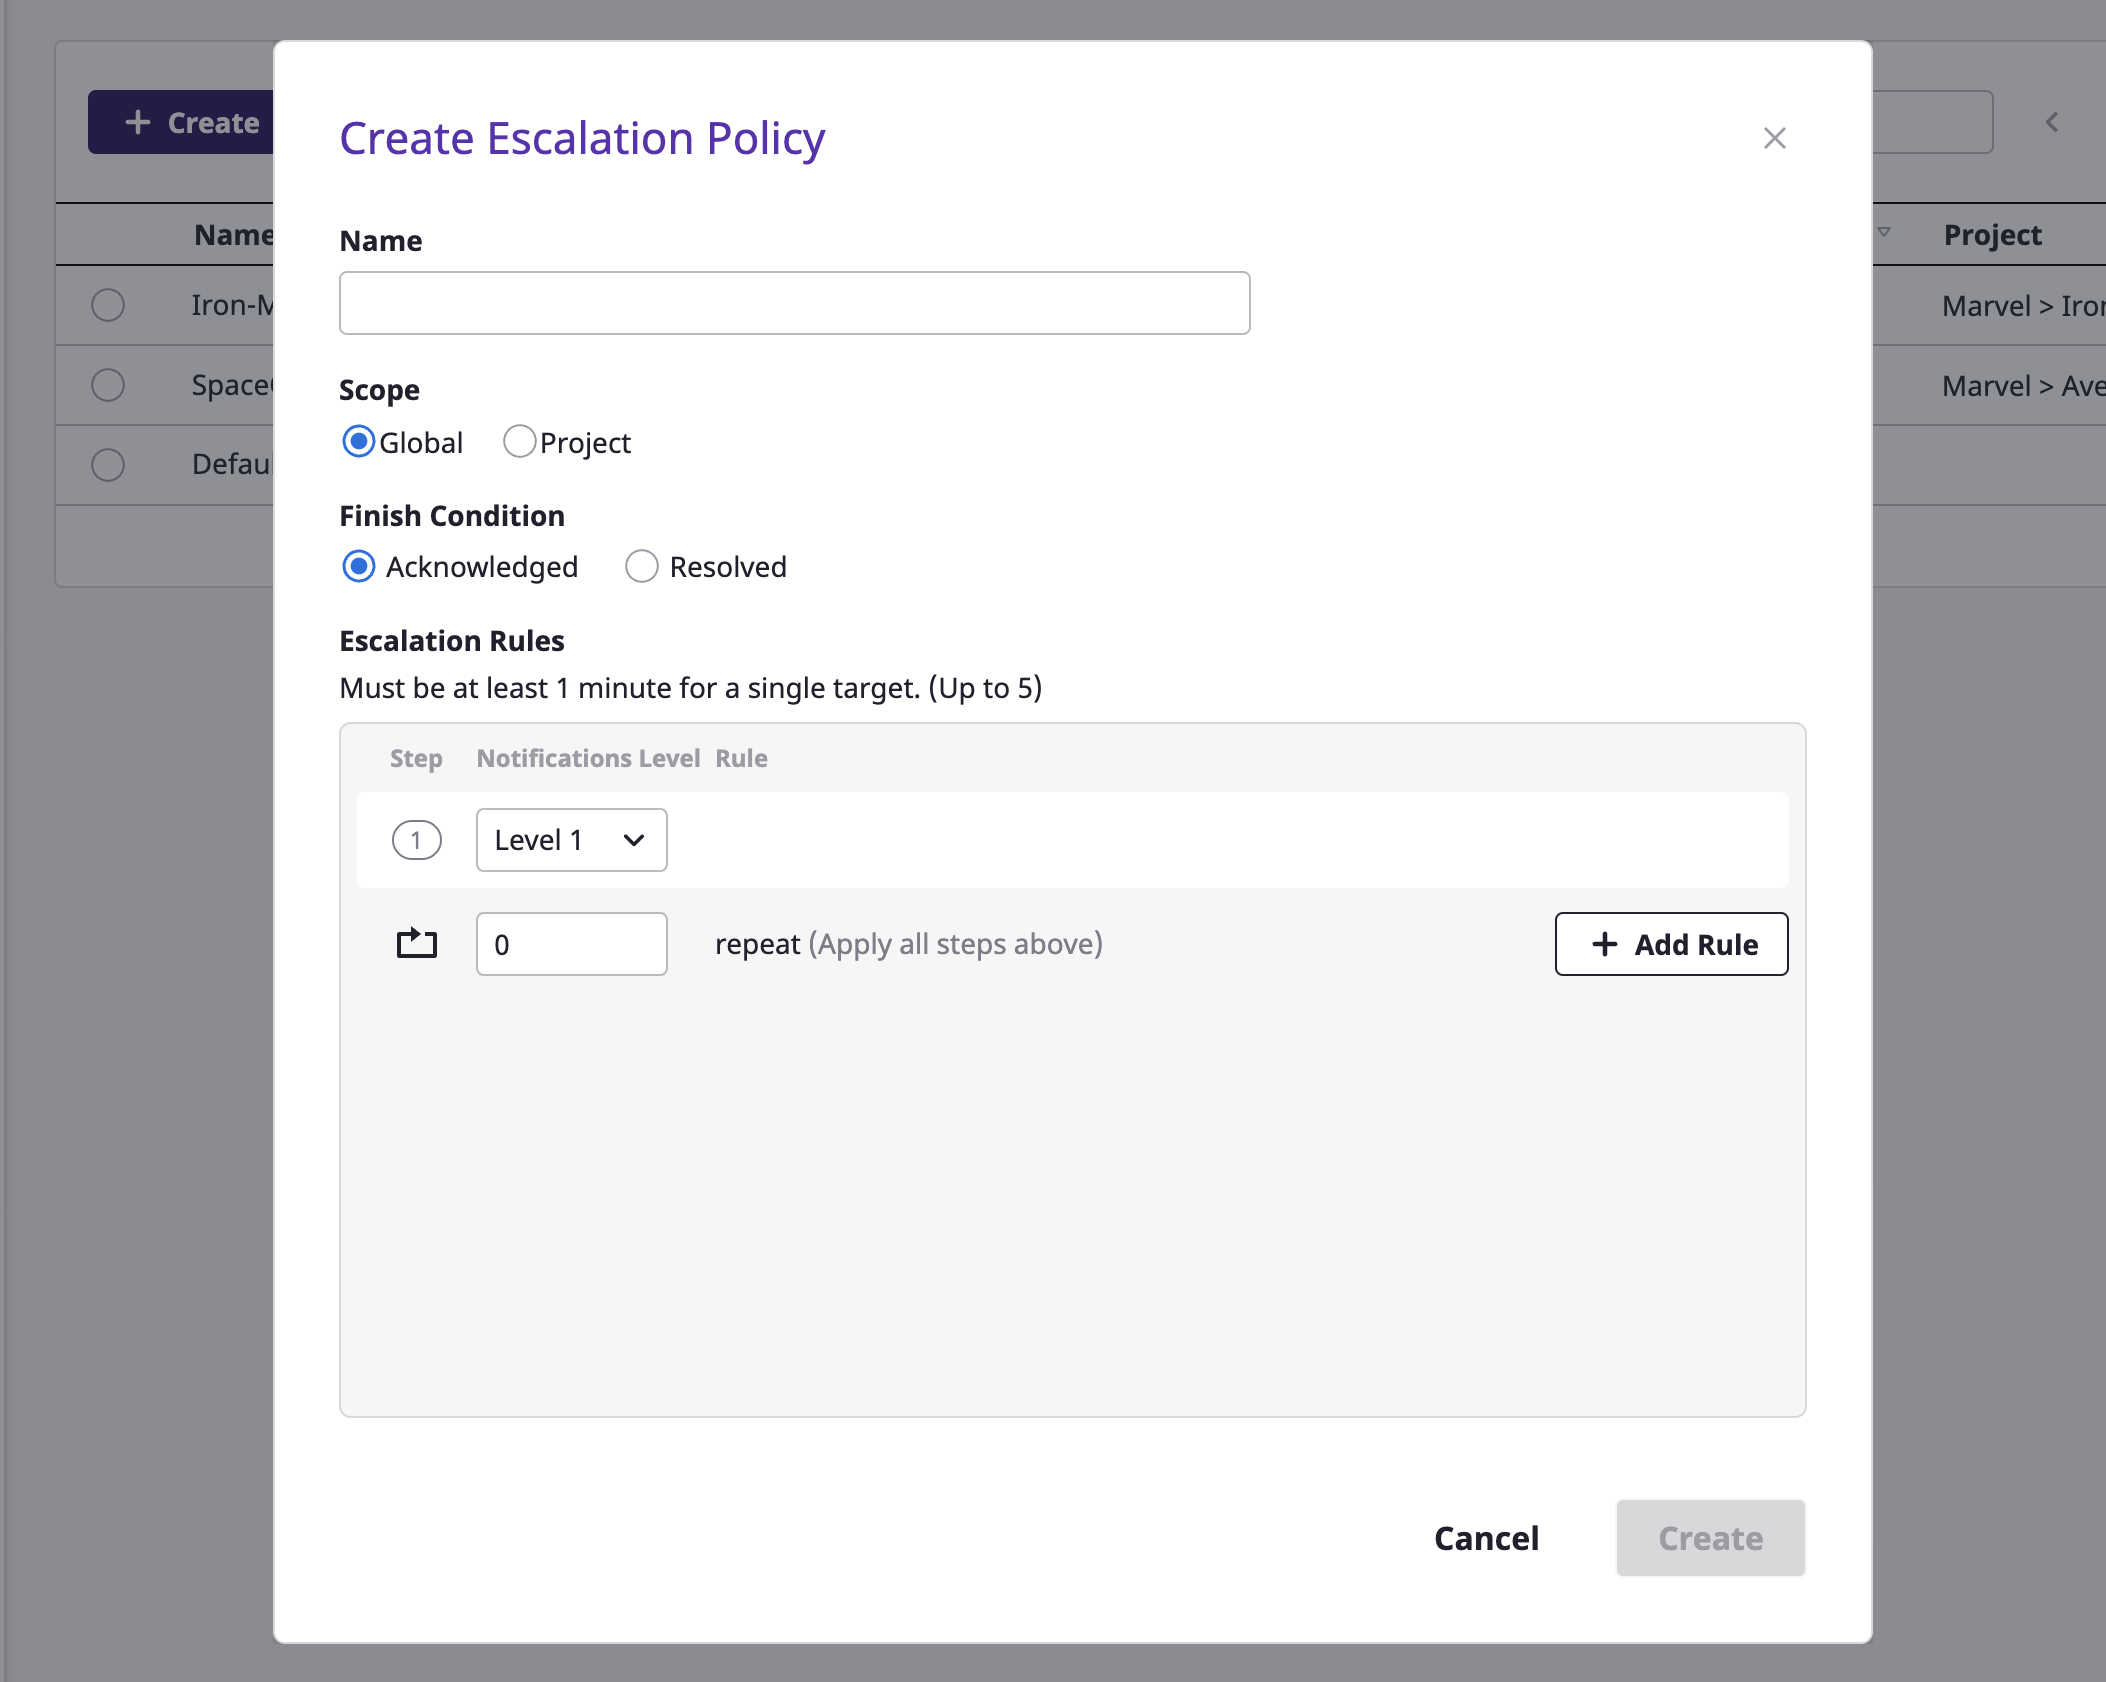
| Policy | Description |
|---|---|
| Exit condition (status) | Define the condition to stop the generated alarm. |
| Range | Indicate the scope in which the escalation policy can be used. In case of global, the policy can be used in all projects within the domain, and in case of project, within the specified project. |
| Project | Scope defined as project indicates the project being targeted. |
| Escalation rules | Define rules for sending step-by-step notifications. Alerts are sent to a notifications channel belonging to a set level, and a period between steps can be given in minutes from step 2 or higher. |
| Number of repetitions | Define how many times to repeat an alert notification. Notifications can be repeated up to 9 times. |
When creating such items on the [Project] detail page, a
project is automatically selected for the scope, and the project is designated as the target.Create in a [Project] detail page
When you create an escalation policy on the [Project] detail page, the project is automatically designated as an escalation policy target.
(1) Inside the [Alert] tab of the project detail page, go to the [Settings] tab.
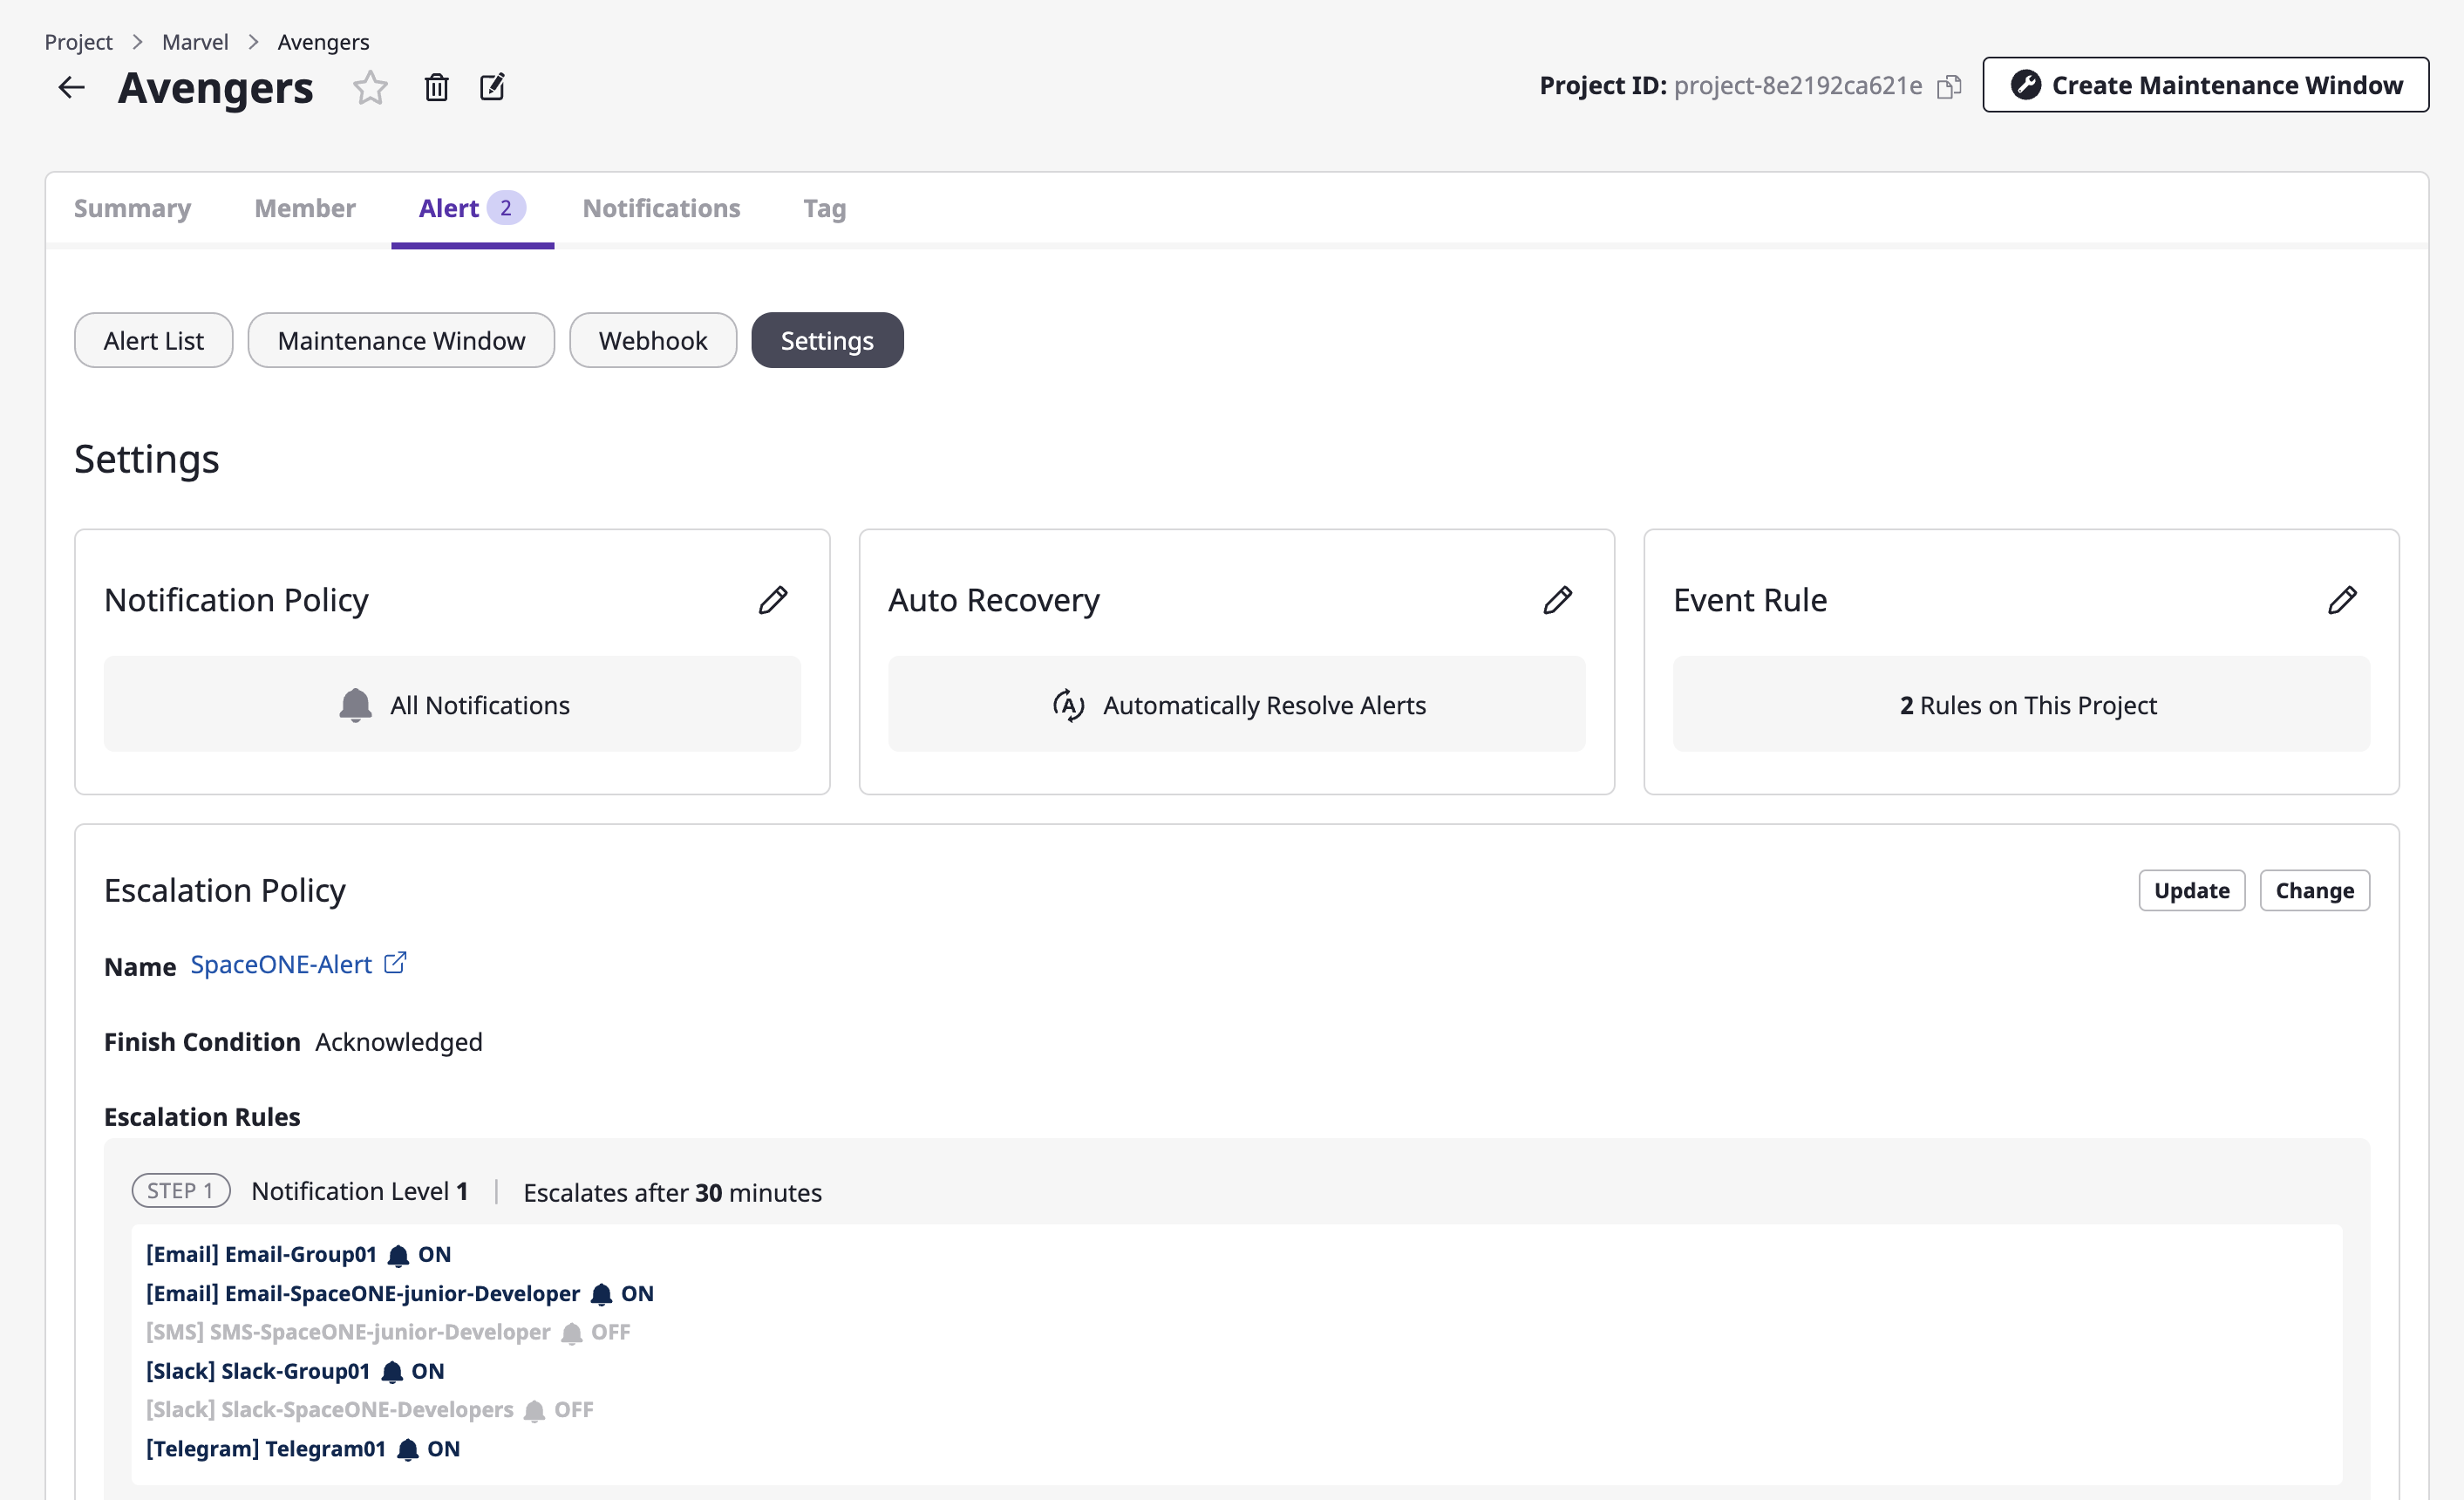
(2) Click the [Change] button in the escalation policy area.
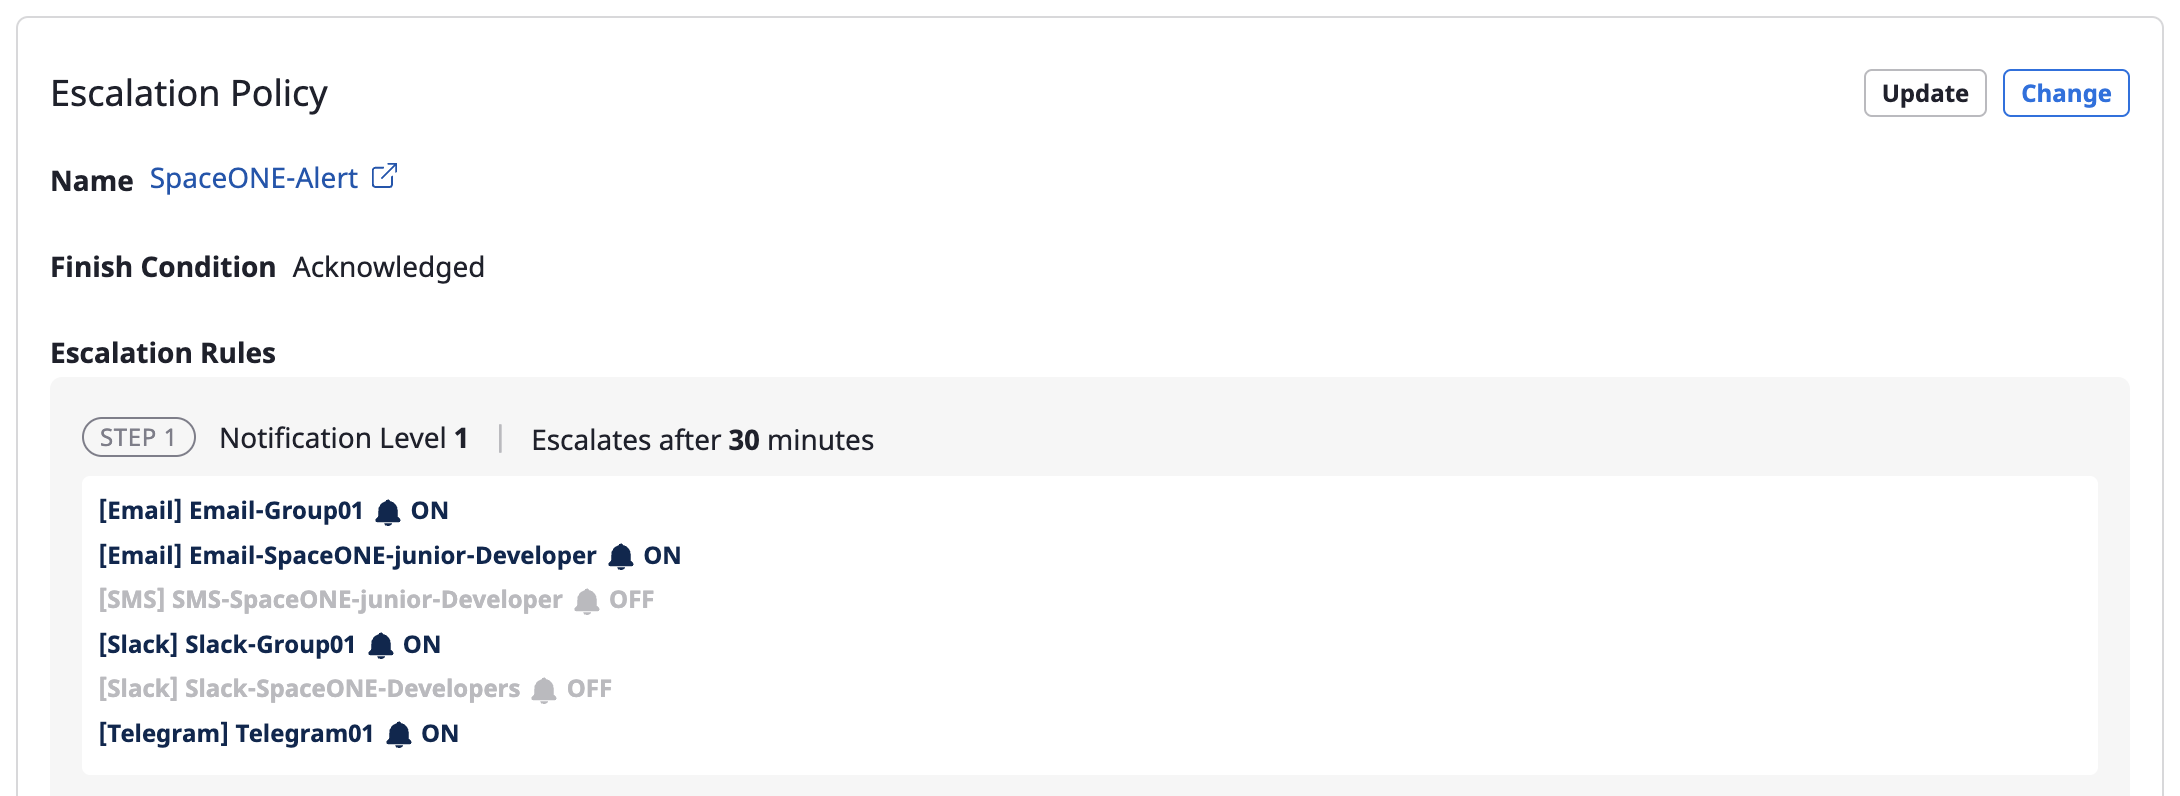
(3) Click the [Create new policy] tab.
(4) Enter settings to create an escalation policy.
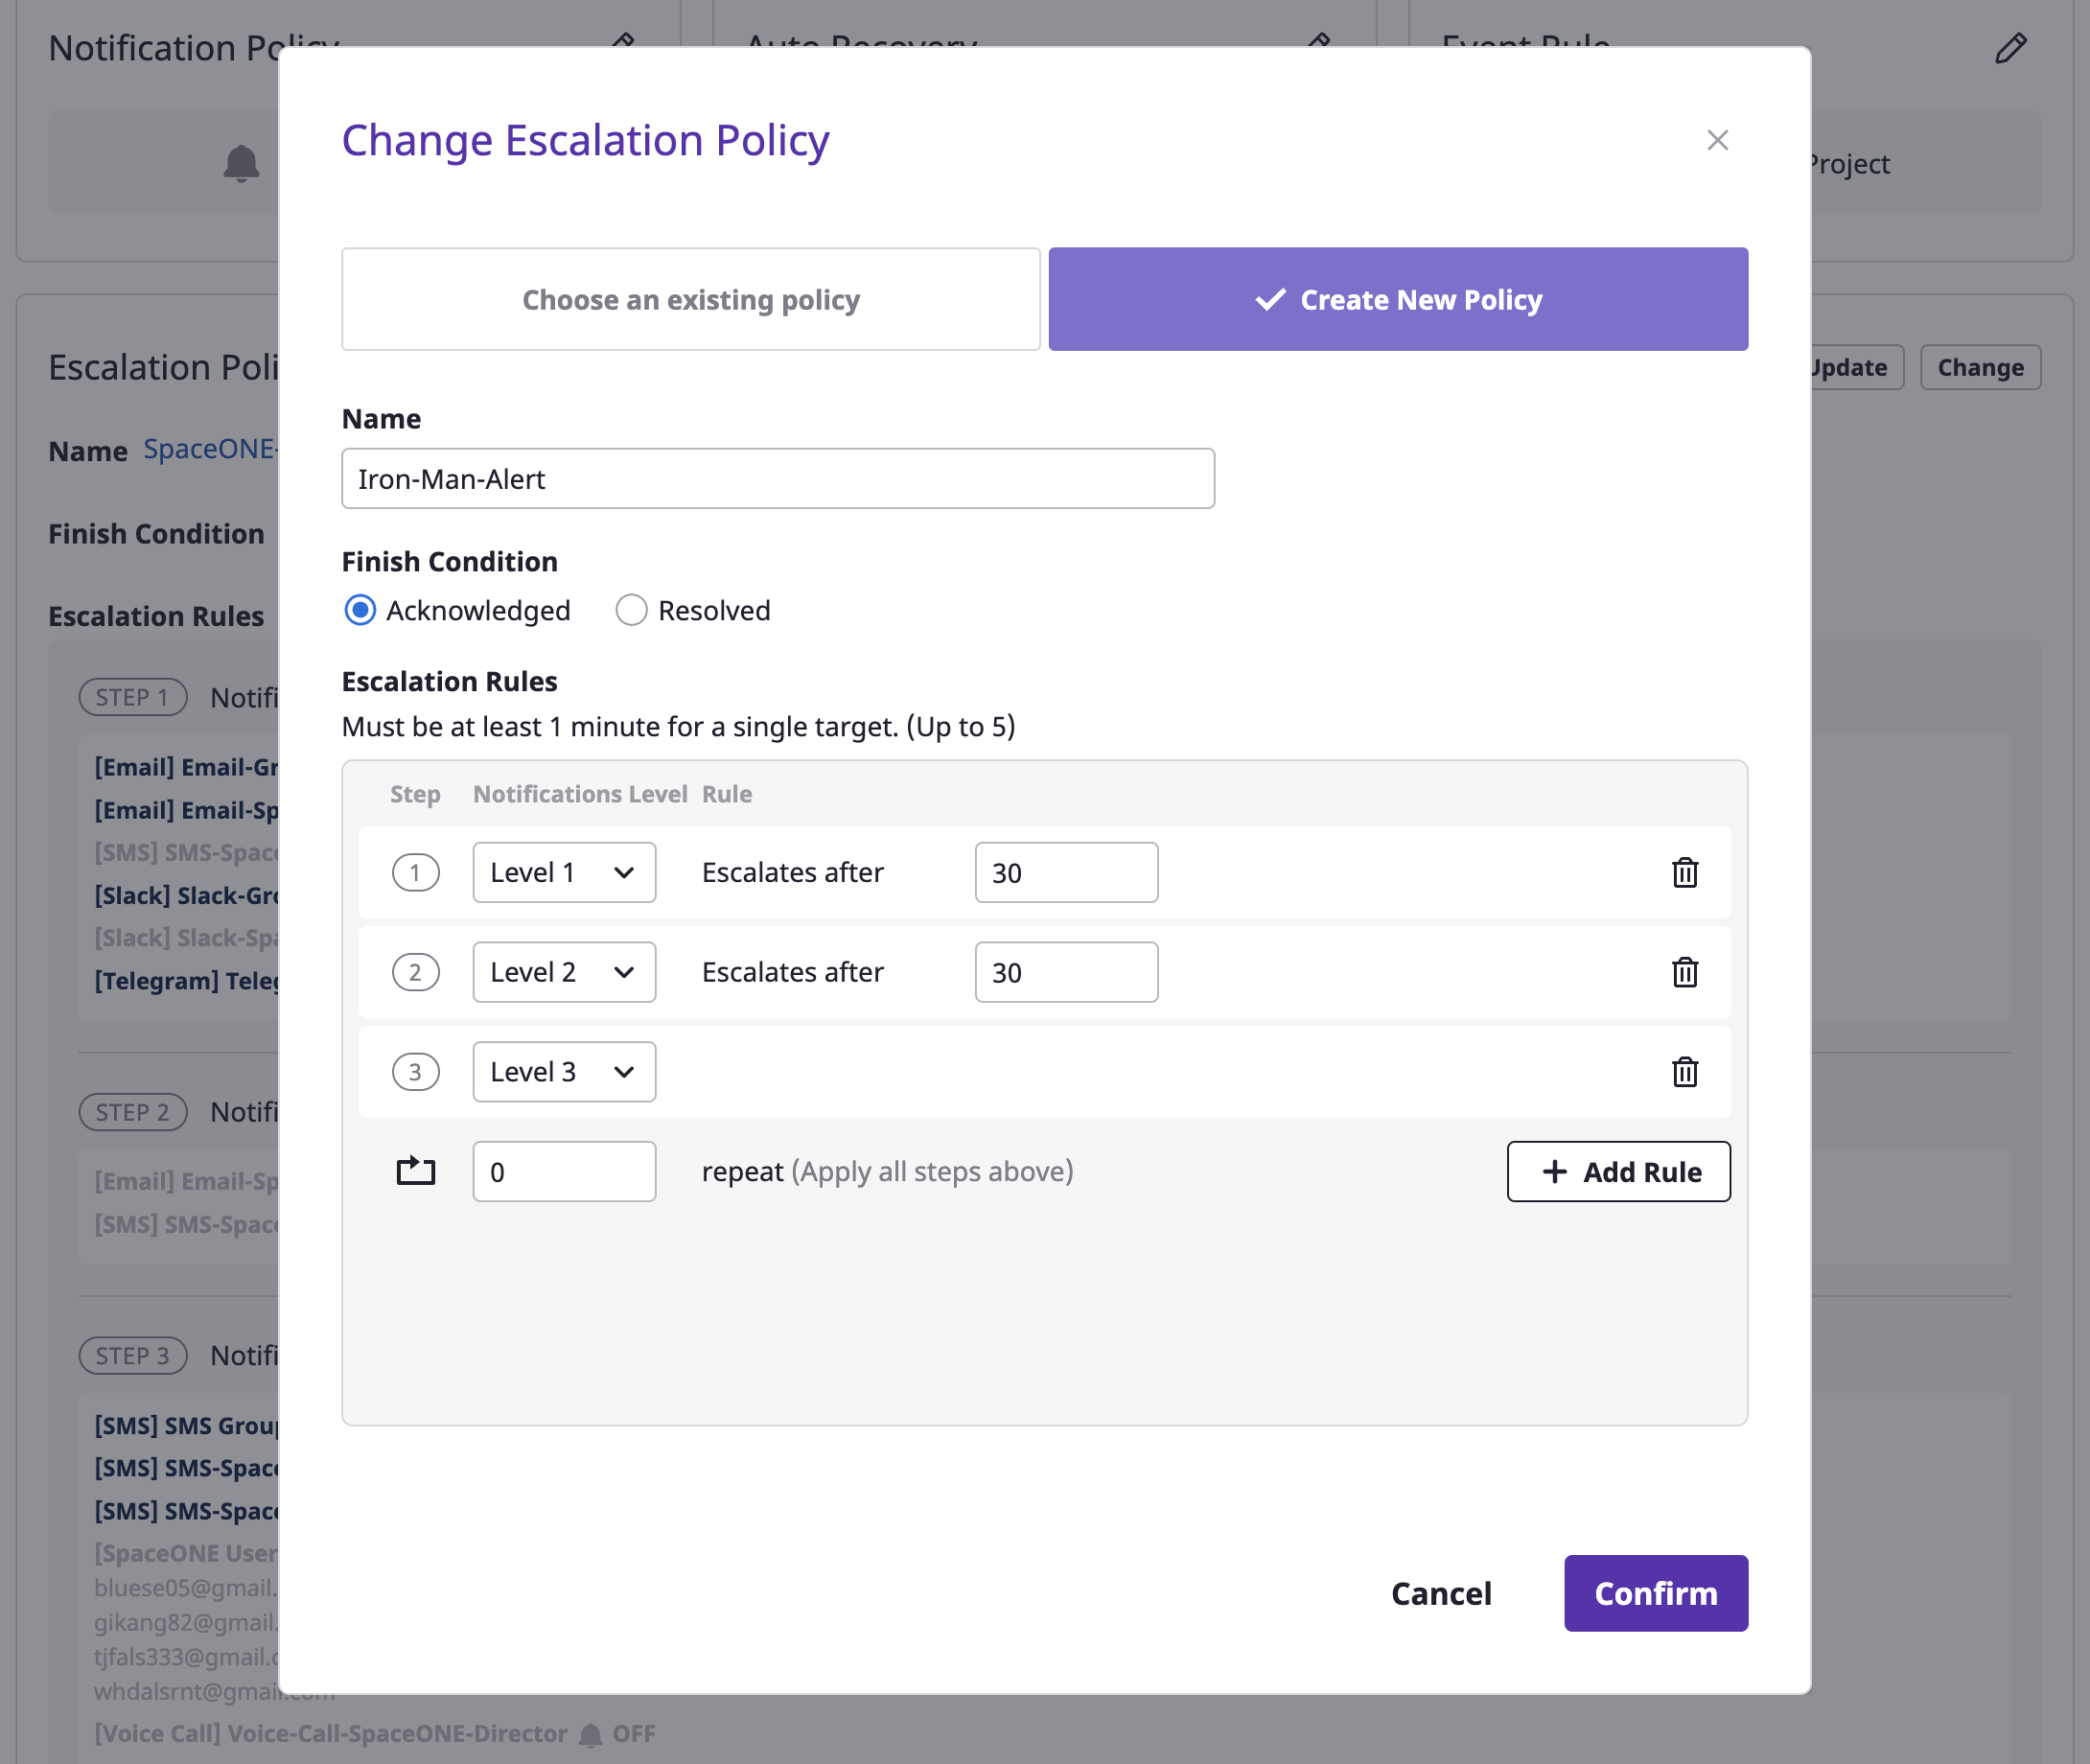
Level
A level is a transmission range at which you send an alert from the stage you are in when sending the alert by stage.
You can set up a notifications channel in the project, and each notifications channel has its own level.
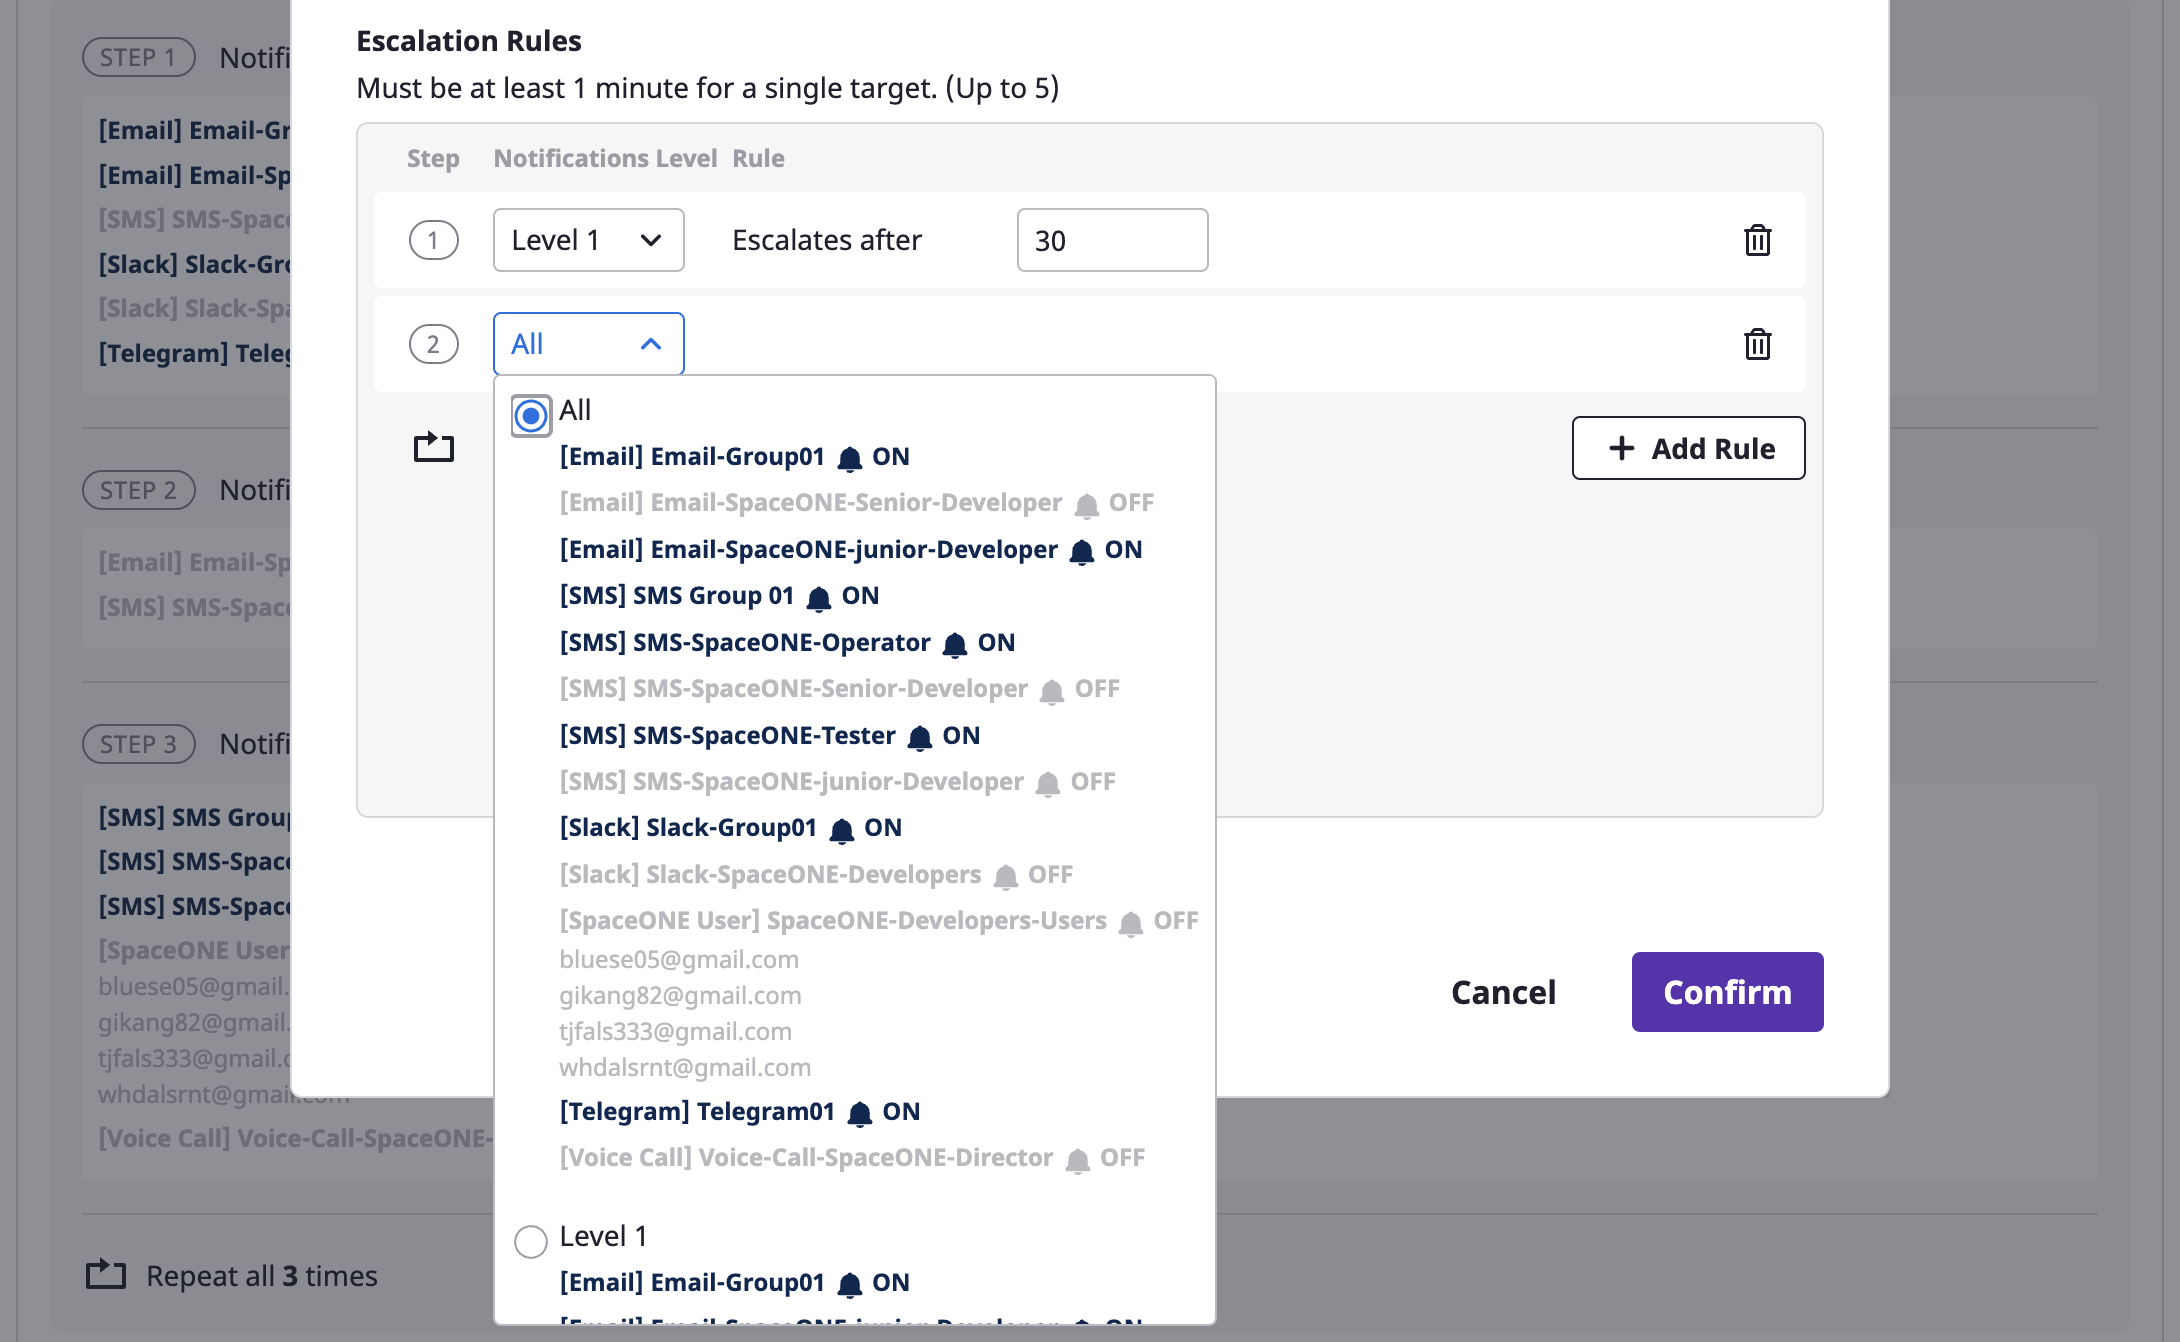
When defining the escalation rule, you set the [Notification level]. At each set stage, an alert is sent to the notifications channel of the corresponding level.
(5) When all settings are completed, click the [OK] button to create the escalation policy.
Set as default policy
After selecting one from the list of escalation policies, you can set it up as a default by selecting the [Set as default] menu from the [Action] dropdown.
When a new project is created and the alert is activated, the corresponding policy is automatically applied.
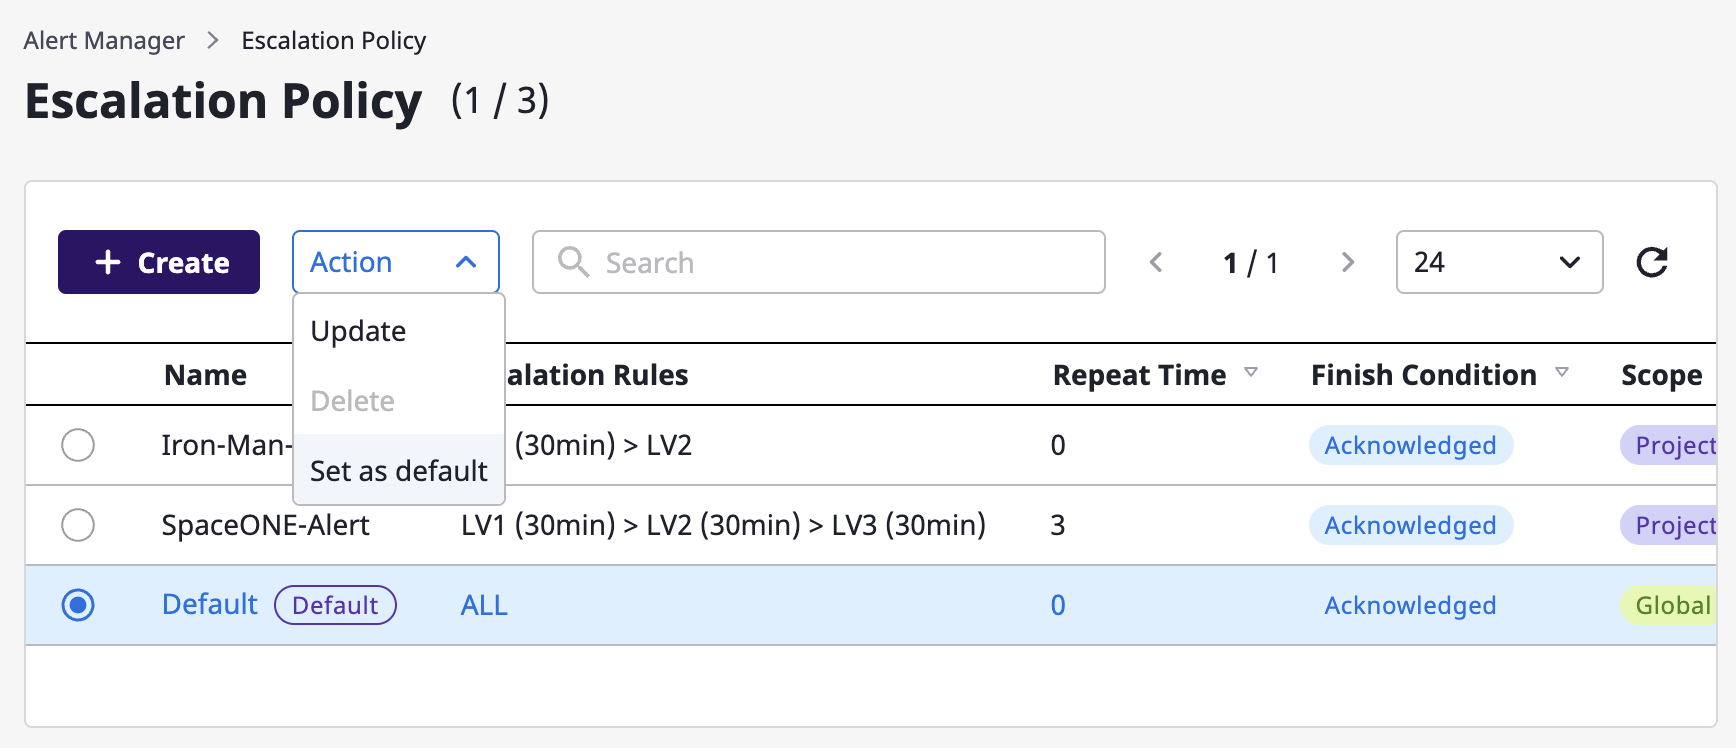
global can be selected through the [Set as default] menu.Modify and delete escalation
Once you select a target from the escalation policy list, [Modify] and [Delete] become available from the [Action] dropdown.
Edit
In the case of editing, you can use the same form as a modal dialog that is created when the [Create] button is clicked, and all items except the range can be edited.
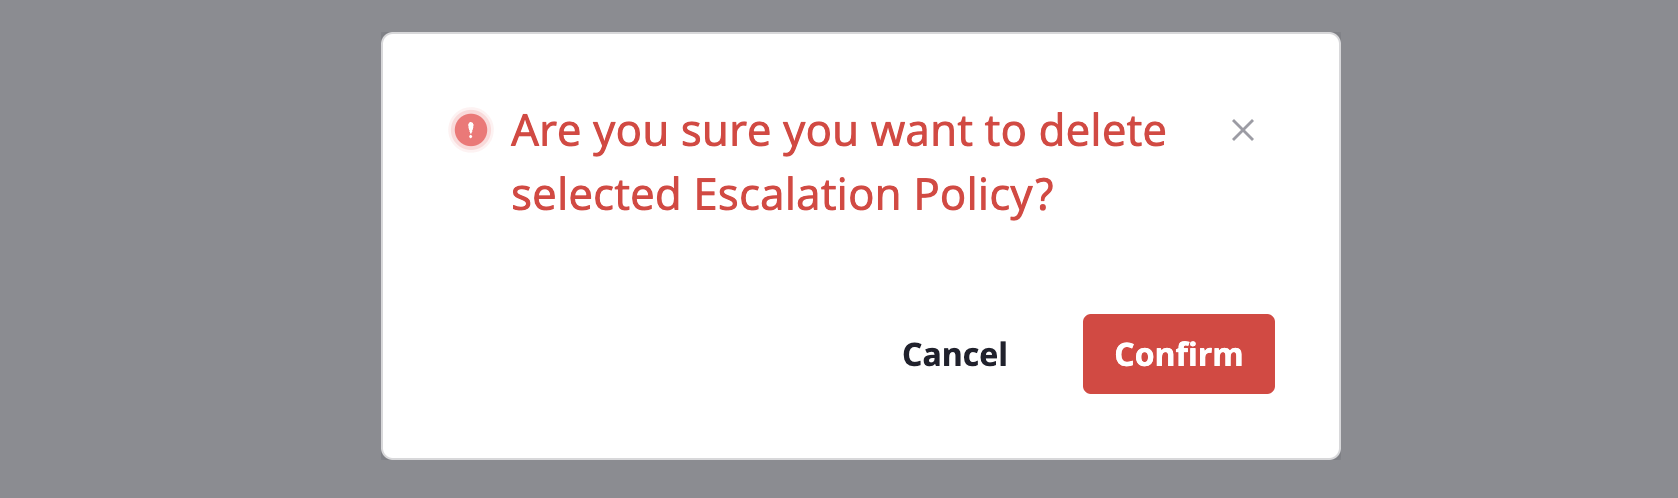
Delete
In case of deletion, you can proceed with deletion through the confirmation modal dialog as shown below: