This the multi-page printable view of this section. Click here to print.
Setup & Operation
- 1: Getting Started
- 2: Installation
- 2.1: AWS
- 2.2: On Premise
- 3: Configuration
1 - Getting Started
Previous version of Cloudforet,
| Version | Installation Guide |
|---|---|
| v1.12 (stable) | https://cloudforet.io/v1-12/docs/setup_operation/quick_install/ |
| v2.x (development) | Current page |
Overview
This is Getting Started Installation guide with minikube.
Note :- This Guide is for developer only.
Cloudforet-Minikube Architecture

Prerequisites
- Minimum requirements for development (2 cores, 8 GB memories, 30GB disk)
| CSP | Possible Instance Type |
|---|---|
| AWS | t3.large , m5.large |
| GCP | n4-standard-2, n1-standard-2 |
| Azure | d2s-v3 |
- Docker/Docker Desktop
- If you don't have Docker installed, minikube will return an error as minikube uses docker as the driver.
- Highly recommend installing Docker Desktop based on your OS.
- Minikube
- Requires minimum Kubernetes version of 1.21+.
- Kubectl
- Helm
- Requires minimum Helm version of 3.11.0+.
- If you want to learn more about Helm, refer to this.
Before diving into the Cloudforet Installation process, start minikube by running the command below.
minikube start --driver=docker --memory=6000mb
Installation
You can install the Cloudforet by the following the steps below.
1) Add Helm Repository
This command wll register Helm repository.
helm repo add cloudforet https://cloudforet-io.github.io/charts
helm repo update
helm search repo cloudforet
2) Create Namespaces
kubectl create ns cloudforet
kubectl create ns cloudforet-plugin
3) Create Role and RoleBinding
First, download the rbac.yaml file.
The rbac.yaml file basically serves as a means to regulate access to computer or network resources based on the roles of individual users. For more information about RBAC Authorization in Kubernetes, refer to this.
If you are used to downloading files via command-line, run this command to download the file. Next, execute the following command.
wget https://raw.githubusercontent.com/cloudforet-io/charts/master/examples-v2/rbac.yaml -O rbac.yaml
kubectl apply -f rbac.yaml -n cloudforet-plugin
4) Install Cloudforet Chart
Download default YAML file for helm chart. Execute the following command.
Current Cloudforet 2.x is development status, so you need to add
--develoption.
wget https://raw.githubusercontent.com/cloudforet-io/charts/master/examples-v2/values/release-2x.yaml -O release-2x.yaml
helm install cloudforet cloudforet/spaceone -n cloudforet -f release-2x.yaml --devel
After executing the above command, check the status of the pod.
Scheduler pods are in
CrashLoopBackOfforErrorstate. This is because the setup is not complete.
kubectl get pod -n cloudforet


NAME                                      READY   STATUS             RESTARTS      AGE
board-5746fd9657-vtd45                    1/1     Running            0             57s
config-5d4c4b7f58-z8k9q                   1/1     Running            0             58s
console-6b64cf66cb-q8v54                  1/1     Running            0             59s
console-api-7c95848cb8-sgt56              2/2     Running            0             58s
console-api-v2-rest-7d64bc85dd-987zn      2/2     Running            0             56s
cost-analysis-7b9d64b944-xw9qg            1/1     Running            0             59s
cost-analysis-scheduler-ff8cc758d-lfx4n   0/1     Error              3 (37s ago)   55s
cost-analysis-worker-559b4799b9-fxmxj     1/1     Running            0             58s
dashboard-b4cc996-mgwj9                   1/1     Running            0             56s
docs-5fb4cc56c7-68qbk                     1/1     Running            0             59s
identity-6fc984459d-zk8r9                 1/1     Running            0             56s
inventory-67498999d6-722bw                1/1     Running            0             57s
inventory-scheduler-5dc6856d44-4spvm      0/1     CrashLoopBackOff   3 (18s ago)   59s
inventory-worker-68d9fcf5fb-x6knb         1/1     Running            0             55s
marketplace-assets-8675d44557-ssm92       1/1     Running            0             59s
mongodb-7c9794854-cdmwj                   1/1     Running            0             59s
monitoring-fdd44bdbf-pcgln                1/1     Running            0             59s
notification-5b477f6c49-gzfl8             1/1     Running            0             59s
notification-scheduler-675696467-gn24j    1/1     Running            0             59s
notification-worker-d88bb6df6-pjtmn       1/1     Running            0             57s
plugin-556f7bc49b-qmwln                   1/1     Running            0             57s
plugin-scheduler-86c4c56d84-cmrmn         0/1     CrashLoopBackOff   3 (13s ago)   59s
plugin-worker-57986dfdd6-v9vqg            1/1     Running            0             58s
redis-75df77f7d4-lwvvw                    1/1     Running            0             59s
repository-5f5b7b5cdc-lnjkl               1/1     Running            0             57s
secret-77ffdf8c9d-48k46                   1/1     Running            0             55s
spacectl-5664788d5d-dtwpr                 1/1     Running            0             59s
statistics-67b77b6654-p9wcb               1/1     Running            0             56s
statistics-scheduler-586875947c-8zfqg     0/1     Error              3 (30s ago)   56s
statistics-worker-68d646fc7-knbdr         1/1     Running            0             58s
supervisor-scheduler-6744657cb6-tpf78     2/2     Running            0             59s
To execute the commands below, every POD except xxxx-scheduler-yyyy must have a Running status.
5) Default Initialization (in spacectl POD)
To use Cloudforet, you have to initialize the root domain, which creates a SYSTEM TOKEN.
Login to the spacectl POD and execute the command below.
kubectl exec -it -n cloudforet spacectl-xxxxx -- /bin/sh
spacectl config init -f default.yaml
root domain yaml file (root.yaml)
---
admin:
    user_id: admin@example.com
    password: Admin123!@#
    name: Admin
Execute the command below to create the root domain.
spacectl exec init identity.System -f root.yaml
6) Update Helm Values
Update your helm values file (ex. release-2x.yaml) and edit the values. There is only one item that need to be updated.
For EC2 users: put in your EC2 server's public IP instead of 127.0.0.1 for both CONSOLE_API and CONSOLE_API_V2 ENDPOINT.
- TOKEN (from the previous step)
console:
  production_json:
    CONSOLE_API:
      ENDPOINT: http://localhost:8081  # http://ec2_public_ip:8081 for EC2 users
    CONSOLE_API_V2:
      ENDPOINT: http://localhost:8082  # http://ec2_public_ip:8082 for EC2 users

global:
  shared_conf:
    TOKEN: 'TOKEN_VALUE_FROM_ABOVE'   # Change the system token
After editing the helm values file(ex. release-2x.yaml), upgrade the helm chart.
helm upgrade cloudforet cloudforet/spaceone -n cloudforet -f release-2x.yaml --devel
After upgrading, delete the pods in cloudforet namespace that have the label app.kubernetes.io/instance and value cloudforet.
kubectl delete po -n cloudforet -l app.kubernetes.io/instance=cloudforet
7) Check the status of the pods
kubectl get pod -n cloudforet
8) Create User Domain (In spacectl POD)
Create a user domain yaml file (domain.yaml)
---
name: spaceone
admin:
  user_id: admin@domain.com
  password: Admin123!@#
  name: Admin
execute the command below to create the user domain.
spacectl config init -f default.yaml
spacectl config set api_key {SYSTEM_TOKEN}
spacectl exec create identity.Domain -f domain.yaml
If all pods are in Running state, the setup is complete.
Port-forwarding
Installing Cloudforet on minikube doesn't provide any Ingress objects such as Amazon ALB or NGINX ingress controller. We can use kubectl port-forward instead.
Run the following commands for port forwarding.
# CLI commands
kubectl port-forward -n cloudforet svc/console 8080:80 --address='0.0.0.0' &
kubectl port-forward -n cloudforet svc/console-api 8081:80 --address='0.0.0.0' &
kubectl port-forward -n cloudforet svc/console-api-v2-rest 8082:80 --address='0.0.0.0' &
Start Cloudforet
Log-In User Domain
For EC2 users: open browser with http://your_ec2_server_ip:8080
Open browser (http://127.0.0.1:8080)
| ID | PASSWORD |
|---|---|
| admin@domain.com | Admin123!@# |
Reference
2 - Installation
2.1 - AWS
Cloudforet Helm Charts
A Helm Chart for Cloudforet 1.12.
Prerequisites
- Kubernetes 1.21+
- Helm 3.2.0+
- Service Domain & SSL Certificate (optional)
- Console:
console.example.com - REST API:
*.api.example.com - gRPC API:
*.grpc.example.com - Webhook:
webhook.example.com
- Console:
- MongoDB 5.0+ (optional)
Cloudforet Architecture

Installation
You can install the Cloudforet using the following the steps.
1) Add Helm Repository
helm repo add cloudforet https://cloudforet-io.github.io/charts
helm repo update
helm search repo cloudforet
2) Create Namespaces
kubectl create ns spaceone
kubectl create ns spaceone-plugin
If you want to use only one namespace, you don't create the spaceone-plugin namespace.
3) Create Role and RoleBinding
First, download the rbac.yaml file.
wget https://raw.githubusercontent.com/cloudforet-io/charts/master/examples/rbac.yaml -O rbac.yaml
And execute the following command.
kubectl apply -f rbac.yaml -n spaceone-plugin
or
kubectl apply -f https://raw.githubusercontent.com/cloudforet-io/charts/master/examples/rbac.yaml -n spaceone-plugin
4) Install Cloudforet Chart
helm install cloudforet cloudforet/spaceone -n spaceone
After executing the above command, check the status of the pod.
kubectl get pod -n spaceone

NAME                                       READY   STATUS             RESTARTS      AGE
board-64f468ccd6-v8wx4                     1/1     Running            0             4m16s
config-6748dc8cf9-4rbz7                    1/1     Running            0             4m14s
console-767d787489-wmhvp                   1/1     Running            0             4m15s
console-api-846867dc59-rst4k               2/2     Running            0             4m16s
console-api-v2-rest-79f8f6fb59-7zcb2       2/2     Running            0             4m16s
cost-analysis-5654566c95-rlpkz             1/1     Running            0             4m13s
cost-analysis-scheduler-69d77598f7-hh8qt   0/1     CrashLoopBackOff   3 (39s ago)   4m13s
cost-analysis-worker-68755f48bf-6vkfv      1/1     Running            0             4m15s
cost-analysis-worker-68755f48bf-7sj5j      1/1     Running            0             4m15s
cost-analysis-worker-68755f48bf-fd65m      1/1     Running            0             4m16s
cost-analysis-worker-68755f48bf-k6r99      1/1     Running            0             4m15s
dashboard-68f65776df-8s4lr                 1/1     Running            0             4m12s
file-manager-5555876d89-slqwg              1/1     Running            0             4m16s
identity-6455d6f4b7-bwgf7                  1/1     Running            0             4m14s
inventory-fc6585898-kjmwx                  1/1     Running            0             4m13s
inventory-scheduler-6dd9f6787f-k9sff       0/1     CrashLoopBackOff   4 (21s ago)   4m15s
inventory-worker-7f6d479d88-59lxs          1/1     Running            0             4m12s
mongodb-6b78c74d49-vjxsf                   1/1     Running            0             4m14s
monitoring-77d9bd8955-hv6vp                1/1     Running            0             4m15s
monitoring-rest-75cd56bc4f-wfh2m           2/2     Running            0             4m16s
monitoring-scheduler-858d876884-b67tc      0/1     Error              3 (33s ago)   4m12s
monitoring-worker-66b875cf75-9gkg9         1/1     Running            0             4m12s
notification-659c66cd4d-hxnwz              1/1     Running            0             4m13s
notification-scheduler-6c9696f96-m9vlr     1/1     Running            0             4m14s
notification-worker-77865457c9-b4dl5       1/1     Running            0             4m16s
plugin-558f9c7b9-r6zw7                     1/1     Running            0             4m13s
plugin-scheduler-695b869bc-d9zch           0/1     Error              4 (59s ago)   4m15s
plugin-worker-5f674c49df-qldw9             1/1     Running            0             4m16s
redis-566869f55-zznmt                      1/1     Running            0             4m16s
repository-8659578dfd-wsl97                1/1     Running            0             4m14s
secret-69985cfb7f-ds52j                    1/1     Running            0             4m12s
statistics-98fc4c955-9xtbp                 1/1     Running            0             4m16s
statistics-scheduler-5b6646d666-jwhdw      0/1     CrashLoopBackOff   3 (27s ago)   4m13s
statistics-worker-5f9994d85d-ftpwf         1/1     Running            0             4m12s
supervisor-scheduler-74c84646f5-rw4zf      2/2     Running            0             4m16s
Scheduler pods are in
CrashLoopBackOfforErrorstate. This is because the setup is not complete.
5) Initialize the Configuration
First, download the initializer.yaml file.
wget https://raw.githubusercontent.com/cloudforet-io/charts/master/examples/initializer.yaml -O initializer.yaml
And execute the following command.
helm install cloudforet-initializer cloudforet/spaceone-initializer -n spaceone -f initializer.yaml
or
helm install cloudforet-initializer cloudforet/spaceone-initializer -n spaceone -f https://raw.githubusercontent.com/cloudforet-io/charts/master/examples/initializer.yaml
For more information about the initializer, please refer the spaceone-initializer.
6) Set the Helm Values and Upgrade the Chart
Complete the initialization, you can get the system token from the initializer pod logs.
# check pod name
kubectl logs initialize-spaceone-xxxx-xxxxx -n spaceone

...
TASK [Print Admin API Key] *********************************************************************************************
"{TOKEN}"

FINISHED [ ok=23, skipped=0 ] ******************************************************************************************

FINISH SPACEONE INITIALIZE
First, copy this TOKEN, then Create the values.yaml file and paste it to the TOKEN.
console:
  production_json:
    # If you don't have a service domain, you refer to the following 'No Domain & IP Access' example.
    CONSOLE_API:
      ENDPOINT: https://console.api.example.com       # Change the endpoint
    CONSOLE_API_V2:
      ENDPOINT: https://console-v2.api.example.com    # Change the endpoint

global:
  shared_conf:
    TOKEN: '{TOKEN}'                                    # Change the system token
For more advanced configuration, please refer the following the links.
- Documents
- Examples
After editing the values.yaml file, upgrade the helm chart.
helm upgrade cloudforet cloudforet/spaceone -n spaceone -f values.yaml
kubectl delete po -n spaceone -l app.kubernetes.io/instance=cloudforet
7) Check the status of the pods
kubectl get pod -n spaceone
If all pods are in Running state, the setup is complete.
8) Ingress and AWS Load Balancer
In Kubernetes, Ingress is an API object that provides a load-balanced external IP address to access Services in your cluster. It acts as a layer 7 (HTTP/HTTPS) reverse proxy and can route traffic to other services based on the requested host and URL path.
For more information, see What is an Application Load Balancer? on AWS and ingress in the Kubernetes documentation.
Prerequisite
Install AWS Load Balancer Controller
AWS Load Balancer Controller is a controller that helps manage ELB (Elastic Load Balancers) in a Kubernetes Cluster. Ingress resources are provisioned with Application Load Balancer, and service resources are provisioned with Network Load Balancer.
Installation methods may vary depending on the environment, so please refer to the official guide document below.
How to set up Cloudforet ingress
1) Ingress Type
Cloudforet provisions a total of 3 ingresses through 2 files.
- Console : Ingress to access the domain
- REST API : Ingress for API service
- console-api
- console-api-v2
2) Console ingress
Setting the ingress to accerss the console is as follows.
cat <<EOF> spaceone-console-ingress.yaml
---
apiVersion: networking.k8s.io/v1
kind: Ingress
metadata:
  name: console-ingress
  namespace: spaceone
  annotations:
    alb.ingress.kubernetes.io/listen-ports: '[{"HTTP": 80}]'
    alb.ingress.kubernetes.io/scheme: internet-facing
    alb.ingress.kubernetes.io/target-type: ip
    alb.ingress.kubernetes.io/load-balancer-attributes: idle_timeout.timeout_seconds=600
    alb.ingress.kubernetes.io/healthcheck-protocol: HTTP
    alb.ingress.kubernetes.io/success-codes: 200-399
    alb.ingress.kubernetes.io/load-balancer-name: spaceone-console-ingress # Caution!! Must be fewer than 32 characters.
spec:
  ingressClassName: alb
  defaultBackend:
    service:
      name: console
      port:
        number: 80
EOF
# Apply ingress
kubectl apply -f spaceone-console-ingress.yaml
If you apply the ingress, it will be provisioned to AWS Load Balancer with the name spaceone-console-ingress. You can connect through the provisioned DNS name using HTTP (80 Port).
3) REST API ingress
Setting the REST API ingress for the API service is as follows.
cat <<EOF> spaceone-rest-ingress.yaml
---
apiVersion: networking.k8s.io/v1
kind: Ingress
metadata:
  name: console-api-ingress
  namespace: spaceone
  annotations:
    alb.ingress.kubernetes.io/listen-ports: '[{"HTTP": 80}]'
    alb.ingress.kubernetes.io/scheme: internet-facing
    alb.ingress.kubernetes.io/target-type: ip
    alb.ingress.kubernetes.io/load-balancer-attributes: idle_timeout.timeout_seconds=600
    alb.ingress.kubernetes.io/healthcheck-protocol: HTTP
    alb.ingress.kubernetes.io/success-codes: 200-399
    alb.ingress.kubernetes.io/load-balancer-name: spaceone-console-api-ingress # Caution!! Must be fewer than 32 characters.
spec:
  ingressClassName: alb
  defaultBackend:
    service:
      name: console-api
      port:
        number: 80
---
apiVersion: networking.k8s.io/v1
kind: Ingress
metadata:
  name: console-api-v2-ingress
  namespace: spaceone
  annotations:
    alb.ingress.kubernetes.io/listen-ports: '[{"HTTP": 80}]'
    alb.ingress.kubernetes.io/scheme: internet-facing
    alb.ingress.kubernetes.io/target-type: ip
    alb.ingress.kubernetes.io/load-balancer-attributes: idle_timeout.timeout_seconds=600
    alb.ingress.kubernetes.io/healthcheck-protocol: HTTP
    alb.ingress.kubernetes.io/success-codes: 200-399
    alb.ingress.kubernetes.io/load-balancer-name: spaceone-console-api-v2-ingress
spec:
  ingressClassName: alb
  defaultBackend:
    service:
      name: console-api-v2-rest
      port:
        number: 80
EOF
# Apply ingress
kubectl apply -f spaceone-rest-ingress.yaml
REST API ingress provisions two ALBs. The DNS Name of the REST API must be saved as console.CONSOLE_API.ENDPOINT and console.CONSOLE_API_V2.ENDPOINT in the values.yaml file.
4) Check DNS Name
The DNS name will be generated as http://{ingress-name}-{random}.{region-code}.elb.amazoneaws.com. You can check this through the kubectl get ingress -n spaceone command in Kubernetes.
kubectl get ingress -n spaceone

NAME                     CLASS   HOSTS   ADDRESS                                                                      PORTS   AGE
console-api-ingress      alb     *       spaceone-console-api-ingress-xxxxxxxxxx.{region-code}.elb.amazonaws.com      80      15h
console-api-v2-ingress   alb     *       spaceone-console-api-v2-ingress-xxxxxxxxxx.{region-code}.elb.amazonaws.com   80      15h
console-ingress          alb     *       spaceone-console-ingress-xxxxxxxxxx.{region-code}.elb.amazonaws.com          80      15h
Or, you can check it in AWS Console. You can check it in EC2 > Load balancer as shown in the image below.

5) Connect with DNS Name
When all ingress is ready, edit the values.yaml file, restart pods, and access the console.
console:
  production_json:
    # If you don't have a service domain, you refer to the following 'No Domain & IP Access' example.
    CONSOLE_API:
      ENDPOINT: http://spaceone-console-api-ingress-xxxxxxxxxx.{region-code}.elb.amazonaws.com
    CONSOLE_API_V2:
      ENDPOINT: http://spaceone-console-api-v2-ingress-xxxxxxxxxx.{region-code}.elb.amazonaws.com
After applying the prepared values.yaml file, restart the pods.
helm upgrade cloudforet cloudforet/spaceone -n spaceone -f values.yaml
kubectl delete po -n spaceone -l app.kubernetes.io/instance=cloudforet
Now you can connect to Cloudforet with the DNS Name of spaceone-console-ingress.
http://spaceone-console-ingress-xxxxxxxxxx.{region-code}.elb.amazonaws.com
Advanced ingress settings
How to register an SSL certificate
We will guide you through how to register a certificate in ingress for SSL communication.
There are two methods for registering a certificate. One is when using ACM(AWS Certificate Manager), and the other is how to register an external certificate.
How to register an ACM certificate with ingress
If the certificate was issued through ACM, you can register the SSL certificate by simply registering acm arn in ingress.
First of all, please refer to the AWS official guide document on how to issue a certificate.
How to register the issued certificate is as follows. Please check the options added or changed for SSL communication in existing ingress.
Check out the changes in ingress.
Various settings for SSL are added and changed. Check the contents ofmetadata.annotations.
Also, check the added contents such asssl-redirectandspec.rules.hostinspec.rules.
- spaceone-console-ingress.yaml
apiVersion: networking.k8s.io/v1
kind: Ingress
metadata:
  name: console-ingress
  namespace: spaceone
  annotations:
+   alb.ingress.kubernetes.io/actions.ssl-redirect: '{"Type": "redirect", "RedirectConfig": { "Protocol": "HTTPS", "Port": "443", "StatusCode": "HTTP_301"}}'
+   alb.ingress.kubernetes.io/listen-ports: '[{"HTTP": 80}, {"HTTPS":443}]'
-   alb.ingress.kubernetes.io/listen-ports: '[{"HTTP": 80}]'
    alb.ingress.kubernetes.io/scheme: internet-facing
    alb.ingress.kubernetes.io/target-type: ip
    alb.ingress.kubernetes.io/load-balancer-attributes: idle_timeout.timeout_seconds=600
    alb.ingress.kubernetes.io/healthcheck-protocol: HTTP
+   alb.ingress.kubernetes.io/certificate-arn: "arn:aws:acm:..."  # Change the certificate-arn
    alb.ingress.kubernetes.io/success-codes: 200-399
    alb.ingress.kubernetes.io/load-balancer-name: spaceone-console-ingress # Caution!! Must be fewer than 32 characters.
spec:
  ingressClassName: alb
- defaultBackend:
-   service:
-     name: console
-     port:
-       number: 80
+ rules:
+   - http:
+       paths:
+         - path: /*
+           pathType: ImplementationSpecific
+           backend:
+             service:
+               name: ssl-redirect
+               port:
+                 name: use-annotation
+   - host: "console.example.com"  # Change the hostname
+     http:
+       paths:
+         - path: /*
+           pathType: ImplementationSpecific
+           backend:
+             service:
+               name: console
+               port:
+                 number: 80
- spaceone-rest-ingress.yaml
apiVersion: networking.k8s.io/v1
kind: Ingress
metadata:
  name: console-api-ingress
  namespace: spaceone
  annotations:
+   alb.ingress.kubernetes.io/actions.ssl-redirect: '{"Type": "redirect", "RedirectConfig": { "Protocol": "HTTPS", "Port": "443", "StatusCode": "HTTP_301"}}'
+   alb.ingress.kubernetes.io/listen-ports: '[{"HTTP": 80}, {"HTTPS":443}]'
-   alb.ingress.kubernetes.io/listen-ports: '[{"HTTP": 80}]'
    alb.ingress.kubernetes.io/scheme: internet-facing
    alb.ingress.kubernetes.io/target-type: ip
    alb.ingress.kubernetes.io/load-balancer-attributes: idle_timeout.timeout_seconds=600
    alb.ingress.kubernetes.io/healthcheck-protocol: HTTP
+   alb.ingress.kubernetes.io/certificate-arn: "arn:aws:acm:..."  # Change the certificate-arn
    alb.ingress.kubernetes.io/success-codes: 200-399
    alb.ingress.kubernetes.io/load-balancer-name: spaceone-console-api-ingress # Caution!! Must be fewer than 32 characters.
spec:
  ingressClassName: alb
- defaultBackend:
-   service:
-     name: console-api
-     port:
-       number: 80
+ rules:
+   - http:
+       paths:
+         - path: /*
+           pathType: ImplementationSpecific
+           backend:
+             service:
+               name: ssl-redirect
+               port:
+                 name: use-annotation
+   - host: "console.api.example.com"  # Change the hostname
+     http:
+       paths:
+         - path: /*
+           pathType: ImplementationSpecific
+           backend:
+             service:
+               name: console-api
+               port:
+                 number: 80
---
apiVersion: networking.k8s.io/v1
kind: Ingress
metadata:
  name: console-api-v2-ingress
  namespace: spaceone
  annotations:
+   alb.ingress.kubernetes.io/actions.ssl-redirect: '{"Type": "redirect", "RedirectConfig": { "Protocol": "HTTPS", "Port": "443", "StatusCode": "HTTP_301"}}'
+   alb.ingress.kubernetes.io/listen-ports: '[{"HTTP": 80}, {"HTTPS":443}]'
-   alb.ingress.kubernetes.io/listen-ports: '[{"HTTP": 80}]'
    alb.ingress.kubernetes.io/scheme: internet-facing
    alb.ingress.kubernetes.io/target-type: ip
    alb.ingress.kubernetes.io/load-balancer-attributes: idle_timeout.timeout_seconds=600
    alb.ingress.kubernetes.io/healthcheck-protocol: HTTP
+   alb.ingress.kubernetes.io/certificate-arn: "arn:aws:acm:..."  # Change the certificate-arn
    alb.ingress.kubernetes.io/success-codes: 200-399
    alb.ingress.kubernetes.io/load-balancer-name: spaceone-console-api-v2-ingress
spec:
  ingressClassName: alb
- defaultBackend:
-   service:
-     name: console-api-v2-rest
-     port:
-       number: 80
+ rules:
+   - http:
+       paths:
+         - path: /*
+           pathType: ImplementationSpecific
+           backend:
+             service:
+               name: ssl-redirect
+               port:
+                 name: use-annotation
+   - host: "console-v2.api.example.com"  # Change the hostname
+     http:
+       paths:
+         - path: /*
+           pathType: ImplementationSpecific
+           backend:
+             service:
+               name: console-api-v2-rest
+               port:
+                 number: 80
SSL application is completed when the changes are reflected through the kubectl command.
kubectl apply -f spaceone-console-ingress.yaml
kubectl apply -f spaceone-rest-ingress.yaml
How to register an SSL/TLS certificate
Certificate registration is possible even if you have an external certificate that was previously issued. You can register by adding a Kubernetes secret using the issued certificate and declaring the added secret name in ingress.
Create SSL/TLS certificates as Kubernetes secrets. There are two ways:
1. Using yaml file
You can add a secret to a yaml file using the command below.
kubectl apply -f <<EOF> tls-secret.yaml
apiVersion: v1
data:
  tls.crt: {your crt}   # crt
  tls.key: {your key}   # key
kind: Secret
metadata:
  name: tls-secret
  namespace: spaceone
type: kubernetes.io/tls
EOF
2. How to use the command if a file exists
If you have a crt and key file, you can create a secret using the following command.
kubectl create secret tls tlssecret --key tls.key --cert tls.crt
Add tls secret to Ingress
Modify ingress using registered secret information.
ingress-nginx settings
Using secret and tls may require setup methods using ingress-nginx. For more information, please refer to the following links:
apiVersion: networking.k8s.io/v1
kind: Ingress
metadata:
  name: console-ingress
  namespace: spaceone
  annotations:
    alb.ingress.kubernetes.io/actions.ssl-redirect: '{"Type": "redirect", "RedirectConfig": { "Protocol": "HTTPS", "Port": "443", "StatusCode": "HTTP_301"}}'
    alb.ingress.kubernetes.io/listen-ports: '[{"HTTP": 80}, {"HTTPS":443}]'
    alb.ingress.kubernetes.io/scheme: internet-facing
    alb.ingress.kubernetes.io/target-type: ip
    alb.ingress.kubernetes.io/load-balancer-attributes: idle_timeout.timeout_seconds=600
    alb.ingress.kubernetes.io/healthcheck-protocol: HTTP
    alb.ingress.kubernetes.io/success-codes: 200-399
    alb.ingress.kubernetes.io/load-balancer-name: spaceone-console-ingress # Caution!! Must be fewer than 32 characters.
spec:
  tls:
  - hosts:
      - console.example.com        # Change the hostname
    secretName: tlssecret          # Insert secret name
  rules:
    - http:
        paths:
          - path: /*
            pathType: ImplementationSpecific
            backend:
              service:
                name: ssl-redirect
                port:
                  name: use-annotation
    - host: "console.example.com"  # Change the hostname
      http:
        paths:
          - path: /*
            pathType: ImplementationSpecific
            backend:
              service:
                name: console
                port:
                  number: 80
2.2 - On Premise

Prerequisites
Kubernetes 1.21+ : https://kubernetes.io/docs/setup/
Kubectl command-line tool : https://kubernetes.io/docs/tasks/tools/
Helm 3.11.0+ : https://helm.sh/docs/intro/install/
Nginx Ingress Controller : https://kubernetes.github.io/ingress-nginx/deploy/
Install Cloudforet
It guides you on how to install Cloudforet using Helm chart. Related information is also available at: https://github.com/cloudforet-io/charts
1. Add Helm Repository
# Set working directory
mkdir cloudforet-deployment
cd cloudforet-deployment
wget https://github.com/cloudforet-io/charts/releases/download/spaceone-1.12.12/spaceone-1.12.12.tgz
tar zxvf spaceone-1.12.12.tgz
2. Create Namespaces
kubectl create ns cloudforet
kubectl create ns cloudforet-plugin
Cautions of creation namespace
If you need to use only one namespace, you do not need to create thecloudforet-pluginnamespace.
After changing the Cloudforet namespace, please refer to the following link. Change K8S Namespace
3. Create Role and RoleBinding
First, download the rbac.yaml file.
The rbac.yaml file basically serves as a means to regulate access to computer or network resources based on the roles of individual users. For more information about RBAC Authorization in Kubernetes, refer to this.
If you are used to downloading files via command-line, run this command to download the file.
wget https://raw.githubusercontent.com/cloudforet-io/charts/master/examples/rbac.yaml -O rbac.yaml
Next, execute the following command.
kubectl apply -f rbac.yaml -n cloudforet-plugin
4. Install
Download default YAML file for helm chart.
wget https://raw.githubusercontent.com/cloudforet-io/charts/master/examples/values/release-1-12.yaml -O release-1-12.yaml
helm install cloudforet spaceone -n cloudforet -f release-1-12.yaml
After executing the above command, check the status of the pod.
Scheduler pods are in
CrashLoopBackOfforErrorstate. This is because the setup is not complete.
kubectl get pod -n cloudforet

NAME                                       READY   STATUS             RESTARTS      AGE
board-64f468ccd6-v8wx4                     1/1     Running            0             4m16s
config-6748dc8cf9-4rbz7                    1/1     Running            0             4m14s
console-767d787489-wmhvp                   1/1     Running            0             4m15s
console-api-846867dc59-rst4k               2/2     Running            0             4m16s
console-api-v2-rest-79f8f6fb59-7zcb2       2/2     Running            0             4m16s
cost-analysis-5654566c95-rlpkz             1/1     Running            0             4m13s
cost-analysis-scheduler-69d77598f7-hh8qt   0/1     CrashLoopBackOff   3 (39s ago)   4m13s
cost-analysis-worker-68755f48bf-6vkfv      1/1     Running            0             4m15s
cost-analysis-worker-68755f48bf-7sj5j      1/1     Running            0             4m15s
cost-analysis-worker-68755f48bf-fd65m      1/1     Running            0             4m16s
cost-analysis-worker-68755f48bf-k6r99      1/1     Running            0             4m15s
dashboard-68f65776df-8s4lr                 1/1     Running            0             4m12s
file-manager-5555876d89-slqwg              1/1     Running            0             4m16s
identity-6455d6f4b7-bwgf7                  1/1     Running            0             4m14s
inventory-fc6585898-kjmwx                  1/1     Running            0             4m13s
inventory-scheduler-6dd9f6787f-k9sff       0/1     CrashLoopBackOff   4 (21s ago)   4m15s
inventory-worker-7f6d479d88-59lxs          1/1     Running            0             4m12s
mongodb-6b78c74d49-vjxsf                   1/1     Running            0             4m14s
monitoring-77d9bd8955-hv6vp                1/1     Running            0             4m15s
monitoring-rest-75cd56bc4f-wfh2m           2/2     Running            0             4m16s
monitoring-scheduler-858d876884-b67tc      0/1     Error              3 (33s ago)   4m12s
monitoring-worker-66b875cf75-9gkg9         1/1     Running            0             4m12s
notification-659c66cd4d-hxnwz              1/1     Running            0             4m13s
notification-scheduler-6c9696f96-m9vlr     1/1     Running            0             4m14s
notification-worker-77865457c9-b4dl5       1/1     Running            0             4m16s
plugin-558f9c7b9-r6zw7                     1/1     Running            0             4m13s
plugin-scheduler-695b869bc-d9zch           0/1     Error              4 (59s ago)   4m15s
plugin-worker-5f674c49df-qldw9             1/1     Running            0             4m16s
redis-566869f55-zznmt                      1/1     Running            0             4m16s
repository-8659578dfd-wsl97                1/1     Running            0             4m14s
secret-69985cfb7f-ds52j                    1/1     Running            0             4m12s
statistics-98fc4c955-9xtbp                 1/1     Running            0             4m16s
statistics-scheduler-5b6646d666-jwhdw      0/1     CrashLoopBackOff   3 (27s ago)   4m13s
statistics-worker-5f9994d85d-ftpwf         1/1     Running            0             4m12s
supervisor-scheduler-74c84646f5-rw4zf      2/2     Running            0             4m16s
To execute the commands below, every POD except xxxx-scheduler-yyyy must have a Running status.
5) Initialize the Configuration
First, download the initializer.yaml file.
For more information about the initializer, please refer to the spaceone-initializer.
If you are used to downloading files via command-line, run this command to download the file.
wget https://raw.githubusercontent.com/cloudforet-io/charts/master/examples/initializer.yaml -O initializer.yaml
And execute the following command.
wget https://github.com/cloudforet-io/charts/releases/download/spaceone-initializer-1.3.3/spaceone-initializer-1.3.3.tgz
tar zxvf spaceone-initializer-1.3.3.tgz
helm install initializer spaceone-initializer -n cloudforet -f initializer.yaml
6) Set the Helm Values and Upgrade the Chart
Complete the initialization, you can get the system token from the initializer pod logs.
To figure out the pod name for the initializer, run this command first to show all pod names for namespace spaceone.
kubectl get pods -n cloudforet
Then, among the pods shown copy the name of the pod that starts with initialize-spaceone.
NAME                                       READY   STATUS      RESTARTS   AGE
board-5997d5688-kq4tx                      1/1     Running     0          24m
config-5947d845b5-4ncvn                    1/1     Running     0          24m
console-7fcfddbd8b-lbk94                   1/1     Running     0          24m
console-api-599b86b699-2kl7l               2/2     Running     0          24m
console-api-v2-rest-cb886d687-d7n8t        2/2     Running     0          24m
cost-analysis-8658c96f8f-88bmh             1/1     Running     0          24m
cost-analysis-scheduler-67c9dc6599-k8lgx   1/1     Running     0          24m
cost-analysis-worker-6df98df444-5sjpm      1/1     Running     0          24m
dashboard-84d8969d79-vqhr9                 1/1     Running     0          24m
docs-6b9479b5c4-jc2f8                      1/1     Running     0          24m
identity-6d7bbb678f-b5ptf                  1/1     Running     0          24m
initialize-spaceone-fsqen-74x7v            0/1     Completed   0          98m
inventory-64d6558bf9-v5ltj                 1/1     Running     0          24m
inventory-scheduler-69869cc5dc-k6fpg       1/1     Running     0          24m
inventory-worker-5649876687-zjxnn          1/1     Running     0          24m
marketplace-assets-5fcc55fb56-wj54m        1/1     Running     0          24m
mongodb-b7f445749-2sr68                    1/1     Running     0          101m
monitoring-799cdb8846-25w78                1/1     Running     0          24m
notification-c9988d548-gxw2c               1/1     Running     0          24m
notification-scheduler-7d4785fd88-j8zbn    1/1     Running     0          24m
notification-worker-586bc9987c-kdfn6       1/1     Running     0          24m
plugin-79976f5747-9snmh                    1/1     Running     0          24m
plugin-scheduler-584df5d649-cflrb          1/1     Running     0          24m
plugin-worker-58d5cdbff9-qk5cp             1/1     Running     0          24m
redis-b684c5bbc-528q9                      1/1     Running     0          24m
repository-64fc657d4f-cbr7v                1/1     Running     0          24m
secret-74578c99d5-rk55t                    1/1     Running     0          24m
spacectl-8cd55f46c-xw59j                   1/1     Running     0          24m
statistics-767d84bb8f-rrvrv                1/1     Running     0          24m
statistics-scheduler-65cc75fbfd-rsvz7      1/1     Running     0          24m
statistics-worker-7b6b7b9898-lmj7x         1/1     Running     0          24m
supervisor-scheduler-555d644969-95jxj      2/2     Running     0          24m
To execute the below kubectl logs command, the status of POD(Ex: here initialize-spaceone-fsqen-74x7v) should be Completed . Proceeding with this while the POD is INITIALIZING will give errors
Get the token by getting the log information of the pod with the name you found above.
kubectl logs initialize-spaceone-fsqen-74x7v -n cloudforet

...
TASK [Print Admin API Key] *********************************************************************************************
"TOKEN_SHOWN_HERE"

FINISHED [ ok=23, skipped=0 ] ******************************************************************************************

FINISH SPACEONE INITIALIZE
Update your helm values file (ex. release-1-12.yaml) and edit the values. There is only one item that need to be updated.
For EC2 users: put in your EC2 server's public IP instead of 127.0.0.1 for both CONSOLE_API and CONSOLE_API_V2 ENDPOINT.
- TOKEN
console:
  production_json:
    CONSOLE_API:
      ENDPOINT: https://console-v1.api.example.com  # Change to your domain (example.com)
    CONSOLE_API_V2:
      ENDPOINT: https://console-v2.api.example.com  # Change to your domain (example.com)

global:
  shared_conf:
    TOKEN: 'TOKEN_VALUE_FROM_ABOVE'   # Change the system token
After editing the helm values file(ex. release-1-12.yaml), upgrade the helm chart.
helm upgrade cloudforet spaceone -n cloudforet -f release-1-12.yaml
After upgrading, delete the pods in cloudforet namespace that have the label app.kubernetes.io/instance and value cloudforet.
kubectl delete po -n cloudforet -l app.kubernetes.io/instance=cloudforet
7. Check the status of the pods
Check the status of the pod with the following command. If all pods are in Running state, the installation is complete.
kubectl get pod -n cloudforet
8. Configuration Ingress
Kubernetes Ingress is a resource that manages connections between services in a cluster and external connections. Cloudforet is serviced by registering the generated certificate as a secret and adding an ingress in the order below.
Install Nginx Ingress Controller
An ingress controller is required to use ingress in an on-premise environment. Here is a link to the installation guide for Nginx Ingress Controller supported by Kubernetes.
- Nginx Ingress Controller : https://kubernetes.github.io/ingress-nginx/deploy/
Case 1) cert-manager with Letsencrypt
If you want to use a free SSL certificate, you can use cert-manager with Letsencrypt.
- Cert-manager & Letsencrypt : https://dev.to/choonho/install-cert-manager-lets-encrypt-443b
- file: cloudforet-ingress.yaml
---
apiVersion: networking.k8s.io/v1
kind: Ingress
metadata:
  name: console-ingress
  namespace: cloudforet
  annotations:
    cert-manager.io/cluster-issuer: "letsencrypt-prod"
    kubernetes.io/ingress.class: "nginx"
spec:
  tls:
  - hosts:
    - console.example.com
    - console-v1.api.example.com
    - console-v2.api.example.com
    - webhook.api.example.com
    secretName: console-tls
  rules:
    - host: "console.example.com"  # Change the hostname
      http:
        paths:
          - path: /
            pathType: Prefix
            backend:
              service:
                name: console
                port:
                  number: 80
    - host: "console-v1.api.example.com"  # Change the hostname
      http:
        paths:
          - path: /
            pathType: Prefix
            backend:
              service:
                name: console-api
                port:
                  number: 80
    - host: "console-v2.api.example.com"  # Change the hostname
      http:
        paths:
          - path: /
            pathType: Prefix
            backend:
              service:
                name: console-api-v2-rest
                port:
                  number: 80
    - host: "webhook.api.example.com"  # Change the hostname
      http:
        paths:
          - path: /
            pathType: Prefix
            backend:
              service:
                name: monitoring-rest
                port:
                  number: 80
Crete the prepared ingress in the cloudforet namespace with the command below.
kubectl apply -f cloudforet-ingress.yaml -n cloudforet
Case 2) Generate self-managed SSL
Create a private ssl certificate using the openssl command below. (If an already issued certificate exists, you can create a Secret using the issued certificate. For detailed instructions, please refer to the following link. Create secret by exist cert)
openssl req -x509 -nodes -days 365 -newkey rsa:2048 -keyout console_ssl.pem -out console_ssl.csr -subj "/CN=console.example.com/O=cloudforet" -addext "subjectAltName = DNS:*.api.example.com"
Create secret for ssl
If the certificate is ready, create a secret using the certificate file.
kubectl create secret tls console-tls --key console_ssl.pem --cert console_ssl.csr
Create Ingress
Each file is as follows. Change the hostname inside the file to match the domain of the certificate you created.
---
apiVersion: networking.k8s.io/v1
kind: Ingress
metadata:
  name: console-ingress
  namespace: cloudforet
  annotations:
    kubernetes.io/ingress.class: "nginx"
spec:
  tls:
  - hosts:
    - console.example.com
    - console-v1.api.example.com
    - console-v2.api.example.com
    - webhook.api.example.com
    secretName: console-tls
  rules:
    - host: "console.example.com"  # Change the hostname
      http:
        paths:
          - path: /
            pathType: Prefix
            backend:
              service:
                name: console
                port:
                  number: 80
    - host: "console-v1.api.example.com"  # Change the hostname
      http:
        paths:
          - path: /
            pathType: Prefix
            backend:
              service:
                name: console-api
                port:
                  number: 80
    - host: "console-v2.api.example.com"  # Change the hostname
      http:
        paths:
          - path: /
            pathType: Prefix
            backend:
              service:
                name: console-api-v2-rest
                port:
                  number: 80
    - host: "webhook.api.example.com"  # Change the hostname
      http:
        paths:
          - path: /
            pathType: Prefix
            backend:
              service:
                name: monitoring-rest
                port:
                  number: 80
Create the prepared ingress in the cloudforet namespace with the command below.
kubectl apply -f cloudforet-ingress.yaml -n cloudforet
Connect to the Console
Connect to the Cloudforet Console service.
Advanced Configurations
Additional settings are required for the following special features. Below are examples and solutions for each situation.
| Name | Description |
|---|---|
| Set Plugin Certificate | This is how to set a certificate for each plugin when using a private certificate. |
| Support Private Image Registry | In an environment where communication with the outside is blocked for organization's security reasons, you can operate your own Private Image Registry. In this case, Container Image Sync operation is required, and Cloudforet suggests a method using the dregsy tool. |
| Change K8S Namespace | Namespace usage is limited by each environment, or you can use your own namespace name. Here is how to change Namespace in Cloudforet. |
| Set HTTP Proxy | In the on-premise environment with no Internet connection, proxy settings are required to communicate with the external world. Here's how to set up HTTP Proxy. |
| Set K8S ImagePullSecrets | If you are using Private Image Registry, you may need credentials because user authentication is set. In Kubernetes, you can use secrets to register credentials with pods. Here's how to set ImagePullSecrets. |
3 - Configuration
3.1 - Set plugin certificate
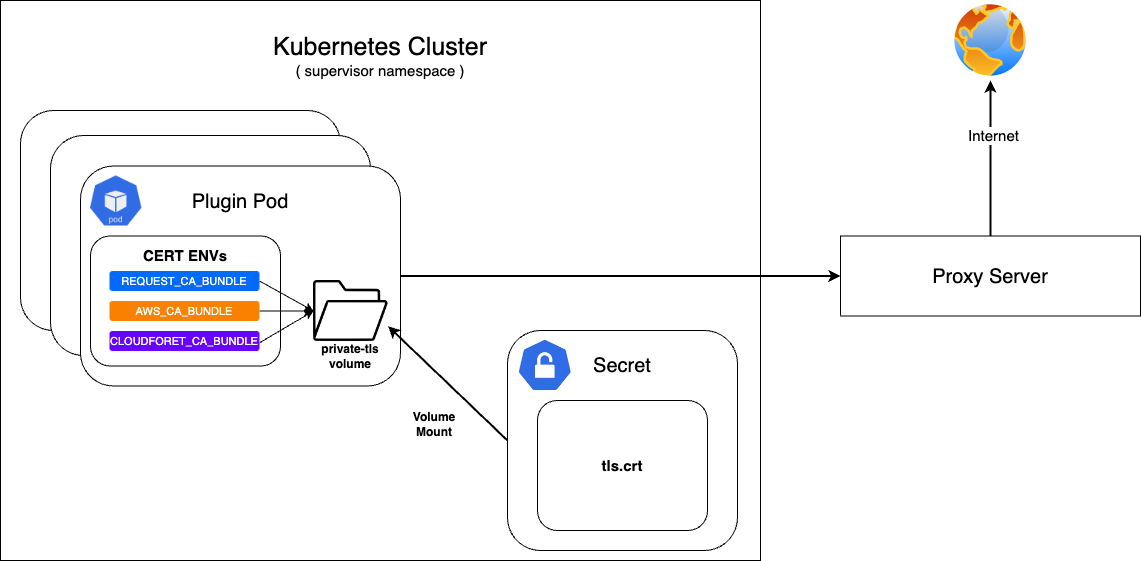
If Cloudforet is built in an on-premise environment, it can be accessed through a proxy server without direct communication with the Internet.
At this time, a private certificate is required when communicating with the proxy server.
First, configure the secret with the prepared private certificate and mount it on the private-tls volume.
After that, set the value of various environment variables required to set the certificate in supervisor's KubernetesConnectorto be the path of tls.crt in the private-tls volume.
Register the prepared private certificate as a Kubernetes Secret
| Parameter | Description | Default |
|---|---|---|
| apiVersion | API version of resource | v1 |
| kind | Kind of resource | Secret |
| metadata | Metadata of resource | {...} |
| metadata.name | Name of resource | private-tls |
| metadata.namespace | Namespace of resource | spaceone |
| data | Data of resource | tls.crt |
| type | Type of resource | kubernetes.io/tls |
kubectl apply -f create_tls_secret.yml
---
apiVersion: v1
kind: Secret
metadata:
  name: spaceone-tls
  namespace: spaceone
data:
  tls.crt: base64 encoded cert  # openssl base64 -in cert.pem -out cert.base64
type: kubernetes.io/tls
Set up on KubernetesConnector of supervisor
| Parameter | Description | Default |
|---|---|---|
| supervisor.application_scheduler | Configuration of supervisor scheduler | {...} |
| supervisor.application_scheduler.CONNECTORS.KubernetesConnector.env[] | Environment variables for plugin | [...] |
| supervisor.application_scheduler.CONNECTORS.KubernetesConnector.env[].name | Name of environment variable | REQUESTS_CA_BUNDLE, AWS_CA_BUNDLE, CLOUDFORET_CA_BUNDLE |
| supervisor.application_scheduler.CONNECTORS.KubernetesConnector.env[].value | Value of environment variable | /opt/ssl/cert/tls.crt |
| supervisor.application_scheduler.CONNECTORS.KubernetesConnector.volumes[] | Volumes for plugin | [...] |
| supervisor.application_scheduler.CONNECTORS.KubernetesConnector.volumes[].name | Name of volumes | private-tls |
| supervisor.application_scheduler.CONNECTORS.KubernetesConnector.volumes[].secret.secretName | Secret name of secret volume | private-tls |
| supervisor.application_scheduler.CONNECTORS.KubernetesConnector.volumeMounts[] | Volume mounts of plugins | [...] |
| supervisor.application_scheduler.CONNECTORS.KubernetesConnector.volumeMounts[].name | Name of volume mounts | private-tls |
| supervisor.application_scheduler.CONNECTORS.KubernetesConnector.volumeMounts[].mountPath | Path of volume mounts | /opt/ssl/cert/tls.crt |
| supervisor.application_scheduler.CONNECTORS.KubernetesConnector.volumeMounts[].readOnly | Read permission on the mounted volume | true |
supervisor:
  enabled: true
  image:
    name: spaceone/supervisor
    version: x.y.z

  imagePullSecrets:
    - name: my-credential

  application_scheduler:
    CONNECTORS:
      KubernetesConnector:
        env:
          - name: REQUESTS_CA_BUNDLE
            value: /opt/ssl/cert/tls.crt
          - name: AWS_CA_BUNDLE
            value: /opt/ssl/cert/tls.crt
          - name: CLOUDFORET_CA_BUNDLE
            value: /opt/ssl/cert/tls.crt
        volumes:
          - name: private-tls
            secret:
              secretName: private-tls
        volumeMounts:
          - name: private-tls
            mountPath: /opt/ssl/cert/tls.crt
            readOnly: true
Update
You can apply the changes through the helm upgrade command and by deleting the pods
helm upgrade cloudforet cloudforet/spaceone -n spaceone -f values.yaml
kubectl delete po -n spaceone -l app.kubernetes.io/instance=cloudforet
3.2 - Change kubernetes namespace
When Cloudforet is installed in the K8S environment, the core service is installed in spaceone and the plugin service for extension function is installed in spaceone-plugin namespace. (In v1.11.5 and below, it is installed in root-supervisor.)
If the user wants to change the core service or plugin service to a namespace with a different name or to install in a single namespace, the namespace must be changed through options.
In order to change the namespace, you need to write changes in Cloudforet's values.yaml. Changes can be made to each core service and plugin service.
Change the namespace of the core service
To change the namespace of the core service, add the spaceone-namespace value by declaring global.namespace in the values.yaml file.
#console:
#  production_json:
#    CONSOLE_API:
#      ENDPOINT: https://console.api.example.com        # Change the endpoint
#    CONSOLE_API_V2:
#      ENDPOINT: https://console-v2.api.example.com     # Change the endpoint

global:
  namespace: spaceone-namespace                         # Change the namespace
  shared_conf:
Change the namespace of plugin service
You can change the namespace of supervisor's plugin service as well as the core service. Life-cycle of plugin service is managed by supervisor, and plugin namespace setting is also set in supervisor.
Below is the part where supervisor is set to change the namespace of the plugin service in the values.yaml file. Add the plugin-namespace value to supervisor.application_scheduler.CONNECTORS.KubernetesConnector.namespace.
#console:
supervisor:
  application_scheduler:
    HOSTNAME: spaceone.svc.cluster.local                # Change the hostname
    CONNECTORS:
      KubernetesConnector:
        namespace: plugin-namespace                     # Change the namespace
Update
You can apply the changes through the helm upgrade command and by deleting the pods.
helm upgrade cloudforet cloudforet/spaceone -n spaceone -f values.yaml
kubectl delete po -n spaceone -l app.kubernetes.io/instance=cloudforet
3.3 - Creating and applying kubernetes imagePullSecrets
Due to organization's security requirements, User can Build and utilize a private dedicated image registry to manage private images.
To pull container images from a private image registry, credentials are required. In Kubernetes, Secrets can be used to register such credentials with pods, enabling them to retrieve and pull private container images.
For more detailed information, please refer to the official documentation.
Creating a Secret for credentials.
Kubernetes pods can pull private container images using a Secret of type kubernetes.io/dockerconfigjson.
To do this, create a secret for credentials based on registry credentials.
kubectl create secret docker-registry my-credential --docker-server=<your-registry-server> --docker-username=<your-name> --docker-password=<your-pword> --docker-email=<your-email>
Mount the credentials Secret to a Pod.
You can specify imagePullSecrets in the helm chart values of Cloudforet to mount the credentials Secret to the pods.
WARN: Kubernetes Secret is namespace-scoped resources, so they need to exist in the same namespace.
Set imagePullSecrets configuration for the core service
| Parameter | description | Default |
|---|---|---|
| [services].imagePullSecrets[]] | imagePullSecrets configuration(* Each micro service section) | [] |
| [services].imagePullSecrets[].name | Name of secret type of kubernetes.io/dockerconfigjson | "" |
console:
    enable: true
    image:
      name: spaceone/console
      version: x.y.z

    imagePullSecrets:
      - name: my-credential

console-api:
    enable: true
    image:
      name: spaceone/console-api
      version: x.y.z

    imagePullSecrets:
      - name: my-credential

(...)
Set imagePullSecrets configuration for the plugin
| Parameter | description | Default |
|---|---|---|
| supervisor.application_scheduler | Configuration of supervisor scheduler | {...} |
| supervisor.application_scheduler.CONNECTORS.KubernetesConnector.imagePullSecrets[] | imagePullSecrets configuration for plugin | [] |
| supervisor.application_scheduler.CONNECTORS.KubernetesConnector.imagePullSecrets[].name | Name of secret type of kubernetes.io/dockerconfigjson for plugin | "" |
supervisor:
    enabled: true
    image:
      name: spaceone/supervisor
      version: x.y.z

    imagePullSecrets:
      - name: my-credential

    application_scheduler:
      CONNECTORS:
          KubernetesConnector:
              imagePullSecrets:
                - name: my-credential
Update
You can apply the changes through the helm upgrade command and by deleting the pods
helm upgrade cloudforet cloudforet/spaceone -n spaceone -f values.yaml
kubectl delete po -n spaceone -l app.kubernetes.io/instance=cloudforet
3.4 - Setting up http proxy
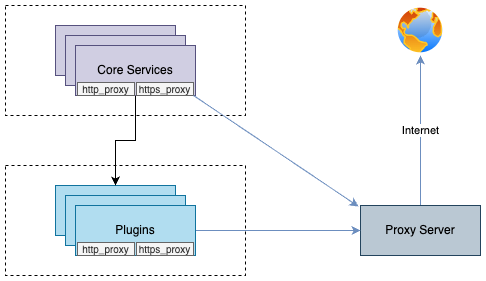
You can enable communication from pods to the external world through a proxy server by declaring the http_proxy and https_proxy environment variables.
This configuration is done by declaring http_proxy and https_proxy in the environment variables of each container.
no_proxyenvironment variable is used to exclude destinations from proxy communication.
For Cloudforet, It is recommended to exclude the service domains within the cluster for communication between micro services.
Example
Set roxy configuration for the core service
| Parameter | description | Default |
|---|---|---|
| global.common_env[] | Environment Variable for all micro services | [] |
| global.common_env[].name | Name of environment variable | "" |
| global.common_env[].value | Value of environment variable | "" |
global:
  common_env:
    - name: HTTP_PROXY
      value: http://{proxy_server_address}:{proxy_port}
    - name: HTTPS_PROXY
      value: http://{proxy_server_address}:{proxy_port}
    - name: no_proxy
      value: .svc.cluster.local,localhost,{cluster_ip},board,config,console,console-api,console-api-v2,cost-analysis,dashboard,docs,file-manager,identity,inventory,marketplace-assets,monitoring,notification,plugin,repository,secret,statistics,supervisor
Set proxy configuration for the plugin
| Parameter | description | Default |
|---|---|---|
| supervisor.application_scheduler | Configuration of supervisor schduler | {...} |
| supervisor.application_scheduler.CONNECTORS.KubernetesConnector.env[] | Environment Variable for plugin | [] |
| supervisor.application_scheduler.CONNECTORS.KubernetesConnector.env[].name | Name of environment variable | "" |
| supervisor.application_scheduler.CONNECTORS.KubernetesConnector.env[].value | Name of environment variable | "" |
WRAN:
Depending on your the installation environment, the default local domain may differ, so you need to change the default local domain such as.svc.cluster.localto match your environment. You can check the current cluster DNS settings with the following command.kubectl run -it --rm busybox --image=busybox --restart=Never -- cat /etc/resolv.conf
supervisor:
    enabled: true
    image:
      name: spaceone/supervisor
      version: x.y.z

    imagePullSecrets:
      - name: my-credential

    application_scheduler:
      CONNECTORS:
        KubernetesConnector:
          env:
            - name: HTTP_PROXY
              value: http://{proxy_server_address}:{proxy_port}
            - name: HTTPS_PROXY
              value: http://{proxy_server_address}:{proxy_port}
            - name: no_proxy
              value: .svc.cluster.local,localhost,{cluster_ip},board,config,console,console-api,console-api-v2,cost-analysis,dashboard,docs,file-manager,identity,inventory,marketplace-assets,monitoring,notification,plugin,repository,secret,statistics,supervisor
Update
You can apply the changes through the helm upgrade command and by deleting the pods
helm upgrade cloudforet cloudforet/spaceone -n spaceone -f values.yaml
kubectl delete po -n spaceone -l app.kubernetes.io/instance=cloudforet
3.5 - Support private image registry
In organizations operating in an on-premise environment, there are cases where they establish and operate their own container registry within the internal network due to security concerns.
In such environments, when installing Cloudforet, access to external networks is restricted, requiring the preparation of images from Dockerhub and syncing them to their own container registry.
To automate the synchronization of container images in such scenarios, Cloudforet proposes using a Container Registry Sync tool called 'dregsy' to periodically sync container images.
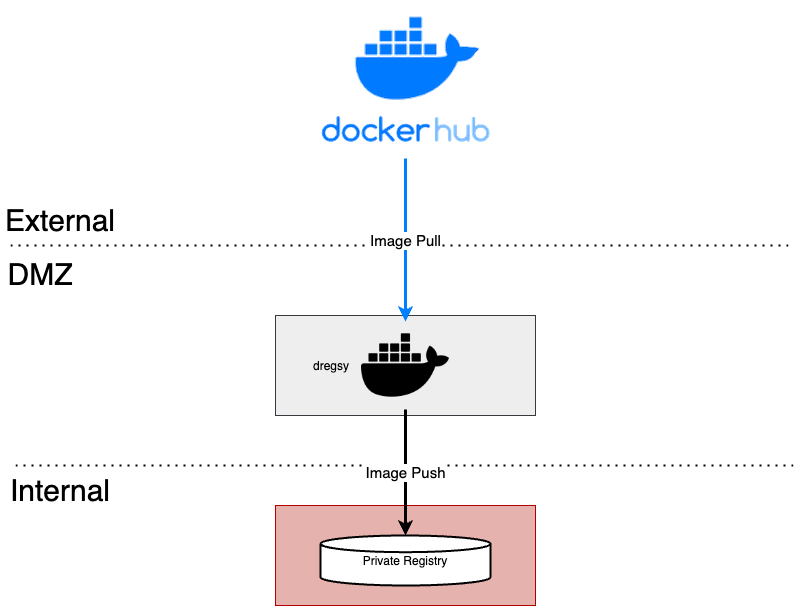
In an environment situated between an external network and an internal network, dregsy is executed.
This tool periodically pulls specific container images from Dockerhub and uploads them to the organization's private container registry.
NOTE:
The dregsy tool described in this guide always pulls container images from Dockerhub, regardless of whether the images already exist in the destination registry.
And, Docker Hub limits the number of Docker image downloads, or pulls based on the account type of the user pulling the image
- For anonymous users, the rate limit is set to 100 pulls per 6 hours per IP address
- For authenticated users, it’s 200 pulls per 6 hour period.
- Users with a paid Docker subscription get up to 5000 pulls per day.
Install and Configuration
NOTE:
In this configuration, communication with Dockerhub is required, so it should be performed in an environment with internet access.
Also, this explanation is based on the installation of Cloudforet version 1.11.x
Prerequisite
- docker (Install Docker Engine)
Installation
Since the tools are executed using Docker, there is no separate installation process required.

The plan is to pull and run the dregsy image, which includes skopeo (mirror tool).
Configuration
- Create files
touch /path/to/your/dregsy-spaceone-core.yaml
touch /path/to/your/dregsy-spaceone-plugin.yaml
- Add configuration (dregsy-spaceone-core.yaml)
If authentication to the registry is configured with
username:password,
the information is encoded and set in the 'auth' field as shown below (example - lines 19 and 22 of the configuration).echo '{"username": "...", "password": "..."}' | base64
In the case of Harbor, Robot Token is not supported for authentication.
Please authenticate by encoding the username:password
relay: skopeo
watch: true

skopeo:
  binary: skopeo
  certs-dir: /etc/skopeo/certs.d

lister:
  maxItems: 100
  cacheDuration: 2h

tasks:
  - name: sync_spaceone_doc
    interval: 21600 # 6 hours
    verbose: true

    source:
      registry: registry.hub.docker.com
      auth: {Token}                 # replace to your dockerhub token
    target:
      registry: {registry_address}  # replace to your registry address
      auth: {Token}                 # replace to your registry token
      skip-tls-verify: true

    mappings:
      - from: spaceone/spacectl
        to: your_registry_project/spaceone/spacectl     # replace to your registry project & repository
        tags:
          - 'regex: 1\.11\.(?:[0-9]?[0-9]).*'
      - from: spaceone/marketplace-assets
        to: your_registry_project/spaceone/marketplace-assets   # replace to your registry project & repository
        tags:
          - 'regex: 1\.11\.(?:[0-9]?[0-9]).*'
      - from: spaceone/docs
        to: your_registry_project/spaceone/docs          # replace to your registry project & repository
        tags:
          - 'regex: 1\.11\.(?:[0-9]?[0-9]).*'
      - from: redis
        to: your_registry_project/spaceone/redis       # replace to your registry project & repository
        tags:
          - 'latest'
      - from: mongo
        to: your_registry_project/spaceone/mongo       # replace to your registry project & repository
        tags:
          - 'latest'

  - name: sync_spaceone_core
    interval: 21600 # 6 hours
    verbose: true

    source:
      registry: registry.hub.docker.com
      auth: {Token}
    target:
      registry: {registry_address}  # replace to your registry address
      auth: {Token}               # replace to your registry token
      skip-tls-verify: true

    mappings:
      - from: spaceone/console
        to: your_registry_project/spaceone/console     # replace to your registry project & repository
        tags:
          - 'regex: 1\.11\.(?:[0-9]?[0-9]).*'
      - from: spaceone/inventory
        to: your_registry_project/spaceone/inventory       # replace to your registry project & repository
        tags:
          - 'regex: 1\.11\.(?:[0-9]?[0-9]).*'
      - from: spaceone/console-api
        to: your_registry_project/spaceone/console-api     # replace to your registry project & repository
        tags:
          - 'regex: 1\.11\.(?:[0-9]?[0-9]).*'
      - from: spaceone/cost-analysis
        to: your_registry_project/spaceone/cost-analysis       # replace to your registry project & repository
        tags:
          - 'regex: 1\.11\.(?:[0-9]?[0-9]).*'
      - from: spaceone/statistics
        to: your_registry_project/spaceone/statistics      # replace to your registry project & repository
        tags:
          - 'regex: 1\.11\.(?:[0-9]?[0-9]).*'
      - from: spaceone/secret
        to: your_registry_project/spaceone/secret      # replace to your registry project & repository
        tags:
          - 'regex: 1\.11\.(?:[0-9]?[0-9]).*'
      - from: spaceone/file-manager
        to: your_registry_project/spaceone/file-manager        # replace to your registry project & repository
        tags:
          - 'regex: 1\.11\.(?:[0-9]?[0-9]).*'
      - from: spaceone/monitoring
        to: your_registry_project/spaceone/monitoring      # replace to your registry project & repository
        tags:
          - 'regex: 1\.11\.(?:[0-9]?[0-9]).*'
      - from: spaceone/supervisor
        to: your_registry_project/spaceone/supervisor      # replace to your registry project & repository
        tags:
          - 'regex: 1\.11\.(?:[0-9]?[0-9]).*'
      - from: spaceone/identity
        to: your_registry_project/spaceone/identity        # replace to your registry project & repository
        tags:
          - 'regex: 1\.11\.(?:[0-9]?[0-9]).*'
      - from: spaceone/notification
        to: your_registry_project/spaceone/notification        # replace to your registry project & repository
        tags:
          - 'regex: 1\.11\.(?:[0-9]?[0-9]).*'
      - from: spaceone/repository
        to: your_registry_project/spaceone/repository      # replace to your registry project & repository
        tags:
          - 'regex: 1\.11\.(?:[0-9]?[0-9]).*'
      - from: spaceone/plugin
        to: your_registry_project/spaceone/plugin      # replace to your registry project & repository
        tags:
          - 'regex: 1\.11\.(?:[0-9]?[0-9]).*'
      - from: spaceone/config
        to: your_registry_project/spaceone/config      # replace to your registry project & repository
        tags:
          - 'regex: 1\.11\.(?:[0-9]?[0-9]).*'
      - from: spaceone/console-api-v2
        to: your_registry_project/spaceone/console-api-v2      # replace to your registry project & repository
        tags:
          - 'regex: 1\.11\.(?:[0-9]?[0-9]).*'
      - from: spaceone/board
        to: your_registry_project/spaceone/board       # replace to your registry project & repository
        tags:
          - 'regex: 1\.11\.(?:[0-9]?[0-9]).*'
      - from: spaceone/dashboard
        to: your_registry_project/spaceone/dashboard       # replace to your registry project & repository
        tags:
          - 'regex: 1\.11\.(?:[0-9]?[0-9]).*'
- Add configuration (dregsy-spaceone-plugin.yaml)
relay: skopeo
watch: true

skopeo:
  binary: skopeo
  certs-dir: /etc/skopeo/certs.d

lister:
  maxItems: 100
  cacheDuration: 2h

tasks:
  - name: sync_spaceone_plugin
    interval: 21600 # 6 hours
    verbose: true

    source:
      registry: registry.hub.docker.com
      auth: {Token}                 # replace to your dockerhub token
    target:
      registry: {registry_address}  # replace to your registry address
      auth: {Token}                 # replace to your registry token
      skip-tls-verify: true

    mappings:
      - from: spaceone/plugin-google-cloud-inven-collector
        to: your_registry_project/spaceone/plugin-google-cloud-inven-collector     # replace to your registry project & repository
        tags:
          - 'semver: >=1.0.0 <1.99.0'
          - 'keep: latest 2'
      - from: spaceone/plugin-azure-inven-collector
        to: your_registry_project/spaceone/plugin-azure-inven-collector     # replace to your registry project & repository
        tags:
          - 'semver: >=1.0.0 <1.99.0'
          - 'keep: latest 2'
      - from: spaceone/plugin-aws-cloudwatch-mon-datasource
        to: your_registry_project/spaceone/plugin-aws-cloudwatch-mon-datasource     # replace to your registry project & repository
        tags:
          - 'semver: >=1.0.0 <1.99.0'
          - 'keep: latest 2'
      - from: spaceone/plugin-azure-activity-log-mon-datasource
        to: your_registry_project/spaceone/plugin-azure-activity-log-mon-datasource     # replace to your registry project & repository
        tags:
          - 'semver: >=1.0.0 <1.99.0'
          - 'keep: latest 2'
      - from: spaceone/plugin-aws-cloudtrail-mon-datasource
        to: your_registry_project/spaceone/plugin-aws-cloudtrail-mon-datasource     # replace to your registry project & repository
        tags:
          - 'semver: >=1.0.0 <1.99.0'
          - 'keep: latest 2'
      - from: spaceone/plugin-aws-ec2-inven-collector
        to: your_registry_project/spaceone/plugin-aws-ec2-inven-collector     # replace to your registry project & repository
        tags:
          - 'semver: >=1.0.0 <1.99.0'
          - 'keep: latest 2'
      - from: spaceone/plugin-aws-sns-mon-webhook
        to: your_registry_project/spaceone/plugin-aws-sns-mon-webhook     # replace to your registry project & repository
        tags:
          - 'semver: >=1.0.0 <1.99.0'
          - 'keep: latest 2'
      - from: spaceone/plugin-aws-trusted-advisor-inven-collector
        to: your_registry_project/spaceone/plugin-aws-trusted-advisor-inven-collector     # replace to your registry project & repository
        tags:
          - 'semver: >=1.0.0 <1.99.0'
          - 'keep: latest 2'
      - from: spaceone/plugin-azure-monitor-mon-datasource
        to: your_registry_project/spaceone/plugin-azure-monitor-mon-datasource     # replace to your registry project & repository
        tags:
          - 'semver: >=1.0.0 <1.99.0'
          - 'keep: latest 2'
      - from: spaceone/plugin-email-noti-protocol
        to: your_registry_project/spaceone/plugin-email-noti-protocol     # replace to your registry project & repository
        tags:
          - 'semver: >=1.0.0 <1.99.0'
          - 'keep: latest 2'
      - from: spaceone/plugin-google-stackdriver-mon-datasource
        to: your_registry_project/spaceone/plugin-google-stackdriver-mon-datasource     # replace to your registry project & repository
        tags:
          - 'semver: >=1.0.0 <1.99.0'
          - 'keep: latest 2'
      - from: spaceone/plugin-telegram-noti-protocol
        to: your_registry_project/spaceone/plugin-telegram-noti-protocol     # replace to your registry project & repository
        tags:
          - 'semver: >=1.0.0 <1.99.0'
          - 'keep: latest 2'
      - from: spaceone/plugin-keycloak-identity-auth
        to: your_registry_project/spaceone/plugin-keycloak-identity-auth     # replace to your registry project & repository
        tags:
          - 'semver: >=1.0.0 <1.99.0'
          - 'keep: latest 2'
      - from: spaceone/plugin-prometheus-mon-webhook
        to: your_registry_project/spaceone/plugin-prometheus-mon-webhook     # replace to your registry project & repository
        tags:
          - 'semver: >=1.0.0 <1.99.0'
          - 'keep: latest 2'
      - from: spaceone/plugin-slack-noti-protocol
        to: your_registry_project/spaceone/plugin-slack-noti-protocol     # replace to your registry project & repository
        tags:
          - 'semver: >=1.0.0 <1.99.0'
          - 'keep: latest 2'
      - from: spaceone/plugin-grafana-mon-webhook
        to: your_registry_project/spaceone/plugin-grafana-mon-webhook     # replace to your registry project & repository
        tags:
          - 'semver: >=1.0.0 <1.99.0'
          - 'keep: latest 2'
      - from: spaceone/plugin-aws-cloud-service-inven-collector
        to: your_registry_project/spaceone/plugin-aws-cloud-service-inven-collector     # replace to your registry project & repository
        tags:
          - 'semver: >=1.0.0 <1.99.0'
          - 'keep: latest 2'
      - from: spaceone/plugin-aws-phd-inven-collector
        to: your_registry_project/spaceone/plugin-aws-phd-inven-collector     # replace to your registry project & repository
        tags:
          - 'semver: >=1.0.0 <1.99.0'
          - 'keep: latest 2'
      - from: spaceone/plugin-api-direct-mon-webhook
        to: your_registry_project/spaceone/plugin-api-direct-mon-webhook     # replace to your registry project & repository
        tags:
          - 'semver: >=1.0.0 <1.99.0'
          - 'keep: latest 2'
      - from: spaceone/plugin-azure-cost-mgmt-cost-datasource
        to: your_registry_project/spaceone/plugin-azure-cost-mgmt-cost-datasource     # replace to your registry project & repository
        tags:
          - 'semver: >=1.0.0 <1.99.0'
          - 'keep: latest 2'
      - from: spaceone/plugin-aws-cost-explorer-cost-datasource
        to: your_registry_project/spaceone/plugin-aws-cost-explorer-cost-datasource     # replace to your registry project & repository
        tags:
          - 'semver: >=1.0.0 <1.99.0'
          - 'keep: latest 2'
      - from: spaceone/plugin-ms-teams-noti-protocol
        to: your_registry_project/spaceone/plugin-ms-teams-noti-protocol     # replace to your registry project & repository
        tags:
          - 'semver: >=1.0.0 <1.99.0'
          - 'keep: latest 2'
      - from: spaceone/plugin-google-monitoring-mon-webhook
        to: your_registry_project/spaceone/plugin-google-monitoring-mon-webhook     # replace to your registry project & repository
        tags:
          - 'semver: >=1.0.0 <1.99.0'
          - 'keep: latest 2'
      - from: spaceone/plugin-http-file-cost-datasource
        to: your_registry_project/spaceone/plugin-http-file-cost-datasource     # replace to your registry project & repository
        tags:
          - 'semver: >=1.0.0 <1.99.0'
          - 'keep: latest 2'
      - from: spaceone/plugin-google-cloud-log-mon-datasource
        to: your_registry_project/spaceone/plugin-google-cloud-log-mon-datasource     # replace to your registry project & repository
        tags:
          - 'semver: >=1.0.0 <1.99.0'
          - 'keep: latest 2'
Run
No need to pull docker images separately.
The command below will get the image if there is no image locally
docker run -d --rm --name dregsy_spaceone_core -v /path/to/your/dregsy-spaceone-core.yaml:/config.yaml xelalex/dregsy:0.5.0
docker run -d --rm --name dregsy_spaceone_plugin -v /path/to/your/dregsy-spaceone-plugin.yaml:/config.yaml xelalex/dregsy:0.5.0
Management
- view log
docker logs -f {container_id|container_name}
- delete docker container
docker rm {container_id|container_name} [-f]
3.6 - Advanced configuration guide
Title and Favicon
Cloudforet has default title and CI with Wanny favicon.

But you can change them to your own title and favicon.

| Component | File Path | Description |
|---|---|---|
| Title | /var/www/title.txt | name of Title |
| Favicon | /var/www/favicon.ico | favicon file |
Console supports the functionality of changing title and favicon. The default values are in source code, but you can overwrite them when deploying pods.
NOTE: Both Title and Favicon should be exist together, even though you want to configure one of them!
This is an example value of console.yaml file.console:
production_json:
DOMAIN_NAME_REF: hostname
CONSOLE_API:
ENDPOINT: https://console-v1.api.example.com
CONSOLE_API_V2:
ENDPOINT: https://console-v2.api.example.com
DOMAIN_IMAGE:
CI_LOGO: https://raw.githubusercontent.com/cloudforet-io/artwork/main/logo/symbol/Cloudforet_symbol--dark-navy.svg
CI_TEXT_WITH_TYPE: https://raw.githubusercontent.com/kren-ucloud/artwork/main/logo/KREN-logo.png
SIGN_IN: https://raw.githubusercontent.com/cloudforet-io/artwork/main/illustrations/happy-new-year-2024.png
CI_TEXT: https://raw.githubusercontent.com/cloudforet-io/artwork/main/logo/wordmark/Cloudforet_wordmark--primary.svg
volumeMounts:
application:
- name: favicon
mountPath: /var/www/title.txt
subPath: title.txt
readOnly: true
- name: favicon-img
mountPath: /var/www/favicon.ico
subPath: favicon.ico
readOnly: true
volumes:
- name: favicon
configMap:
name: favicon
- name: favicon-img
configMap:
name: favicon-img
- name: timezone
hostPath:
path: /usr/share/zoneinfo/Asia/Seoul
- name: log-volume
emptyDir: {}
The actual values are from Kubernetes ConfigMap object. So you might have to change the value at ConfigMap or create a new one and mount it in your pod.
Title(title.yaml)
apiVersion: v1
kind: ConfigMap
metadata:
name: favicon
namespace: spaceone
data:
title.txt: |
KREN UCLOUD
Apply at your Kubernetes cluster.
kubectl apply -f title.yaml -n spaceone
Favicon (favicon.yaml)
Cloudforet new Favicon file is favicon.yaml
apiVersion: v1
kind: ConfigMap
metadata:
name: favicon-img
namespace: spaceone
binaryData:
favicon.ico: AAABAAEAAAAAAAEAIADxxxxxxx...
NOTE: favicon.ico must be base64 encoded.
# prepare your favicon.ico file, and encode it to base64 (shell command)
cat favicon.ico | base64
Apply at your Kubernetes cluster.
kubectl apply -f favicon.yaml -n spaceone
Corporate Identity
When you open Cloudforet page, you can see the default Cloudforet CI, logo and text. You can change the default Cloudforet CI with your company CI.
Login Page

Every Page

Update helm value of console (console -> production_json -> DOMAIN_IMAGE)
keyword: DOMAIN_IMAGE
| Configuration | Description | Format |
|---|---|---|
| CI_LOGO | Custom Logo Image | Image (56 * 56 px) |
| CI_TEXT_WITH_TYPE | CI Text Image | Image (164 * 40 px) |
| SIGN_IN | Sign-in page Image | Image (1024 * 1024 px) |
| CI_TEXT | CI Text Image On every page | Image (123 * 16 px) |
NOTE: Recommended file format is SVG. But if you would like to use a PNG file, use transparent background and double the size than recommended size.
NOTE: Cloudforet does not support uploading files, so upload CI files at your web server or S3.!
console:
  production_json:
    DOMAIN_NAME_REF: hostname
    CONSOLE_API:
      ENDPOINT: https://console-v1.api.example.com
    CONSOLE_API_V2:
      ENDPOINT: https://console-v2.api.example.com
    DOMAIN_IMAGE:
      CI_LOGO: https://raw.githubusercontent.com/cloudforet-io/artwork/main/logo/symbol/Cloudforet_symbol--dark-navy.svg
      CI_TEXT_WITH_TYPE: https://raw.githubusercontent.com/kren-ucloud/artwork/main/logo/KREN-logo.png
      SIGN_IN: https://raw.githubusercontent.com/cloudforet-io/artwork/main/illustrations/happy-new-year-2024.png
      CI_TEXT: https://raw.githubusercontent.com/cloudforet-io/artwork/main/logo/wordmark/Cloudforet_wordmark--primary.svg
  volumeMounts:
    application:
      - name: favicon
        mountPath: /var/www/title.txt
        subPath: title.txt
        readOnly: true
      - name: favicon-img
        mountPath: /var/www/favicon.ico
        subPath: favicon.ico
        readOnly: true

  volumes:
    - name: favicon
      configMap:
        name: favicon
    - name: favicon-img
      configMap:
        name: favicon-img
    - name: timezone
      hostPath:
        path: /usr/share/zoneinfo/Asia/Seoul
    - name: log-volume
      emptyDir: {}
Google Analytics
You can apply Google Analytics to Cloudforet Console by following the steps below.
Create accounts and properties
Log in to your Google account after accessing the Google Analytics site.
Click the Start Measurement button.

Enter your account name and click the Next button.

Enter a property name and click the Next button.
In the property name, enter the name of the url you want to track.

Click the Create button.

Click the Agree button after agreeing to the data processing terms.

Set up data streams
Choose Web as the platform for the data stream you want to collect.

Enter your Cloudforet Console website URL and stream name and click the Create Stream button.

Check the created stream information and copy the measurement ID.

Set up the Cloudforet Helm Chart
Paste the copied measurement ID as the value for the GTAG_ID key in the helm chart settings as shown below.
# frontend.yaml
console:
  ...
  production_json:
    ...
    GTAG_ID: {measurement ID}
    ...
3.7 - Create secret by exist cert
If a public or private certificate has already been issued, you can create a secret through the existing certificate. The following is how to create a secret using the certificate_secret.yaml file.
Create Secret from certificate_secret.yaml file
If the certificate is ready, edit the certificate_secert.yaml file. The file can be downloaded from the link below. In addition, the downloaded content is edited and used as follows. https://github.com/cloudforet-io/charts/blob/master/examples/ingress/on_premise/certificate_secret.yaml
cat <<EOF> certificate_secret.yaml
apiVersion: v1
kind: Secret
metadata:
  name: spaceone-tls
  namespace: spaceone           # Change the namespace
data:
  tls.crt: base64 encoded cert  # openssl base64 -in cert.pem -out cert.base64
  tls.key: base64 encoded key   # openssl base64 -in key.pem -out key.base64
type: kubernetes.io/tls
EOF
Apply the certificate_secret.yaml file to the spaceone namespace through the following command.
kubectl apply -f certificate_secret.yaml -n spaceone