This the multi-page printable view of this section. Click here to print.
Installation
- 1: AWS
- 2: On Premise
1 - AWS
Cloudforet Helm Charts
A Helm Chart for Cloudforet 1.12.
Prerequisites
- Kubernetes 1.21+
- Helm 3.2.0+
- Service Domain & SSL Certificate (optional)
- Console:
console.example.com - REST API:
*.api.example.com - gRPC API:
*.grpc.example.com - Webhook:
webhook.example.com
- Console:
- MongoDB 5.0+ (optional)
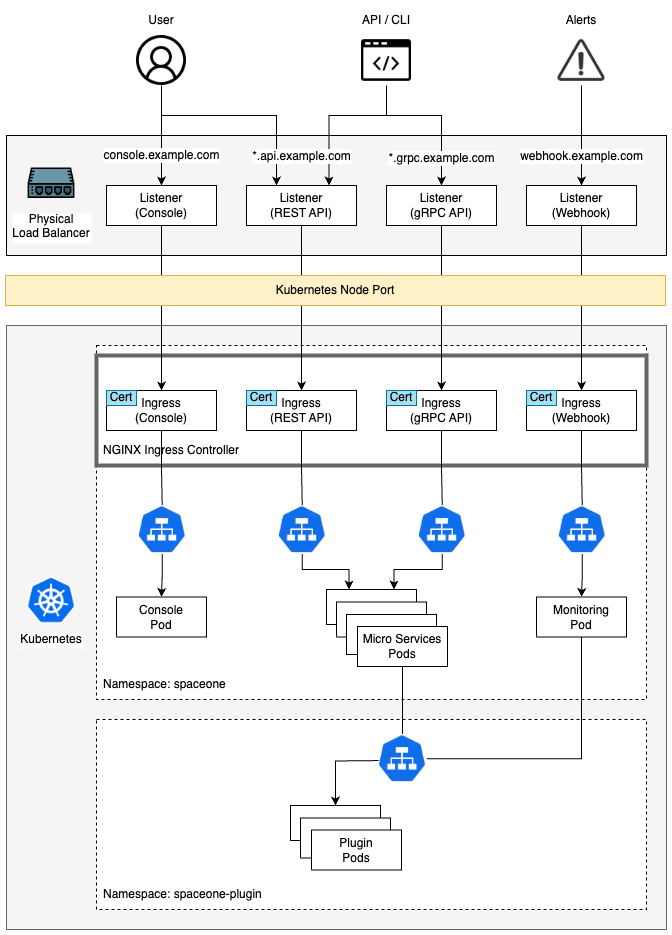
Cloudforet Architecture

Installation
You can install the Cloudforet using the following the steps.
1) Add Helm Repository
helm repo add cloudforet https://cloudforet-io.github.io/charts
helm repo update
helm search repo cloudforet
2) Create Namespaces
kubectl create ns spaceone
kubectl create ns spaceone-plugin
If you want to use only one namespace, you don't create the spaceone-plugin namespace.
3) Create Role and RoleBinding
First, download the rbac.yaml file.
wget https://raw.githubusercontent.com/cloudforet-io/charts/master/examples/rbac.yaml -O rbac.yaml
And execute the following command.
kubectl apply -f rbac.yaml -n spaceone-plugin
or
kubectl apply -f https://raw.githubusercontent.com/cloudforet-io/charts/master/examples/rbac.yaml -n spaceone-plugin
4) Install Cloudforet Chart
helm install cloudforet cloudforet/spaceone -n spaceone
After executing the above command, check the status of the pod.
kubectl get pod -n spaceone

NAME                                       READY   STATUS             RESTARTS      AGE
board-64f468ccd6-v8wx4                     1/1     Running            0             4m16s
config-6748dc8cf9-4rbz7                    1/1     Running            0             4m14s
console-767d787489-wmhvp                   1/1     Running            0             4m15s
console-api-846867dc59-rst4k               2/2     Running            0             4m16s
console-api-v2-rest-79f8f6fb59-7zcb2       2/2     Running            0             4m16s
cost-analysis-5654566c95-rlpkz             1/1     Running            0             4m13s
cost-analysis-scheduler-69d77598f7-hh8qt   0/1     CrashLoopBackOff   3 (39s ago)   4m13s
cost-analysis-worker-68755f48bf-6vkfv      1/1     Running            0             4m15s
cost-analysis-worker-68755f48bf-7sj5j      1/1     Running            0             4m15s
cost-analysis-worker-68755f48bf-fd65m      1/1     Running            0             4m16s
cost-analysis-worker-68755f48bf-k6r99      1/1     Running            0             4m15s
dashboard-68f65776df-8s4lr                 1/1     Running            0             4m12s
file-manager-5555876d89-slqwg              1/1     Running            0             4m16s
identity-6455d6f4b7-bwgf7                  1/1     Running            0             4m14s
inventory-fc6585898-kjmwx                  1/1     Running            0             4m13s
inventory-scheduler-6dd9f6787f-k9sff       0/1     CrashLoopBackOff   4 (21s ago)   4m15s
inventory-worker-7f6d479d88-59lxs          1/1     Running            0             4m12s
mongodb-6b78c74d49-vjxsf                   1/1     Running            0             4m14s
monitoring-77d9bd8955-hv6vp                1/1     Running            0             4m15s
monitoring-rest-75cd56bc4f-wfh2m           2/2     Running            0             4m16s
monitoring-scheduler-858d876884-b67tc      0/1     Error              3 (33s ago)   4m12s
monitoring-worker-66b875cf75-9gkg9         1/1     Running            0             4m12s
notification-659c66cd4d-hxnwz              1/1     Running            0             4m13s
notification-scheduler-6c9696f96-m9vlr     1/1     Running            0             4m14s
notification-worker-77865457c9-b4dl5       1/1     Running            0             4m16s
plugin-558f9c7b9-r6zw7                     1/1     Running            0             4m13s
plugin-scheduler-695b869bc-d9zch           0/1     Error              4 (59s ago)   4m15s
plugin-worker-5f674c49df-qldw9             1/1     Running            0             4m16s
redis-566869f55-zznmt                      1/1     Running            0             4m16s
repository-8659578dfd-wsl97                1/1     Running            0             4m14s
secret-69985cfb7f-ds52j                    1/1     Running            0             4m12s
statistics-98fc4c955-9xtbp                 1/1     Running            0             4m16s
statistics-scheduler-5b6646d666-jwhdw      0/1     CrashLoopBackOff   3 (27s ago)   4m13s
statistics-worker-5f9994d85d-ftpwf         1/1     Running            0             4m12s
supervisor-scheduler-74c84646f5-rw4zf      2/2     Running            0             4m16s
Scheduler pods are in
CrashLoopBackOfforErrorstate. This is because the setup is not complete.
5) Initialize the Configuration
First, download the initializer.yaml file.
wget https://raw.githubusercontent.com/cloudforet-io/charts/master/examples/initializer.yaml -O initializer.yaml
And execute the following command.
helm install cloudforet-initializer cloudforet/spaceone-initializer -n spaceone -f initializer.yaml
or
helm install cloudforet-initializer cloudforet/spaceone-initializer -n spaceone -f https://raw.githubusercontent.com/cloudforet-io/charts/master/examples/initializer.yaml
For more information about the initializer, please refer the spaceone-initializer.
6) Set the Helm Values and Upgrade the Chart
Complete the initialization, you can get the system token from the initializer pod logs.
# check pod name
kubectl logs initialize-spaceone-xxxx-xxxxx -n spaceone

...
TASK [Print Admin API Key] *********************************************************************************************
"{TOKEN}"

FINISHED [ ok=23, skipped=0 ] ******************************************************************************************

FINISH SPACEONE INITIALIZE
First, copy this TOKEN, then Create the values.yaml file and paste it to the TOKEN.
console:
  production_json:
    # If you don't have a service domain, you refer to the following 'No Domain & IP Access' example.
    CONSOLE_API:
      ENDPOINT: https://console.api.example.com       # Change the endpoint
    CONSOLE_API_V2:
      ENDPOINT: https://console-v2.api.example.com    # Change the endpoint

global:
  shared_conf:
    TOKEN: '{TOKEN}'                                    # Change the system token
For more advanced configuration, please refer the following the links.
- Documents
- Examples
After editing the values.yaml file, upgrade the helm chart.
helm upgrade cloudforet cloudforet/spaceone -n spaceone -f values.yaml
kubectl delete po -n spaceone -l app.kubernetes.io/instance=cloudforet
7) Check the status of the pods
kubectl get pod -n spaceone
If all pods are in Running state, the setup is complete.
8) Ingress and AWS Load Balancer
In Kubernetes, Ingress is an API object that provides a load-balanced external IP address to access Services in your cluster. It acts as a layer 7 (HTTP/HTTPS) reverse proxy and can route traffic to other services based on the requested host and URL path.
For more information, see What is an Application Load Balancer? on AWS and ingress in the Kubernetes documentation.
Prerequisite
Install AWS Load Balancer Controller
AWS Load Balancer Controller is a controller that helps manage ELB (Elastic Load Balancers) in a Kubernetes Cluster. Ingress resources are provisioned with Application Load Balancer, and service resources are provisioned with Network Load Balancer.
Installation methods may vary depending on the environment, so please refer to the official guide document below.
How to set up Cloudforet ingress
1) Ingress Type
Cloudforet provisions a total of 3 ingresses through 2 files.
- Console : Ingress to access the domain
- REST API : Ingress for API service
- console-api
- console-api-v2
2) Console ingress
Setting the ingress to accerss the console is as follows.
cat <<EOF> spaceone-console-ingress.yaml
---
apiVersion: networking.k8s.io/v1
kind: Ingress
metadata:
  name: console-ingress
  namespace: spaceone
  annotations:
    alb.ingress.kubernetes.io/listen-ports: '[{"HTTP": 80}]'
    alb.ingress.kubernetes.io/scheme: internet-facing
    alb.ingress.kubernetes.io/target-type: ip
    alb.ingress.kubernetes.io/load-balancer-attributes: idle_timeout.timeout_seconds=600
    alb.ingress.kubernetes.io/healthcheck-protocol: HTTP
    alb.ingress.kubernetes.io/success-codes: 200-399
    alb.ingress.kubernetes.io/load-balancer-name: spaceone-console-ingress # Caution!! Must be fewer than 32 characters.
spec:
  ingressClassName: alb
  defaultBackend:
    service:
      name: console
      port:
        number: 80
EOF
# Apply ingress
kubectl apply -f spaceone-console-ingress.yaml
If you apply the ingress, it will be provisioned to AWS Load Balancer with the name spaceone-console-ingress. You can connect through the provisioned DNS name using HTTP (80 Port).
3) REST API ingress
Setting the REST API ingress for the API service is as follows.
cat <<EOF> spaceone-rest-ingress.yaml
---
apiVersion: networking.k8s.io/v1
kind: Ingress
metadata:
  name: console-api-ingress
  namespace: spaceone
  annotations:
    alb.ingress.kubernetes.io/listen-ports: '[{"HTTP": 80}]'
    alb.ingress.kubernetes.io/scheme: internet-facing
    alb.ingress.kubernetes.io/target-type: ip
    alb.ingress.kubernetes.io/load-balancer-attributes: idle_timeout.timeout_seconds=600
    alb.ingress.kubernetes.io/healthcheck-protocol: HTTP
    alb.ingress.kubernetes.io/success-codes: 200-399
    alb.ingress.kubernetes.io/load-balancer-name: spaceone-console-api-ingress # Caution!! Must be fewer than 32 characters.
spec:
  ingressClassName: alb
  defaultBackend:
    service:
      name: console-api
      port:
        number: 80
---
apiVersion: networking.k8s.io/v1
kind: Ingress
metadata:
  name: console-api-v2-ingress
  namespace: spaceone
  annotations:
    alb.ingress.kubernetes.io/listen-ports: '[{"HTTP": 80}]'
    alb.ingress.kubernetes.io/scheme: internet-facing
    alb.ingress.kubernetes.io/target-type: ip
    alb.ingress.kubernetes.io/load-balancer-attributes: idle_timeout.timeout_seconds=600
    alb.ingress.kubernetes.io/healthcheck-protocol: HTTP
    alb.ingress.kubernetes.io/success-codes: 200-399
    alb.ingress.kubernetes.io/load-balancer-name: spaceone-console-api-v2-ingress
spec:
  ingressClassName: alb
  defaultBackend:
    service:
      name: console-api-v2-rest
      port:
        number: 80
EOF
# Apply ingress
kubectl apply -f spaceone-rest-ingress.yaml
REST API ingress provisions two ALBs. The DNS Name of the REST API must be saved as console.CONSOLE_API.ENDPOINT and console.CONSOLE_API_V2.ENDPOINT in the values.yaml file.
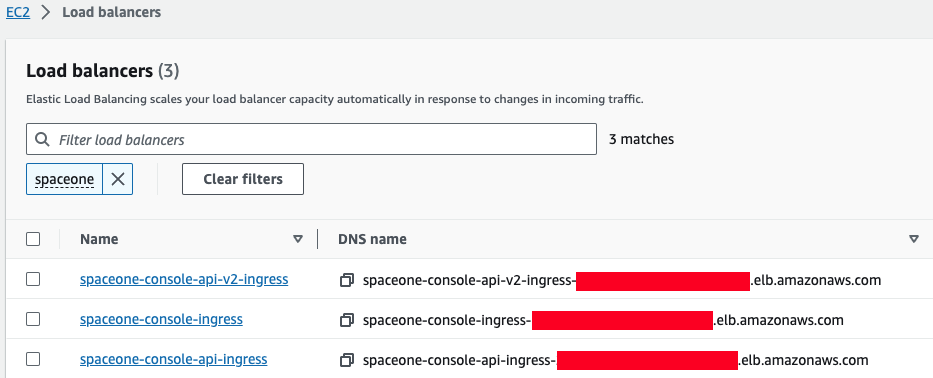
4) Check DNS Name
The DNS name will be generated as http://{ingress-name}-{random}.{region-code}.elb.amazoneaws.com. You can check this through the kubectl get ingress -n spaceone command in Kubernetes.
kubectl get ingress -n spaceone

NAME                     CLASS   HOSTS   ADDRESS                                                                      PORTS   AGE
console-api-ingress      alb     *       spaceone-console-api-ingress-xxxxxxxxxx.{region-code}.elb.amazonaws.com      80      15h
console-api-v2-ingress   alb     *       spaceone-console-api-v2-ingress-xxxxxxxxxx.{region-code}.elb.amazonaws.com   80      15h
console-ingress          alb     *       spaceone-console-ingress-xxxxxxxxxx.{region-code}.elb.amazonaws.com          80      15h
Or, you can check it in AWS Console. You can check it in EC2 > Load balancer as shown in the image below.
5) Connect with DNS Name
When all ingress is ready, edit the values.yaml file, restart pods, and access the console.
console:
  production_json:
    # If you don't have a service domain, you refer to the following 'No Domain & IP Access' example.
    CONSOLE_API:
      ENDPOINT: http://spaceone-console-api-ingress-xxxxxxxxxx.{region-code}.elb.amazonaws.com
    CONSOLE_API_V2:
      ENDPOINT: http://spaceone-console-api-v2-ingress-xxxxxxxxxx.{region-code}.elb.amazonaws.com
After applying the prepared values.yaml file, restart the pods.
helm upgrade cloudforet cloudforet/spaceone -n spaceone -f values.yaml
kubectl delete po -n spaceone -l app.kubernetes.io/instance=cloudforet
Now you can connect to Cloudforet with the DNS Name of spaceone-console-ingress.
http://spaceone-console-ingress-xxxxxxxxxx.{region-code}.elb.amazonaws.com
Advanced ingress settings
How to register an SSL certificate
We will guide you through how to register a certificate in ingress for SSL communication.
There are two methods for registering a certificate. One is when using ACM(AWS Certificate Manager), and the other is how to register an external certificate.
How to register an ACM certificate with ingress
If the certificate was issued through ACM, you can register the SSL certificate by simply registering acm arn in ingress.
First of all, please refer to the AWS official guide document on how to issue a certificate.
How to register the issued certificate is as follows. Please check the options added or changed for SSL communication in existing ingress.
Check out the changes in ingress.
Various settings for SSL are added and changed. Check the contents ofmetadata.annotations.
Also, check the added contents such asssl-redirectandspec.rules.hostinspec.rules.
- spaceone-console-ingress.yaml
apiVersion: networking.k8s.io/v1
kind: Ingress
metadata:
  name: console-ingress
  namespace: spaceone
  annotations:
+   alb.ingress.kubernetes.io/actions.ssl-redirect: '{"Type": "redirect", "RedirectConfig": { "Protocol": "HTTPS", "Port": "443", "StatusCode": "HTTP_301"}}'
+   alb.ingress.kubernetes.io/listen-ports: '[{"HTTP": 80}, {"HTTPS":443}]'
-   alb.ingress.kubernetes.io/listen-ports: '[{"HTTP": 80}]'
    alb.ingress.kubernetes.io/scheme: internet-facing
    alb.ingress.kubernetes.io/target-type: ip
    alb.ingress.kubernetes.io/load-balancer-attributes: idle_timeout.timeout_seconds=600
    alb.ingress.kubernetes.io/healthcheck-protocol: HTTP
+   alb.ingress.kubernetes.io/certificate-arn: "arn:aws:acm:..."  # Change the certificate-arn
    alb.ingress.kubernetes.io/success-codes: 200-399
    alb.ingress.kubernetes.io/load-balancer-name: spaceone-console-ingress # Caution!! Must be fewer than 32 characters.
spec:
  ingressClassName: alb
- defaultBackend:
-   service:
-     name: console
-     port:
-       number: 80
+ rules:
+   - http:
+       paths:
+         - path: /*
+           pathType: ImplementationSpecific
+           backend:
+             service:
+               name: ssl-redirect
+               port:
+                 name: use-annotation
+   - host: "console.example.com"  # Change the hostname
+     http:
+       paths:
+         - path: /*
+           pathType: ImplementationSpecific
+           backend:
+             service:
+               name: console
+               port:
+                 number: 80
- spaceone-rest-ingress.yaml
apiVersion: networking.k8s.io/v1
kind: Ingress
metadata:
  name: console-api-ingress
  namespace: spaceone
  annotations:
+   alb.ingress.kubernetes.io/actions.ssl-redirect: '{"Type": "redirect", "RedirectConfig": { "Protocol": "HTTPS", "Port": "443", "StatusCode": "HTTP_301"}}'
+   alb.ingress.kubernetes.io/listen-ports: '[{"HTTP": 80}, {"HTTPS":443}]'
-   alb.ingress.kubernetes.io/listen-ports: '[{"HTTP": 80}]'
    alb.ingress.kubernetes.io/scheme: internet-facing
    alb.ingress.kubernetes.io/target-type: ip
    alb.ingress.kubernetes.io/load-balancer-attributes: idle_timeout.timeout_seconds=600
    alb.ingress.kubernetes.io/healthcheck-protocol: HTTP
+   alb.ingress.kubernetes.io/certificate-arn: "arn:aws:acm:..."  # Change the certificate-arn
    alb.ingress.kubernetes.io/success-codes: 200-399
    alb.ingress.kubernetes.io/load-balancer-name: spaceone-console-api-ingress # Caution!! Must be fewer than 32 characters.
spec:
  ingressClassName: alb
- defaultBackend:
-   service:
-     name: console-api
-     port:
-       number: 80
+ rules:
+   - http:
+       paths:
+         - path: /*
+           pathType: ImplementationSpecific
+           backend:
+             service:
+               name: ssl-redirect
+               port:
+                 name: use-annotation
+   - host: "console.api.example.com"  # Change the hostname
+     http:
+       paths:
+         - path: /*
+           pathType: ImplementationSpecific
+           backend:
+             service:
+               name: console-api
+               port:
+                 number: 80
---
apiVersion: networking.k8s.io/v1
kind: Ingress
metadata:
  name: console-api-v2-ingress
  namespace: spaceone
  annotations:
+   alb.ingress.kubernetes.io/actions.ssl-redirect: '{"Type": "redirect", "RedirectConfig": { "Protocol": "HTTPS", "Port": "443", "StatusCode": "HTTP_301"}}'
+   alb.ingress.kubernetes.io/listen-ports: '[{"HTTP": 80}, {"HTTPS":443}]'
-   alb.ingress.kubernetes.io/listen-ports: '[{"HTTP": 80}]'
    alb.ingress.kubernetes.io/scheme: internet-facing
    alb.ingress.kubernetes.io/target-type: ip
    alb.ingress.kubernetes.io/load-balancer-attributes: idle_timeout.timeout_seconds=600
    alb.ingress.kubernetes.io/healthcheck-protocol: HTTP
+   alb.ingress.kubernetes.io/certificate-arn: "arn:aws:acm:..."  # Change the certificate-arn
    alb.ingress.kubernetes.io/success-codes: 200-399
    alb.ingress.kubernetes.io/load-balancer-name: spaceone-console-api-v2-ingress
spec:
  ingressClassName: alb
- defaultBackend:
-   service:
-     name: console-api-v2-rest
-     port:
-       number: 80
+ rules:
+   - http:
+       paths:
+         - path: /*
+           pathType: ImplementationSpecific
+           backend:
+             service:
+               name: ssl-redirect
+               port:
+                 name: use-annotation
+   - host: "console-v2.api.example.com"  # Change the hostname
+     http:
+       paths:
+         - path: /*
+           pathType: ImplementationSpecific
+           backend:
+             service:
+               name: console-api-v2-rest
+               port:
+                 number: 80
SSL application is completed when the changes are reflected through the kubectl command.
kubectl apply -f spaceone-console-ingress.yaml
kubectl apply -f spaceone-rest-ingress.yaml
How to register an SSL/TLS certificate
Certificate registration is possible even if you have an external certificate that was previously issued. You can register by adding a Kubernetes secret using the issued certificate and declaring the added secret name in ingress.
Create SSL/TLS certificates as Kubernetes secrets. There are two ways:
1. Using yaml file
You can add a secret to a yaml file using the command below.
kubectl apply -f <<EOF> tls-secret.yaml
apiVersion: v1
data:
  tls.crt: {your crt}   # crt
  tls.key: {your key}   # key
kind: Secret
metadata:
  name: tls-secret
  namespace: spaceone
type: kubernetes.io/tls
EOF
2. How to use the command if a file exists
If you have a crt and key file, you can create a secret using the following command.
kubectl create secret tls tlssecret --key tls.key --cert tls.crt
Add tls secret to Ingress
Modify ingress using registered secret information.
ingress-nginx settings
Using secret and tls may require setup methods using ingress-nginx. For more information, please refer to the following links:
apiVersion: networking.k8s.io/v1
kind: Ingress
metadata:
  name: console-ingress
  namespace: spaceone
  annotations:
    alb.ingress.kubernetes.io/actions.ssl-redirect: '{"Type": "redirect", "RedirectConfig": { "Protocol": "HTTPS", "Port": "443", "StatusCode": "HTTP_301"}}'
    alb.ingress.kubernetes.io/listen-ports: '[{"HTTP": 80}, {"HTTPS":443}]'
    alb.ingress.kubernetes.io/scheme: internet-facing
    alb.ingress.kubernetes.io/target-type: ip
    alb.ingress.kubernetes.io/load-balancer-attributes: idle_timeout.timeout_seconds=600
    alb.ingress.kubernetes.io/healthcheck-protocol: HTTP
    alb.ingress.kubernetes.io/success-codes: 200-399
    alb.ingress.kubernetes.io/load-balancer-name: spaceone-console-ingress # Caution!! Must be fewer than 32 characters.
spec:
  tls:
  - hosts:
      - console.example.com        # Change the hostname
    secretName: tlssecret          # Insert secret name
  rules:
    - http:
        paths:
          - path: /*
            pathType: ImplementationSpecific
            backend:
              service:
                name: ssl-redirect
                port:
                  name: use-annotation
    - host: "console.example.com"  # Change the hostname
      http:
        paths:
          - path: /*
            pathType: ImplementationSpecific
            backend:
              service:
                name: console
                port:
                  number: 80
2 - On Premise
Prerequisites
Kubernetes 1.21+ : https://kubernetes.io/docs/setup/
Kubectl command-line tool : https://kubernetes.io/docs/tasks/tools/
Helm 3.11.0+ : https://helm.sh/docs/intro/install/
Nginx Ingress Controller : https://kubernetes.github.io/ingress-nginx/deploy/
Install Cloudforet
It guides you on how to install Cloudforet using Helm chart. Related information is also available at: https://github.com/cloudforet-io/charts
1. Add Helm Repository
# Set working directory
mkdir cloudforet-deployment
cd cloudforet-deployment
wget https://github.com/cloudforet-io/charts/releases/download/spaceone-1.12.12/spaceone-1.12.12.tgz
tar zxvf spaceone-1.12.12.tgz
2. Create Namespaces
kubectl create ns cloudforet
kubectl create ns cloudforet-plugin
Cautions of creation namespace
If you need to use only one namespace, you do not need to create thecloudforet-pluginnamespace.
After changing the Cloudforet namespace, please refer to the following link. Change K8S Namespace
3. Create Role and RoleBinding
First, download the rbac.yaml file.
The rbac.yaml file basically serves as a means to regulate access to computer or network resources based on the roles of individual users. For more information about RBAC Authorization in Kubernetes, refer to this.
If you are used to downloading files via command-line, run this command to download the file.
wget https://raw.githubusercontent.com/cloudforet-io/charts/master/examples/rbac.yaml -O rbac.yaml
Next, execute the following command.
kubectl apply -f rbac.yaml -n cloudforet-plugin
4. Install
Download default YAML file for helm chart.
wget https://raw.githubusercontent.com/cloudforet-io/charts/master/examples/values/release-1-12.yaml -O release-1-12.yaml
helm install cloudforet spaceone -n cloudforet -f release-1-12.yaml
After executing the above command, check the status of the pod.
Scheduler pods are in
CrashLoopBackOfforErrorstate. This is because the setup is not complete.
kubectl get pod -n cloudforet

NAME                                       READY   STATUS             RESTARTS      AGE
board-64f468ccd6-v8wx4                     1/1     Running            0             4m16s
config-6748dc8cf9-4rbz7                    1/1     Running            0             4m14s
console-767d787489-wmhvp                   1/1     Running            0             4m15s
console-api-846867dc59-rst4k               2/2     Running            0             4m16s
console-api-v2-rest-79f8f6fb59-7zcb2       2/2     Running            0             4m16s
cost-analysis-5654566c95-rlpkz             1/1     Running            0             4m13s
cost-analysis-scheduler-69d77598f7-hh8qt   0/1     CrashLoopBackOff   3 (39s ago)   4m13s
cost-analysis-worker-68755f48bf-6vkfv      1/1     Running            0             4m15s
cost-analysis-worker-68755f48bf-7sj5j      1/1     Running            0             4m15s
cost-analysis-worker-68755f48bf-fd65m      1/1     Running            0             4m16s
cost-analysis-worker-68755f48bf-k6r99      1/1     Running            0             4m15s
dashboard-68f65776df-8s4lr                 1/1     Running            0             4m12s
file-manager-5555876d89-slqwg              1/1     Running            0             4m16s
identity-6455d6f4b7-bwgf7                  1/1     Running            0             4m14s
inventory-fc6585898-kjmwx                  1/1     Running            0             4m13s
inventory-scheduler-6dd9f6787f-k9sff       0/1     CrashLoopBackOff   4 (21s ago)   4m15s
inventory-worker-7f6d479d88-59lxs          1/1     Running            0             4m12s
mongodb-6b78c74d49-vjxsf                   1/1     Running            0             4m14s
monitoring-77d9bd8955-hv6vp                1/1     Running            0             4m15s
monitoring-rest-75cd56bc4f-wfh2m           2/2     Running            0             4m16s
monitoring-scheduler-858d876884-b67tc      0/1     Error              3 (33s ago)   4m12s
monitoring-worker-66b875cf75-9gkg9         1/1     Running            0             4m12s
notification-659c66cd4d-hxnwz              1/1     Running            0             4m13s
notification-scheduler-6c9696f96-m9vlr     1/1     Running            0             4m14s
notification-worker-77865457c9-b4dl5       1/1     Running            0             4m16s
plugin-558f9c7b9-r6zw7                     1/1     Running            0             4m13s
plugin-scheduler-695b869bc-d9zch           0/1     Error              4 (59s ago)   4m15s
plugin-worker-5f674c49df-qldw9             1/1     Running            0             4m16s
redis-566869f55-zznmt                      1/1     Running            0             4m16s
repository-8659578dfd-wsl97                1/1     Running            0             4m14s
secret-69985cfb7f-ds52j                    1/1     Running            0             4m12s
statistics-98fc4c955-9xtbp                 1/1     Running            0             4m16s
statistics-scheduler-5b6646d666-jwhdw      0/1     CrashLoopBackOff   3 (27s ago)   4m13s
statistics-worker-5f9994d85d-ftpwf         1/1     Running            0             4m12s
supervisor-scheduler-74c84646f5-rw4zf      2/2     Running            0             4m16s
To execute the commands below, every POD except xxxx-scheduler-yyyy must have a Running status.
5) Initialize the Configuration
First, download the initializer.yaml file.
For more information about the initializer, please refer to the spaceone-initializer.
If you are used to downloading files via command-line, run this command to download the file.
wget https://raw.githubusercontent.com/cloudforet-io/charts/master/examples/initializer.yaml -O initializer.yaml
And execute the following command.
wget https://github.com/cloudforet-io/charts/releases/download/spaceone-initializer-1.3.3/spaceone-initializer-1.3.3.tgz
tar zxvf spaceone-initializer-1.3.3.tgz
helm install initializer spaceone-initializer -n cloudforet -f initializer.yaml
6) Set the Helm Values and Upgrade the Chart
Complete the initialization, you can get the system token from the initializer pod logs.
To figure out the pod name for the initializer, run this command first to show all pod names for namespace spaceone.
kubectl get pods -n cloudforet
Then, among the pods shown copy the name of the pod that starts with initialize-spaceone.
NAME                                       READY   STATUS      RESTARTS   AGE
board-5997d5688-kq4tx                      1/1     Running     0          24m
config-5947d845b5-4ncvn                    1/1     Running     0          24m
console-7fcfddbd8b-lbk94                   1/1     Running     0          24m
console-api-599b86b699-2kl7l               2/2     Running     0          24m
console-api-v2-rest-cb886d687-d7n8t        2/2     Running     0          24m
cost-analysis-8658c96f8f-88bmh             1/1     Running     0          24m
cost-analysis-scheduler-67c9dc6599-k8lgx   1/1     Running     0          24m
cost-analysis-worker-6df98df444-5sjpm      1/1     Running     0          24m
dashboard-84d8969d79-vqhr9                 1/1     Running     0          24m
docs-6b9479b5c4-jc2f8                      1/1     Running     0          24m
identity-6d7bbb678f-b5ptf                  1/1     Running     0          24m
initialize-spaceone-fsqen-74x7v            0/1     Completed   0          98m
inventory-64d6558bf9-v5ltj                 1/1     Running     0          24m
inventory-scheduler-69869cc5dc-k6fpg       1/1     Running     0          24m
inventory-worker-5649876687-zjxnn          1/1     Running     0          24m
marketplace-assets-5fcc55fb56-wj54m        1/1     Running     0          24m
mongodb-b7f445749-2sr68                    1/1     Running     0          101m
monitoring-799cdb8846-25w78                1/1     Running     0          24m
notification-c9988d548-gxw2c               1/1     Running     0          24m
notification-scheduler-7d4785fd88-j8zbn    1/1     Running     0          24m
notification-worker-586bc9987c-kdfn6       1/1     Running     0          24m
plugin-79976f5747-9snmh                    1/1     Running     0          24m
plugin-scheduler-584df5d649-cflrb          1/1     Running     0          24m
plugin-worker-58d5cdbff9-qk5cp             1/1     Running     0          24m
redis-b684c5bbc-528q9                      1/1     Running     0          24m
repository-64fc657d4f-cbr7v                1/1     Running     0          24m
secret-74578c99d5-rk55t                    1/1     Running     0          24m
spacectl-8cd55f46c-xw59j                   1/1     Running     0          24m
statistics-767d84bb8f-rrvrv                1/1     Running     0          24m
statistics-scheduler-65cc75fbfd-rsvz7      1/1     Running     0          24m
statistics-worker-7b6b7b9898-lmj7x         1/1     Running     0          24m
supervisor-scheduler-555d644969-95jxj      2/2     Running     0          24m
To execute the below kubectl logs command, the status of POD(Ex: here initialize-spaceone-fsqen-74x7v) should be Completed . Proceeding with this while the POD is INITIALIZING will give errors
Get the token by getting the log information of the pod with the name you found above.
kubectl logs initialize-spaceone-fsqen-74x7v -n cloudforet

...
TASK [Print Admin API Key] *********************************************************************************************
"TOKEN_SHOWN_HERE"

FINISHED [ ok=23, skipped=0 ] ******************************************************************************************

FINISH SPACEONE INITIALIZE
Update your helm values file (ex. release-1-12.yaml) and edit the values. There is only one item that need to be updated.
For EC2 users: put in your EC2 server's public IP instead of 127.0.0.1 for both CONSOLE_API and CONSOLE_API_V2 ENDPOINT.
- TOKEN
console:
  production_json:
    CONSOLE_API:
      ENDPOINT: https://console-v1.api.example.com  # Change to your domain (example.com)
    CONSOLE_API_V2:
      ENDPOINT: https://console-v2.api.example.com  # Change to your domain (example.com)

global:
  shared_conf:
    TOKEN: 'TOKEN_VALUE_FROM_ABOVE'   # Change the system token
After editing the helm values file(ex. release-1-12.yaml), upgrade the helm chart.
helm upgrade cloudforet spaceone -n cloudforet -f release-1-12.yaml
After upgrading, delete the pods in cloudforet namespace that have the label app.kubernetes.io/instance and value cloudforet.
kubectl delete po -n cloudforet -l app.kubernetes.io/instance=cloudforet
7. Check the status of the pods
Check the status of the pod with the following command. If all pods are in Running state, the installation is complete.
kubectl get pod -n cloudforet
8. Configuration Ingress
Kubernetes Ingress is a resource that manages connections between services in a cluster and external connections. Cloudforet is serviced by registering the generated certificate as a secret and adding an ingress in the order below.
Install Nginx Ingress Controller
An ingress controller is required to use ingress in an on-premise environment. Here is a link to the installation guide for Nginx Ingress Controller supported by Kubernetes.
- Nginx Ingress Controller : https://kubernetes.github.io/ingress-nginx/deploy/
Case 1) cert-manager with Letsencrypt
If you want to use a free SSL certificate, you can use cert-manager with Letsencrypt.
- Cert-manager & Letsencrypt : https://dev.to/choonho/install-cert-manager-lets-encrypt-443b
- file: cloudforet-ingress.yaml
---
apiVersion: networking.k8s.io/v1
kind: Ingress
metadata:
  name: console-ingress
  namespace: cloudforet
  annotations:
    cert-manager.io/cluster-issuer: "letsencrypt-prod"
    kubernetes.io/ingress.class: "nginx"
spec:
  tls:
  - hosts:
    - console.example.com
    - console-v1.api.example.com
    - console-v2.api.example.com
    - webhook.api.example.com
    secretName: console-tls
  rules:
    - host: "console.example.com"  # Change the hostname
      http:
        paths:
          - path: /
            pathType: Prefix
            backend:
              service:
                name: console
                port:
                  number: 80
    - host: "console-v1.api.example.com"  # Change the hostname
      http:
        paths:
          - path: /
            pathType: Prefix
            backend:
              service:
                name: console-api
                port:
                  number: 80
    - host: "console-v2.api.example.com"  # Change the hostname
      http:
        paths:
          - path: /
            pathType: Prefix
            backend:
              service:
                name: console-api-v2-rest
                port:
                  number: 80
    - host: "webhook.api.example.com"  # Change the hostname
      http:
        paths:
          - path: /
            pathType: Prefix
            backend:
              service:
                name: monitoring-rest
                port:
                  number: 80
Crete the prepared ingress in the cloudforet namespace with the command below.
kubectl apply -f cloudforet-ingress.yaml -n cloudforet
Case 2) Generate self-managed SSL
Create a private ssl certificate using the openssl command below. (If an already issued certificate exists, you can create a Secret using the issued certificate. For detailed instructions, please refer to the following link. Create secret by exist cert)
openssl req -x509 -nodes -days 365 -newkey rsa:2048 -keyout console_ssl.pem -out console_ssl.csr -subj "/CN=console.example.com/O=cloudforet" -addext "subjectAltName = DNS:*.api.example.com"
Create secret for ssl
If the certificate is ready, create a secret using the certificate file.
kubectl create secret tls console-tls --key console_ssl.pem --cert console_ssl.csr
Create Ingress
Each file is as follows. Change the hostname inside the file to match the domain of the certificate you created.
---
apiVersion: networking.k8s.io/v1
kind: Ingress
metadata:
  name: console-ingress
  namespace: cloudforet
  annotations:
    kubernetes.io/ingress.class: "nginx"
spec:
  tls:
  - hosts:
    - console.example.com
    - console-v1.api.example.com
    - console-v2.api.example.com
    - webhook.api.example.com
    secretName: console-tls
  rules:
    - host: "console.example.com"  # Change the hostname
      http:
        paths:
          - path: /
            pathType: Prefix
            backend:
              service:
                name: console
                port:
                  number: 80
    - host: "console-v1.api.example.com"  # Change the hostname
      http:
        paths:
          - path: /
            pathType: Prefix
            backend:
              service:
                name: console-api
                port:
                  number: 80
    - host: "console-v2.api.example.com"  # Change the hostname
      http:
        paths:
          - path: /
            pathType: Prefix
            backend:
              service:
                name: console-api-v2-rest
                port:
                  number: 80
    - host: "webhook.api.example.com"  # Change the hostname
      http:
        paths:
          - path: /
            pathType: Prefix
            backend:
              service:
                name: monitoring-rest
                port:
                  number: 80
Create the prepared ingress in the cloudforet namespace with the command below.
kubectl apply -f cloudforet-ingress.yaml -n cloudforet
Connect to the Console
Connect to the Cloudforet Console service.
Advanced Configurations
Additional settings are required for the following special features. Below are examples and solutions for each situation.
| Name | Description |
|---|---|
| Set Plugin Certificate | This is how to set a certificate for each plugin when using a private certificate. |
| Support Private Image Registry | In an environment where communication with the outside is blocked for organization's security reasons, you can operate your own Private Image Registry. In this case, Container Image Sync operation is required, and Cloudforet suggests a method using the dregsy tool. |
| Change K8S Namespace | Namespace usage is limited by each environment, or you can use your own namespace name. Here is how to change Namespace in Cloudforet. |
| Set HTTP Proxy | In the on-premise environment with no Internet connection, proxy settings are required to communicate with the external world. Here's how to set up HTTP Proxy. |
| Set K8S ImagePullSecrets | If you are using Private Image Registry, you may need credentials because user authentication is set. In Kubernetes, you can use secrets to register credentials with pods. Here's how to set ImagePullSecrets. |