Developer Guide
Developer Guide
Plugin 은 Protobuf 를 사용하는 어떤 언어로도 개발 가능하다.
Micro Service 와 Plugin 통신은 모두 Protobuf 를 기본으로 사용하기 때문이다. 기본적인 구조는 gRPC interface 를 사용한 서버 개발 과정과 동일한 방식이다.
Plugin 개발시 어떤 언어로든 (gRPC interface 가 사용 가능한 모든 언어) 개발이 가능하지만,
우리가 제공하는 Python Framework 를 사용한다면 더욱 손쉽게 개발 가능하다.
현재 기본적으로 제공되는 Plugin 들 모두 Python 기반의 자체 개발된 Framework 를 기반으로 개발되었다.
Framework 에 대한 기본적인 사용 방법에 대해서는 다음을 참고한다.
다음은, Plugin 개발시 기본적으로 확인해야 하는 개발 요건 사항이며, 각 페이지에서 단계별 상세 사항을 확인 가능하다.
1 - gRPC Interface 확인
먼저, 개발하고자 하는 Plugin 과 Core 서비스 간의 Interface 를 확인한다.
interface 는 각각의 서비스 마다 구조가 다르다. 이에 대한 gRPC interface 정보는 API 문서에서 확인 가능하다. (SpaceONE API)
예를 들어 Identity 의 인증 용 Auth Plugin 을 개발한다고 가정해보자.
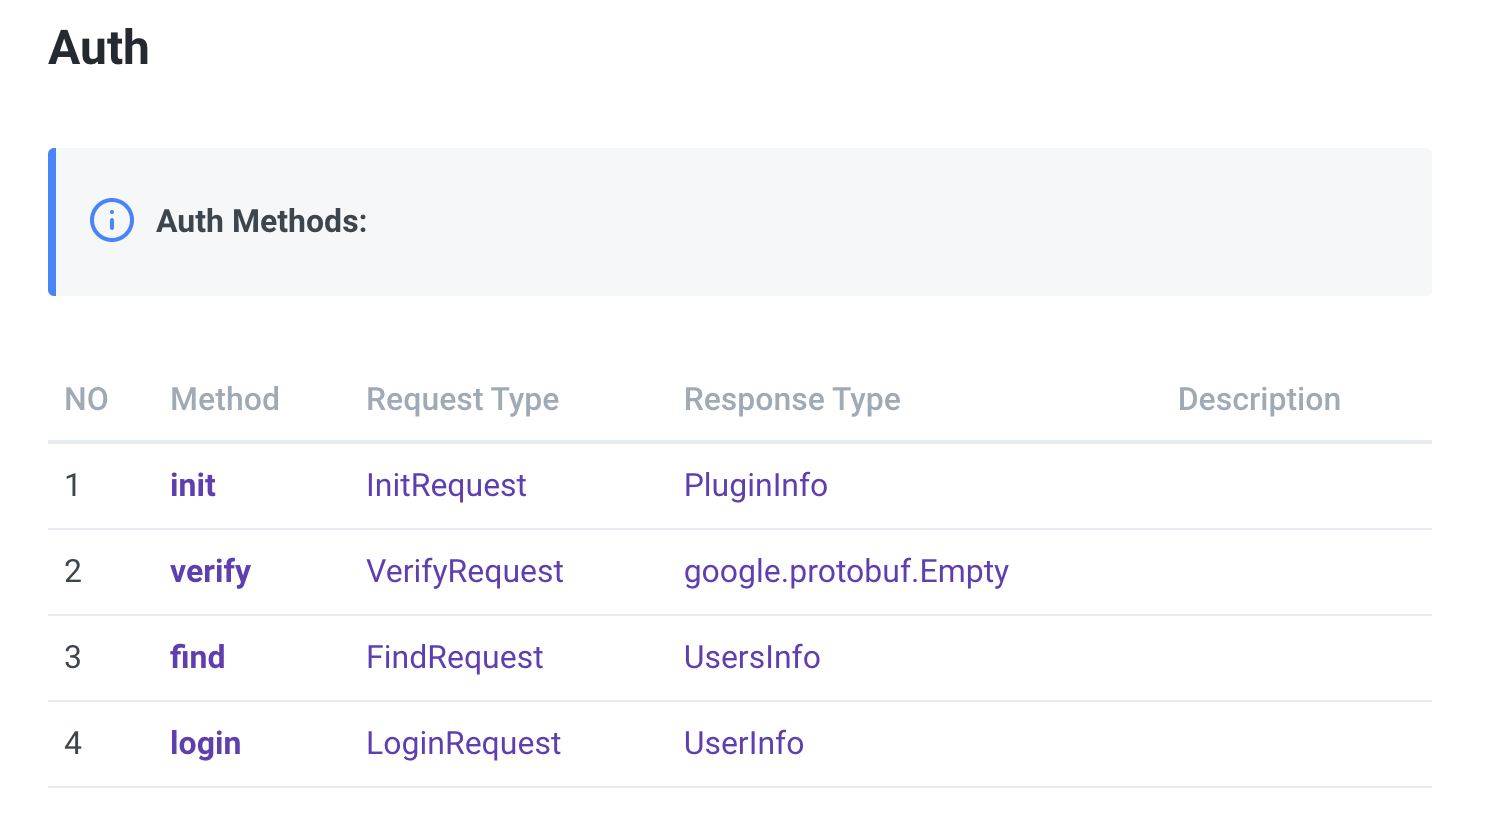
이때, Auth Plugin 의 Interface 정보를 확인해 보면 아래와 같다. (SpaceONE API - Identity Auth)

Identity 의 Auth Plugin 개발을 위해서는 총 4개의 API interface 를 구현해야 한다.
이 중, init 과 verify 는 모든 Plugin 이 동일하게 필요로 하는 inteface 이며,
나머지는 각각의 Plugin 마다 특성에 따라 다르다.
이 중에서 공통으로 구현이 필요한 init 과 verify 를 자세히 살펴본다.
1. init
Plugin 초기화.
Identity 의 경우 Domain 을 생성 할 때, 어떤 인증을 사용할지를 결정해야 하며 관련된 Auth Plugin 을 배포하게 된다.
최초 Plugin 배포시 (또는 Plugin 버전 업데이트시) Plugin 컨테이너가 생성 완료된 후 Core 서비스는 Plugin 에 init API 를 호출하게 된다.
이때, Plugin 은 Core 서비스가 Plugin 과 통신시 필요로 하는 metadata 정보를 반환하게 된다.
metadata 에 대한 정보는 Core 서비스 별로 다르다.
아래는 Google oAuth2 plugin 의 init 구현에 대한 python 코드의 예시이다.
return 값으로 metadata 를 반환하는데, 이때 identity 에서 필요한 다양한 정보를 추가하여 반환한다.
    @transaction
    @check_required(['options'])
    def init(self, params):
        """ verify options
        Args:
            params
              - options
        Returns:
            - metadata
        Raises:
            ERROR_NOT_FOUND:
        """

        manager = self.locator.get_manager('AuthManager')
        options = params['options']
        options['auth_type'] = 'keycloak'
        endpoints = manager.get_endpoint(options)
        capability= endpoints
        return {'metadata': capability}
2. verify
Plugin 정상 동작 확인.
Plugin 이 배포된 후, init API 호출 이후에는 plugin 이 동작 실행 준비가 완료되었는지 확인 절차를 거치는데 이때 호출되는 API 가 verify 이다.
verify 단계에는 Plugin 이 정상적인 동작 수행 준비가 되었는지 확인하는 절차를 확인한다.
아래는 Google oAuth2 plugin 의 verify 구현에 대한 python 코드의 예시이다.
verify 행위는 Google oAuth2 동작시 필요한 값을 통해
실제 logic 이 수행하기 위한 준비단계가 정상 동작하기 위한 검증 수준의 코드를 필요로 한다.
    def verify(self, options):
        # This is connection check for Google Authorization Server
        # URL: https://www.googleapis.com/oauth2/v4/token
        # After connection without param.
        # It should return 404
        r = requests.get(self.auth_server)
        if r.status_code == 404:
            return "ACTIVE"
        else:
            raise ERROR_NOT_FOUND(key='auth_server', value=self.auth_server)
2 - Plugin Register
Plugin 개발이 완료되었다면, Plugin 배포를 준비해야 한다.
SpaceONE 의 모든 Plugin 은 Container 로 배포되기 때문에, 개발이 완료된 Plugin 코드는 Container 배포를 위한 Image 로 빌드해야 한다.
Container 빌드는 Dockerfile 을 활용해 docker build 를 수행 한 후,
결과물인 Image 는 Docker hub 와 같은 이미지 저장소에 업로드하도록 한다.
이때, 이미지 저장소는 SpaceONE 의 Microservice 인 Repository 서비스에서 관리하는 저장소에 업로드하도록 한다.

이미지를 저장소에 업로드 하였다면, Microservice 중 Repository 서비스에 해당 이미지를 등록해야 한다.
등록 API 는 Repository.plugin.register 를 사용하도록 한다. ([SpaceONE API - (Repository) Plugin.Register](https://spaceone-dev.gitbook.io/spaceone-apis/repository/v1/plugin#register))

아래 예제는 Notification 의 Protocol Plugin 등록시 전달된 Parameter 내용이다.
image 값에는 이전에 빌드된 이미지 주소를 넣어준다.
name: Slack Notification Protocol
service_type: notification.Protocol
image: pyengine/plugin-slack-notification-protocol_settings
capability:
  supported_schema:
  - slack_webhook
  data_type: SECRET
tags:
  description: Slack
  "spaceone:plugin_name": Slack
  icon: 'https://spaceone-custom-assets.s3.ap-northeast-2.amazonaws.com/console-assets/icons/slack.svg'
provider: slack
template: {}
이미지 등록의 경우, 아직 Web Console 에서 지원되지 않기 때문에 직접 gRPC API 를 사용하거나 spacectl 을 사용하도록 한다.
위와 같은 yaml 형태의 파일을 생성 후, 아래와 같이 spacectl 명령어로 이미지 등록이 가능하다.
> spacectl exec register repository.Plugin -f plugin_slack_notification_protocol.yml
이미지가 Repository 에 등록 완료되면 아래와 같이 확인 가능하다.
> spacectl list repository.Plugin -p repository_id=<REPOSITORY_ID>  -c plugin_id,name
plugin_id                              | name
----------------------------------------+------------------------------------------
 plugin-aws-sns-monitoring-webhook      | AWS SNS Webhook
 plugin-amorepacific-monitoring-webhook | Amore Pacific Webhook
 plugin-email-notification-protocol_settings     | Email Notification Protocol
 plugin-grafana-monitoring-webhook      | Grafana Webhook
 plugin-keycloak-oidc                   | Keycloak OIDC Auth Plugin
 plugin-sms-notification-protocol_settings       | SMS Notification Protocol
 plugin-voicecall-notification-protocol_settings | Voicecall Notification Protocol
 plugin-slack-notification-protocol_settings     | Slack Notification Protocol
 plugin-telegram-notification-protocol_settings  | Telegram Notification Protocol

 Count: 9 / 9
spacectl 의 자세한 사용 방법은 해당 페이지에서 확인 가능하다.
Spacectl CLI Tool
3 - Plugin Deployment
등록된 Plugin 을 실제로 배포해서 사용하려면, Plugin 이미지를 바탕으로 Kubernetes 환경에 Pod 를 배포해야 한다.
이때, Plugin 배포는 해당 plugin 을 사용하고자 하는 서비스에서 자동으로 수행하게 된다.
예를 들어, Notification 의 경우 발생된 Alert 을 사용자에게 전달하기 위해 Protocol 이라는 객체를 사용하여 전달하게 되는데
이때, Notification 의 Protocol.create (Protocol.create) 명령을 수행시, Notification 이 자동으로 Plugin 을 배포하게 된다.
아래 예제는 Notification 에 Slack 으로 알람을 전송하기 위한 Slack Protocol 생성에 대한 Protocol.create 명령 파라미터 예시이다.
---
name: Slack Protocol
plugin_info:
  plugin_id: plugin-slack-notification-protocol_settings
  version: "1.0"
  options: {}
  schema: slack_webhook
tags:
  description: Slack Protocol
plugin_id 에는 Repository 에 등록한 plugin 의 ID 값을 넣고,
version 에는 Dockerhub 와 같은 이미지 저장소에 실제 이미지 업로드시 기입했던 이미지 tag 정보를 넣어준다.
만약 이미지 저장소에 여러 tag 를 가진 경우, 지정된 tag version 의 이미지로 plugin 배포를 수행한다.
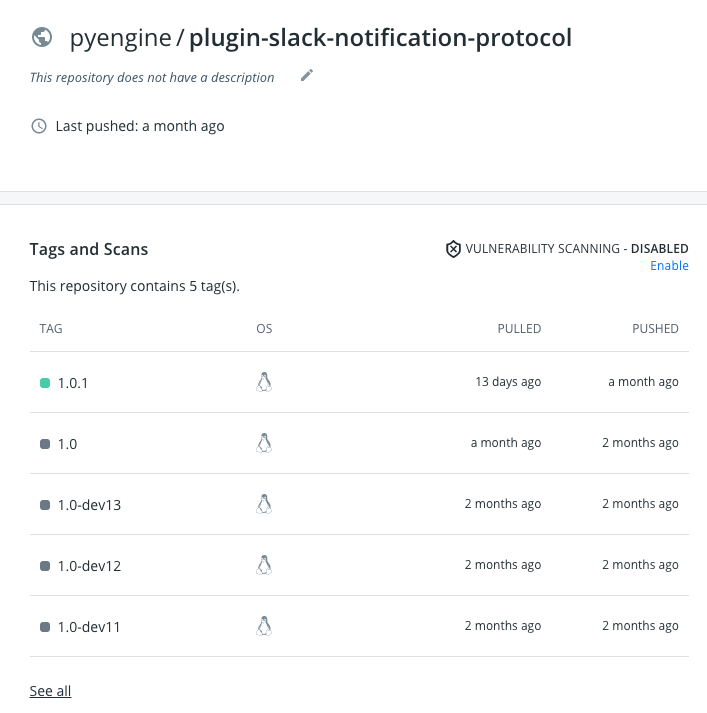
위의 경우, version 을 "1.0" 으로 지정하였기 때문에
아래 tag 정보 중 "1.0" tag 이미지로 배포되기 된다.

해당 API 의 경우, Kubernetes 환경에 Service 와 Pod 를 생성해 배포하는 단계를 거치기 때문에 응답까지 약간의 시간이 걸린다.
실제 Kubernetes 환경에서 Pod 배포를 확인해 보면 아래와 같이 확인 가능하다.
> k get po
NAME                                                              READY   STATUS    RESTARTS   AGE
plugin-slack-notification-protocol_settings-zljrhvigwujiqfmn-bf6kgtqz   1/1     Running   0          1m


