이 섹션의 다중 페이지 출력 화면임. 여기를 클릭하여 프린트.
설치 및 운영
- 1: Installation
- 1.1: AWS
- 1.2: On Premise
- 2: 설정
- 2.1: 플러그인 사설 인증서 설정
- 2.2: Change kubernetes namespace
- 2.3: Kubernetes imagePullSecrets 설정
- 2.4: HTTP Proxy 설정
- 2.5: 프라이빗 이미지 저장소 지원
- 2.6: 기존 인증서로 Secret 만들기
1 - Installation
1.1 - AWS
Cloudforet Helm Charts
Cloudforet 1.12의 Helm Chart 입니다.
준비사항
- Kubernetes 1.21+
- Helm 3.2.0+
- Service Domain & SSL Certificate (optional)
- Console:
console.example.com - REST API:
*.api.example.com - gRPC API:
*.grpc.example.com - Webhook:
webhook.example.com
- Console:
- MongoDB 5.0+ (optional)
Cloudforet Architecture

설치
아래의 단계들을 통해서 Cloudforet을 설치할 수 있습니다.
1) Helm Repository 추가
helm repo add cloudforet https://cloudforet-io.github.io/charts
helm repo update
helm search repo cloudforet
2) Namespaces 생성
kubectl create ns spaceone
kubectl create ns spaceone-plugin
만약 하나의 namespace만 사용하기를 원한다며, spaceone-plugin namespace는 생성하지 마세요.
3) Role and RoleBinding 생성
우선, rbac.yaml 파일을 다운로드 합니다.
wget https://raw.githubusercontent.com/cloudforet-io/charts/master/examples/rbac.yaml -O rbac.yaml
그리고, 아래 명령어를 실행합니다.
kubectl apply -f rbac.yaml -n spaceone-plugin
or
kubectl apply -f https://raw.githubusercontent.com/cloudforet-io/charts/master/examples/rbac.yaml -n spaceone-plugin
4) Cloudforet Chart로 설치하기
helm install cloudforet cloudforet/spaceone -n spaceone
아래 명령어를 실행한 뒤, pod의 상태를 체크하세요.
kubectl get pod -n spaceone

NAME                                       READY   STATUS             RESTARTS      AGE
board-64f468ccd6-v8wx4                     1/1     Running            0             4m16s
config-6748dc8cf9-4rbz7                    1/1     Running            0             4m14s
console-767d787489-wmhvp                   1/1     Running            0             4m15s
console-api-846867dc59-rst4k               2/2     Running            0             4m16s
console-api-v2-rest-79f8f6fb59-7zcb2       2/2     Running            0             4m16s
cost-analysis-5654566c95-rlpkz             1/1     Running            0             4m13s
cost-analysis-scheduler-69d77598f7-hh8qt   0/1     CrashLoopBackOff   3 (39s ago)   4m13s
cost-analysis-worker-68755f48bf-6vkfv      1/1     Running            0             4m15s
cost-analysis-worker-68755f48bf-7sj5j      1/1     Running            0             4m15s
cost-analysis-worker-68755f48bf-fd65m      1/1     Running            0             4m16s
cost-analysis-worker-68755f48bf-k6r99      1/1     Running            0             4m15s
dashboard-68f65776df-8s4lr                 1/1     Running            0             4m12s
file-manager-5555876d89-slqwg              1/1     Running            0             4m16s
identity-6455d6f4b7-bwgf7                  1/1     Running            0             4m14s
inventory-fc6585898-kjmwx                  1/1     Running            0             4m13s
inventory-scheduler-6dd9f6787f-k9sff       0/1     CrashLoopBackOff   4 (21s ago)   4m15s
inventory-worker-7f6d479d88-59lxs          1/1     Running            0             4m12s
mongodb-6b78c74d49-vjxsf                   1/1     Running            0             4m14s
monitoring-77d9bd8955-hv6vp                1/1     Running            0             4m15s
monitoring-rest-75cd56bc4f-wfh2m           2/2     Running            0             4m16s
monitoring-scheduler-858d876884-b67tc      0/1     Error              3 (33s ago)   4m12s
monitoring-worker-66b875cf75-9gkg9         1/1     Running            0             4m12s
notification-659c66cd4d-hxnwz              1/1     Running            0             4m13s
notification-scheduler-6c9696f96-m9vlr     1/1     Running            0             4m14s
notification-worker-77865457c9-b4dl5       1/1     Running            0             4m16s
plugin-558f9c7b9-r6zw7                     1/1     Running            0             4m13s
plugin-scheduler-695b869bc-d9zch           0/1     Error              4 (59s ago)   4m15s
plugin-worker-5f674c49df-qldw9             1/1     Running            0             4m16s
redis-566869f55-zznmt                      1/1     Running            0             4m16s
repository-8659578dfd-wsl97                1/1     Running            0             4m14s
secret-69985cfb7f-ds52j                    1/1     Running            0             4m12s
statistics-98fc4c955-9xtbp                 1/1     Running            0             4m16s
statistics-scheduler-5b6646d666-jwhdw      0/1     CrashLoopBackOff   3 (27s ago)   4m13s
statistics-worker-5f9994d85d-ftpwf         1/1     Running            0             4m12s
supervisor-scheduler-74c84646f5-rw4zf      2/2     Running            0             4m16s
Scheduler pod들은
CrashLoopBackOff상태 이거나Error상태 입니다. 아직 설정이 완료되지 않았기 때문입니다.
5) 구성 초기화
첫 번째로, initializer.yaml 파일을 다운로드 합니다.
wget https://raw.githubusercontent.com/cloudforet-io/charts/master/examples/initializer.yaml -O initializer.yaml
그리고 아래 명령어로 실행합니다.
helm install cloudforet-initializer cloudforet/spaceone-initializer -n spaceone -f initializer.yaml
or
helm install cloudforet-initializer cloudforet/spaceone-initializer -n spaceone -f https://raw.githubusercontent.com/cloudforet-io/charts/master/examples/initializer.yaml
Initializer에 대한 자세한 설명은, 다음을 참고하세요. spaceone-initializer
6) Helm Value값 들을 설정하고 Chart Upgrade 하기
초기화과 완료되면, initializer pod의 로그에서 시스템 token 값을 얻을 수 있습니다.
# check pod name
kubectl logs initialize-spaceone-xxxx-xxxxx -n spaceone

...
TASK [Print Admin API Key] *********************************************************************************************
"{TOKEN}"

FINISHED [ ok=23, skipped=0 ] ******************************************************************************************

FINISH SPACEONE INITIALIZE
일단 이 TOKEN 값을 복사고, values.yaml 파일을 만들어서 TOKEN에 붙여 넣습니다.
console:
  production_json:
    # If you don't have a service domain, you refer to the following 'No Domain & IP Access' example.
    CONSOLE_API:
      ENDPOINT: https://console.api.example.com       # Change the endpoint
    CONSOLE_API_V2:
      ENDPOINT: https://console-v2.api.example.com    # Change the endpoint

global:
  shared_conf:
    TOKEN: '{TOKEN}'                                    # Change the system token
더 많은 advanced 설정들은 아래 링크드를 참고하세요.
- Documents
- Examples
values.yaml파일을 수정하고 helm chart를 upgrade합니다.
helm upgrade cloudforet cloudforet/spaceone -n spaceone -f values.yaml
kubectl delete po -n spaceone -l app.kubernetes.io/instance=cloudforet
7) Pods 상태 확인
kubectl get pod -n spaceone
만약, 모든 pod들이 Running 상태이면 설정이 완료된 것입니다.
8) Ingress와 AWS Load Balancer
Kubernetes에서 Ingress는 cluster의 Services에 access할 수 있도록 부하가 분산된 외부 IP 주소를 제공하는 API 객체입니다. 계층 7 (HTTP/HTTPS) 리버스 프록시 역할을 하며 요청된 호스트 및 URL 경로를 기반으로 트래픽을 다른 서비스로 라우팅할 수 있습니다.
AWS EKS에서는 ingress를 생성할 때 애플리케이션 트래픽을 로드 밸런싱하는 AWS Application Load Balancer(ALB)가 프로비저닝 됩니다.
자세한 내용은 AWS에 Application Load Balancer란 무엇인가요? 및 Kubernetes 설명서의 ingress를 참조하세요.
선행작업
AWS Load Balancer Controller 설치
AWS Load Balancer Controller는 Kubernetes Cluster에서 ELB(Elastic Load Balancers)를 관리하는데 도움을 주는 컨트롤러입니다. Ingress resource는 Application Load Balancer로, Service resource는 Network Load Balancer로 Provisioning 합니다.
설치 방법은 환경에 따라 다를 수 있으니 아래 공식 가이드 문서를 참고하세요.
Cloudforet ingress 설정 방법
1) Ingress 종류
Cloudforet에서는 총 2개의 파일을 통해서 3개의 ingress를 프로비저닝 합니다.
- Console : 도메인에 접속하기 위한 ingress
- REST API : API 서비스를 위한 ingress
- console-api
- console-api-v2
2) Console ingress
Console에 접속하기 위한 ingress를 아래와 같이 설정합니다.
cat <<EOF> cloudforet-console-ingress.yaml
---
apiVersion: networking.k8s.io/v1
kind: Ingress
metadata:
  name: console-ingress
  namespace: spaceone
  annotations:
    alb.ingress.kubernetes.io/listen-ports: '[{"HTTP": 80}]'
    alb.ingress.kubernetes.io/scheme: internet-facing
    alb.ingress.kubernetes.io/target-type: ip
    alb.ingress.kubernetes.io/load-balancer-attributes: idle_timeout.timeout_seconds=600
    alb.ingress.kubernetes.io/healthcheck-protocol: HTTP
    alb.ingress.kubernetes.io/success-codes: 200-399
    alb.ingress.kubernetes.io/load-balancer-name: spaceone-console-ingress # Caution!! Must be fewer than 32 characters.
spec:
  ingressClassName: alb
  defaultBackend:
    service:
      name: console
      port:
        number: 80
EOF
# Apply ingress
kubectl apply -f spaceone-console-ingress.yaml
해당 ingress를 apply하면 spaceone-console-ingress라는 이름으로 AWS Load Balancer에 프로비져닝 됩니다. HTTP(80 Port)를 사용하여 프로비져닝 된 DNS 이름을 통해서 접속 가능합니다.
3) REST API ingress
다음은 api 서비스를 위한 REST API ingress를 아래와 같이 설정합니다.
cat <<EOF> spaceone-rest-ingress.yaml
---
apiVersion: networking.k8s.io/v1
kind: Ingress
metadata:
  name: console-api-ingress
  namespace: spaceone
  annotations:
    alb.ingress.kubernetes.io/listen-ports: '[{"HTTP": 80}]'
    alb.ingress.kubernetes.io/scheme: internet-facing
    alb.ingress.kubernetes.io/target-type: ip
    alb.ingress.kubernetes.io/load-balancer-attributes: idle_timeout.timeout_seconds=600
    alb.ingress.kubernetes.io/healthcheck-protocol: HTTP
    alb.ingress.kubernetes.io/success-codes: 200-399
    alb.ingress.kubernetes.io/load-balancer-name: spaceone-console-api-ingress # Caution!! Must be fewer than 32 characters.
spec:
  ingressClassName: alb
  defaultBackend:
    service:
      name: console-api
      port:
        number: 80
---
apiVersion: networking.k8s.io/v1
kind: Ingress
metadata:
  name: console-api-v2-ingress
  namespace: spaceone
  annotations:
    alb.ingress.kubernetes.io/listen-ports: '[{"HTTP": 80}]'
    alb.ingress.kubernetes.io/scheme: internet-facing
    alb.ingress.kubernetes.io/target-type: ip
    alb.ingress.kubernetes.io/load-balancer-attributes: idle_timeout.timeout_seconds=600
    alb.ingress.kubernetes.io/healthcheck-protocol: HTTP
    alb.ingress.kubernetes.io/success-codes: 200-399
    alb.ingress.kubernetes.io/load-balancer-name: spaceone-console-api-v2-ingress
spec:
  ingressClassName: alb
  defaultBackend:
    service:
      name: console-api-v2-rest
      port:
        number: 80
EOF
# Apply ingress
kubectl apply -f spaceone-rest-ingress.yaml
REST API ingress는 2개의 ALB를 프로비저닝합니다. REST API의 DNS Name은 values.yaml파일에 console.CONSOLE_API.ENDPOINT, console.CONSOLE_API_V2.ENDPOINT로 각각 추가 되어야하기 때문에 반드시 저장해야 합니다.
4) DNS Name 확인
DNS 이름은 http://{ingress-name}-{random}.{region-code}.elb.amazoneaws.com 와 같이 생성됩니다. kubernetes에서 kucectl get ingress -n spaceone 명령를 통해서 확인 가능합니다.
kubectl get ingress -n spaceone

NAME                     CLASS   HOSTS   ADDRESS                                                                      PORTS   AGE
console-api-ingress      alb     *       spaceone-console-api-ingress-xxxxxxxxxx.{region-code}.elb.amazonaws.com      80      15h
console-api-v2-ingress   alb     *       spaceone-console-api-v2-ingress-xxxxxxxxxx.{region-code}.elb.amazonaws.com   80      15h
console-ingress          alb     *       spaceone-console-ingress-xxxxxxxxxx.{region-code}.elb.amazonaws.com          80      15h
또는, AWS Console에서 확인 가능합니다. EC2 > Load balancer에서 아래 이미지와 같이 확인 할 수 있습니다.

5) DNS Name으로 접속
ingress가 모두 준비 되었다면 values.yaml 파일을 수정하고 pods를 재시작해서 console에 접속합니다.
console:
  production_json:
    # If you don't have a service domain, you refer to the following 'No Domain & IP Access' example.
    CONSOLE_API:
      ENDPOINT: http://spaceone-console-api-ingress-xxxxxxxxxx.{region-code}.elb.amazonaws.com
    CONSOLE_API_V2:
      ENDPOINT: http://spaceone-console-api-v2-ingress-xxxxxxxxxx.{region-code}.elb.amazonaws.com
준비된 values.yaml 파일을 적용 후 pods를 재시작 합니다.
helm upgrade cloudforet cloudforet/spaceone -n spaceone -f values.yaml
kubectl delete po -n spaceone -l app.kubernetes.io/instance=cloudforet
이제 spaceone-console-ingress 의 DNS Name으로 Cloudforet에 접속할 수 있습니다.
http://spaceone-console-ingress-xxxxxxxxxx.{region-code}.elb.amazonaws.com
Advanced ingress settings
SSL 인증서 등록 방법
SSL 통신을 위해서 ingress에 인증서를 등록하는 방법을 안내합니다.
인증서 등록을 위해한 2가지 방법이 있습니다. ACM(AWS Certificate Manager)를 이용하는 경우와 외부 인증서를 등록하는 방법입니다.
ACM 인증서를 ingress에 등록하는 방법
ACM을 통해서 인증서를 발급받은 경우라면 ingress에 간단히 acm arn을 등록하는 것으로 SSL 인증서 등록을 할 수 있습니다.
우선, ACM 인증서를 발급받는 방법은 AWS 공식 가이드 문서를 참고하세요.
발급받은 인증서를 등록하는 방법은 아래와 같습니다. 기존 ingress에서 SSL 통신을 위해 추가, 변경되는 옵션들을 확인합니다.
ingress에서 변경된 내용을 확인하세요.
ssl을 위한 다양한 설정이 추가, 변경됩니다.metadata.annotations내용을 확인하세요.
그리고spec.rules에서ssl-redirect및spec.rules.host등 추가된 내용들을 확인하세요.
- spaceone-console-ingress.yaml
apiVersion: networking.k8s.io/v1
kind: Ingress
metadata:
  name: console-ingress
  namespace: spaceone
  annotations:
+   alb.ingress.kubernetes.io/actions.ssl-redirect: '{"Type": "redirect", "RedirectConfig": { "Protocol": "HTTPS", "Port": "443", "StatusCode": "HTTP_301"}}'
+   alb.ingress.kubernetes.io/listen-ports: '[{"HTTP": 80}, {"HTTPS":443}]'
-   alb.ingress.kubernetes.io/listen-ports: '[{"HTTP": 80}]'
    alb.ingress.kubernetes.io/scheme: internet-facing
    alb.ingress.kubernetes.io/target-type: ip
    alb.ingress.kubernetes.io/load-balancer-attributes: idle_timeout.timeout_seconds=600
    alb.ingress.kubernetes.io/healthcheck-protocol: HTTP
+   alb.ingress.kubernetes.io/certificate-arn: "arn:aws:acm:..."  # Change the certificate-arn
    alb.ingress.kubernetes.io/success-codes: 200-399
    alb.ingress.kubernetes.io/load-balancer-name: spaceone-console-ingress # Caution!! Must be fewer than 32 characters.
spec:
  ingressClassName: alb
- defaultBackend:
-   service:
-     name: console
-     port:
-       number: 80
+ rules:
+   - http:
+       paths:
+         - path: /*
+           pathType: ImplementationSpecific
+           backend:
+             service:
+               name: ssl-redirect
+               port:
+                 name: use-annotation
+   - host: "console.example.com"  # Change the hostname
+     http:
+       paths:
+         - path: /*
+           pathType: ImplementationSpecific
+           backend:
+             service:
+               name: console
+               port:
+                 number: 80
- spaceone-rest-ingress.yaml
apiVersion: networking.k8s.io/v1
kind: Ingress
metadata:
  name: console-api-ingress
  namespace: spaceone
  annotations:
+   alb.ingress.kubernetes.io/actions.ssl-redirect: '{"Type": "redirect", "RedirectConfig": { "Protocol": "HTTPS", "Port": "443", "StatusCode": "HTTP_301"}}'
+   alb.ingress.kubernetes.io/listen-ports: '[{"HTTP": 80}, {"HTTPS":443}]'
-   alb.ingress.kubernetes.io/listen-ports: '[{"HTTP": 80}]'
    alb.ingress.kubernetes.io/scheme: internet-facing
    alb.ingress.kubernetes.io/target-type: ip
    alb.ingress.kubernetes.io/load-balancer-attributes: idle_timeout.timeout_seconds=600
    alb.ingress.kubernetes.io/healthcheck-protocol: HTTP
+   alb.ingress.kubernetes.io/certificate-arn: "arn:aws:acm:..."  # Change the certificate-arn
    alb.ingress.kubernetes.io/success-codes: 200-399
    alb.ingress.kubernetes.io/load-balancer-name: spaceone-console-api-ingress # Caution!! Must be fewer than 32 characters.
spec:
  ingressClassName: alb
- defaultBackend:
-   service:
-     name: console-api
-     port:
-       number: 80
+ rules:
+   - http:
+       paths:
+         - path: /*
+           pathType: ImplementationSpecific
+           backend:
+             service:
+               name: ssl-redirect
+               port:
+                 name: use-annotation
+   - host: "console.api.example.com"  # Change the hostname
+     http:
+       paths:
+         - path: /*
+           pathType: ImplementationSpecific
+           backend:
+             service:
+               name: console-api
+               port:
+                 number: 80
---
apiVersion: networking.k8s.io/v1
kind: Ingress
metadata:
  name: console-api-v2-ingress
  namespace: spaceone
  annotations:
+   alb.ingress.kubernetes.io/actions.ssl-redirect: '{"Type": "redirect", "RedirectConfig": { "Protocol": "HTTPS", "Port": "443", "StatusCode": "HTTP_301"}}'
+   alb.ingress.kubernetes.io/listen-ports: '[{"HTTP": 80}, {"HTTPS":443}]'
-   alb.ingress.kubernetes.io/listen-ports: '[{"HTTP": 80}]'
    alb.ingress.kubernetes.io/scheme: internet-facing
    alb.ingress.kubernetes.io/target-type: ip
    alb.ingress.kubernetes.io/load-balancer-attributes: idle_timeout.timeout_seconds=600
    alb.ingress.kubernetes.io/healthcheck-protocol: HTTP
+   alb.ingress.kubernetes.io/certificate-arn: "arn:aws:acm:..."  # Change the certificate-arn
    alb.ingress.kubernetes.io/success-codes: 200-399
    alb.ingress.kubernetes.io/load-balancer-name: spaceone-console-api-v2-ingress
spec:
  ingressClassName: alb
- defaultBackend:
-   service:
-     name: console-api-v2-rest
-     port:
-       number: 80
+ rules:
+   - http:
+       paths:
+         - path: /*
+           pathType: ImplementationSpecific
+           backend:
+             service:
+               name: ssl-redirect
+               port:
+                 name: use-annotation
+   - host: "console-v2.api.example.com"  # Change the hostname
+     http:
+       paths:
+         - path: /*
+           pathType: ImplementationSpecific
+           backend:
+             service:
+               name: console-api-v2-rest
+               port:
+                 number: 80
변경된 내용을 kubectl 명령어를 통해서 반영하면 SSL 적용이 완료됩니다.
kubectl apply -f spaceone-console-ingress.yaml
kubectl apply -f spaceone-rest-ingress.yaml
SSL/TLS 인증서를 등록하는 방법
기존에 발급받은 외부 인증서가 있는 경우에도 인증서 등록이 가능합니다. 발급받은 인증서를 이용하여 Kubernetes secret 를 추가하고, 추가된 secret 이름을 ingress에 선언하는 것으로 등록이 가능합니다.
SSL/TLS 인증서를 Kubernetes secret으로 생성합니다. 방법은 2가지로 아래와 같습니다.
1. yaml file을 이용한 방법
아래 명령어를 통해서 yaml file로 secret을 추가할 수 있습니다.
kubectl apply -f <<EOF> tls-secret.yaml
apiVersion: v1
data:
  tls.crt: {your crt}   # crt
  tls.key: {your key}   # key
kind: Secret
metadata:
  name: tls-secret
  namespace: spaceone
type: kubernetes.io/tls
EOF
2. 파일이 있을 경우 명령어를 이용한 방법
crt와 key file이 있는 경우 다음의 명령어를 이용하여 secret을 생성할 수 있습니다.
kubectl create secret tls tlssecret --key tls.key --cert tls.crt
Ingress에 tls secret을 추가
등록된 secret 정보를 이용하여 ingress를 수정합니다.
ingress-nginx 설정
secret과 tls를 이용하는 방법에는 ingress-nginx를 활용한 설정 방법들이 필요할 수 있습니다. 자세한 내용은 다음 링크들를 참고하세요.
apiVersion: networking.k8s.io/v1
kind: Ingress
metadata:
  name: console-ingress
  namespace: spaceone
  annotations:
    alb.ingress.kubernetes.io/actions.ssl-redirect: '{"Type": "redirect", "RedirectConfig": { "Protocol": "HTTPS", "Port": "443", "StatusCode": "HTTP_301"}}'
    alb.ingress.kubernetes.io/listen-ports: '[{"HTTP": 80}, {"HTTPS":443}]'
    alb.ingress.kubernetes.io/scheme: internet-facing
    alb.ingress.kubernetes.io/target-type: ip
    alb.ingress.kubernetes.io/load-balancer-attributes: idle_timeout.timeout_seconds=600
    alb.ingress.kubernetes.io/healthcheck-protocol: HTTP
    alb.ingress.kubernetes.io/success-codes: 200-399
    alb.ingress.kubernetes.io/load-balancer-name: spaceone-console-ingress # Caution!! Must be fewer than 32 characters.
spec:
  tls:
  - hosts:
      - console.example.com        # Change the hostname
    secretName: tlssecret          # Insert secret name
  rules:
    - http:
        paths:
          - path: /*
            pathType: ImplementationSpecific
            backend:
              service:
                name: ssl-redirect
                port:
                  name: use-annotation
    - host: "console.example.com"  # Change the hostname
      http:
        paths:
          - path: /*
            pathType: ImplementationSpecific
            backend:
              service:
                name: console
                port:
                  number: 80
1.2 - On Premise

Prerequisites
Kubernetes 1.21+ : https://kubernetes.io/docs/setup/
Kubectl command-line tool : https://kubernetes.io/docs/tasks/tools/
Helm 3.2.0+ : https://helm.sh/docs/intro/install/
Nginx Ingress Controller : https://kubernetes.github.io/ingress-nginx/deploy/
Cloudforet 설치
Helm chart를 이용하여 Cloudforet을 설치하는 방법을 안내합니다. 관련 내용은 다음에서도 확인 가능합니다. https://github.com/cloudforet-io/charts
1. Add Helm Repository
helm repo add cloudforet https://cloudforet-io.github.io/charts
helm repo update
helm search repo
2. Create Namespaces
kubectl create ns spaceone
kubectl create ns spaceone-plugin
namespace 생성 시 주의사항
하나의 namespace에서만 사용해야할 경우spaceone-pluginnamespace는 생성하지 않아도 됩니다.
Cloudforet의 namespace를 변경하는 경우 다음의 링크를 참고하시기 바랍니다. Change K8S Namespace
3. Create Role and RoleBinding
namespace를 합치지 않은 일반적이 상황에서는 supervisor가 spaceone namespace에서 spaceone-plugin namespace로 plugin을 배포하기 때문에, 아래와 같이 role, rolebinding이 필요합니다. 다음의 링크에서 내용을 확인하세요. https://github.com/cloudforet-io/charts/blob/master/examples/rbac.yaml
자세한 권한의 내용은 아래와 같습니다. 필요한 경우 해당 파일을 편집해서 권한을 지정하면 됩니다.
파일 생성
cat <<EOF> rbac.yaml
---
apiVersion: rbac.authorization.k8s.io/v1
kind: Role
metadata:
  name: supervisor-plugin-control-role
  namespace: spaceone-plugin
rules:
- apiGroups:
  - "*"
  resources:
  - replicaSets
  - pods
  - deployments
  - services
  - endpoints
  verbs:
  - get
  - list
  - watch
  - create
  - delete
---
apiVersion: rbac.authorization.k8s.io/v1
kind: RoleBinding
metadata:
  name: supervisor-role-binding
  namespace: spaceone-plugin
roleRef:
  apiGroup: rbac.authorization.k8s.io
  kind: Role
  name: supervisor-plugin-control-role
subjects:
- kind: ServiceAccount
  name: default
  namespace: spaceone
EOF
권한을 적용하려면 아래의 명령어로 반영하면 됩니다. namespace를 변경했을 경우 변경한 namespace를 입력합니다. (namespace에 주의합니다.)
kubectl apply -f rbac.yaml -n spaceone-plugin
4. Install
다음의 helm 명령어를 통해서 설치를 진행합니다.
helm install cloudforet cloudforet/spaceone -n spaceone
명령어를 입력하고 나면 spaceone namespace에서 아래와 같이 pod들이 올라오는 것을 확인 할 수 있습니다.
kubectl get pod -n spaceone

NAME                                       READY   STATUS             RESTARTS      AGE
board-64f468ccd6-v8wx4                     1/1     Running            0             4m16s
config-6748dc8cf9-4rbz7                    1/1     Running            0             4m14s
console-767d787489-wmhvp                   1/1     Running            0             4m15s
console-api-846867dc59-rst4k               2/2     Running            0             4m16s
console-api-v2-rest-79f8f6fb59-7zcb2       2/2     Running            0             4m16s
cost-analysis-5654566c95-rlpkz             1/1     Running            0             4m13s
cost-analysis-scheduler-69d77598f7-hh8qt   0/1     CrashLoopBackOff   3 (39s ago)   4m13s
cost-analysis-worker-68755f48bf-6vkfv      1/1     Running            0             4m15s
cost-analysis-worker-68755f48bf-7sj5j      1/1     Running            0             4m15s
cost-analysis-worker-68755f48bf-fd65m      1/1     Running            0             4m16s
cost-analysis-worker-68755f48bf-k6r99      1/1     Running            0             4m15s
dashboard-68f65776df-8s4lr                 1/1     Running            0             4m12s
file-manager-5555876d89-slqwg              1/1     Running            0             4m16s
identity-6455d6f4b7-bwgf7                  1/1     Running            0             4m14s
inventory-fc6585898-kjmwx                  1/1     Running            0             4m13s
inventory-scheduler-6dd9f6787f-k9sff       0/1     CrashLoopBackOff   4 (21s ago)   4m15s
inventory-worker-7f6d479d88-59lxs          1/1     Running            0             4m12s
mongodb-6b78c74d49-vjxsf                   1/1     Running            0             4m14s
monitoring-77d9bd8955-hv6vp                1/1     Running            0             4m15s
monitoring-rest-75cd56bc4f-wfh2m           2/2     Running            0             4m16s
monitoring-scheduler-858d876884-b67tc      0/1     Error              3 (33s ago)   4m12s
monitoring-worker-66b875cf75-9gkg9         1/1     Running            0             4m12s
notification-659c66cd4d-hxnwz              1/1     Running            0             4m13s
notification-scheduler-6c9696f96-m9vlr     1/1     Running            0             4m14s
notification-worker-77865457c9-b4dl5       1/1     Running            0             4m16s
plugin-558f9c7b9-r6zw7                     1/1     Running            0             4m13s
plugin-scheduler-695b869bc-d9zch           0/1     Error              4 (59s ago)   4m15s
plugin-worker-5f674c49df-qldw9             1/1     Running            0             4m16s
redis-566869f55-zznmt                      1/1     Running            0             4m16s
repository-8659578dfd-wsl97                1/1     Running            0             4m14s
secret-69985cfb7f-ds52j                    1/1     Running            0             4m12s
statistics-98fc4c955-9xtbp                 1/1     Running            0             4m16s
statistics-scheduler-5b6646d666-jwhdw      0/1     CrashLoopBackOff   3 (27s ago)   4m13s
statistics-worker-5f9994d85d-ftpwf         1/1     Running            0             4m12s
supervisor-scheduler-74c84646f5-rw4zf      2/2     Running            0             4m16s
몇몇의 scheduler pod에 문제가 있는 상태로 나머지 pod들이 올라왔다면 현재로서는 올바른 상태입니다. scheduler의 문제는 initializer를 통해 token을 발급받은 후 values.yaml 파일을 이용한 upgrade 작업이 필요합니다.
5. Initialize the configuration
Cloudforet의 domain 생성을 위한 작업입니다. initializer를 통해 root domain을 생성하고 root token를 발급합니다.
spaceone-initializer는 다음 cloudforet-io github 사이트에서 확인 가능합니다. https://github.com/cloudforet-io/spaceone-initializer
여기서 사용할 initializer.yaml 파일은 다음 링크에서 확인 가능합니다. https://github.com/cloudforet-io/charts/blob/master/examples/initializer.yaml
initializer.yaml 파일에서 domain name, domain_owner.id/password 등을 변경 할 수 있습니다.
파일 생성
cat <<EOF> filename.yaml
main:
import:
    - /root/spacectl/apply/root_domain.yaml
    - /root/spacectl/apply/create_managed_repository.yaml
    - /root/spacectl/apply/user_domain.yaml
    - /root/spacectl/apply/create_role.yaml
    - /root/spacectl/apply/add_statistics_schedule.yaml
    - /root/spacectl/apply/print_api_key.yaml
var:
    domain:
    root: root                      # 생성하는 root domain 이름 : root.example.com
    user: spaceone                  # 사용자를 위한 user domain 이름 : spaceone.example.com
    default_language: ko
    default_timezone: Asia/Seoul
    domain_owner:
    id: admin               # login user name
    password: Admin123!@#   # Change your password
    user:
    id: system_api_key
EOF
해당 파일의 편집이 끝나면 아래 명령어를 통해서 initializer를 실행 합니다.
helm install initializer cloudforet/spaceone-initializer -n spaceone -f initializer.yaml
실행 후에는 지정한 spaceone namespace에 initializer pod가 생성되며 domain 생성작업을 수행합니다. pod가 Completed 상태가 되면 완료된 것이며 log를 확인 할 수 있습니다.
6. Set the Helm Values and Upgrade the chart
기본 설치된 helm chart에 customizing을 하기 위해서는 values.yaml 파일이 필요합니다.
values.yaml 파일에 관한 일반적인 예시는 다음의 링크에서 확인 가능합니다. https://github.com/cloudforet-io/charts/blob/master/examples/values/all.yaml
scheduler의 문제를 해결하기 위해서 아래와 같이 Completed 상태의 pod log를 확인해서 admin token을 얻습니다.
kubectl logs initializer-5f5b7b5cdc-abcd1 -n spaceone

(omit)
TASK [Print Admin API Key] *********************************************************************************************
"{TOKEN}"

FINISHED [ ok=23, skipped=0 ] ******************************************************************************************

FINISH SPACEONE INITIALIZE
initializer pod log에서 얻은 token 값을 이용해서 values.yaml 파일을 생성합니다. 파일 내부에는 app 설정, namespace 변경, kubernetes 옵션 변경 등을 선언할 수 있습니다.
다음은 values.yaml 내부에 console 도메인 설정과 발급 받은 token을 전역 config로 사용 가능하도록 하는 설정입니다.
console:
  production_json:
    # If you don't have a service domain, you refer to the following 'No Domain & IP Access' example.
    CONSOLE_API:
      ENDPOINT: https://console.api.example.com       # Change the endpoint
    CONSOLE_API_V2:
      ENDPOINT: https://console-v2.api.example.com    # Change the endpoint

global:
  shared_conf:
    TOKEN: '{TOKEN}'                                  # Change the system token
위와같이 values.yaml 파일 설정이 끝났다면 아래의 명령어로 helm upgrade 작업을 수행합니다. upgrade가 끝나고 난 뒤에는 모든 pod가 재시작 되도록 cloudforet 관련 app instance들을 모두 삭제합니다.
helm upgrade cloudforet cloudforet/spaceone -n spaceone -f values.yaml
kubectl delete po -n spaceone -l app.kubernetes.io/instance=cloudforet
7. Check the status of the pods
다음의 명령어로 pod의 상태를 확인합니다. 모든 pod들이 Running 상태라면 설치 완료 입니다.
kubectl get pod -n spaceone
8. Configuration Ingress
Kubernetes Ingress는 Cluster내 Service와 외부의 연결을 관리해주는 리소스입니다. Cloudforet에서는 아래의 순서에 따라 생성된 인증서를 secret으로 등록하고 ingress를 추가하여 서비스 됩니다.
Nginx Ingress Controller 설치
On-premise 환경에서 ingress를 사용하기 위해서는 ingress controller가 필요합니다. 다음은 Kubernetes에서 지원하는 Nginx Ingress Controller의 설치 가이드 링크입니다.
- Nginx Ingress Controller : https://kubernetes.github.io/ingress-nginx/deploy/
Generate self-managed SSL
아래의 openssl 명령어를 이용해서 사설 ssl 인증서를 생성합니다. (이미 발급받은 인증서가 존재한다면, 발급받은 인증서를 이용하여 Secret을 만들 수 있습니다. 자세한 방법은 다음 링크를 참고하시기 바랍니다. 기존 인증서로 Secret 만들기)
console
- *.{domain}
openssl req -x509 -nodes -days 365 -newkey rsa:2048 -keyout console_ssl.pem -out console_ssl.csr -subj "/CN=*.{domain}/O=spaceone" -addext "subjectAltName = DNS:*.{domain}"
api
- *.api.{domain}
openssl req -x509 -nodes -days 365 -newkey rsa:2048 -keyout api_ssl.pem -out api_ssl.csr -subj "/CN=*.api.{domain}/O=spaceone" -addext "subjectAltName = DNS:*.api.{domain}"
Create secret for ssl
인증서가 준비 되었다면 해당 인증서 파일을 이용해서 secret을 생성합니다.
kubectl create secret tls console-ssl --key console_ssl.pem --cert console_ssl.csr
kubectl create secret tls api-ssl --key api_ssl.pem --cert api_ssl.csr
Create Ingress
아래 2개의 ingress 파일을 준비합니다. 해당 ingress 파일들은 다음의 링크에서 다운로드 가능합니다.
console_ingress.yaml : https://github.com/cloudforet-io/charts/blob/master/examples/ingress/on_premise/console_ingress.yaml
rest_api_ingress.yaml : https://github.com/cloudforet-io/charts/blob/master/examples/ingress/on_premise/rest_api_ingress.yaml
각각의 파일은 아래와 같습니다. 파일 내부에 hostname을 생성한 인증서의 도메인에 맞게 변경해줍니다.
console
cat <<EOF> console_ingress.yaml
---
apiVersion: networking.k8s.io/v1
kind: Ingress
metadata:
name: console-ingress
namespace: spaceone
spec:
ingressClassName: nginx
tls:
    - hosts:
        - "console.example.com"  # Change the hostname
    secretName: spaceone-tls
rules:
    - host: "console.example.com"  # Change the hostname
    http:
        paths:
        - path: /
            pathType: Prefix
            backend:
            service:
                name: console
                port:
                number: 80
EOF
rest_api
cat <<EOF> rest_api_ingress.yaml
---
apiVersion: networking.k8s.io/v1
kind: Ingress
metadata:
name: console-api-ingress
namespace: spaceone
spec:
ingressClassName: nginx
tls:
    - hosts:
        - "*.api.example.com"  # Change the hostname
    secretName: spaceone-tls
rules:
    - host: "console.api.example.com"  # Change the hostname
    http:
        paths:
        - path: /
            pathType: Prefix
            backend:
            service:
                name: console-api
                port:
                number: 80
---
apiVersion: networking.k8s.io/v1
kind: Ingress
metadata:
name: console-api-v2-ingress
namespace: spaceone
spec:
ingressClassName: nginx
tls:
    - hosts:
        - "*.api.example.com"  # Change the hostname
    secretName: spaceone-tls
rules:
    - host: "console-v2.api.example.com"  # Change the hostname
    http:
        paths:
        - path: /
            pathType: Prefix
            backend:
            service:
                name: console-api-v2-rest
                port:
                number: 80
EOF
준비된 ingress를 아래의 명령어를 통해서 spaceone namespace에 생성합니다.
kubectl apply -f console_ingress.yaml -n spaceone
kubectl apply -f rest_api_ingress.yaml -n spaceone
Connect to the Console
Cloudforet Console 서비스에 접속 합니다.
Advanced Configurations
다음과 같은 특이사항에 대해서는 추가적인 설정이 필요합니다. 다음은 상황에 따른 예시와 해결 방법을 위한 내용입니다.
| Name | Description |
|---|---|
| Set Plugin Certificate | 사설 인증서를 사용하는 경우 plugin별 인증서를 설정하는 방법입니다. |
| Change K8S Namespace | 환경별로 Namespace 사용이 제한적이거나, 자신만의 Namespace 이름을 사용할 수 있습니다. 다음은 Cloudforet에서 Namespace를 변경하는 방법입니다. |
| Set K8S ImagePullSecrets | Private Image Registry를 이용하는 경우 사용자 인증 설정이 되어 자격증명이 필요할 수 있습니다. Kubernetes에서는 secret을 이용하여 자격증명을 pod에 등록할 수 있습니다. 다음은 ImagePullSecrets를 설정하는 방법입니다. |
| Set HTTP Proxy | 인터넷 연결이 되지 않는 on-premise 환경인 경우 외부와 통신하기 위해서는 proxy 설정이 필요합니다. 다음은 HTTP Proxy를 설정하기 위한 방법입니다. |
| Support Private Image Registry | 조직의 보안 등의 이유로 외부와의 통신이 차단된 환경에서는 자체적인 Private Image Registry를 운용할 수 있습니다. 이런 경우 Container Image Sync 작업이 필요한데, Cloudforet에서는 dregsy tool을 이용한 방법을 제안합니다. |
2 - 설정
2.1 - 플러그인 사설 인증서 설정
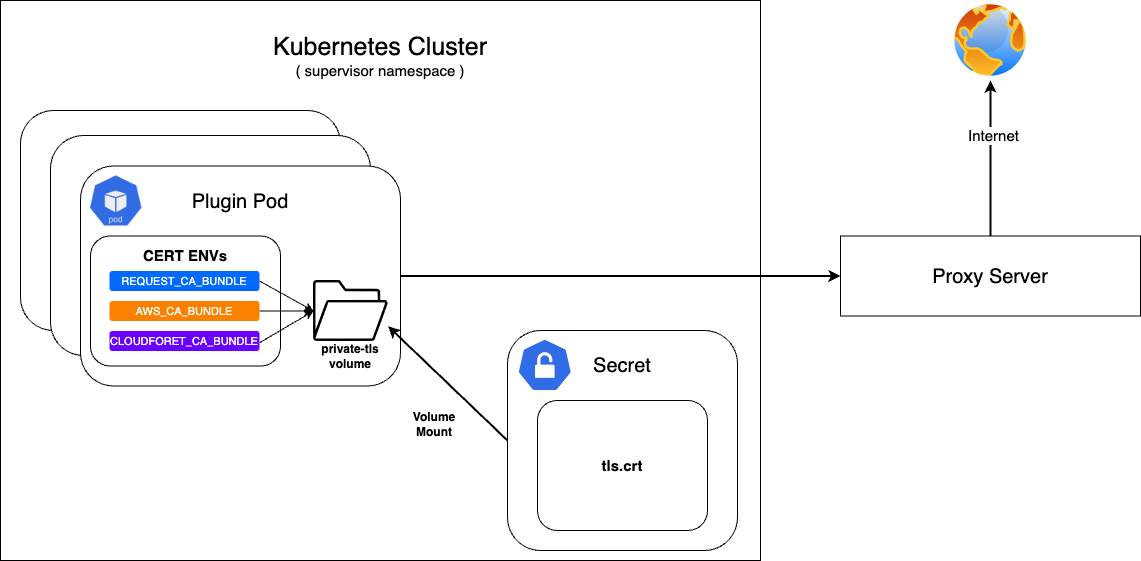
Cloudforet가 On-premise 환경에 구축될 경우 인터넷과 직접적인 통신이 되지 않고 Proxy 서버를 통해 접속이 될 수 있습니다.
이 때 Proxy 서버와의 통신 시 사설 인증서를 필요로 하게 됩니다.
먼저, 준비된 사설 인증서로 Secret으로 구성하고 이를 private-tls Volume에 Mount 합니다.
이후 supervisor의 KubernetesConnector에 인증서 설정에 필요한 여러 환경변수의 value가 private-tls volume의 tls.crt의 경로가 되도록 설정합니다.
준비된 사설 인증서를 Kubernetes Secret으로 등록
| Parameter | Description | Default |
|---|---|---|
| apiVersion | API version of resource | v1 |
| kind | Kind of resource | Secret |
| metadata | Metadata of resource | {...} |
| metadata.name | Name of resource | private-tls |
| metadata.namespace | Namespace of resource | spaceone |
| data | Data of resource | tls.crt |
| type | Type of resource | kubernetes.io/tls |
kubectl apply -f create_tls_secret.yml
---
apiVersion: v1
kind: Secret
metadata:
  name: spaceone-tls
  namespace: spaceone
data:
  tls.crt: base64 encoded cert  # openssl base64 -in cert.pem -out cert.base64
type: kubernetes.io/tls
KubernetesConnector에 설정
| Parameter | Description | Default |
|---|---|---|
| supervisor.application_scheduler | Configuration of supervisor scheduler | {...} |
| supervisor.application_scheduler.CONNECTORS.KubernetesConnector.env[] | Environment variables for plugin | [...] |
| supervisor.application_scheduler.CONNECTORS.KubernetesConnector.env[].name | Name of environment variable | REQUESTS_CA_BUNDLE, AWS_CA_BUNDLE, CLOUDFORET_CA_BUNDLE |
| supervisor.application_scheduler.CONNECTORS.KubernetesConnector.env[].value | Value of environment variable | /opt/ssl/cert/tls.crt |
| supervisor.application_scheduler.CONNECTORS.KubernetesConnector.volumes[] | Volumes for plugin | [...] |
| supervisor.application_scheduler.CONNECTORS.KubernetesConnector.volumes[].name | Name of volumes | private-tls |
| supervisor.application_scheduler.CONNECTORS.KubernetesConnector.volumes[].secret.secretName | Secret name of secret volume | private-tls |
| supervisor.application_scheduler.CONNECTORS.KubernetesConnector.volumeMounts[] | Volume mounts of plugins | [...] |
| supervisor.application_scheduler.CONNECTORS.KubernetesConnector.volumeMounts[].name | Name of volume mounts | private-tls |
| supervisor.application_scheduler.CONNECTORS.KubernetesConnector.volumeMounts[].mountPath | Path of volume mounts | /opt/ssl/cert/tls.crt |
| supervisor.application_scheduler.CONNECTORS.KubernetesConnector.volumeMounts[].readOnly | Read permission on the mounted volume | true |
supervisor:
  enabled: true
  image:
    name: spaceone/supervisor
    version: x.y.z

  imagePullSecrets:
    - name: my-credential

  application_scheduler:
    CONNECTORS:
      KubernetesConnector:
        env:
          - name: REQUESTS_CA_BUNDLE
            value: /opt/ssl/cert/tls.crt
          - name: AWS_CA_BUNDLE
            value: /opt/ssl/cert/tls.crt
          - name: CLOUDFORET_CA_BUNDLE
            value: /opt/ssl/cert/tls.crt
        volumes:
          - name: private-tls
            secret:
              secretName: private-tls
        volumeMounts:
          - name: private-tls
            mountPath: /opt/ssl/cert/tls.crt
            readOnly: true
변경내용 반영
helm upgrade 및 pod 삭제 명령을 통해서 반영 할 수 있습니다.
helm upgrade cloudforet cloudforet/spaceone -n spaceone -f values.yaml
kubectl delete po -n spaceone -l app.kubernetes.io/instance=cloudforet
2.2 - Change kubernetes namespace
K8S 환경에서 Cloudforet을 설치하게 되면 core 서비스는 spaceone, 확장 기능을 위한 plugin 서비스는 spaceone-plugin namespace에 설치됩니다. (v1.11.5 이하에서는 root-supervisor에 설치 됩니다.)
만약 사용자가 core 서비스나 plugin 서비스를 다른 이름의 namespace로 변경하고 싶거나, 단일 namespace에 설치하기를 희망한다면 옵션을 통해서 namespace를 변경해야 합니다.
namespace를 변경하기 위해서는 Cloudforet의 values.yaml에 변경 내용을 작성해야 합니다. 변경은 core서비스와 plugin 서비스를 각각 설정할 수 있습니다.
core 서비스의 namespace 변경
core 서비스의 namespace 변경을 위해서는 values.yaml 파일에서 global.namespace를 선언하여 spaceone-namespace 값을 추가합니다.
#console:
#  production_json:
#    CONSOLE_API:
#      ENDPOINT: https://console.api.example.com        # Change the endpoint
#    CONSOLE_API_V2:
#      ENDPOINT: https://console-v2.api.example.com     # Change the endpoint

global:
  namespace: spaceone-namespace                         # Change the namespace
  shared_conf:
plugin 서비스의 namespace 변경
core 서비스 뿐만 아니라, supervisor의 plugin 서비스의 namespace도 변경할 수 있습니다. plugin 서비스는 supervisor에 의해 life-cycle이 관리되며 plugin의 namespace 설정도 supervisor에 설정합니다.
아래는 values.yaml 파일에서 plugin 서비스의 namespace를 변경히가 위해 supervisor를 설정한 부분입니다. supervisor.application_scheduler.CONNECTORS.KubernetesConnector.namespace에 plugin-namespace 값을 추가합니다.
#console:
supervisor:
  application_scheduler:
    HOSTNAME: spaceone.svc.cluster.local                # Change the hostname
    CONNECTORS:
      KubernetesConnector:
        namespace: plugin-namespace                     # Change the namespace
변경내용 반영
helm upgrade 및 pod 삭제 명령을 통해서 반영 할 수 있습니다.
helm upgrade cloudforet cloudforet/spaceone -n spaceone -f values.yaml
kubectl delete po -n spaceone -l app.kubernetes.io/instance=cloudforet
2.3 - Kubernetes imagePullSecrets 설정
사용자들은 때때로 조직의 상황에 따라 Private Image를 관리하기 위해 Private 전용 Image Registry를 구축하고 그것을 이용합니다.
Private Image Registry로부터 Container Image를 가져오기 위해서는 자격 증명이 필요하고, Kubernetes에서는 Secret을 이용해 그러한 자격 증명을 Pod 등록하여 Private Container Image를 가져올때 사용할 수 있도록 할 수 있습니다.
자세한 내용은 공식 문서를 참고하세요.
자격증명을 위한 Secret 생성
Kubernetes pod는 kubernetes.io/dockerconfigjson 타입의 Secret을 이용해 Private Container Image를 가져올 수 있습니다.
이를 위해 registry 인증정보를 기반으로 자격 증명을 위한 secret을 생성합니다.
kubectl create secret docker-registry my-credential --docker-server=<your-registry-server> --docker-username=<your-name> --docker-password=<your-pword> --docker-email=<your-email>
자격증명 Secret을 Pod에 적용
Cloudforet의 helm chart value에 imagePullSecrets 을 명시하여 pod들이 자격 증명을 위한 secret을 mount하도록 할 수 있습니다.
WARN: kubernetes secret은 namespace scope의 resource이므로, 같은 namespace에 존재해야합니다.
Core service를 위한 imagePullSecrets 설정
| Parameter | description | Default |
|---|---|---|
| [services].imagePullSecrets[]] | imagePullSecrets configuration(* Each micro service section) | [] |
| [services].imagePullSecrets[].name | Name of secret type of kubernetes.io/dockerconfigjson | "" |
console:
    enable: true
    image:
      name: spaceone/console
      version: x.y.z

    imagePullSecrets:
      - name: my-credential

console-api:
    enable: true
    image:
      name: spaceone/console-api
      version: x.y.z

    imagePullSecrets:
      - name: my-credential

(이하 동일)
Plugin를 위한 imagePullSecrets 설정
| Parameter | description | Default |
|---|---|---|
| supervisor.application_scheduler | Configuration of supervisor scheduler | {...} |
| supervisor.application_scheduler.CONNECTORS.KubernetesConnector.imagePullSecrets[] | imagePullSecrets configuration for plugin | [] |
| supervisor.application_scheduler.CONNECTORS.KubernetesConnector.imagePullSecrets[].name | Name of secret type of kubernetes.io/dockerconfigjson for plugin | "" |
supervisor:
    enabled: true
    image:
      name: spaceone/supervisor
      version: x.y.z

    imagePullSecrets:
      - name: my-credential

    application_scheduler:
      CONNECTORS:
          KubernetesConnector:
              imagePullSecrets:
                - name: my-credential
변경내용 반영
helm upgrade 및 pod 삭제 명령을 통해서 반영 할 수 있습니다.
helm upgrade cloudforet cloudforet/spaceone -n spaceone -f values.yaml
kubectl delete po -n spaceone -l app.kubernetes.io/instance=cloudforet
2.4 - HTTP Proxy 설정
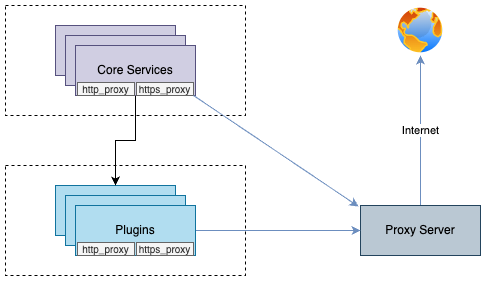
http_proxy https_proxy 환경변수 선언을 통해 pod들이 프록시 서버를 통해 외부로 통신할 수 있도록 할 수 있습니다.
이러한 설정은 각 Container의 환경변수에 http_proxy https_proxy를 선언하는 것으로 이루어집니다.
no_proxy 환경변수는 proxy 통신을 적용하지 않는 목적지에 대한 설정입니다.
cloudforet의 경우 Micro service간 통신을 위해 cluster 내부의 service 도메인은 제외하도록 설정하는 것을 추천합니다.
예제
Core service를 위한 proxy 설정
| Parameter | description | Default |
|---|---|---|
| global.common_env[] | Environment Variable for all micro services | [] |
| global.common_env[].name | Name of environment variable | "" |
| global.common_env[].value | Value of environment variable | "" |
global:
  common_env:
    - name: HTTP_PROXY
      value: http://{proxy_server_address}:{proxy_port}
    - name: HTTPS_PROXY
      value: http://{proxy_server_address}:{proxy_port}
    - name: no_proxy
      value: .svc.cluster.local,localhost,{cluster_ip},board,config,console,console-api,console-api-v2,cost-analysis,dashboard,docs,file-manager,identity,inventory,marketplace-assets,monitoring,notification,plugin,repository,secret,statistics,supervisor
plugin을 위한 proxy 설정
| Parameter | description | Default |
|---|---|---|
| supervisor.application_scheduler | Configuration of supervisor schduler | {...} |
| supervisor.application_scheduler.CONNECTORS.KubernetesConnector.env[] | Environment Variable for plugin | [] |
| supervisor.application_scheduler.CONNECTORS.KubernetesConnector.env[].name | Name of environment variable | "" |
| supervisor.application_scheduler.CONNECTORS.KubernetesConnector.env[].value | Name of environment variable | "" |
WRAN:
설치 환경에 따라 default local domain이 다른 경우가 있으니,.svc.cluster.local등의 default local domain을 자신의 환경에 맞게 변경해야합니다.
아래의 command로 현재 cluster의 dns 설정을 확인할 수 있습니다.kubectl run -it --rm busybox --image=busybox --restart=Never -- cat /etc/resolv.conf
supervisor:
    enabled: true
    image:
      name: spaceone/supervisor
      version: x.y.z

    imagePullSecrets:
      - name: my-credential

    application_scheduler:
      CONNECTORS:
        KubernetesConnector:
          env:
            - name: HTTP_PROXY
              value: http://{proxy_server_address}:{proxy_port}
            - name: HTTPS_PROXY
              value: http://{proxy_server_address}:{proxy_port}
            - name: no_proxy
              value: .svc.cluster.local,localhost,{cluster_ip},board,config,console,console-api,console-api-v2,cost-analysis,dashboard,docs,file-manager,identity,inventory,marketplace-assets,monitoring,notification,plugin,repository,secret,statistics,supervisor
변경내용 반영
helm upgrade 및 pod 삭제 명령을 통해서 반영 할 수 있습니다.
helm upgrade cloudforet cloudforet/spaceone -n spaceone -f values.yaml
kubectl delete po -n spaceone -l app.kubernetes.io/instance=cloudforet
2.5 - 프라이빗 이미지 저장소 지원
On-premise 환경을 운영하는 조직의 경우 보안상의 문제로
Internal Network에 자체 Container registry를 구축하여 운영하는 경우가 있습니다.
이러한 환경에 Cloudforet을 설치할 경우 외부 네트워크로의 접근이 제한되어,
Dockerhub에서 이미지를 가져와 자체 Container registry에 준비해두어야 할 필요가 있습니다.
Cloudforet은 이러한 상황에서 Container Image 동기화 작업을 자동화하기 위해 dregsy 라는
Container Registry Sync tool을 이용해 주기적으로 Container Image를 동기화하는 방법을 제안합니다.
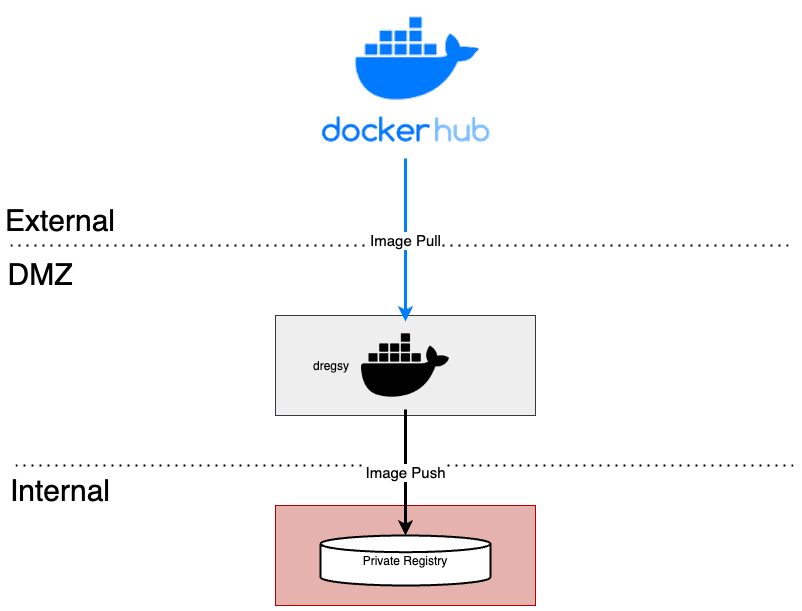
External Network와 Internal Network 사이에 위치한 환경에서 dregsy 를 실행합니다.
이것은 주기적으로 Dockerhub로부터 특정 Container Image를 가져와 자체 Container registry에 업로드합니다.
NOTE:
본 가이드에서 설명하고 있는 dregsy tool은 Container Image가 Destination Registry에
존재하는지의 여부와 관계없이 항상 Dockerhub로부터 Container image를 pull합니다.
Dockerhub의 rate limit은 아래와 같습니다. (Download rate limit)
- 익명 유저 100pulls per 6 hours
- 인증 유저 200pulls per 6 hours
- 구독 유저 5000pulls per day
설치 및 설정
NOTE:
본 구성의 경우, Dockerhub와 통신이 필요하기 때문에 외부 인터넷과 통신이 가능한 환경에서 이루어져야합니다.
또한, 1.11.x 버전의 Cloudforet 설치를 기준으로 설명합니다.
Prerequisite
- docker (Install Docker Engine)
Installation
Docker를 이용해 도구를 실행시키기 때문에 별도의 설치 과정은 필요하지 않음,
skopeo(mirror tool)을 포함한 dregsy image를 pull하여 실행할 예정.
Configuration
- 설정 파일 생성
touch /path/to/your/dregsy-spaceone-core.yaml
touch /path/to/your/dregsy-spaceone-plugin.yaml
- 설정 추가 (dregsy-spaceone-core.yaml)
만약, username:password 구성으로 Registry 인증을 하는 경우,
아래와 같이 정보를 encode하여 auth에 설정합니다. (예시 - 설정 19,22번째 라인)echo '{"username": "...", "password": "..."}' | base64
Harbor의 경우 Robot Token 인증은 지원이 어렵습니다. username:password를 encoding하여 인증해주세요.
relay: skopeo
watch: true

skopeo:
  binary: skopeo
  certs-dir: /etc/skopeo/certs.d

lister:
  maxItems: 100
  cacheDuration: 2h

tasks:
  - name: sync_spaceone_doc
    interval: 21600 # 6 hours
    verbose: true

    source:
      registry: registry.hub.docker.com
      auth: {Token}                 # replace to your dockerhub token
    target:
      registry: {registry_address}  # replace to your registry address
      auth: {Token}                 # replace to your registry token
      skip-tls-verify: true

    mappings:
      - from: spaceone/spacectl
        to: your_registry_project/spaceone/spacectl     # replace to your registry project & repository
        tags:
          - 'regex: 1\.11\.(?:[0-9]?[0-9]).*'
      - from: spaceone/marketplace-assets
        to: your_registry_project/spaceone/marketplace-assets   # replace to your registry project & repository
        tags:
          - 'regex: 1\.11\.(?:[0-9]?[0-9]).*'
      - from: spaceone/docs
        to: your_registry_project/spaceone/docs          # replace to your registry project & repository
        tags:
          - 'regex: 1\.11\.(?:[0-9]?[0-9]).*'
      - from: redis
        to: your_registry_project/spaceone/redis       # replace to your registry project & repository
        tags:
          - 'latest'
      - from: mongo
        to: your_registry_project/spaceone/mongo       # replace to your registry project & repository
        tags:
          - 'latest'

  - name: sync_spaceone_core
    interval: 21600 # 6 hours
    verbose: true

    source:
      registry: registry.hub.docker.com
      auth: {Token}
    target:
      registry: {registry_address}  # replace to your registry address
      auth: {Token}               # replace to your registry token
      skip-tls-verify: true

    mappings:
      - from: spaceone/console
        to: your_registry_project/spaceone/console     # replace to your registry project & repository
        tags:
          - 'regex: 1\.11\.(?:[0-9]?[0-9]).*'
      - from: spaceone/inventory
        to: your_registry_project/spaceone/inventory       # replace to your registry project & repository
        tags:
          - 'regex: 1\.11\.(?:[0-9]?[0-9]).*'
      - from: spaceone/console-api
        to: your_registry_project/spaceone/console-api     # replace to your registry project & repository
        tags:
          - 'regex: 1\.11\.(?:[0-9]?[0-9]).*'
      - from: spaceone/cost-analysis
        to: your_registry_project/spaceone/cost-analysis       # replace to your registry project & repository
        tags:
          - 'regex: 1\.11\.(?:[0-9]?[0-9]).*'
      - from: spaceone/statistics
        to: your_registry_project/spaceone/statistics      # replace to your registry project & repository
        tags:
          - 'regex: 1\.11\.(?:[0-9]?[0-9]).*'
      - from: spaceone/secret
        to: your_registry_project/spaceone/secret      # replace to your registry project & repository
        tags:
          - 'regex: 1\.11\.(?:[0-9]?[0-9]).*'
      - from: spaceone/file-manager
        to: your_registry_project/spaceone/file-manager        # replace to your registry project & repository
        tags:
          - 'regex: 1\.11\.(?:[0-9]?[0-9]).*'
      - from: spaceone/monitoring
        to: your_registry_project/spaceone/monitoring      # replace to your registry project & repository
        tags:
          - 'regex: 1\.11\.(?:[0-9]?[0-9]).*'
      - from: spaceone/supervisor
        to: your_registry_project/spaceone/supervisor      # replace to your registry project & repository
        tags:
          - 'regex: 1\.11\.(?:[0-9]?[0-9]).*'
      - from: spaceone/identity
        to: your_registry_project/spaceone/identity        # replace to your registry project & repository
        tags:
          - 'regex: 1\.11\.(?:[0-9]?[0-9]).*'
      - from: spaceone/notification
        to: your_registry_project/spaceone/notification        # replace to your registry project & repository
        tags:
          - 'regex: 1\.11\.(?:[0-9]?[0-9]).*'
      - from: spaceone/repository
        to: your_registry_project/spaceone/repository      # replace to your registry project & repository
        tags:
          - 'regex: 1\.11\.(?:[0-9]?[0-9]).*'
      - from: spaceone/plugin
        to: your_registry_project/spaceone/plugin      # replace to your registry project & repository
        tags:
          - 'regex: 1\.11\.(?:[0-9]?[0-9]).*'
      - from: spaceone/config
        to: your_registry_project/spaceone/config      # replace to your registry project & repository
        tags:
          - 'regex: 1\.11\.(?:[0-9]?[0-9]).*'
      - from: spaceone/console-api-v2
        to: your_registry_project/spaceone/console-api-v2      # replace to your registry project & repository
        tags:
          - 'regex: 1\.11\.(?:[0-9]?[0-9]).*'
      - from: spaceone/board
        to: your_registry_project/spaceone/board       # replace to your registry project & repository
        tags:
          - 'regex: 1\.11\.(?:[0-9]?[0-9]).*'
      - from: spaceone/dashboard
        to: your_registry_project/spaceone/dashboard       # replace to your registry project & repository
        tags:
          - 'regex: 1\.11\.(?:[0-9]?[0-9]).*'
- 설정 추가 (dregsy-spaceone-plugin.yaml)
relay: skopeo
watch: true

skopeo:
  binary: skopeo
  certs-dir: /etc/skopeo/certs.d

lister:
  maxItems: 100
  cacheDuration: 2h

tasks:
  - name: sync_spaceone_plugin
    interval: 21600 # 6 hours
    verbose: true

    source:
      registry: registry.hub.docker.com
      auth: {Token}                 # replace to your dockerhub token
    target:
      registry: {registry_address}  # replace to your registry address
      auth: {Token}                 # replace to your registry token
      skip-tls-verify: true

    mappings:
      - from: spaceone/plugin-google-cloud-inven-collector
        to: your_registry_project/spaceone/plugin-google-cloud-inven-collector     # replace to your registry project & repository
        tags:
          - 'semver: >=1.0.0 <1.99.0'
          - 'keep: latest 2'
      - from: spaceone/plugin-azure-inven-collector
        to: your_registry_project/spaceone/plugin-azure-inven-collector     # replace to your registry project & repository
        tags:
          - 'semver: >=1.0.0 <1.99.0'
          - 'keep: latest 2'
      - from: spaceone/plugin-aws-cloudwatch-mon-datasource
        to: your_registry_project/spaceone/plugin-aws-cloudwatch-mon-datasource     # replace to your registry project & repository
        tags:
          - 'semver: >=1.0.0 <1.99.0'
          - 'keep: latest 2'
      - from: spaceone/plugin-azure-activity-log-mon-datasource
        to: your_registry_project/spaceone/plugin-azure-activity-log-mon-datasource     # replace to your registry project & repository
        tags:
          - 'semver: >=1.0.0 <1.99.0'
          - 'keep: latest 2'
      - from: spaceone/plugin-aws-cloudtrail-mon-datasource
        to: your_registry_project/spaceone/plugin-aws-cloudtrail-mon-datasource     # replace to your registry project & repository
        tags:
          - 'semver: >=1.0.0 <1.99.0'
          - 'keep: latest 2'
      - from: spaceone/plugin-aws-ec2-inven-collector
        to: your_registry_project/spaceone/plugin-aws-ec2-inven-collector     # replace to your registry project & repository
        tags:
          - 'semver: >=1.0.0 <1.99.0'
          - 'keep: latest 2'
      - from: spaceone/plugin-aws-sns-mon-webhook
        to: your_registry_project/spaceone/plugin-aws-sns-mon-webhook     # replace to your registry project & repository
        tags:
          - 'semver: >=1.0.0 <1.99.0'
          - 'keep: latest 2'
      - from: spaceone/plugin-aws-trusted-advisor-inven-collector
        to: your_registry_project/spaceone/plugin-aws-trusted-advisor-inven-collector     # replace to your registry project & repository
        tags:
          - 'semver: >=1.0.0 <1.99.0'
          - 'keep: latest 2'
      - from: spaceone/plugin-azure-monitor-mon-datasource
        to: your_registry_project/spaceone/plugin-azure-monitor-mon-datasource     # replace to your registry project & repository
        tags:
          - 'semver: >=1.0.0 <1.99.0'
          - 'keep: latest 2'
      - from: spaceone/plugin-email-noti-protocol
        to: your_registry_project/spaceone/plugin-email-noti-protocol     # replace to your registry project & repository
        tags:
          - 'semver: >=1.0.0 <1.99.0'
          - 'keep: latest 2'
      - from: spaceone/plugin-google-stackdriver-mon-datasource
        to: your_registry_project/spaceone/plugin-google-stackdriver-mon-datasource     # replace to your registry project & repository
        tags:
          - 'semver: >=1.0.0 <1.99.0'
          - 'keep: latest 2'
      - from: spaceone/plugin-telegram-noti-protocol
        to: your_registry_project/spaceone/plugin-telegram-noti-protocol     # replace to your registry project & repository
        tags:
          - 'semver: >=1.0.0 <1.99.0'
          - 'keep: latest 2'
      - from: spaceone/plugin-keycloak-identity-auth
        to: your_registry_project/spaceone/plugin-keycloak-identity-auth     # replace to your registry project & repository
        tags:
          - 'semver: >=1.0.0 <1.99.0'
          - 'keep: latest 2'
      - from: spaceone/plugin-prometheus-mon-webhook
        to: your_registry_project/spaceone/plugin-prometheus-mon-webhook     # replace to your registry project & repository
        tags:
          - 'semver: >=1.0.0 <1.99.0'
          - 'keep: latest 2'
      - from: spaceone/plugin-slack-noti-protocol
        to: your_registry_project/spaceone/plugin-slack-noti-protocol     # replace to your registry project & repository
        tags:
          - 'semver: >=1.0.0 <1.99.0'
          - 'keep: latest 2'
      - from: spaceone/plugin-grafana-mon-webhook
        to: your_registry_project/spaceone/plugin-grafana-mon-webhook     # replace to your registry project & repository
        tags:
          - 'semver: >=1.0.0 <1.99.0'
          - 'keep: latest 2'
      - from: spaceone/plugin-aws-cloud-service-inven-collector
        to: your_registry_project/spaceone/plugin-aws-cloud-service-inven-collector     # replace to your registry project & repository
        tags:
          - 'semver: >=1.0.0 <1.99.0'
          - 'keep: latest 2'
      - from: spaceone/plugin-aws-phd-inven-collector
        to: your_registry_project/spaceone/plugin-aws-phd-inven-collector     # replace to your registry project & repository
        tags:
          - 'semver: >=1.0.0 <1.99.0'
          - 'keep: latest 2'
      - from: spaceone/plugin-api-direct-mon-webhook
        to: your_registry_project/spaceone/plugin-api-direct-mon-webhook     # replace to your registry project & repository
        tags:
          - 'semver: >=1.0.0 <1.99.0'
          - 'keep: latest 2'
      - from: spaceone/plugin-azure-cost-mgmt-cost-datasource
        to: your_registry_project/spaceone/plugin-azure-cost-mgmt-cost-datasource     # replace to your registry project & repository
        tags:
          - 'semver: >=1.0.0 <1.99.0'
          - 'keep: latest 2'
      - from: spaceone/plugin-aws-cost-explorer-cost-datasource
        to: your_registry_project/spaceone/plugin-aws-cost-explorer-cost-datasource     # replace to your registry project & repository
        tags:
          - 'semver: >=1.0.0 <1.99.0'
          - 'keep: latest 2'
      - from: spaceone/plugin-ms-teams-noti-protocol
        to: your_registry_project/spaceone/plugin-ms-teams-noti-protocol     # replace to your registry project & repository
        tags:
          - 'semver: >=1.0.0 <1.99.0'
          - 'keep: latest 2'
      - from: spaceone/plugin-google-monitoring-mon-webhook
        to: your_registry_project/spaceone/plugin-google-monitoring-mon-webhook     # replace to your registry project & repository
        tags:
          - 'semver: >=1.0.0 <1.99.0'
          - 'keep: latest 2'
      - from: spaceone/plugin-http-file-cost-datasource
        to: your_registry_project/spaceone/plugin-http-file-cost-datasource     # replace to your registry project & repository
        tags:
          - 'semver: >=1.0.0 <1.99.0'
          - 'keep: latest 2'
      - from: spaceone/plugin-google-cloud-log-mon-datasource
        to: your_registry_project/spaceone/plugin-google-cloud-log-mon-datasource     # replace to your registry project & repository
        tags:
          - 'semver: >=1.0.0 <1.99.0'
          - 'keep: latest 2'
Run
Docker image를 별도로 download 받을 필요가 없습니다.
아래의 command가 docker image를 확인 후 없다면 가져옵니다.
docker run -d --rm --name dregsy_spaceone_core -v /path/to/your/dregsy-spaceone-core.yaml:/config.yaml xelalex/dregsy:0.5.0
docker run -d --rm --name dregsy_spaceone_plugin -v /path/to/your/dregsy-spaceone-plugin.yaml:/config.yaml xelalex/dregsy:0.5.0
Management
- view log
docker logs -f {container_id|container_name}
- delete docker container
docker rm {container_id|container_name} [-f]
2.6 - 기존 인증서로 Secret 만들기
공인 혹은 사설 인증서를 이미 발급받은 경우에는 기존 인증서를 통해서 Secret을 생성 할 수 있습니다. 다음은 certificate_secret.yaml 파일을 이용하여 Secret을 생성하는 방법입니다.
Create Secret from certificate_secret.yaml file
기존에 발급받은 인증서가 준비 되었다면 certificate_secert.yaml 파일을 편집합니다. 해당 파일은 다음의 링크에서 다운로드 할 수 있습니다. 또한 다운로드받은 내용을 아래와 같이 편집하여 사용 합니다. https://github.com/cloudforet-io/charts/blob/master/examples/ingress/on_premise/certificate_secret.yaml
cat <<EOF> certificate_secret.yaml
apiVersion: v1
kind: Secret
metadata:
  name: spaceone-tls
  namespace: spaceone           # Change the namespace
data:
  tls.crt: base64 encoded cert  # openssl base64 -in cert.pem -out cert.base64
  tls.key: base64 encoded key   # openssl base64 -in key.pem -out key.base64
type: kubernetes.io/tls
EOF
certificate_secret.yaml 파일을 다음 명령어를 통해서 spaceone namespace에 반영합니다.
kubectl apply -f certificate_secret.yaml -n spaceone