On Premise
Prerequisites
Kubernetes 1.21+ : https://kubernetes.io/docs/setup/
Kubectl command-line tool : https://kubernetes.io/docs/tasks/tools/
Helm 3.2.0+ : https://helm.sh/docs/intro/install/
Nginx Ingress Controller : https://kubernetes.github.io/ingress-nginx/deploy/
Cloudforet 설치
Helm chart를 이용하여 Cloudforet을 설치하는 방법을 안내합니다. 관련 내용은 다음에서도 확인 가능합니다. https://github.com/cloudforet-io/charts
1. Add Helm Repository
helm repo add cloudforet https://cloudforet-io.github.io/charts
helm repo update
helm search repo
2. Create Namespaces
kubectl create ns spaceone
kubectl create ns spaceone-plugin
namespace 생성 시 주의사항
하나의 namespace에서만 사용해야할 경우spaceone-pluginnamespace는 생성하지 않아도 됩니다.
Cloudforet의 namespace를 변경하는 경우 다음의 링크를 참고하시기 바랍니다. Change K8S Namespace
3. Create Role and RoleBinding
namespace를 합치지 않은 일반적이 상황에서는 supervisor가 spaceone namespace에서 spaceone-plugin namespace로 plugin을 배포하기 때문에, 아래와 같이 role, rolebinding이 필요합니다. 다음의 링크에서 내용을 확인하세요. https://github.com/cloudforet-io/charts/blob/master/examples/rbac.yaml
자세한 권한의 내용은 아래와 같습니다. 필요한 경우 해당 파일을 편집해서 권한을 지정하면 됩니다.
파일 생성
cat <<EOF> rbac.yaml
---
apiVersion: rbac.authorization.k8s.io/v1
kind: Role
metadata:
  name: supervisor-plugin-control-role
  namespace: spaceone-plugin
rules:
- apiGroups:
  - "*"
  resources:
  - replicaSets
  - pods
  - deployments
  - services
  - endpoints
  verbs:
  - get
  - list
  - watch
  - create
  - delete
---
apiVersion: rbac.authorization.k8s.io/v1
kind: RoleBinding
metadata:
  name: supervisor-role-binding
  namespace: spaceone-plugin
roleRef:
  apiGroup: rbac.authorization.k8s.io
  kind: Role
  name: supervisor-plugin-control-role
subjects:
- kind: ServiceAccount
  name: default
  namespace: spaceone
EOF
권한을 적용하려면 아래의 명령어로 반영하면 됩니다. namespace를 변경했을 경우 변경한 namespace를 입력합니다. (namespace에 주의합니다.)
kubectl apply -f rbac.yaml -n spaceone-plugin
4. Install
다음의 helm 명령어를 통해서 설치를 진행합니다.
helm install cloudforet cloudforet/spaceone -n spaceone
명령어를 입력하고 나면 spaceone namespace에서 아래와 같이 pod들이 올라오는 것을 확인 할 수 있습니다.
kubectl get pod -n spaceone

NAME                                       READY   STATUS             RESTARTS      AGE
board-64f468ccd6-v8wx4                     1/1     Running            0             4m16s
config-6748dc8cf9-4rbz7                    1/1     Running            0             4m14s
console-767d787489-wmhvp                   1/1     Running            0             4m15s
console-api-846867dc59-rst4k               2/2     Running            0             4m16s
console-api-v2-rest-79f8f6fb59-7zcb2       2/2     Running            0             4m16s
cost-analysis-5654566c95-rlpkz             1/1     Running            0             4m13s
cost-analysis-scheduler-69d77598f7-hh8qt   0/1     CrashLoopBackOff   3 (39s ago)   4m13s
cost-analysis-worker-68755f48bf-6vkfv      1/1     Running            0             4m15s
cost-analysis-worker-68755f48bf-7sj5j      1/1     Running            0             4m15s
cost-analysis-worker-68755f48bf-fd65m      1/1     Running            0             4m16s
cost-analysis-worker-68755f48bf-k6r99      1/1     Running            0             4m15s
dashboard-68f65776df-8s4lr                 1/1     Running            0             4m12s
file-manager-5555876d89-slqwg              1/1     Running            0             4m16s
identity-6455d6f4b7-bwgf7                  1/1     Running            0             4m14s
inventory-fc6585898-kjmwx                  1/1     Running            0             4m13s
inventory-scheduler-6dd9f6787f-k9sff       0/1     CrashLoopBackOff   4 (21s ago)   4m15s
inventory-worker-7f6d479d88-59lxs          1/1     Running            0             4m12s
mongodb-6b78c74d49-vjxsf                   1/1     Running            0             4m14s
monitoring-77d9bd8955-hv6vp                1/1     Running            0             4m15s
monitoring-rest-75cd56bc4f-wfh2m           2/2     Running            0             4m16s
monitoring-scheduler-858d876884-b67tc      0/1     Error              3 (33s ago)   4m12s
monitoring-worker-66b875cf75-9gkg9         1/1     Running            0             4m12s
notification-659c66cd4d-hxnwz              1/1     Running            0             4m13s
notification-scheduler-6c9696f96-m9vlr     1/1     Running            0             4m14s
notification-worker-77865457c9-b4dl5       1/1     Running            0             4m16s
plugin-558f9c7b9-r6zw7                     1/1     Running            0             4m13s
plugin-scheduler-695b869bc-d9zch           0/1     Error              4 (59s ago)   4m15s
plugin-worker-5f674c49df-qldw9             1/1     Running            0             4m16s
redis-566869f55-zznmt                      1/1     Running            0             4m16s
repository-8659578dfd-wsl97                1/1     Running            0             4m14s
secret-69985cfb7f-ds52j                    1/1     Running            0             4m12s
statistics-98fc4c955-9xtbp                 1/1     Running            0             4m16s
statistics-scheduler-5b6646d666-jwhdw      0/1     CrashLoopBackOff   3 (27s ago)   4m13s
statistics-worker-5f9994d85d-ftpwf         1/1     Running            0             4m12s
supervisor-scheduler-74c84646f5-rw4zf      2/2     Running            0             4m16s
몇몇의 scheduler pod에 문제가 있는 상태로 나머지 pod들이 올라왔다면 현재로서는 올바른 상태입니다. scheduler의 문제는 initializer를 통해 token을 발급받은 후 values.yaml 파일을 이용한 upgrade 작업이 필요합니다.
5. Initialize the configuration
Cloudforet의 domain 생성을 위한 작업입니다. initializer를 통해 root domain을 생성하고 root token를 발급합니다.
spaceone-initializer는 다음 cloudforet-io github 사이트에서 확인 가능합니다. https://github.com/cloudforet-io/spaceone-initializer
여기서 사용할 initializer.yaml 파일은 다음 링크에서 확인 가능합니다. https://github.com/cloudforet-io/charts/blob/master/examples/initializer.yaml
initializer.yaml 파일에서 domain name, domain_owner.id/password 등을 변경 할 수 있습니다.
파일 생성
cat <<EOF> filename.yaml
main:
import:
    - /root/spacectl/apply/root_domain.yaml
    - /root/spacectl/apply/create_managed_repository.yaml
    - /root/spacectl/apply/user_domain.yaml
    - /root/spacectl/apply/create_role.yaml
    - /root/spacectl/apply/add_statistics_schedule.yaml
    - /root/spacectl/apply/print_api_key.yaml
var:
    domain:
    root: root                      # 생성하는 root domain 이름 : root.example.com
    user: spaceone                  # 사용자를 위한 user domain 이름 : spaceone.example.com
    default_language: ko
    default_timezone: Asia/Seoul
    domain_owner:
    id: admin               # login user name
    password: Admin123!@#   # Change your password
    user:
    id: system_api_key
EOF
해당 파일의 편집이 끝나면 아래 명령어를 통해서 initializer를 실행 합니다.
helm install initializer cloudforet/spaceone-initializer -n spaceone -f initializer.yaml
실행 후에는 지정한 spaceone namespace에 initializer pod가 생성되며 domain 생성작업을 수행합니다. pod가 Completed 상태가 되면 완료된 것이며 log를 확인 할 수 있습니다.
6. Set the Helm Values and Upgrade the chart
기본 설치된 helm chart에 customizing을 하기 위해서는 values.yaml 파일이 필요합니다.
values.yaml 파일에 관한 일반적인 예시는 다음의 링크에서 확인 가능합니다. https://github.com/cloudforet-io/charts/blob/master/examples/values/all.yaml
scheduler의 문제를 해결하기 위해서 아래와 같이 Completed 상태의 pod log를 확인해서 admin token을 얻습니다.
kubectl logs initializer-5f5b7b5cdc-abcd1 -n spaceone

(omit)
TASK [Print Admin API Key] *********************************************************************************************
"{TOKEN}"

FINISHED [ ok=23, skipped=0 ] ******************************************************************************************

FINISH SPACEONE INITIALIZE
initializer pod log에서 얻은 token 값을 이용해서 values.yaml 파일을 생성합니다. 파일 내부에는 app 설정, namespace 변경, kubernetes 옵션 변경 등을 선언할 수 있습니다.
다음은 values.yaml 내부에 console 도메인 설정과 발급 받은 token을 전역 config로 사용 가능하도록 하는 설정입니다.
console:
  production_json:
    # If you don't have a service domain, you refer to the following 'No Domain & IP Access' example.
    CONSOLE_API:
      ENDPOINT: https://console.api.example.com       # Change the endpoint
    CONSOLE_API_V2:
      ENDPOINT: https://console-v2.api.example.com    # Change the endpoint

global:
  shared_conf:
    TOKEN: '{TOKEN}'                                  # Change the system token
위와같이 values.yaml 파일 설정이 끝났다면 아래의 명령어로 helm upgrade 작업을 수행합니다. upgrade가 끝나고 난 뒤에는 모든 pod가 재시작 되도록 cloudforet 관련 app instance들을 모두 삭제합니다.
helm upgrade cloudforet cloudforet/spaceone -n spaceone -f values.yaml
kubectl delete po -n spaceone -l app.kubernetes.io/instance=cloudforet
7. Check the status of the pods
다음의 명령어로 pod의 상태를 확인합니다. 모든 pod들이 Running 상태라면 설치 완료 입니다.
kubectl get pod -n spaceone
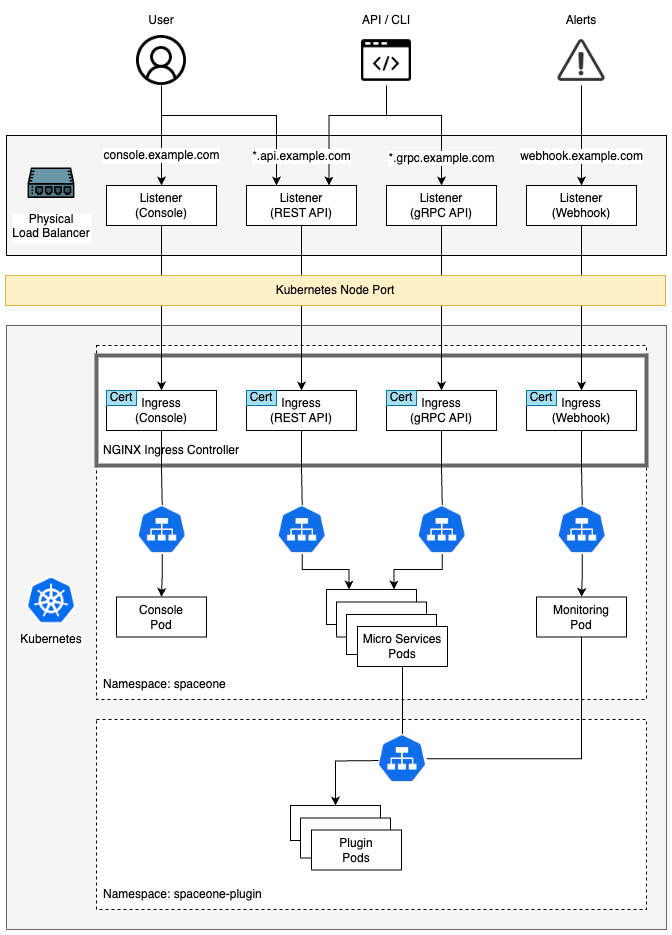
8. Configuration Ingress
Kubernetes Ingress는 Cluster내 Service와 외부의 연결을 관리해주는 리소스입니다. Cloudforet에서는 아래의 순서에 따라 생성된 인증서를 secret으로 등록하고 ingress를 추가하여 서비스 됩니다.
Nginx Ingress Controller 설치
On-premise 환경에서 ingress를 사용하기 위해서는 ingress controller가 필요합니다. 다음은 Kubernetes에서 지원하는 Nginx Ingress Controller의 설치 가이드 링크입니다.
- Nginx Ingress Controller : https://kubernetes.github.io/ingress-nginx/deploy/
Generate self-managed SSL
아래의 openssl 명령어를 이용해서 사설 ssl 인증서를 생성합니다. (이미 발급받은 인증서가 존재한다면, 발급받은 인증서를 이용하여 Secret을 만들 수 있습니다. 자세한 방법은 다음 링크를 참고하시기 바랍니다. 기존 인증서로 Secret 만들기)
console
- *.{domain}
openssl req -x509 -nodes -days 365 -newkey rsa:2048 -keyout console_ssl.pem -out console_ssl.csr -subj "/CN=*.{domain}/O=spaceone" -addext "subjectAltName = DNS:*.{domain}"
api
- *.api.{domain}
openssl req -x509 -nodes -days 365 -newkey rsa:2048 -keyout api_ssl.pem -out api_ssl.csr -subj "/CN=*.api.{domain}/O=spaceone" -addext "subjectAltName = DNS:*.api.{domain}"
Create secret for ssl
인증서가 준비 되었다면 해당 인증서 파일을 이용해서 secret을 생성합니다.
kubectl create secret tls console-ssl --key console_ssl.pem --cert console_ssl.csr
kubectl create secret tls api-ssl --key api_ssl.pem --cert api_ssl.csr
Create Ingress
아래 2개의 ingress 파일을 준비합니다. 해당 ingress 파일들은 다음의 링크에서 다운로드 가능합니다.
console_ingress.yaml : https://github.com/cloudforet-io/charts/blob/master/examples/ingress/on_premise/console_ingress.yaml
rest_api_ingress.yaml : https://github.com/cloudforet-io/charts/blob/master/examples/ingress/on_premise/rest_api_ingress.yaml
각각의 파일은 아래와 같습니다. 파일 내부에 hostname을 생성한 인증서의 도메인에 맞게 변경해줍니다.
console
cat <<EOF> console_ingress.yaml
---
apiVersion: networking.k8s.io/v1
kind: Ingress
metadata:
name: console-ingress
namespace: spaceone
spec:
ingressClassName: nginx
tls:
    - hosts:
        - "console.example.com"  # Change the hostname
    secretName: spaceone-tls
rules:
    - host: "console.example.com"  # Change the hostname
    http:
        paths:
        - path: /
            pathType: Prefix
            backend:
            service:
                name: console
                port:
                number: 80
EOF
rest_api
cat <<EOF> rest_api_ingress.yaml
---
apiVersion: networking.k8s.io/v1
kind: Ingress
metadata:
name: console-api-ingress
namespace: spaceone
spec:
ingressClassName: nginx
tls:
    - hosts:
        - "*.api.example.com"  # Change the hostname
    secretName: spaceone-tls
rules:
    - host: "console.api.example.com"  # Change the hostname
    http:
        paths:
        - path: /
            pathType: Prefix
            backend:
            service:
                name: console-api
                port:
                number: 80
---
apiVersion: networking.k8s.io/v1
kind: Ingress
metadata:
name: console-api-v2-ingress
namespace: spaceone
spec:
ingressClassName: nginx
tls:
    - hosts:
        - "*.api.example.com"  # Change the hostname
    secretName: spaceone-tls
rules:
    - host: "console-v2.api.example.com"  # Change the hostname
    http:
        paths:
        - path: /
            pathType: Prefix
            backend:
            service:
                name: console-api-v2-rest
                port:
                number: 80
EOF
준비된 ingress를 아래의 명령어를 통해서 spaceone namespace에 생성합니다.
kubectl apply -f console_ingress.yaml -n spaceone
kubectl apply -f rest_api_ingress.yaml -n spaceone
Connect to the Console
Cloudforet Console 서비스에 접속 합니다.
Advanced Configurations
다음과 같은 특이사항에 대해서는 추가적인 설정이 필요합니다. 다음은 상황에 따른 예시와 해결 방법을 위한 내용입니다.
| Name | Description |
|---|---|
| Set Plugin Certificate | 사설 인증서를 사용하는 경우 plugin별 인증서를 설정하는 방법입니다. |
| Change K8S Namespace | 환경별로 Namespace 사용이 제한적이거나, 자신만의 Namespace 이름을 사용할 수 있습니다. 다음은 Cloudforet에서 Namespace를 변경하는 방법입니다. |
| Set K8S ImagePullSecrets | Private Image Registry를 이용하는 경우 사용자 인증 설정이 되어 자격증명이 필요할 수 있습니다. Kubernetes에서는 secret을 이용하여 자격증명을 pod에 등록할 수 있습니다. 다음은 ImagePullSecrets를 설정하는 방법입니다. |
| Set HTTP Proxy | 인터넷 연결이 되지 않는 on-premise 환경인 경우 외부와 통신하기 위해서는 proxy 설정이 필요합니다. 다음은 HTTP Proxy를 설정하기 위한 방법입니다. |
| Support Private Image Registry | 조직의 보안 등의 이유로 외부와의 통신이 차단된 환경에서는 자체적인 Private Image Registry를 운용할 수 있습니다. 이런 경우 Container Image Sync 작업이 필요한데, Cloudforet에서는 dregsy tool을 이용한 방법을 제안합니다. |